I am taking apart my 335 International Harvester engine. This is my first one and I am taking my time so I don't mess this up. I know I am suppose to stamp my connecting rods so they go back in the same way they come out. Is there anything else I need to keep separate and is there any organizational tools to help. Thanks!


You are using an out of date browser. It may not display this or other websites correctly.
You should upgrade or use an alternative browser.
You should upgrade or use an alternative browser.
Disassembling an Engine
- Thread starter JM61
- Start date
rsanter
Well-known member
If you will reuse the cam and lifters you need to keep the lifters in order
Rusted Nut
Well-known member
Any moving part (wrist pins, lifters, push rods) you plan to reuse, you need to ID and make sure you put them back as they were.
A few things to consider. Life happens and it may be days, weeks, months or even years before you put this all back together.
Take pictures.
Get a binder and take notes.
Get a box of ziplock bags and a marker to keep track of all the bolts, nuts and small parts.
If you are reusing hardware, I poke holes in a piece of cardboard and put the bolts back in the same orientation that they came out of.
Take pictures.
Get a binder and take notes.
Get a box of ziplock bags and a marker to keep track of all the bolts, nuts and small parts.
If you are reusing hardware, I poke holes in a piece of cardboard and put the bolts back in the same orientation that they came out of.
PWC Repair
Well-known member
The notes, marked zip lock bags, and shoving bolts through cardboard are ALL things that I do as well!
finn
Well-known member
Get a large roll of pig mat, oil dry, have a bucket of hot soapy water at the ready, a mop, some cardboard, drain buckets, brake clean, and rags. Put the cardboard on a large flat, clean workbench for the removed parts.
Have a plan for cleaning the oily parts, ie, some sort of parts cleaner and solvent.
Have a plan for cleaning the oily parts, ie, some sort of parts cleaner and solvent.
Firebrick43
Well-known member
TD-9 engine? As in starts on gasoline and runs on diesel.
shanker
Well-known member
I just did an in-frame on a john deere 4230 which has the 404 engine. It was my first time doing an overhaul on a diesel engine. I can't stress enough what @Sinatra recommended. I used a cheap storage shelf, covered each shelf with cardboard and used a marker to mark directions and what bolts and stuff were for.
I have no idea how that IH engine is designed, but before you push the pistons out the top, scrape off the carbon ring from the top of each cylinder. If it's a wet block, you're going to need to borrow a liner puller, and once the head is off, do not try and rotate the crank w/o having the liners held down with bolts/washers.
I bought a factory service manual off ebay for my tractor and my local machine shop that rebuild the head and the connecting rods had lots of great advice too.
I used a Reliance brand in-frame kit, I pulled the pistons out of the liners and checked the gap on all the rings, the gap was ok, but the ring gaps were almost all lined up.
I have no idea how that IH engine is designed, but before you push the pistons out the top, scrape off the carbon ring from the top of each cylinder. If it's a wet block, you're going to need to borrow a liner puller, and once the head is off, do not try and rotate the crank w/o having the liners held down with bolts/washers.
I bought a factory service manual off ebay for my tractor and my local machine shop that rebuild the head and the connecting rods had lots of great advice too.
I used a Reliance brand in-frame kit, I pulled the pistons out of the liners and checked the gap on all the rings, the gap was ok, but the ring gaps were almost all lined up.
Oil based paint marker from art store and zip lock bags (mark bags with Sharpie). The cardboard works as well. Mark everything including basic timing marks before you take it apart if possible. Don't be afraid to use more bags than you think you'll need keep all related assemblies in same bag, by cylinder, etc. When I rebuilt my wife's Mercedes I had her trunk full of zip locks lol. Helped alot when putting everything back together. I kept a composition book with notes and pasted procedures/torque specs/etc from an DYIalldata subscription into the book. It was a huge help. Good luck!
engineer2
Well-known member
All valve train parts that your reuse need to go back where they came from to avoid tick-tick-tick.
Save whatever old gaskets you can and compare them to what came in the gasket kit.
I've cleaned pistons very nicely in a coffee can with dishwasher detergent boiling on a stove.
Pay attention to the piston ring stack. Pay attention to the direction of connecting rods and bearings.
See the shop manual or online for rear seal installation.
Save whatever old gaskets you can and compare them to what came in the gasket kit.
I've cleaned pistons very nicely in a coffee can with dishwasher detergent boiling on a stove.
Pay attention to the piston ring stack. Pay attention to the direction of connecting rods and bearings.
See the shop manual or online for rear seal installation.
Firebrick43
Well-known member
Measure any sleeve stick up before pulling them.
The easiest way to pull dry sleeves on an IH engine is to weld three vertical lines on the inside of the old sleeves, turn the engine upside down and go inside and have coffee. 95 percent of the time you will come back to them laying on the floor.
Don’t crank the welder. Some thin rod at amps near the bottom is fine.
Make sure the block is clean before putting the new sleeves in. I use a scotchbrite pad and wd40 to clean the block bores.
Freeze the sleeves in dry ice at a minimum or liquid nitrogen off possible. The will drop right in
Make sure you hone the sleeves after install
The easiest way to pull dry sleeves on an IH engine is to weld three vertical lines on the inside of the old sleeves, turn the engine upside down and go inside and have coffee. 95 percent of the time you will come back to them laying on the floor.
Don’t crank the welder. Some thin rod at amps near the bottom is fine.
Make sure the block is clean before putting the new sleeves in. I use a scotchbrite pad and wd40 to clean the block bores.
Freeze the sleeves in dry ice at a minimum or liquid nitrogen off possible. The will drop right in
Make sure you hone the sleeves after install
What's funny is that Reliance and even Deere don't recommend removing the pistons from the liners. I don't have that much faith in people so I always check to make sure the ring orientation is correct. I'm not taking the chance on it being wrong and having to buy another set of head bolts (most Deere engines use torque to yield bolts now) and a head gasket.I just did an in-frame on a john deere 4230 which has the 404 engine. It was my first time doing an overhaul on a diesel engine. I can't stress enough what @Sinatra recommended. I used a cheap storage shelf, covered each shelf with cardboard and used a marker to mark directions and what bolts and stuff were for.
I have no idea how that IH engine is designed, but before you push the pistons out the top, scrape off the carbon ring from the top of each cylinder. If it's a wet block, you're going to need to borrow a liner puller, and once the head is off, do not try and rotate the crank w/o having the liners held down with bolts/washers.
I bought a factory service manual off ebay for my tractor and my local machine shop that rebuild the head and the connecting rods had lots of great advice too.
I used a Reliance brand in-frame kit, I pulled the pistons out of the liners and checked the gap on all the rings, the gap was ok, but the ring gaps were almost all lined up.
I like to always use new bolts for piece of mind. On low horsepower engines you might be OK but never reused rod bolts. Find a manual to learn how to overhaul it step by step and know what the specs are. If you don't have a set of micrometers, order some Plastigauge to make sure your oil tolerances are correct.
When you order a kit, you'll have to clarify what size your bearings are. Plastigauge an old bearing or use a micrometer to make sure the crank is within spec. The bearing size should be on the back side of the bearing. You'll see STD (for standard size), 0.010, .020, .030, etc. If you see numbers, the crank has already be turned and someone has worked on the engine before.
you don't say how much experience you have , sooooooo....
I learned the hard way. they put me in a corner and said disassemble the SBC. ok.....came back later and said "why did you pull the connecting rod bolts?" "You said disassemble" "yeah, but not the con-rod bolts" "then you should have SAID SO!" ...had to buy new con-rod bolts....
I learned the hard way. they put me in a corner and said disassemble the SBC. ok.....came back later and said "why did you pull the connecting rod bolts?" "You said disassemble" "yeah, but not the con-rod bolts" "then you should have SAID SO!" ...had to buy new con-rod bolts....
RoninB4
Well-known member
-Not much to add to what others have posted. I wouldn't want to "stamp" a con rod due to the stress it's normally subjected to and "stamping" displaces metal, can create a stress riser, and potentially deforms the con rod. Engraving with a small Dremel-like moto tool wouldn't be my choice either as it breaks the casting "skin" of the surface. Likely not going to create a disaster but why do that when you don't have to? A safer method would be using a paint pen that can be cleaned off later. I would do this with almost all components.I am taking apart my 335 International Harvester engine. This is my first one and I am taking my time so I don't mess this up. I know I am suppose to stamp my connecting rods so they go back in the same way they come out. Is there anything else I need to keep separate and is there any organizational tools to help. Thanks!
A cheap container for small parts could be one of those compressed paper egg cartons. They're cheap, absorb fluids, won't harm small components, has a lid, and have multiple cavities. Some masking tape and a Sharpie is good for labeling things. I sometime use different colored markers for various grouping of components (blue for intake/fuel, red for exhaust, black for oil, yellow for hydraulics, etc.). As others have posted, taking photos, organizing, and notes can be essential when you're trying to remember what you did/saw months later. Measuring instruments and some common tap sizes (cleaning out threaded holes) can help throughout the rebuild. Good luck.
RedneckWelder
Well-known member
Don’t stamp, get a set of good oil based paint pens.
Keep parts lightly oiled basically everything in an engine will flash rust.
We use ziplock bags and plastic shrink wrap to contain and cover
Take your time, photograph everything, and keep it clean and organized.
Keep parts lightly oiled basically everything in an engine will flash rust.
We use ziplock bags and plastic shrink wrap to contain and cover
Take your time, photograph everything, and keep it clean and organized.
Last edited:
Madjik Man
Well-known member
- Joined
- Dec 3, 2015
- Messages
- 1,542
Automotive paint pens for alignment marks.
A ton of zip lock bags.
I’ll take pictures if the nuts, bolts, bracket etc when they’re on the engine (or where ever), put them in a separate zip lock bag for each component/area, mark the zip lock bag with said component/area and even the image number on my phone.
Like someone said above, the vision is to work on the project non stop until it’s finished but the reality is life always gets in the way…
A ton of zip lock bags.
I’ll take pictures if the nuts, bolts, bracket etc when they’re on the engine (or where ever), put them in a separate zip lock bag for each component/area, mark the zip lock bag with said component/area and even the image number on my phone.
Like someone said above, the vision is to work on the project non stop until it’s finished but the reality is life always gets in the way…
Packard V8
Well-known member
Most connecting rods and caps are already stamped to insure they can be mated upon reassembly. Trust but verify.
Connecting rod bolts, main bolts, head bolts on older engines are routinely reused. Clean the threads of the fasteners and the holes in the block to which they are threaded.
If washers are present under head or main bolts, insure they're cleaned and reinstalled in the proper place. They're hardened and a chicom big box washer will not replace them.
In USAF aircraft powerplant service, no matter how many times the tech has done it, he's supposed to have the manual open to the page he's working.
My machinist builds SBCs all the time, but as he torques, he still puts a paint mark on the rod nuts, main bolts, head bolts. As mentioned, interruptions happen. It's either marked or it gets torqued again.
jack vines
Connecting rod bolts, main bolts, head bolts on older engines are routinely reused. Clean the threads of the fasteners and the holes in the block to which they are threaded.
If washers are present under head or main bolts, insure they're cleaned and reinstalled in the proper place. They're hardened and a chicom big box washer will not replace them.
In USAF aircraft powerplant service, no matter how many times the tech has done it, he's supposed to have the manual open to the page he's working.
My machinist builds SBCs all the time, but as he torques, he still puts a paint mark on the rod nuts, main bolts, head bolts. As mentioned, interruptions happen. It's either marked or it gets torqued again.
jack vines
Here's what I came up with. Of course the "R" stands for right side and the "L" for the left. How can I tell if these are bad pushrods? The engine came out of a 71 IH truck that I'm putting it into my 68 IH pickup. I have never started this engine before but I know it's not froze up. My goal is to do a total restoration and rebuild. Thanks for all the great advice and information.

regguy1
Well-known member
FYI: NEVER wipe parts you are going to assemble with rags, you won't see it but rags deposit lint on parts and it will plug up the oil pickup screen. prior to assembly dry all parts by blowing them off with compressed air.
Roll the push rods individually across a flat surface with the bigger end hanging off. If it wobbles, it's bent and throw it away.Here's what I came up with. Of course the "R" stands for right side and the "L" for the left. How can I tell if these are bad pushrods? The engine came out of a 71 IH truck that I'm putting it into my 68 IH pickup. I have never started this engine before but I know it's not froze up. My goal is to do a total restoration and rebuild. Thanks for all the great advice and information.
Firebrick43
Well-known member
O, a 345 V8 not a 335 inline 4 diesel. Drastically different enginesHere's what I came up with. Of course the "R" stands for right side and the "L" for the left. How can I tell if these are bad pushrods? The engine came out of a 71 IH truck that I'm putting it into my 68 IH pickup. I have never started this engine before but I know it's not froze up. My goal is to do a total restoration and rebuild. Thanks for all the great advice and information.
Walkers
Well-known member
Before you get too far in machine work, verify that you can get parts before it is bored, crank turned, etc. you likely wont be able to get crank bearings undersized more than .010/.010, or rings larger than .030 over. Make sure you know if you have contour pistons or flat tops, the heads are different for each.
Caps should be stamped, paint pens wont hold up to shot peening, or even washing, or a solvent tank. Anyone that says don't stamp has never done a rebuild. Any metal displacement worries are overblown, the rods get resized during the rebuild process.
I recently rebuilt a 152, and a 196 (half a 304 and half a 392), and have a 345 in my scout. Be sure to check your rocker arm assemblies for cracked towers. Check the cam bearing yourself before the cam goes back in. For some reason cam bearings being installed improperly on IH motors is a common thing. Check for oil flow to the heads prior to first start (need to slowly rotate the motor while priming until oil starts to flow to the rockers).
Those are the big ticket things that generally go wrong for people inexperienced with IH motors. If you dont have it, get a manual for the truck, or for a scout with the same motor. Join Binderplanet.com and post your project there, plenty of knowledgeable guy on the site.
Caps should be stamped, paint pens wont hold up to shot peening, or even washing, or a solvent tank. Anyone that says don't stamp has never done a rebuild. Any metal displacement worries are overblown, the rods get resized during the rebuild process.
I recently rebuilt a 152, and a 196 (half a 304 and half a 392), and have a 345 in my scout. Be sure to check your rocker arm assemblies for cracked towers. Check the cam bearing yourself before the cam goes back in. For some reason cam bearings being installed improperly on IH motors is a common thing. Check for oil flow to the heads prior to first start (need to slowly rotate the motor while priming until oil starts to flow to the rockers).
Those are the big ticket things that generally go wrong for people inexperienced with IH motors. If you dont have it, get a manual for the truck, or for a scout with the same motor. Join Binderplanet.com and post your project there, plenty of knowledgeable guy on the site.
RoninB4
Well-known member
-Paint pens may not hold up to shot peening (OP may not do that if rebuild is in garage) but I've had plenty of paint pens stand up to solvents unless scrubbed with a brass brush or applied in excessive thickness. Steel bars from supply houses use it all the time and they seem to have good results under severe conditions. What they use doesn't come off even when vigorously scrubbed and I have to cut or grind it off. Paint has different qualities, they're not all the same and should be tested before further marking.Caps should be stamped, paint pens wont hold up to shot peening, or even washing, or a solvent tank.
-It's not just metal displacement alone to be concerned about. If the amount of force used in stamping is unknown then it should be a concern. Anyone that's never examined the edges of stamping under magnification for fragile micro burrs wouldn't know. The term "resized" is a bit vague.Anyone that says don't stamp has never done a rebuild. Any metal displacement worries are overblown, the rods get resized during the rebuild process.
You're entitled to your experience-based opinion, this post was based on my experience.
"Resized" is the industry term for torquing the big end of the rod and then honing it to size and concentricity on a rod resizing machine. If you're not getting this done as a part of the rebuild process you'll have issues. Also, every decent machine shop that I've been associated with replaces the rod bolts when they recondition the rods. at the very least throw away the used nuts and get new ones.-Paint pens may not hold up to shot peening (OP may not do that if rebuild is in garage) but I've had plenty of paint pens stand up to solvents unless scrubbed with a brass brush or applied in excessive thickness. Steel bars from supply houses use it all the time and they seem to have good results under severe conditions. What they use doesn't come off even when vigorously scrubbed and I have to cut or grind it off. Paint has different qualities, they're not all the same and should be tested before further marking.
-It's not just metal displacement alone to be concerned about. If the amount of force used in stamping is unknown then it should be a concern. Anyone that's never examined the edges of stamping under magnification for fragile micro burrs wouldn't know. The term "resized" is a bit vague.
You're entitled to your experience-based opinion, this post was based on my experience.
Walkers
Well-known member
Resizing rods is not vague, the ends of the caps are ground down, then the rod hole is bored to the correct size. The boring takes care of any sort of metal displacement that you are imagining. Stamping them is the industry standard method of marking them. Some even come from the factory pre stamped.-It's not just metal displacement alone to be concerned about. If the amount of force used in stamping is unknown then it should be a concern. Anyone that's never examined the edges of stamping under magnification for fragile micro burrs wouldn't know. The term "resized" is a bit vague.
RoninB4
Well-known member
"Resized" is the industry term for torquing the big end of the rod and then honing it to size and concentricity on a rod resizing machine. If you're not getting this done as a part of the rebuild process you'll have issues. Also, every decent machine shop that I've been associated with replaces the rod bolts when they recondition the rods. at the very least throw away the used nuts and get new ones.
Resizing rods is not vague, the ends of the caps are ground down, then the rod hole is bored to the correct size. The boring takes care of any sort of metal displacement that you are imagining. Stamping them is the industry standard method of marking them. Some even come from the factory pre stamped.
-That's just what I thought the term "resizing" meant. What idiot would stamp the inside surface of a precision bore? Paint pen to the bore itself is also an absurd idea. I appreciate both of you attempting to educate me but am quite familiar with boring/honing metal. I asked for clarification of the term because I suspected there was a misunderstanding.
Schurkey
Well-known member
BEFORE disassembly, if possible perform a cranking compression test and a cylinder leakdown test on each cylinder. That tells you the basic sealing characteristics of the rings, valves, head gasket.
BE SURE YOU CAN GET PARTS--PISTONS, BEARINGS, TIMING GEARS, GASKETS, and all the other items needed. Supply chains are STILL in sad shape after the Communist Plague. My favorite machinist is still complaining that he can't get parts required, so blocks and cylinder heads at his shop are taking up time 'n' space while he waits weeks or months to receive what used to be "common" items.
I used to stamp connecting rods and caps. Learned later that the better process is to use a vibrating engraver.
Paint pen? Will never stand up to proper cleaning.
Rod resizing? Have the rods CHECKED for size. Most or all of them will not need resizing unless you insist on replacing the fasteners. Resizing changes the center-to-center length (although not by much.)
Verify piston-to-head clearance. Most engines have WAY TOO MUCH. This reduces turbulence in the cylinder, making for a lazy burn and needing excess timing advance. It's made MUCH WORSE by replacing OEM steel-shim head gaskets with aftermarket composition gaskets that are twice as thick as what the engine was designed-for, and aftermarket replacement pistons that are sabotaged by design with too-little compression height. Many "replacement" pistons are .010 or .020 too damn short.
The usual "fix" for excess piston-to-head clearance is to mill the block decks. Be sure the machine shop centers the block off of the main saddles, so the block decks are even from front-to-back, 90 degrees to the crank centerline, and even from side-to-side. Factory deck machining is not accurate enough to base the new machining from, and besides--the block distorts over time and with use and heat-cycling. What might have been "accurate" when new, probably is not now.
IF (big IF) the main caps are being align bored/align honed, do that before machining the block decks.
Ideally, the cylinders are honed using a torque-plate and head gasket, to simulate cylinder head/head bolt distortion. The bores need to be straight and round AFTER the head is torqued into place, not when the block has no stress sitting in the machining fixture. "Good Luck" finding a machine shop with an Intercoursable-Harvester torque plate. Depending on the equipment used, 50--80% of the benefit of a torque plate can be accomplished by using short bolts and a stack of washers or a solid tubular spacer on each head-bolt hole, with the bolts going into the block the same amount (same thread engagement) as the actual head bolts would. Torque to spec, hone the cylinder.
In particular for head bolts and main-cap bolts: If there's a washer under the bolt head (usually not on cast-iron parts) do not apply lube between the washer and the casting. Lube (or seal, as appropriate) the threads, lube under the bolt head, (between bolt head and washer or casting) but not between washer and casting. Use a torque spec appropriate for the lube you're using. In general, oil requires a higher torque than moly-based fastener lube.
I will not allow "kitty litter" or "Oil Dri" granulated clay in my shop. Too much dust, contaminates everything. I wipe-up spilled fluids with rags, then clean with detergent and water. No dust.
DO NOT dunk the pistons/rings in a bucket of oil. Wipe the fresh and cleaned cylinder walls with a hint of ATF on a non-linting rag, oil the wrist pin. Rings get oiled during installation onto the pistons, wipe the excess from the piston. Too much oil on the rings slows seating.
I disassemble and clean new or used hydraulic lifters before installation. New ones are often contaminated with anti-rust preservative, old ones will be filthy inside--the oil path into the lifter is relatively large, the clearance for oil to get out of the lifter is microscopic. Grit and sludge get into the lifter in use, but can't get back out. Hydraulic lifters are like miniature oil filters. Disassemble them ONE AT A TIME because you do not want to mix the internal pieces from one to another. Lifter plungers are select-fit into the lifter bodies. That's what makes for the microscopic clearances.
Once the lifters are cleaned and re-assembled, I pump them full of ATF (flows easily at room temperature) using a pump-style oil can. This allows me to verify lifter leakdown rate, and also assures that the lifter can flow oil to the pushrod seat (if required.)
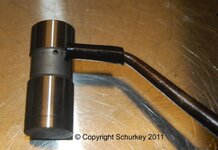

SV rocker arms are probably totally worn-out. In fact, that's common with most engine families. They'll wear the valve tips, too.
EVERYTHING gets cleaned in hot, soapy water. Used parts, the block, (rifle-brush EVERY oil gallery) even new parts straight out of the box or bag. Compressed air to dry. Some sort of metal-protectant to prevent rust.
Remember that the SV-series engines are timed off of the #8 spark plug wire, not #1 like most engines.
EVERYTHING that needs lube on initial fire-up was provided with assembly lube. There is NO reason to go crazy "priming" the oiling system, ESPECIALLY when the engine has a submerged oil pump. Some guys prime for ten minutes, turn the crank, prime for ten minutes, turn the crank...that's insane. "Priming" is optional. You're purging air from the pump and the oil filter, and filling the major oil galleries by spinning the pump. If "priming" takes more than one minute, something is wrong. You're DONE priming when you show oil pressure on the gauge. You DO NOT need to squirt oil over the rocker arms. DO NOT spin the oil pump with a high-speed 1/4" or 3/8" drill. A 400--500 rpm 1/2" air drill (doesn't build heat when used) is ideal, only because drills that spin slower are really uncommon. At idle, the oil pump is turning ~350 rpm.
When the engine is fired-up, "break in" the cam/lifters as usual procedure, then re-check all adjustments, top-off fluids, tension belts, etc. IF (big IF) you use thick, moly-based paste on the cam lobes/lifter bottoms, change the oil filter if not the oil as well. Moly-based paste assembly lube can plug an oil filter in twenty minutes.
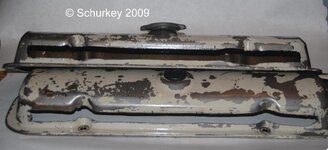
I like to sacrifice a Treasure-Yard valve cover pair, so that I can verify that the pushrods spin. Paint a vertical stripe on the pushrods with a paint-pen, When the engine runs, assure that each pushrod spins. If a pushrod doesn't spin, the lifter isn't spinning either--and it'll wear-out the lifter and cam in short order. (Pontiac valve cover set shown.)
Head for a deserted highway, accelerate, put the truck in HIGH GEAR, and nail the gas pedal. When you get to highway speed, coast down to the lowest speed the truck can handle in high gear without problems. NAIL the gas again, get up to speed, coast down. Repeat until it stops being fun. High cylinder pressure seats the rings, high vacuum when coasting brings oil up the cylinder walls to wash-away oil particles. You want high load, but not high RPM. 3,500 rpm is PLENTY.
BE SURE YOU CAN GET PARTS--PISTONS, BEARINGS, TIMING GEARS, GASKETS, and all the other items needed. Supply chains are STILL in sad shape after the Communist Plague. My favorite machinist is still complaining that he can't get parts required, so blocks and cylinder heads at his shop are taking up time 'n' space while he waits weeks or months to receive what used to be "common" items.
I used to stamp connecting rods and caps. Learned later that the better process is to use a vibrating engraver.
Paint pen? Will never stand up to proper cleaning.
Rod resizing? Have the rods CHECKED for size. Most or all of them will not need resizing unless you insist on replacing the fasteners. Resizing changes the center-to-center length (although not by much.)
Verify piston-to-head clearance. Most engines have WAY TOO MUCH. This reduces turbulence in the cylinder, making for a lazy burn and needing excess timing advance. It's made MUCH WORSE by replacing OEM steel-shim head gaskets with aftermarket composition gaskets that are twice as thick as what the engine was designed-for, and aftermarket replacement pistons that are sabotaged by design with too-little compression height. Many "replacement" pistons are .010 or .020 too damn short.
The usual "fix" for excess piston-to-head clearance is to mill the block decks. Be sure the machine shop centers the block off of the main saddles, so the block decks are even from front-to-back, 90 degrees to the crank centerline, and even from side-to-side. Factory deck machining is not accurate enough to base the new machining from, and besides--the block distorts over time and with use and heat-cycling. What might have been "accurate" when new, probably is not now.
IF (big IF) the main caps are being align bored/align honed, do that before machining the block decks.
Ideally, the cylinders are honed using a torque-plate and head gasket, to simulate cylinder head/head bolt distortion. The bores need to be straight and round AFTER the head is torqued into place, not when the block has no stress sitting in the machining fixture. "Good Luck" finding a machine shop with an Intercoursable-Harvester torque plate. Depending on the equipment used, 50--80% of the benefit of a torque plate can be accomplished by using short bolts and a stack of washers or a solid tubular spacer on each head-bolt hole, with the bolts going into the block the same amount (same thread engagement) as the actual head bolts would. Torque to spec, hone the cylinder.
In particular for head bolts and main-cap bolts: If there's a washer under the bolt head (usually not on cast-iron parts) do not apply lube between the washer and the casting. Lube (or seal, as appropriate) the threads, lube under the bolt head, (between bolt head and washer or casting) but not between washer and casting. Use a torque spec appropriate for the lube you're using. In general, oil requires a higher torque than moly-based fastener lube.
I will not allow "kitty litter" or "Oil Dri" granulated clay in my shop. Too much dust, contaminates everything. I wipe-up spilled fluids with rags, then clean with detergent and water. No dust.
DO NOT dunk the pistons/rings in a bucket of oil. Wipe the fresh and cleaned cylinder walls with a hint of ATF on a non-linting rag, oil the wrist pin. Rings get oiled during installation onto the pistons, wipe the excess from the piston. Too much oil on the rings slows seating.
I disassemble and clean new or used hydraulic lifters before installation. New ones are often contaminated with anti-rust preservative, old ones will be filthy inside--the oil path into the lifter is relatively large, the clearance for oil to get out of the lifter is microscopic. Grit and sludge get into the lifter in use, but can't get back out. Hydraulic lifters are like miniature oil filters. Disassemble them ONE AT A TIME because you do not want to mix the internal pieces from one to another. Lifter plungers are select-fit into the lifter bodies. That's what makes for the microscopic clearances.
Once the lifters are cleaned and re-assembled, I pump them full of ATF (flows easily at room temperature) using a pump-style oil can. This allows me to verify lifter leakdown rate, and also assures that the lifter can flow oil to the pushrod seat (if required.)
SV rocker arms are probably totally worn-out. In fact, that's common with most engine families. They'll wear the valve tips, too.
EVERYTHING gets cleaned in hot, soapy water. Used parts, the block, (rifle-brush EVERY oil gallery) even new parts straight out of the box or bag. Compressed air to dry. Some sort of metal-protectant to prevent rust.
Remember that the SV-series engines are timed off of the #8 spark plug wire, not #1 like most engines.
EVERYTHING that needs lube on initial fire-up was provided with assembly lube. There is NO reason to go crazy "priming" the oiling system, ESPECIALLY when the engine has a submerged oil pump. Some guys prime for ten minutes, turn the crank, prime for ten minutes, turn the crank...that's insane. "Priming" is optional. You're purging air from the pump and the oil filter, and filling the major oil galleries by spinning the pump. If "priming" takes more than one minute, something is wrong. You're DONE priming when you show oil pressure on the gauge. You DO NOT need to squirt oil over the rocker arms. DO NOT spin the oil pump with a high-speed 1/4" or 3/8" drill. A 400--500 rpm 1/2" air drill (doesn't build heat when used) is ideal, only because drills that spin slower are really uncommon. At idle, the oil pump is turning ~350 rpm.
When the engine is fired-up, "break in" the cam/lifters as usual procedure, then re-check all adjustments, top-off fluids, tension belts, etc. IF (big IF) you use thick, moly-based paste on the cam lobes/lifter bottoms, change the oil filter if not the oil as well. Moly-based paste assembly lube can plug an oil filter in twenty minutes.
I like to sacrifice a Treasure-Yard valve cover pair, so that I can verify that the pushrods spin. Paint a vertical stripe on the pushrods with a paint-pen, When the engine runs, assure that each pushrod spins. If a pushrod doesn't spin, the lifter isn't spinning either--and it'll wear-out the lifter and cam in short order. (Pontiac valve cover set shown.)
Head for a deserted highway, accelerate, put the truck in HIGH GEAR, and nail the gas pedal. When you get to highway speed, coast down to the lowest speed the truck can handle in high gear without problems. NAIL the gas again, get up to speed, coast down. Repeat until it stops being fun. High cylinder pressure seats the rings, high vacuum when coasting brings oil up the cylinder walls to wash-away oil particles. You want high load, but not high RPM. 3,500 rpm is PLENTY.
Last edited:
Ricky Joe
Well-known member
I probably have a manual, if you need it.
theoldwizard1
Well-known member
One thing that can easily be over looked is a bent pushrod. They should all roll smoothly on a flat surface (sheet of glass).
Even if you don't have a valve job, inspect the valves to see if the are bent and that they fit well in the valve guides.. Valve seals are usually cheap. Replace them. Lap the valves !
If there was any concern about the head surface being flat, place a towel on a sturdy table and lay a piece of glass (at least 50% bigger than the head; It there is a glass store near you, you can usually buy reclaimed "plate" glass cheap) on top of towel. Using double sided tape, tape wet/dry sandpaper to the glass. Place the head on top of the sandpaper and make figure 8s until the entire head is equally shiny. You can probably start with 400 grit. Either 600 or 800 on the send pass. Use some oil on the sand paper to help move the grit/filings out of the way.
Even if you don't have a valve job, inspect the valves to see if the are bent and that they fit well in the valve guides.. Valve seals are usually cheap. Replace them. Lap the valves !
If there was any concern about the head surface being flat, place a towel on a sturdy table and lay a piece of glass (at least 50% bigger than the head; It there is a glass store near you, you can usually buy reclaimed "plate" glass cheap) on top of towel. Using double sided tape, tape wet/dry sandpaper to the glass. Place the head on top of the sandpaper and make figure 8s until the entire head is equally shiny. You can probably start with 400 grit. Either 600 or 800 on the send pass. Use some oil on the sand paper to help move the grit/filings out of the way.