
You are using an out of date browser. It may not display this or other websites correctly.
You should upgrade or use an alternative browser.
You should upgrade or use an alternative browser.
Craftsman Drill Press Information Belts, Bearings, Chucks, Keys, etc…1946-1984
- Thread starter 11b30b4
- Start date

Looks like the gear wrench spanner for the safety nut is discontinued and spendy where available. I found a version that will likely work on sale (same pin diameter and span)

Zeus36
Well-known member
Looks like the gear wrench spanner for the safety nut is discontinued and spendy where available. I found a version that will likely work on sale (same pin diameter and span)
That adjustable spanner hook wrench is also used on motorcycle fork stem nuts, some rear motorcycle shocks, adjusting collars, lock nut rings, hydraulic cylinder collars, and bearings. Some bicycle stems also use notched stem nuts.
They can also be used on collet chuck collars for the ER series if you don't have the factory wrench handy.
floor standing or bench? I've seen some low profile casters that come mounted on angle brackets so you just add your own board. They also allow you to lower them on fixed feet once in place.What is everyone using for feet on these? I'd like to be able to wheel it around without scratching up my base.

300 Lb. Capacity Mobile Base
Amazing deals on this 300Lb Capacity Mobile Base at Harbor Freight. Quality tools & low prices.
 www.harborfreight.com

VEVOR Heavy Duty Leveling Casters, Leveling Casters Stem, Set of 4, 1.65", Retractable Leveling Casters for Workbench, 440lbs Max Loading Capacity, 360-degree Swivel Casters for Industry Equipment | VEVOR US
Discover VEVOR Heavy Duty Leveling Casters, Leveling Casters Stem, Set of 4, 1.65", Retractable Leveling Casters for Workbench, 440lbs Max Loading Capacity, 360-degree Swivel Casters for Industry Equipment, Sturdy Structure and Stable & Load-bearing at lowest price, 2days delivery, 30days returns.
 www.vevor.com
Shop the Best Selection of equipment casters Products | VEVOR US
Find the perfect equipment casters product at VEVOR. Shop a wide selection of high-quality equipment casters, from accessories to gadgets, and enjoy fast shipping and a secure payment system.
www.vevor.com
Last edited:
does your casting have slab holes? I'd probably use this kind of wheel in the smallest diameter I could get away with if I didn't want to add to the footprint (unless you need more stability) (keep in mind this will add height to the setup and give it a gap between the base and floor:Floor standing

VEVOR Heavy Duty Leveling Casters, Leveling Casters Stem, Set of 4, 2", Retractable Leveling Casters for Workbench, 2200lbs Max Loading Capacity, 360-degree Swivel Casters for Industry Equipment | VEVOR US
Shop VEVOR Heavy Duty Leveling Casters, Leveling Casters Stem, Set of 4, 2", Retractable Leveling Casters for Workbench, 2200lbs Max Loading Capacity, 360-degree Swivel Casters for Industry Equipment at lowest price, 2-day delivery, 30-day returns. Shop now at VEVOR.

VEVOR Caster Wheels, 2 inch, Set of 4, 110 lbs Load Capacity, Threaded Stem Casters with Security Dual Locking Brake, Heavy Duty Industrial Casters, No Noise Swivel Caster Wheels for Cart, Furniture | VEVOR US
VEVOR Caster Wheels 2 inch set of 4 with 110 lbs load capacity roll silently, resist rust, protect floors, and feature dual-locking brakes for secure, smooth movement.
Though many go w/this
Criss
ALLIANCE MEMBER
Thank you I snagged one¡Looks like the gear wrench spanner for the safety nut is discontinued and spendy where available. I found a version that will likely work on sale (same pin diameter and span)
Glad I found this thread. I have this Craftsman drill press that I grabbed at a yard sale last year for $20. I plugged it in and it worked so I took a chance on flipping it. It does not have a CMAN motor. Well I have had it for sale for a while now for $40 and anyone who looks at it picks it apart and doesn't want it unless it's free. I'm willing to take the $20 I'm in it for. It's from the 1940's (according to this thread identifying the label plate as such) and yes there's probably a few issues but is this something that can be restored? Is it worth restoring? Are parts available? Is there a market for this as a parts piece? It's too cool to scrap in my opinion but I'm tired of tripping over it in the garage. Any help is appreciated. Thanks.


There's likely a market for parts judging by ebay listings, though that may be worth more effort than it's worth to you. I don't know how mods or OP would feel about listing items on here (as it may affect their fees or bite into personal business) so I'll let them pipe in on that one.Glad I found this thread. I have this Craftsman drill press that I grabbed at a yard sale last year for $20. I plugged it in and it worked so I took a chance on flipping it. It does not have a CMAN motor. Well I have had it for sale for a while now for $40 and anyone who looks at it picks it apart and doesn't want it unless it's free. I'm willing to take the $20 I'm in it for. It's from the 1940's (according to this thread identifying the label plate as such) and yes there's probably a few issues but is this something that can be restored? Is it worth restoring? Are parts available? Is there a market for this as a parts piece? It's too cool to scrap in my opinion but I'm tired of tripping over it in the garage. Any help is appreciated. Thanks.
Last edited:
It's definitely way too heavy to ship for eBay. I'm not interested in shipping something like that. I guess the easiest question would be is this thing worth not scrapping?There's likely a market for parts judging by ebay listings, though that may be worth more effort than it's worth to you. I don't know how mods pr OP would feel about listing items on here (as it may affect their fees or bite into personal business) so I'll let them pipe in on that one.
I meant more-so on the part-out and shipping side of things. Ebay lets you do local pick up only listings but at that point, FB or craigslist is the cheaper option given ebay fees. You're going to get biased opinions about the worth of salvaging it in a thread about these drill presses so imo is worth salvaging. Do you need a drill press? The old one I got is replacing my newer one so if you could use another project....It's definitely way too heavy to ship for eBay. I'm not interested in shipping something like that. I guess the easiest question would be is this thing worth not scrapping?
FWIW; they seem to hold up fine and all it could use may be a cleaning (timestamped to "performance"):
I already have a more modern drill press so I don't need this one. Like I said I bought it because it was old, cool looking, and cheap in my opinion. After staring at it for a week I decided I needed to flip it. I agree it's worth salvaging. Just going to take the right person who likes to restore vintage tools. I just relisted it on craigslist for 25 bucks maybe that will stir some attention.
FrankLee
Well-known member
There are a couple obvious issues that, if corrected, should help it sell.I already have a more modern drill press so I don't need this one. Like I said I bought it because it was old, cool looking, and cheap in my opinion. After staring at it for a week I decided I needed to flip it. I agree it's worth salvaging. Just going to take the right person who likes to restore vintage tools. I just relisted it on craigslist for 25 bucks maybe that will stir some attention.
First, the quill is fully extended. It could be that the spring is not tensioned. If that's the case, it's an easy fix.
Second, the spindle pulley is upside-down. Please post a photo of the pulley from the top.
Third, the belt is way out of alignment. The belt should be square to the motor shaft and the spindle.
It doesn't seem like you're going to tear it down completely, but for others, do not rely solely on Don's Engine video to rebuild this model of drill press. IMO, there are several things he did not understand about this machine.
Last edited:
that video with the DP mounted to plywood then put into that mobile base is what I would use if I was doing something similar.does your casting have slab holes? I'd probably use this kind of wheel in the smallest diameter I could get away with if I didn't want to add to the footprint (unless you need more stability) (keep in mind this will add height to the setup and give it a gap between the base and floor:
VEVOR Heavy Duty Leveling Casters, Leveling Casters Stem, Set of 4, 2", Retractable Leveling Casters for Workbench, 2200lbs Max Loading Capacity, 360-degree Swivel Casters for Industry Equipment | VEVOR US
Shop VEVOR Heavy Duty Leveling Casters, Leveling Casters Stem, Set of 4, 2", Retractable Leveling Casters for Workbench, 2200lbs Max Loading Capacity, 360-degree Swivel Casters for Industry Equipment at lowest price, 2-day delivery, 30-day returns. Shop now at VEVOR.www.vevor.com
VEVOR Caster Wheels, 2 inch, Set of 4, 110 lbs Load Capacity, Threaded Stem Casters with Security Dual Locking Brake, Heavy Duty Industrial Casters, No Noise Swivel Caster Wheels for Cart, Furniture | VEVOR US
VEVOR Caster Wheels 2 inch set of 4 with 110 lbs load capacity roll silently, resist rust, protect floors, and feature dual-locking brakes for secure, smooth movement.
Though many go w/this
Hey, it's the 3rd one from my post up top! Not sure if that's where you got the tip but glad it helped if so. What do you object to in Don's rebuild? I sat thru them a few days ago and can't recall much that made me raise an eyebrow. Just in case I need to do something he does by mistake.There are a couple obvious issues that, if corrected, should help it sell.
First, the quill is fully extended. It could be that the spring is not tensioned. If that's the case, it's an easy fix.
Second, the spindle pulley is upside-down. Please post a photo of the pulley from the top.
Third, the belt is way out of alignment. The belt should be square to the motor shaft and the spindle.
It doesn't seem like you're going to tear it down completely, but for others, do not rely solely on Don's Engine video to rebuild this model of drill press. IMO, there are several things he did not understand about this machine.
Coincidentally, last Friday, I picked up one of these 12-1/4" machines, model 103.23621. I believe the original paint will clean up nicely.
View attachment 1974134
I'm not going to lie, I miss the days when industrial design was not an after thought (remember old engine bays?) and I'm a sucker for these art deco pieces. The fact they're functional and hefty is just an added plus.I already have a more modern drill press so I don't need this one. Like I said I bought it because it was old, cool looking, and cheap in my opinion. After staring at it for a week I decided I needed to flip it. I agree it's worth salvaging. Just going to take the right person who likes to restore vintage tools. I just relisted it on craigslist for 25 bucks maybe that will stir some attention.
an aside:
KitchenAid brought in industrial designer and commercial artist Egmont Arens to develop a series of low-cost mixers. In 1937, he created the streamlined K model, which has become the standard for the brand. Featuring sleek lines and enameled surfaces, this more modern take on the mixer was instantly popular and helped KitchenAid to eventually take the top spot in sales.
Brian Maynard, a KitchenAid marketing director, said it best in 2007: “The first mixer was actually introduced in 1919, but it was Arens’ 1937 Model K design that really captivated consumers. And while its core following is among those who love to cook and bake, our research tells us that many less avid cooks simply want one on their countertop, largely because they like its design.”
The design proved so successful, KitchenAid actually used a silhouette of the mixer’s shape as part of its logo. That image was trademarked with the U.S. Patent and Trademark Office. In 1997, the mixer was named an icon of American design by the San Francisco Museum of Modern Art.

Julia Child claimed her KitchenAid was a K-5A, as shown here, but it was a later K5SSBU model. KitchenAid
FrankLee
Well-known member
I saw it the day it was posted. Unless I really want something, I'll usually wait several days before I respond. Sellers are more likely to accept a lower price. I got that one for $40.Hey, it's the 3rd one from my post up top! Not sure if that's where you got the tip but glad it helped if so.
I wanted this machine because it has sleeve bushings/bearings. This is the tenth of this size I've had and usually the bushings are worn and runout is horrible. I want to measure and document replacement bushings. Unfortunately or maybe fortunately, the bushings on this dp seem tight and likely do not need replacing.
All I'm going to say is that the dp in Don's Engine's video linked above is a 12-1/4" machine. It is constructed much differently than the 15-1/2" or 13-1/2" drill presses. If Don is a member here, he can pm me for details.What do you object to in Don's rebuild? I sat thru them a few days ago and can't recall much that made me raise an eyebrow. Just in case I need to do something he does by mistake.
I hope to take plenty of pictures during the refurb of mine and post the refurb with explanations.
Your machine is a 15-1/2" 150. Stick with Jeff's videos.
Last edited:
I saw it the day it was posted. Unless I really want something, I'll usually wait several days before I respond. Sellers are more likely to accept a lower price. I got that one for $40.
I wanted this machine because it has sleeve bushings/bearings. This is the tenth of this size I've had and usually the bushings are worn and runout is horrible. I want to measure and document replacement bushings. Unfortunately or maybe fortunately, the bushings on this dp seem tight and likely do not need replacing.
All I'm going to say is that the dp in Don's Engine's video linked above is a 12-1/4" machine. It is constructed much differently than the 15-1/2" or 13-1/2" drill presses. If Don is a member here, he can pm me for details.
I hope to take plenty of pictures during the refurb of mine and post the refurb with explanations.
Your machine is a 15-1/2" 150. Stick with Jeff's videos.
I too have an older Craftsman drill press, which also came with the mortising and shaper accessories. However by looking at the photos posted by the OP, I am unable to find a match. I am also unable to find a model number on mine. I am attaching two photos in case anyone can identify mine.
Thank you in advance for any help.
Thank you in advance for any help.
Attachments


I saw it the day it was posted. Unless I really want something, I'll usually wait several days before I respond. Sellers are more likely to accept a lower price. I got that one for $40.
I wanted this machine because it has sleeve bushings/bearings. This is the tenth of this size I've had and usually the bushings are worn and runout is horrible. I want to measure and document replacement bushings. Unfortunately or maybe fortunately, the bushings on this dp seem tight and likely do not need replacing.
All I'm going to say is that the dp in Don's Engine's video linked above is a 12-1/4" machine. It is constructed much differently than the 15-1/2" or 13-1/2" drill presses. If Don is a member here, he can pm me for details.
I hope to take plenty of pictures during the refurb of mine and post the refurb with explanations.
Your machine is a 15-1/2" 150. Stick with Jeff's videos.
I noticed quite earlier that his was bushing instead of ball bearings so figured it was a much earlier/economic model. Pushing the shaft through the bronze bushing seemed not ideal even after working it. It also looked to me from seeing pics that the pulley is staked/captive onto the shaft though can't tell w/o having it in front of me. Maybe I'm misremembering....I've seen two part pulleys (bronze shaft/al wheel) and one part pulleys (all AL) Looking forward to your rebuild. I suppose bushing machinery should have tighter tolerances since you don't have as many moving surfaces.....may have read something about old lathes and gunsmiths preference for one over another.
Last edited:
Just got it. About HF quality if you couldn't tell from the pics but at least it's drop forged and worked like a charm removing my chuck.Thank you I snagged one¡
bmw57isetta
Well-known member
lmg:I too have an older Craftsman drill press, which also came with the mortising and shaper accessories. However by looking at the photos posted by the OP, I am unable to find a match. I am also unable to find a model number on mine. I am attaching two photos in case anyone can identify mine.
Thank you in advance for any help.
That's a pre-WWII, Atlas-manufactured drill press. Probably built sometime in 1937 thru 1940. I've got the basic Dunlap model, built to run forever. Yours would have been top-of-the-line at the time. Here's a link to the 1937 Sears Power Tool Catalog off of the vintagemachinery.org site. (Scroll down to pages 25-27 for the drill presses.) Treasure trove of info and lots of catalog and publication reprints. Click on "View PDF" under pic of catalog and be patient as it tends to load pretty slowly.
Last edited:
Wow!!! Had no idea it was that old. I bought it in the late 1980s to early 1990s at an estate sale who was a local farmer/community handyman whom I had happened to be acquainted with. Probably paid about $200 for it, and I recall reactions from the crowd when the bidding was highest. I wanted it for sentimental reasons because I liked the ornery old fart, and also because I have always appreciated older well built machinery. Still using it today and thinking of Roy every time I throw the switch.lmg:
That's a pre-WWII, Atlas-manufactured drill press. Probably built sometime in 1937 thru 1940. I've got the basic Dunlap model, built to run forever. Yours would have been top-of-the-line at the time. Here's a link to the 1937 Sears Power Tool Catalog off of the vintagemachinery.org site. (Scroll down to pages 25-27 for the drill presses.) Treasure trove of info and lots of catalog and publication reprints. Click on "View PDF" under pic of catalog and be patient as it tends to load pretty slowly.
Bmw57isetta, thank you so much for this information, I really appreciate it.
Didn't really intend to make the above in bold, but it is appropriate.Thank you again.
bmw57isetta
Well-known member
You/re quite welcome! Always great to see another classic piece of USA iron getting some attention. GJ got me hooked on these old drill presses years ago.Wow!!! Had no idea it was that old. I bought it in the late 1980s to early 1990s at an estate sale who was a local farmer/community handyman whom I had happened to be acquainted with. Probably paid about $200 for it, and I recall reactions from the crowd when the bidding was highest. I wanted it for sentimental reasons because I liked the ornery old fart, and also because I have always appreciated older well built machinery. Still using it today and thinking of Roy every time I throw the switch.
Bmw57isetta, thank you so much for this information, I really appreciate it.
Didn't really intend to make the above in bold, but it is appropriate.
Thank you again.
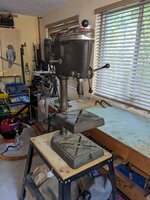
Greetings, new member here, came across this while researching restoring my Craftsman 100 drill press. I have had this machine for about 15 years now, did a light cleaning when I got it and it has served me well over the years.
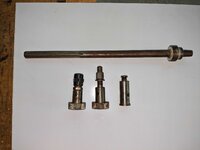
It appears the owner before me used this machine as a mill for the most part. It has the vari-slo attachment, and came with an extra spindle, an endmill collet, an arbor for slitting? And a third tool holder I am not sure what it holds.
There doesn't seem to be a lot of info on the use of this machine as a mill. Might be that it not great as a mill, but for me that's better than no mill.
My question is about the bearings, since I plan on changing out the bearings, is there a better choice for handling the side loads the machine is subject to during milling?
Just getting started on disassembling the machine, and looking forward to the upcoming YouTube series on the vari-slo attachment over at Jeff's shop channel.
Thanks for any input you can offer.
FrankLee
Well-known member
There doesn't seem to be a lot of info on the use of this machine as a mill. Might be that it not great as a mill, but for me that's better than no mill.
My question is about the bearings, since I plan on changing out the bearings, is there a better choice for handling the side loads the machine is subject to during milling?
There have been prior discussions about this but I couldn't find them.
You are correct. There are better choices than a drill press for milling, but...
The 80, 100, 150 and some later Craftsman drill presses all use 6202-5/8 deep groove ball bearings in the quill/spindle. Many other Craftsman machines also use these 6202-5/8 or other 62xx ball bearings.
However, the drill press is the only machine that primarily apply an axial load on the bearing. A lathe may apply an axial load some, but all other machines and motors apply a radial load on bearings. So, IMO, the bearings are not the issue when using a drill press as a mill.
The real issue is the chuck.
Radial loads on a taper chuck can cause the chuck to dislodge from the spindle. Starting in 1951, Craftsman drill presses came equipped with a Jacobs Safe-Lock chuck. These Jacobs 633C chucks have a safety collar that threads onto the thrust collar attached to the spindle. This chuck cannot fall off the spindle with a radial load.
So, if your 100 has a Jacobs 633C chuck, IMO, you should be ok performing light milling.
Please post some pictures of your drill press and accessories.
Last edited:
Well that sounds like good news to me, thanks for the info. Thought I attached pics in my last post. Here ya go.There have been prior discussions about this but I couldn't find them.
You are correct. There are better choices than a drill press for milling, but...
The 80, 100, 150 and some later Craftsman drill presses all use 6202-5/8 deep groove ball bearings in the quill/spindle. Many other Craftsman machines also use these 6202-5/8 or other 62xx ball bearings.
However, the drill press is the only machine that primarily utilizes an axial load on the bearing. A lathe may utilize an axial load some, but all other machines and motors utilize a radial load on bearings. So, IMO, the bearings are not the issue when using a drill press as a mill. The issue is the chuck.
Radial loads on a taper chuck can cause the chuck to dislodge from the spindle. Starting in 1951, Craftsman drill presses came equipped with a Jacobs Safe-Lock chuck. These Jacobs 633C chucks have a safety collar that threads onto the thrust collar attached to the spindle. This chuck cannot fall off the spindle with a radial load.
So, if your 100 has a Jacobs 633C chuck, IMO, you should be ok performing light milling.
Please post some pictures of your drill press and accessories.
FrankLee
Well-known member
Very nice!
You do have a Jacobs 633C chuck.
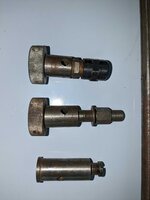
1/4" and 1/2" collet attachment on the left, router bit attachment in the center. I don't recognize the attachment on the right, but it looks very similar to the others.
The spare spindle looks well used, so my swag is that it is bent.
You do have a Jacobs 633C chuck.
1/4" and 1/2" collet attachment on the left, router bit attachment in the center. I don't recognize the attachment on the right, but it looks very similar to the others.
The spare spindle looks well used, so my swag is that it is bent.
Greetings, new member here, came across this while researching restoring my Craftsman 100 drill press. I have had this machine for about 15 years now, did a light cleaning when I got it and it has served me well over the years.
It appears the owner before me used this machine as a mill for the most part. It has the vari-slo attachment, and came with an extra spindle, an endmill collet, an arbor for slitting? And a third tool holder I am not sure what it holds.
There doesn't seem to be a lot of info on the use of this machine as a mill. Might be that it not great as a mill, but for me that's better than no mill.
My question is about the bearings, since I plan on changing out the bearings, is there a better choice for handling the side loads the machine is subject to during milling?
Just getting started on disassembling the machine, and looking forward to the upcoming YouTube series on the vari-slo attachment over at Jeff's shop channel.
Thanks for any input you can offer.
I'm actually in the process of something similar. You've got a collet chuck for routing, a shaping/cutter arbor and not sure of the third (Is it craftsman labeled? There's a few other makers of similar attachment) Could be for slitting as you mention. I'll be converting my shaping/cutter attachments to er20 collet chucks (I'm actually putting shopping cart together if you want me to share). Before you do any milling, I'd advice you build one of the supports below. It will allow you to make cuts in one or two directions (depending on which you build) w/o putting load on the bearings or bending your spindle shaft:
Popular Mechanics
Popular Mechanics inspires, instructs and influences readers to help them master the modern world. Whether it’s practical DIY home-improvement tips, gadgets and digital technology, information on the newest cars or the latest breakthroughs in science -- PM is the ultimate guide to our high-tech...
books.google.com
pg 180:
Popular Mechanics
Popular Mechanics inspires, instructs and influences readers to help them master the modern world. Whether it’s practical DIY home-improvement tips, gadgets and digital technology, information on the newest cars or the latest breakthroughs in science -- PM is the ultimate guide to our high-tech...
books.google.com
Last edited:
Thank you very much for the info, please do share how you are going to get the ER20 to work.I'm actually in the process of something similar. You've got a collet chuck for routing, a shaping/cutter arbor and not sure of the third (Is it craftsman labeled? There's a few other makers of similar attachment) Could be for slitting as you mention. I'll be converting my shaping/cutter attachments to er20 collet chucks (I'm actually putting shopping cart together if you want me to share). Before you do any milling, I'd advice you build one of the supports below. It will allow you to make cuts in one or two directions (depending on which you build) w/o putting load on the bearings or bending your spindle shaft:

Popular Mechanics
Popular Mechanics inspires, instructs and influences readers to help them master the modern world. Whether it’s practical DIY home-improvement tips, gadgets and digital technology, information on the newest cars or the latest breakthroughs in science -- PM is the ultimate guide to our high-tech...books.google.com
pg 180:

Popular Mechanics
Popular Mechanics inspires, instructs and influences readers to help them master the modern world. Whether it’s practical DIY home-improvement tips, gadgets and digital technology, information on the newest cars or the latest breakthroughs in science -- PM is the ultimate guide to our high-tech...books.google.com
edit: Added cheaper vendors of parts below:Thank you very much for the info, please do share how you are going to get the ER20 to work.
edit: I found a ready made alternative of the first option below on aliexpress (no need to tap and drill or shorten (if a stiffer setup is required).
edit: I got this collet holder and it's very hard (hrc 46-50) so unless you have carbide drills or boring bar or lathe, I would avoid this method. You still need a carbide tap to cut threads if you get a hole in there. For the ER20 chuck to work, the plan is to drill and tap one of these to accept the collared arbor threads. I believe 1/2 inch requires more than ~10mm drill for coarse or fine (plz double check) so the model listed is the one to go with. I'd probably install a nut to avoid loosening if running motor in either direction:
edit: Cheaper than above:
If you wanted to convert your collet chuck to ER20, you'd get either of the following:

Collet Extension Rod 1/2in Shank Chuck Holders HSS ER20 Collet Chuck Tool New | eBay
Find many great new & used options and get the best deals for Collet Extension Rod 1/2in Shank Chuck Holders HSS ER20 Collet Chuck Tool New at the best online prices at eBay! Free shipping for many products!
www.ebay.com
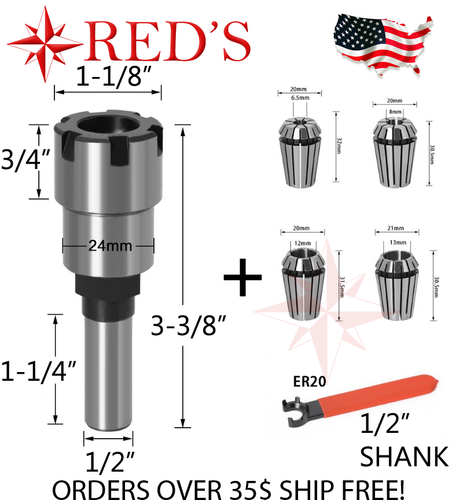
1/2 Shank Router Bit Extension Rod 1/4, 1/2, 8mm,12mm ER 20 Collet Milling Wood | eBay
Find many great new & used options and get the best deals for 1/2 Shank Router Bit Extension Rod 1/4, 1/2, 8mm,12mm ER 20 Collet Milling Wood at the best online prices at eBay! Free shipping for many products!
www.ebay.com
You could also cut the above to whatever thread your slotting adapter accepts (if in 1/2" flavor) or you could tap the threads in your adapter to accept some form of 1/2" thread to match. I'd double think this one in case the current diameter is necessary for whatever application your tool was made for.
You'd need collets. Either of these two sets would get you started for British units:

14Pcs ER20 Spring Collet Set Fit For CNC Milling Lathe Tool Engraving Machines | eBay
Find many great new & used options and get the best deals for 14Pcs ER20 Spring Collet Set Fit For CNC Milling Lathe Tool Engraving Machines at the best online prices at eBay! Free shipping for many products!
www.ebay.com
If you have access to a lathe, you could make your own JT33 to ER20 adapters, making for a stiffer, less moving parts fixture, by turning down the 26mm diameter of the following to 24mm for the shoulder (1") and 3/4" for the rest of the body. I wouldn't use this as is since side loading would make it pop off, you'd need to reuse/turn your own collars since I'm having trouble sourcing an alternative. IMO, this is the best method for the stiffest setup and lowest amount of moment arm on the spindle but likely the costliest.
NOTE: You could technically do all of the above w/ER16/ER25/32/40 but I landed on ER20 for some odd reason....maybe combination of cost and potential to damage spindle if going w/too big a cutter......I was spitballing this one, maybe ER25/32 is fine and it gives you more diameters
Last edited:
Well once I had time to play with a Vari-SLO, I decided to find one for myself. Luckily, FrankLee hooked me up and I am now in the process to squaring this thing away. A viewer reached out to me for a scan of the dial panel so here it is for anyone who needs it:

The Vari-SLO I have was missing the OEM knob and the previous owner fabricated a replacement Control Link Assembly (these are often broken on many of the Vari-SLOs I have seen posted or for sale) that he made from steel and seems too heavy to me. I fabricated an aluminum one to replace it. There is someone selling CNC aluminum replacements on ebay for $50ish but I can fabricate my own just fine.
Lastly there were several small parts missing:
Aluminum shoe (clamping pad) for the Control Knob Assembly. I will fabricate a replacement.
Control Knob (FrankLee added one but its not what I was looking for) and the Control Knob threaded stud. The OEM knob and threaded stud are 3/8-16 thread. Here is a pic of the OEM knob and stud:

Since Savage Manufacturing utilized a different company to make the parts for these Vari-SLOs, I figured they must have used a knob that was fairly common that they could purchase in bulk and keep in mind that this was all around late 1940s (for the original Savage Speed Control) through the 1950s for the Vari-SLO. Extensive searching with google for anything like Bakelite ball knob just gave me typical ball knobs and nothing with the three ridges around the knob. Then I started searching for vintage Bakelite tool knobs and still nothing that looked OEM. Then somehow, I was scanning images of vintage Bakelite knobs and I found this:

This is a Harley Daka Ware motorcycle shift knob. As far as I can tell it’s a near exact match although it has a thread of 3/8-24 rather than 3/8-16. If you google “Daka Ware motorcycle shift knob” there should be several options for around $20.00. Yes, there are ******** Harley fans out there selling them for $100.00 but there seems to be a good amount of them available at fair prices.


If you purchase one of these knobs, you will need a Double-End Threaded Stud, 3/8"-16Thread to3/8"-24Thread for this to work and they are available only from a ton of sources in a variety of sizes. I will check with the viewer who sent me his VS for the video series to get a measurement on the threaded stud, but my guess is that its 2.5” in length with ¾” thread on each end and 1” no thread in the center.
Anyway, I wanted to share all this for anyone with a Vari-SLO and needing parts.
The Vari-SLO I have was missing the OEM knob and the previous owner fabricated a replacement Control Link Assembly (these are often broken on many of the Vari-SLOs I have seen posted or for sale) that he made from steel and seems too heavy to me. I fabricated an aluminum one to replace it. There is someone selling CNC aluminum replacements on ebay for $50ish but I can fabricate my own just fine.
Lastly there were several small parts missing:
Aluminum shoe (clamping pad) for the Control Knob Assembly. I will fabricate a replacement.
Control Knob (FrankLee added one but its not what I was looking for) and the Control Knob threaded stud. The OEM knob and threaded stud are 3/8-16 thread. Here is a pic of the OEM knob and stud:
Since Savage Manufacturing utilized a different company to make the parts for these Vari-SLOs, I figured they must have used a knob that was fairly common that they could purchase in bulk and keep in mind that this was all around late 1940s (for the original Savage Speed Control) through the 1950s for the Vari-SLO. Extensive searching with google for anything like Bakelite ball knob just gave me typical ball knobs and nothing with the three ridges around the knob. Then I started searching for vintage Bakelite tool knobs and still nothing that looked OEM. Then somehow, I was scanning images of vintage Bakelite knobs and I found this:
This is a Harley Daka Ware motorcycle shift knob. As far as I can tell it’s a near exact match although it has a thread of 3/8-24 rather than 3/8-16. If you google “Daka Ware motorcycle shift knob” there should be several options for around $20.00. Yes, there are ******** Harley fans out there selling them for $100.00 but there seems to be a good amount of them available at fair prices.
If you purchase one of these knobs, you will need a Double-End Threaded Stud, 3/8"-16Thread to3/8"-24Thread for this to work and they are available only from a ton of sources in a variety of sizes. I will check with the viewer who sent me his VS for the video series to get a measurement on the threaded stud, but my guess is that its 2.5” in length with ¾” thread on each end and 1” no thread in the center.
Anyway, I wanted to share all this for anyone with a Vari-SLO and needing parts.
FrankLee
Well-known member
Very cool! I'm looking forward to the rest of the story.
I sold mine this past weekend to a a guy who wants to restore it. Glad I was able to find it a home.There are a couple obvious issues that, if corrected, should help it sell.
First, the quill is fully extended. It could be that the spring is not tensioned. If that's the case, it's an easy fix.
Second, the spindle pulley is upside-down. Please post a photo of the pulley from the top.
Third, the belt is way out of alignment. The belt should be square to the motor shaft and the spindle.
It doesn't seem like you're going to tear it down completely, but for others, do not rely solely on Don's Engine video to rebuild this model of drill press. IMO, there are several things he did not understand about this machine.
Coincidentally, last Friday, I picked up one of these 12-1/4" machines, model 103.23621. I believe the original paint will clean up nicely.
View attachment 1974134
Another VS update. Since I have a VS now, I can explore a bit more aggressively than I could with one that I did not own. That being said, I wanted to know exactly what the two small set screws on wach pulley were for. I assumed that the pulley was pressed together, and the set screws secured the bottom sheave of the pulley to the brass sleeve. I also assumed that the top sheave of the pulley and the brass sleeve were mated together during forming and were permanent.
So that we are all on the same page, this is a pic of one of the pulleys and the red indicated on of the two set screw holes in the bottom sheave of the pulley.

So how to disassembly this thing and not damage it. I cut two small ½ white pine boards with ½ of a 1.5” circle in each. I have a 22mm bearing setter and here is how these looked.

With the two set screws removed, I placed each half board opposite each other and between the bottom sheave and the moving (Reeve’s) sheave then placed this in a vise. In this pic I am pointing out that the brass sleeve is protruding the bottom sheave by about 1/6”. The Top side is flush and since the set screws are on this end, it makes sense that this is how the pulleys were assembled.

Next, I slowly tighten the vise and compress the two boards until they meet. I was careful to not bend or distort the sliding brass sleeve on the Reeve’s sheave and the brass sleeve shaft. Also, as this assembly compressed, it forced the separation of the brass sleeve shaft downwards and out of the bottom sheave. In this pic I am pointing out that the brass sleeve is now recessed by about 1/6”.

Next, I used the 22mm bearing setter which is close to the same OD of the bearing to drive the brass sleeve through the bottom sheave. I later found that removing the boards from the vise and resting them on the top of the vise jaws made it easier to drive the sleeve out of the sheave.


And here are the components disassembled. I am fairly certain that the brass sleeve inside the Reeve’s sheave and the brass sleeve shaft in the top sheave are permanently affixed.

So now I know the pulleys can be disassembled and exactly what the two set screws do.
So that we are all on the same page, this is a pic of one of the pulleys and the red indicated on of the two set screw holes in the bottom sheave of the pulley.
So how to disassembly this thing and not damage it. I cut two small ½ white pine boards with ½ of a 1.5” circle in each. I have a 22mm bearing setter and here is how these looked.
With the two set screws removed, I placed each half board opposite each other and between the bottom sheave and the moving (Reeve’s) sheave then placed this in a vise. In this pic I am pointing out that the brass sleeve is protruding the bottom sheave by about 1/6”. The Top side is flush and since the set screws are on this end, it makes sense that this is how the pulleys were assembled.
Next, I slowly tighten the vise and compress the two boards until they meet. I was careful to not bend or distort the sliding brass sleeve on the Reeve’s sheave and the brass sleeve shaft. Also, as this assembly compressed, it forced the separation of the brass sleeve shaft downwards and out of the bottom sheave. In this pic I am pointing out that the brass sleeve is now recessed by about 1/6”.
Next, I used the 22mm bearing setter which is close to the same OD of the bearing to drive the brass sleeve through the bottom sheave. I later found that removing the boards from the vise and resting them on the top of the vise jaws made it easier to drive the sleeve out of the sheave.
And here are the components disassembled. I am fairly certain that the brass sleeve inside the Reeve’s sheave and the brass sleeve shaft in the top sheave are permanently affixed.
So now I know the pulleys can be disassembled and exactly what the two set screws do.
bubinga
Well-known member
I'm thinking about looking at this one, This is a 150 correct?


