To avoid these ads, REGISTER NOW!

New pole barn, pretty sure windows will leak

Stryfe

Active member
Joined
Oct 28, 2023
Messages
33
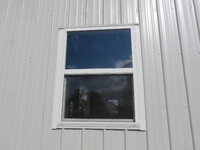
So, I've already seen some shoddy work done during this build that I've had to point out to get fixed. Mostly with the framing, but small things. Overall happy with the shop. Now that the building is done I'm checking out the siding and for the most part it looks pretty good but the window trim is absolutely going to leak and I'm curious how I can fix this. I've called the builder and they've said they haven't had complaints of leaks, but I'm thinking people probably just aren't noticing.

It's to my understanding that the channel should overlap itself in such a way that water will flow down and away from the building. This looks like it'd flow right into the building and soak the insulation from behind the siding. Additionally, they used tape flashing/sealing tape underneath that goes directly from the window to the wooden frame. I was under the impression that this tape should go onto house wrap or something similar.

I checked the trim around the door and it's done right. Top channel overlaps sides, water will run down and drain to ground.

What do I need to do? I'm leaning towards doing this myself so it's done right.

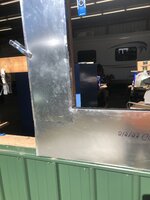
Pic 1 - side of window
Pic 2 - top of window
Pic 3 - bottom of window

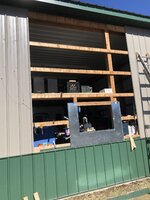
Edit: additional photos of another window
Pic 4 - Right side of window channel/trip directly on rib of siding
Pic 5 - Looking from the bottom up, this creates a channel for water
Pic 6 - Left side of same window, on flat part of siding
Pic 7 - Same area, but different angle showing the lower trim is folded the wrong way
Pic 8 - Right side of window on rib of siding

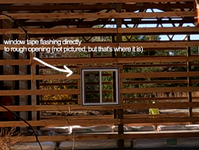
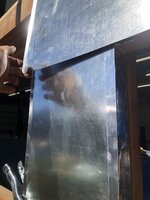
Edit 2: Found a picture of the window with the flashing to rough opening, which IMO does nothing.
Pic 9 - Flashing tape to wood
 

Attachments

  • image0[1].jpeg
    image0[1].jpeg
    342.9 KB · Views: 430
  • image1[1].jpeg
    image1[1].jpeg
    234.2 KB · Views: 389
  • image2[1].jpeg
    image2[1].jpeg
    201.5 KB · Views: 371
  • image0.jpeg
    image0.jpeg
    356.6 KB · Views: 172
  • image1.jpeg
    image1.jpeg
    343.3 KB · Views: 173
  • image2.jpeg
    image2.jpeg
    197.7 KB · Views: 147
  • image3.jpeg
    image3.jpeg
    287.2 KB · Views: 135
  • image4.jpeg
    image4.jpeg
    293.3 KB · Views: 136
  • flashingtape.png
    flashingtape.png
    2.9 MB · Views: 123
Last edited:
To avoid these ads, REGISTER NOW!

619DioFan

Well-known member
Joined
Apr 9, 2013
Messages
3,617
Location
San Diego , Ca.
Stevie Wonder could see how half *** that was done. the builder needs to make it right , otherwise you will which means pulling the window(s) and reinstalling them correctly ( IMO )
 

tarmy

Well-known member
Joined
May 28, 2014
Messages
4,683
Location
Nor Cal
Wonder what else is done that is that half assed?

No way you should pay them until that is properly installed.
 

lmg

Well-known member
Joined
Mar 17, 2023
Messages
96
Stryfe, I suggest you go to the metal building dealer or the manufacturer and get the construction details. I can assure you they they have them for every component. Then get the builder to bring his work into compliance with the manufacturers recommendations. The manufacturer is the entity that generates the details, so I would probably just go there first to make sure you are getting the latest revisions, but be aware if say flashing configuration has changed recently, you may need to go back and get an earlier version of the details.

Actually if the contractor does not follow manufacturers instructions, he can be at risk for liability:

And here is a quote from Martin Holladay of Green Building Advisor"
  1. GBA Editor
    Martin Holladay | Jan 09, 2018 01:45pm | #1
    "Malcolm,
    Section 102.2 of the 2006 International Energy Conservation Code requires that “All materials, systems and equipment shall be installed in accordance with the manufacturer’s installation instructions and the International Building Code.”
    Section 303.2 of the 2009 International Energy Conservation Code and the 2012 IECC require:
    "303.2 Installation. All materials, systems and equipment shall be installed in accordance with the manufacturer's installation instructions and the International Building Code."
    As with all code requirements, it's your local code compliance officer who is responsible for interpreting the code."

Hate so say this, but the owner should be looking at every phase of the work with the manufacturer's instructions in hand.

And if you find issues, be sure and take photos in case they are covered up.

And during discussion of issues, be kind, courteous, so you two can work together to resolve the issues.

And if you are trying to be proactive and want a clause in the contract stating the essence of Martin's quote, and the contractor walks away. you are probably better off.

And you may want to explore https://www.greenbuildingadvisor.com They are discussing many of the same items discussed here.
 
OP
S

Stryfe

Active member
Joined
Oct 28, 2023
Messages
33
Wonder what else is done that is that half assed?

No way you should pay them until that is properly installed.
I was out there every step of the way checking and the only other thing I was disappointed with was how the overhang was done. Had them fix it and looked good afterwards. For this particular issue I couldn't see it until it was done.
 
OP
S

Stryfe

Active member
Joined
Oct 28, 2023
Messages
33
Stevie Wonder could see how half *** that was done. the builder needs to make it right , otherwise you will which means pulling the window(s) and reinstalling them correctly ( IMO )
I've talked to him about it, method to fix would be to use silicone which I don't believe should be the primary method of weather/waterproofing. The flashing should've just been done correctly. Already thinking about just doing it myself.

I'll bet he has never seen a leak. Probably won't even come to check on a complaint and if he does you can bet that it'll be on a sunny day following a drought.
I could definitely get him out here, he's pretty personable and easy to work with.

Stryfe, I suggest you go to the metal building dealer or the manufacturer and get the construction details. I can assure you they they have them for every component. Then get the builder to bring his work into compliance with the manufacturers recommendations. The manufacturer is the entity that generates the details, so I would probably just go there first to make sure you are getting the latest revisions, but be aware if say flashing configuration has changed recently, you may need to go back and get an earlier version of the details.

Actually if the contractor does not follow manufacturers instructions, he can be at risk for liability:

And here is a quote from Martin Holladay of Green Building Advisor"
  1. GBA Editor
    Martin Holladay | Jan 09, 2018 01:45pm | #1
    "Malcolm,
    Section 102.2 of the 2006 International Energy Conservation Code requires that “All materials, systems and equipment shall be installed in accordance with the manufacturer’s installation instructions and the International Building Code.”
    Section 303.2 of the 2009 International Energy Conservation Code and the 2012 IECC require:
    "303.2 Installation. All materials, systems and equipment shall be installed in accordance with the manufacturer's installation instructions and the International Building Code."
    As with all code requirements, it's your local code compliance officer who is responsible for interpreting the code."

Hate so say this, but the owner should be looking at every phase of the work with the manufacturer's instructions in hand.

And if you find issues, be sure and take photos in case they are covered up.

And during discussion of issues, be kind, courteous, so you two can work together to resolve the issues.

And if you are trying to be proactive and want a clause in the contract stating the essence of Martin's quote, and the contractor walks away. you are probably better off.

And you may want to explore https://www.greenbuildingadvisor.com They are discussing many of the same items discussed here.
Thank you.
 
OP
S

Stryfe

Active member
Joined
Oct 28, 2023
Messages
33
What would you do differently if you fix it yourself?
After reading through this thread, I'd remove the siding where I need to in order to install a sheathing/vapor barrier for the flashing tape to stick to, since at the moment it's only taped to the rough opening. (Though I should mention it has fiberglass/vinyl insulation between the siding and frame)

Then, I'd install z flashing on top in order to direct water away from the window flange. I plan to watch videos and read up, lots of good stuff from RR buildings on YouTube on sealing windows. I am extremely particular/meticulous and I'm confident I could fix this without leaks... but the point is that I believe this should be on the builder. I'm taking @lmg advice and contacting the local siding/steel supplier for construction details/standard operating procedure on installing these windows with their flashing/trim into a building built with their siding. I then plan to present that to the builder and demand proper installation.
 

Attachments

  • window.png
    window.png
    337 KB · Views: 281
Last edited:

lmg

Well-known member
Joined
Mar 17, 2023
Messages
96
Mueller is our main manufacturer here, at least for the smaller jobs, they have everything online.
 

Dakotadadv8

Well-known member
Joined
May 30, 2021
Messages
1,487
Caulk and tape great products. Easy to apply, always installed own window and doors.
 

koko2502

Member
Joined
Apr 29, 2015
Messages
6
Location
Macungie, PA
My windows on my newly built pole garage are done the same way. The difference I have than yours is my 3 doors are done the same way as the windows. What makes it difficult to fix is when the ribs of the metal siding are right on the edge of the end of the window. I cut the rib off the siding and put some pvc board down the sides and capped the top and bottom.
 
OP
S

Stryfe

Active member
Joined
Oct 28, 2023
Messages
33
My windows on my newly built pole garage are done the same way. The difference I have than yours is my 3 doors are done the same way as the windows. What makes it difficult to fix is when the ribs of the metal siding are right on the edge of the end of the window. I cut the rib off the siding and put some pvc board down the sides and capped the top and bottom.
Any pics?
 

jack stand

Well-known member
Joined
Feb 29, 2012
Messages
3,338
Location
Lakes Region Maine
If you have trouble finding manufacturers installation instructions, search vinyl siding. The concerns and procedures are similar or the same.
Any wall siding that requires termination in a channel or other accessory for expansion of installation reasons is going to require special attention to be waterproof.
Generally it's housewrap, flashing, properly cutting the top J to direct water into the side J's and flashing tape.
Usually the bottom areas (your picture 3) are the worst to seal. Especially vertical siding, there's no opportunity to "turn" and water in the J outward to the face.
I've often wanted to try "barn metal" with no vertical J on the sides of openings. Cut tight and caulk just like aluminum siding.
 
Last edited:
OP
S

Stryfe

Active member
Joined
Oct 28, 2023
Messages
33
If you have trouble finding manufacturers installation instructions, search vinyl siding. The concerns and procedures are similar or the same.
Any wall siding that requires termination in a channel or other accessory for expansion of installation reasons is going to require special attention to be waterproof.
Generally it's housewrap, flashing, properly cutting the top J to direct water into the side J's and flashing tape.
Usually the bottom areas (your picture 3) are the worst to seal. Especially vertical siding, there's no opportunity to "turn" and water in the J outward to the face.
I've often wanted to try "barn metal" with no vertical J on the sides of openings. Cut tight and caulk just like aluminum siding.

Thanks. I also noticed today that 2 of the windows have a side that are on the "hump" edge of the siding, so it would be impossible to get back there with caulk.
 
To avoid these ads, REGISTER NOW!
OP
S

Stryfe

Active member
Joined
Oct 28, 2023
Messages
33
Here's another picture I found before the shop went up (zoom in). This is the extent of the channel/window trim. The only additional thing that was done before siding + insulation went up was flashing tape from the window frame to wood frame. I simply can't understand how it can be confidently stated that this won't leak when I can see a clear path for water to enter. It will go between the siding and backing of the insulation which is fiberglass and soak it.
 

Attachments

  • image0 (2).jpeg
    image0 (2).jpeg
    640.6 KB · Views: 195

kaymccampbell

Well-known member
Joined
Feb 27, 2015
Messages
29,547
Location
Upstate New York
As much as I'm sure you'd like to force your contractor into fixing it we all know the odds are that this will not go well. Were I in your shoes, I'd buy matching caulk and seal them up.
 
OP
S

Stryfe

Active member
Joined
Oct 28, 2023
Messages
33
WTF......Am I seeing this right guys? Absolutely zero J channel?
I'm pretty sure the "trim" around the windows is channeling of some sort right? Looks pretty similar to this:
1698639034945.png

You can see it nailed to the frame here:
1698639063282.png

As much as I'm sure you'd like to force your contractor into fixing it we all know the odds are that this will not go well. Were I in your shoes, I'd buy matching caulk and seal them up.
I hate this solution but I think you're right. I already have some DAP AMF window and siding sealant that I was going to use, but would really like to fix this the right way and use caulk as an addition to the weather proofing instead of a solution, ya know?
 

kaymccampbell

Well-known member
Joined
Feb 27, 2015
Messages
29,547
Location
Upstate New York
I'm pretty sure the "trim" around the windows is channeling of some sort right? Looks pretty similar to this:
1698639034945.png

You can see it nailed to the frame here:
1698639063282.png


I hate this solution but I think you're right. I already have some DAP AMF window and siding sealant that I was going to use, but would really like to fix this the right way and use caulk as an addition to the weather proofing instead of a solution, ya know?
I understand, but the weather is turning, and it's coming time to pull indoors and do other things. A quicker solution now will hold things until better weather in 6 months or so.
 

jack stand

Well-known member
Joined
Feb 29, 2012
Messages
3,338
Location
Lakes Region Maine
This doesn't help you now , but I always use tyvek over the purlins before windows and siding.
This makes taping effective in creating a "sheathing" that would end your leaking and wet insulation concerns along with keeping the wind out of your FG insulation for better performance.
I'd tape the window flange to the tyvek, install the window trim (flashing and J) and this would get taped as well. The appropriate housewrap tape is all that's needed but you need to rub it in properly for permanent adhesion. I've taken this apart after almost 15 years for an addition. Tyvek and tape were in perfect shape besides being clean. No signs of wood staining from years of "opportunity" for water intrusion from bottom to top.

I think that pulling the 2 or 3 vertical rows of metal surrounding A window and make the corrections. It seems like a monumental task but you can have a 12-16' panel on the ground in 15 minutes. Putting it back is similar.
Tyvek (or Typar) can be run vertically, run it from the top down in 1 piece and use a 10' wide roll. Don't go crazy with the staples. All you need is enough to hold it there and if you use cap nails you need even less ... making less penetrations.
Good staging or scaffolding will be an immense help. This could be a pair of short extension ladders (300# rated), with a pair of ladder Jack's and a good wooden plank to go between. (LVL's are great)
The next might be pipe staging but I've never liked them and much more involved setting it up (slow).
A manlift/bucket is just overkill and expensive and needs hard ground to work on.
You can do this!
 
OP
S

Stryfe

Active member
Joined
Oct 28, 2023
Messages
33
This doesn't help you now , but I always use tyvek over the purlins before windows and siding.
This makes taping effective in creating a "sheathing" that would end your leaking and wet insulation concerns along with keeping the wind out of your FG insulation for better performance.
I'd tape the window flange to the tyvek, install the window trim (flashing and J) and this would get taped as well. The appropriate housewrap tape is all that's needed but you need to rub it in properly for permanent adhesion. I've taken this apart after almost 15 years for an addition. Tyvek and tape were in perfect shape besides being clean. No signs of wood staining from years of "opportunity" for water intrusion from bottom to top.

I think that pulling the 2 or 3 vertical rows of metal surrounding A window and make the corrections. It seems like a monumental task but you can have a 12-16' panel on the ground in 15 minutes. Putting it back is similar.
Tyvek (or Typar) can be run vertically, run it from the top down in 1 piece and use a 10' wide roll. Don't go crazy with the staples. All you need is enough to hold it there and if you use cap nails you need even less ... making less penetrations.
Good staging or scaffolding will be an immense help. This could be a pair of short extension ladders (300# rated), with a pair of ladder Jack's and a good wooden plank to go between. (LVL's are great)
The next might be pipe staging but I've never liked them and much more involved setting it up (slow).
A manlift/bucket is just overkill and expensive and needs hard ground to work on.
You can do this!

So you use house wrap over the existing insulation? Picture for reference - install tyvek over this? This is my shop and how they've laid down the insulation + siding. It goes frame -> vinyl-backed fiberglass insulation -> siding.

1698680193522.png

Another issue I'm seeing is that 2 out of the 4 windows have a side on a rib. I've watched enough RR Buildings to see that he strategically lays out siding to not run into this, that way he can use an extended j-channel on the top of the window to divert water away. Hopefully this doesn't have to be fixed because if so, I'm looking at replacing the siding too - right?

Looking at pics in order:
- Building showing fiberglass side of vinyl/fiberglass insulation with siding applied directly to it
- Right side of window channel/trip directly on rib of siding
- Looking from the bottom up, this creates a channel for water
- Left side of same window, on flat part of siding
- Same area, but different angle showing the lower trim is folded the wrong way
- Right side of window on rib of siding
 

Attachments

  • image1.jpeg
    image1.jpeg
    343.3 KB · Views: 96
  • image0.jpeg
    image0.jpeg
    356.6 KB · Views: 89
  • image2.jpeg
    image2.jpeg
    197.7 KB · Views: 87
  • image3.jpeg
    image3.jpeg
    287.2 KB · Views: 79
  • image4.jpeg
    image4.jpeg
    293.3 KB · Views: 136
OP
S

Stryfe

Active member
Joined
Oct 28, 2023
Messages
33
They're coming back out tomorrow. So far I have these action items:
  • Siding is not tight to window and cut terribly. Since there are two siding panels that meet at each window, there's no excuse for a cut that isn't tight. (It's not a single panel that had to fit over the window)
  • J channel is "flapped"/folded incorrectly. Not tucked where it needs to be tucked
  • Windows are aligned with ribs of siding so the j channel sits on the rib. Is this worth bringing up? I've heard this is a no-no from some, others seem to think it's a non-issue
  • Flashing tape on j channel goes to wooden rough opening - why? Seems pointless without a vapor barrier. Am I fine to just install the siding over the insulation as it is? This seems normal to me from what I've seen. I haven't seen fiberglass vinyl insulation then have tyvek wrapped around it.

Anything else I should say? I almost feel like they need to get new siding on here with how bad the cuts are. Not sure I can get them to go that far.
 
OP
S

Stryfe

Active member
Joined
Oct 28, 2023
Messages
33
Alright, got an update. They came out and the owner shared my concerns and said "they know better" when he saw that the j channel was flapped the wrong way on the edges along with the metal not being tight against the window. It's wrong on all 4 windows so they will have to pull siding off.

I don't think they're going to replace the siding where the window cutouts are terrible, but they will at least be pulling siding off and fixing the existing j-channel. I requested that they replace the top channel with an extended trim piece to shed water off like how RR buildings does it, but I don't know how they'll do that on the areas that the trim hits on a high rib.

I still have the question:
  • When the siding is off, should I put tyvek/tycor on over the insulation and then use flashing tape from the j channel to it? This doesn't look like common practice to me from what I can find when a shop is insulated this way. I usually see siding -> insulation -> frame in that order. So nothing to flash tape to.
    • (Looks like YES after watching some Locke Buildings on youtube. Just around the windows install some water resistant wrap outside the insulation blanket)
 
Last edited:
OP
S

Stryfe

Active member
Joined
Oct 28, 2023
Messages
33
Update: I didn't think it was possible but they came out and made things way worse and then ended their working relationship with me. Said with hundreds of buildings they've built I'm the only one to complain.

They came out, cut the siding instead of pulling it off to fix the J-channel, did not fix the J-channel at all, and instead made a slot to slip Z-flashing under, bent my siding in the process, bent the J-channel trim in the process, AND the Z-flashing is angled TOWARDS the building.

Incredible. Not to mention this Z-flashing is bent and looks like used scrap material.
 

koko2502

Member
Joined
Apr 29, 2015
Messages
6
Location
Macungie, PA
2 pictures - one with the ribs right at edge of the window and one with the ribs not near the edge. Have to make them look alike. The only difference between the 2 is the wood is notched at the bottom of the window with the ribs. I didn't want to take the window out, all I did was loosen the screws and cut the ribs down the side of the one. pvc board down the sides and J channel top and bottom.
 

Attachments

  • IMG_0799.JPG
    IMG_0799.JPG
    330.6 KB · Views: 101
  • IMG_0797.JPG
    IMG_0797.JPG
    334.3 KB · Views: 106

cyamaha2007

Well-known member
Joined
Apr 20, 2009
Messages
2,001
Location
St.Charles MO
I listened to a local builder when I was installing windows during my barn build. That was a huge mistake, I have been removing them one by 1 and re doing the installation with flashing. Basically to fix this I created a drain sheet behind the window that channels any leakage down to the wainscoting kick out flashing. You could do something similar and carry your flashing down to the lower trim. You could use tyvek or something similar to help with cost. I used steel because it was on hand and I thought it would be less likely to trap moisture.
 

Attachments

  • D311C8DE-BAFE-4230-8019-A4C7E0FBFA30.jpeg
    D311C8DE-BAFE-4230-8019-A4C7E0FBFA30.jpeg
    965.3 KB · Views: 82
  • 866F8117-7C01-45C1-B92C-A566D59D2413.jpeg
    866F8117-7C01-45C1-B92C-A566D59D2413.jpeg
    701.7 KB · Views: 50
  • 25DA9201-338D-4089-B7EA-D8305A8E905D.jpeg
    25DA9201-338D-4089-B7EA-D8305A8E905D.jpeg
    475.6 KB · Views: 48
  • F483E8C2-22B4-4C70-BB8B-1BD5E58C753D.jpeg
    F483E8C2-22B4-4C70-BB8B-1BD5E58C753D.jpeg
    715.9 KB · Views: 42
  • 97FA4AD5-8F53-4BC8-A3BB-7DFA54D33B32.jpeg
    97FA4AD5-8F53-4BC8-A3BB-7DFA54D33B32.jpeg
    766.8 KB · Views: 44
  • 70D1052D-ACAF-4F19-8817-C73655147D57.jpeg
    70D1052D-ACAF-4F19-8817-C73655147D57.jpeg
    592.3 KB · Views: 46
  • E424BD35-1D4B-462E-AC4F-599FC3AA27D4.jpeg
    E424BD35-1D4B-462E-AC4F-599FC3AA27D4.jpeg
    566 KB · Views: 69
OP
S

Stryfe

Active member
Joined
Oct 28, 2023
Messages
33
Alright so I think I've come up with a temporary solution that should work. Is there any reason why the top trim piece cant be Z flashing instead of j-channel? I'm thinking something like this:

zflash1.pngzflash2.png

Is there anything that says the top trim piece can't just strictly be z-flash without J-channel like shown in pics above?

-----

And since I don't think I shared it, here's what they did to the windows and siding after they came back to "fix it":

IMG_3596.JPEGIMG_3597.JPEGIMG_3598.JPEGIMG_3599.JPEGIMG_3600.JPEGIMG_3601.JPEGIMG_3602.JPEGIMG_3603.JPEG
 

aknott400

New member
Joined
Apr 3, 2024
Messages
3
2 pictures - one with the ribs right at edge of the window and one with the ribs not near the edge. Have to make them look alike. The only difference between the 2 is the wood is notched at the bottom of the window with the ribs. I didn't want to take the window out, all I did was loosen the screws and cut the ribs down the side of the one. pvc board down the sides and J channel top and bottom.
This is an creative solution! I would like to do a similar fix on my windows. Did you cut the rib off the panel while the panel was still installed? What did you use to cut off the rib?
 
To avoid these ads, REGISTER NOW!
Top Bottom