

I've finally finished my epoxy floors and am so thrilled with how they came out. I first want to start by recognizing the people over at Alpha Garage - I have nothing but great reviews and experience working with them. While I was able to learn a lot here on GJ, there was still a lot of unanswered questions I had, and Bert from AlphaGarage was my DUDE and helped answer any of my questions. It was extremely helpful having him just a text or phone call away. With that said, THANK YOU BERT! Let's get into it!
PRODUCTS USED
Wolverine Coating 3-Part System
MY GARAGE
~400sqft attached garage. House was built in the early 80s. Slab was in fairly decent condition. (I had recently drywalled/painted the whole garage)
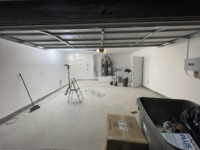
Above photo is kind of out of order, but gives idea of garage layout/size. This was after I grinded floors.

Here's an idea of what the floor/walls looked like when we first moved in some 4 years ago.
FLOOR PREP
This was by far the hardest part of the whole project. I rented a stand up/push 10" diamond disc grinder from HD which worked pretty well all things considering. It took me about 6-7 hours to complete. The grinder I had allowed me to hook up to my shop vac to control dust. The filter would get caked in concrete dust every 15 min or so, so I would need to turn everything off, open vac, beat filter, and resume. I'm sure there are better methods or better vacuums to use for this. Oh well. Turned out great. To remove all of the residual dust I swept/leaf blew repeatedly until there was almost no pickup of dust when I swiped with my finger. I was under a tight schedule and I did not want to spray water and have to wait 24+ hours for it to dry, or risk any possibility of moisture under the epoxy.
PRIMER
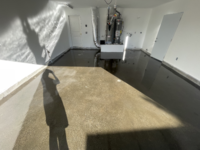
With my fancy spiked shoes on, I got the primer (BondTite 1101) mixed up per the instructions and started laying the epoxy. This was tough to spread as it was soaking into the concrete pretty quickly (at least that's what it felt like). In hindsight I wish I would have had a notched squeegee on hand to better spread the epoxy. Instead I was spreading with my 18" roller. I had to press pretty darn hard to get it to spread, and I ended up snapping the wooden painters pole! I frantically went and swapped it out (thank God I had another on standby). Don't cheap out on your painters pole. Spend the extra money to get a heavy duty one.
BODY COAT
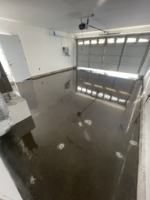
The next day I prepped the floor for the body coat (LiquaTile 1184). I went with their Silver Gray color. I went over the whole floor and sanded out any bubbles, then wiped everything with denatured alcohol. Here comes the fun part! Mixed up the body coat and started pouring! This went down a lot easier but I still kinda wish I had a notched squeegee to spread. Once I had it all rolled out evenly (with my new heavy duty painters pole LOL), I went around and threw down a very light flake. (Flake variation is called Dakota) Note* I was originally going to paint the perimeter curb with epoxy as well, but after talking with Bert he had suggested saving some mixed epoxy on a paint stick, and then taking it into HD to get it color matched in a masonry paint. I am SO glad I ended up doing this because A) You don't want/need to waste your epoxy in these areas that wont be receiving foot/vehicle traffic and B) It would have been WAY too overwhelming trying to get that all painted on before it reached the end of it's pot life. It's a fairly tedious process if your curb is rough/porous like mine.

Body coat finished. DAYUM!


CLEAR COAT + TRACTION ADDITIVE
The next day I went over everything with denatured alcohol and then began mixing the clear coat EnduraShield 2254. I opted for the traction additive as well (SpheriTex 110) which is added and mixed into the clear coat. Applying the clear coat was easy, but needed to be done so very particularly. You really only want a light coating everywhere. If you add too much to your roller, it will pool in areas and the traction additive will sink. When I was finished, I think I made the mistake of pouring what was left from the paint tray out onto the floor. I rolled it out, but I think these areas we're thicker than others and so it dried inconsistently from the properly rolled areas. The result was some areas looking glossier than others. You really have to look for it, and can only see in certain light, so it's not that big of a deal for me.
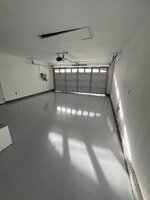
The timing was perfect, the clear coat was applied and we were leaving on vacation the next day, so the floor was able to cure for about 7 days without us being home. It would have been hard to resist the temptation to start moving in on day 4 or 5. I'm glad I was able to give it the best chance for cure.
CURB PAINTING
Once back from vacation the floor was cured perfectly. Like mentioned earlier, I color matched my epoxy and painted the curbs with a masonry paint. 1 gallon of this from HD was more than enough. I was able to take my time and not worry about epoxy hardening. Also, the color was a perfect match.

CONCLUSION
In the end, I'm super happy with how it turned out. My garage is completely transformed and I look forward to spending my time in there working on projects. I can't emphasize enough how pleased I was with Alpha Garage. Not only do you get a really solid product, but you also get top of the line customer service. You would think I'm being paid for this, but I promise I'm not. I'm just a very happy customer!
Hope you guys enjoyed my review. Feel free to leave any questions! I'll leave you with some photos of how the garage is currently looking. I'm already starting to build out my workbench which I am very excited about.

That workbench is about 12ft. Looks way smaller in this photo. Beer for reference. Also, you could say I'm a Husky influencer. lol

I had just mopped the floor and my footprints were left behind. They are not cured into floor I promise. Also, my '87 pickup wondering why it's out in the rain and not in the garage.
PRODUCTS USED
Wolverine Coating 3-Part System
MY GARAGE
~400sqft attached garage. House was built in the early 80s. Slab was in fairly decent condition. (I had recently drywalled/painted the whole garage)
Above photo is kind of out of order, but gives idea of garage layout/size. This was after I grinded floors.
Here's an idea of what the floor/walls looked like when we first moved in some 4 years ago.
FLOOR PREP
This was by far the hardest part of the whole project. I rented a stand up/push 10" diamond disc grinder from HD which worked pretty well all things considering. It took me about 6-7 hours to complete. The grinder I had allowed me to hook up to my shop vac to control dust. The filter would get caked in concrete dust every 15 min or so, so I would need to turn everything off, open vac, beat filter, and resume. I'm sure there are better methods or better vacuums to use for this. Oh well. Turned out great. To remove all of the residual dust I swept/leaf blew repeatedly until there was almost no pickup of dust when I swiped with my finger. I was under a tight schedule and I did not want to spray water and have to wait 24+ hours for it to dry, or risk any possibility of moisture under the epoxy.
PRIMER
With my fancy spiked shoes on, I got the primer (BondTite 1101) mixed up per the instructions and started laying the epoxy. This was tough to spread as it was soaking into the concrete pretty quickly (at least that's what it felt like). In hindsight I wish I would have had a notched squeegee on hand to better spread the epoxy. Instead I was spreading with my 18" roller. I had to press pretty darn hard to get it to spread, and I ended up snapping the wooden painters pole! I frantically went and swapped it out (thank God I had another on standby). Don't cheap out on your painters pole. Spend the extra money to get a heavy duty one.
BODY COAT
The next day I prepped the floor for the body coat (LiquaTile 1184). I went with their Silver Gray color. I went over the whole floor and sanded out any bubbles, then wiped everything with denatured alcohol. Here comes the fun part! Mixed up the body coat and started pouring! This went down a lot easier but I still kinda wish I had a notched squeegee to spread. Once I had it all rolled out evenly (with my new heavy duty painters pole LOL), I went around and threw down a very light flake. (Flake variation is called Dakota) Note* I was originally going to paint the perimeter curb with epoxy as well, but after talking with Bert he had suggested saving some mixed epoxy on a paint stick, and then taking it into HD to get it color matched in a masonry paint. I am SO glad I ended up doing this because A) You don't want/need to waste your epoxy in these areas that wont be receiving foot/vehicle traffic and B) It would have been WAY too overwhelming trying to get that all painted on before it reached the end of it's pot life. It's a fairly tedious process if your curb is rough/porous like mine.
Body coat finished. DAYUM!
CLEAR COAT + TRACTION ADDITIVE
The next day I went over everything with denatured alcohol and then began mixing the clear coat EnduraShield 2254. I opted for the traction additive as well (SpheriTex 110) which is added and mixed into the clear coat. Applying the clear coat was easy, but needed to be done so very particularly. You really only want a light coating everywhere. If you add too much to your roller, it will pool in areas and the traction additive will sink. When I was finished, I think I made the mistake of pouring what was left from the paint tray out onto the floor. I rolled it out, but I think these areas we're thicker than others and so it dried inconsistently from the properly rolled areas. The result was some areas looking glossier than others. You really have to look for it, and can only see in certain light, so it's not that big of a deal for me.
The timing was perfect, the clear coat was applied and we were leaving on vacation the next day, so the floor was able to cure for about 7 days without us being home. It would have been hard to resist the temptation to start moving in on day 4 or 5. I'm glad I was able to give it the best chance for cure.
CURB PAINTING
Once back from vacation the floor was cured perfectly. Like mentioned earlier, I color matched my epoxy and painted the curbs with a masonry paint. 1 gallon of this from HD was more than enough. I was able to take my time and not worry about epoxy hardening. Also, the color was a perfect match.
CONCLUSION
In the end, I'm super happy with how it turned out. My garage is completely transformed and I look forward to spending my time in there working on projects. I can't emphasize enough how pleased I was with Alpha Garage. Not only do you get a really solid product, but you also get top of the line customer service. You would think I'm being paid for this, but I promise I'm not. I'm just a very happy customer!
Hope you guys enjoyed my review. Feel free to leave any questions! I'll leave you with some photos of how the garage is currently looking. I'm already starting to build out my workbench which I am very excited about.
That workbench is about 12ft. Looks way smaller in this photo. Beer for reference. Also, you could say I'm a Husky influencer. lol
I had just mopped the floor and my footprints were left behind. They are not cured into floor I promise. Also, my '87 pickup wondering why it's out in the rain and not in the garage.