To avoid these ads, REGISTER NOW!

Between 485 & 705 SQ/FT Bob Heine's Auto Emporium

Workspaces between 485 and 705 squarefeet.
OP
B

Bob Heine

ALLIANCE MEMBER
Joined
Oct 24, 2009
Messages
10,708
Location
Boca Raton, Florida
It looked like that an hour after you changed it. PTs seem to make dirty looking oil instantly. At least ours does, and has since new.
Kay, you are absolutely right. I don't understand why but I have taken to testing the oil by feel. There's a tester that supposed to test automobile fluids for transmittance and temperature. I'm not going to spend $43 to find out it only measures snake oil.
Engine Oil Tester.jpg
 
To avoid these ads, REGISTER NOW!

Blackbyrd

Well-known member
Joined
Nov 28, 2020
Messages
1,172
Location
TN
meh unless it can give you the viscosity and the chemical make up, testing beyond feeling for grit is kind of a waste.... unless its a device I would trust.

Id rather see how much oxidation is present and what the add pack levels looks like? Has it started picking up wear material from bearings and such if im gonna go through testing.

Transmittance is a UV light test, so the minute clean oil comes in contact with the residual oil/carbon deposits in the engine its gonna show a false degradation.
 

Squankum

Well-known member
Joined
Mar 28, 2011
Messages
7,861
Location
Southeast
Kay, you are absolutely right. I don't understand why but I have taken to testing the oil by feel. There's a tester that supposed to test automobile fluids for transmittance and temperature. I'm not going to spend $43 to find out it only measures snake oil.
Engine Oil Tester.jpg

Bob, for less than that kind of money, you can get your oil tested at a lab! Well, one sample.
 

Squankum

Well-known member
Joined
Mar 28, 2011
Messages
7,861
Location
Southeast
My '87 Corvette FSM says change engine oil and filter "Every 3000 mi (5000 km) or 3 mos" and I last changed the oil 77 miles and 3 Years 10 Months 21 Days ago. It looks like brand new oil. Not going to change it yet.

Bob, I'd worry about additives settling out after that much time. Please see the video I posted at my thread last week by nerdy-son-of-Lake-Speed. I'm having a situation with the rear axle on the Durango lately and Mobil 1 gear oil that I bought in volume to save money then it sat for years may be a culprit. (355K mi may be the other very likely culprit.)

Then again, you aren't driving it yet, so I'd wait until it's all fixed up, then change it.
 
Last edited:

Squankum

Well-known member
Joined
Mar 28, 2011
Messages
7,861
Location
Southeast
Bob, you could always send some oil to Chris Elliot for testing.


(My memory swears that this ongoing bit once included conventional vs. Mobil 1 motor oil but I can't find it. And Don Giller, the YouTuber who apparently has an archive of all of the Letterman shows and makes compilations of them, doesn't remember it.)
 
Last edited:

Squankum

Well-known member
Joined
Mar 28, 2011
Messages
7,861
Location
Southeast
It looked like that an hour after you changed it. PTs seem to make dirty looking oil instantly. At least ours does, and has since new.

My theory, which is mine: there are pockets in the cylinder head that retain old oil, that dirty up the new batch. That's one theory. Those pockets aren't there to hold oil on purpose, just the way the design cookie crumbled when designing the casting to do what they needed for cam towers/bearings/ports/valve guides.

My second theory, which is also mine, based on research in the past two years in The Underground Lair:

Not all drain plugs are really in a great spot! Also, maybe the garage floor you're dealing with isn't that level. I've started experimenting on various cars in the fleet and they can all use a little bit or medium amount of tilting to get more oil out of the drain plug. For the old Mercedes, it's the jacking pad under the right rear corner, ahead of the right rear tire, for the drain plug is on the driver's side and front corner of the aluminum oil pan there. For the Econoline, it's the frame rail in the midpoint between driver's side front and rear tires.

Let oil drain, once it moves from thin line pouring to drip trip, start jacking in a location you suspect will help, peer under car with your preferred lighting, and it's pouring a thin line again, you're onto something!

I recently did an oil change on the BMW and only let it drain for an hour, not an LHO drain (long, hot, overnight), and I didn't jack it in a way to make it tilt for max drippage -- and yeah, the oil was dirtier than I'm used to, soon after an oil change. Kinda bugs me... And I don't have a dipstick to get an oil sample with, all I can do is remove the fill cap and wipe it with a white paper towel and see what that gives me.
 
Last edited:
OP
B

Bob Heine

ALLIANCE MEMBER
Joined
Oct 24, 2009
Messages
10,708
Location
Boca Raton, Florida
That little dog is a warrior Bob! Those lizards give me the creepie crawlies……..
Fred, I'm not a fan of many cold blooded animals. Looking into their eyes doesn't give me warm fuzzies.
I'd take a falling iguana over a rattlesnake in the deep grass any day!

I'm not saying I'd want the iguanas either :ROFLMAO:
Marc, I have to agree with you. The deadlier the cold blooded animal is, the more I feel like eliminating them from my immediate presence. Also, Jasmine might get a bad scratch from their claws but I don't think an iguana could kill her. Alligator, crocodile, rattler, moccasin or copperhead might give her a run for her money.
meh unless it can give you the viscosity and the chemical make up, testing beyond feeling for grit is kind of a waste.... unless its a device I would trust.

Id rather see how much oxidation is present and what the add pack levels looks like? Has it started picking up wear material from bearings and such if im gonna go through testing.

Transmittance is a UV light test, so the minute clean oil comes in contact with the residual oil/carbon deposits in the engine its gonna show a false degradation.
Adam, I agree. I'm just going to start the process of changing the oil in all three cars.
LOL I suppose you're right! I have dispatched so damn many buzz worms, I'm probably more used to them....we severely lack in trees, so no worries of them dropping on ya .....
Fred, living where I do there's lots of things that can kill me. There are lots and lots of coconut palms in Florida. A falling coconut carries enough energy to kill a person so I steer clear of them. It' a half-mile walk to the Brightline passenger express station. Trains and I have some negative history.

"Brightline ranks number one in terms of the number of deaths per mile traveled. Statistics show that for every 37,000 traveled by a Brightline train, it experiences an accident that results in a fatality. The figures are staggering, and the next deadliest train on the list does not even come close. For context, San Francisco’s CalTrain, which is second on the list, experiences one fatality for every 105,000 miles."
Bob, for less than that kind of money, you can get your oil tested at a lab! Well, one sample.
@Squankum, I would spend money on lab tests if there were any signs of oil-related problems with my vehicles. The '87 Corvette is the highest mileage one, with 87,887 miles and the only oil issue left since I replaced the valve seals is the front seal. In the 33 years I've owned it I've never needed to add oil between changes.
Bob, I'd worry about additives settling out after that much time. Please see the video I posted at my thread last week by nerdy-son-of-Lake-Speed. I'm having a situation with the rear axle on the Durango lately and Mobil 1 gear oil that I bought in volume to save money then it sat for years may be a culprit. (355K mi may be the other very likely culprit.)

Then again, you aren't driving it yet, so I'd wait until it's all fixed up, then change it.
OK, the differential fluid in the Corvette is due for a change. I've never changed it and although there are no signs of any leaks I am still planning to do something about it. There's no drain plug on the differential and there is no simple cover to remove. The differential cover is part of the batwing and is a nightmare to remove. The FSM diagram makes it look simple:
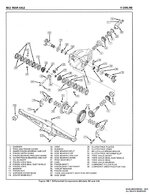
Rear Axle.jpg
The reality is more complicated, requiring removal of the transverse rear leaf spring, upper tie rods and spindle support rods.
Batwing Removal.jpg
Of course, none of that stuff is accessible until you remove the exhaust system and spare tire carrier.
Driveshaft Universals 5.jpg
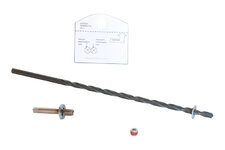
I bought two solutitons: 1) a suction pump and 2) a drain plug kit.
Gear Oil Pump.jpg Draiin Plug Kit.jpg
The suction pump may or may not fully drain the differential but I plan to try that first. If it doesn't remove enough fluid or if there appears to be metal dust, I will use the template to locate the drain hole to make me comfortable, I may
Bob, you could always send some oil to Chris Elliot for testing.

(My memory swears that this ongoing bit once included conventional vs. Mobil 1 motor oil but I can't find it. And Don Giller, the YouTuber who apparently has an archive of all of the Letterman shows and makes compilations of them, doesn't remember it.)
I would normally trust Chris Elliot but since his passing from brain cancer in 2002 I've relied on others for my oil-related questions. There seems to be a curse on my oil expert club since Vito Corleone passed in 2004.
 
Last edited:
OP
B

Bob Heine

ALLIANCE MEMBER
Joined
Oct 24, 2009
Messages
10,708
Location
Boca Raton, Florida
My theory, which is mine: there are pockets in the cylinder head that retain old oil, that dirty up the new batch. That's one theory. Those pockets aren't there to hold oil on purpose, just the way the design cookie crumbled when designing the casting to do what they needed for cam towers/bearings/ports/valve guides.

My second theory, which is also mine, based on research in the past two years in The Underground Lair:

Not all drain plugs are really in a great spot! Also, maybe the garage floor you're dealing with isn't that level. I've started experimenting on various cars in the fleet and they can all use a little bit or medium amount of tilting to get more oil out of the drain plug. For the old Mercedes, it's the jacking pad under the right rear corner, ahead of the right rear tire, for the drain plug is on the driver's side and front corner of the aluminum oil pan there. For the Econoline, it's the frame rail in the midpoint between driver's side front and rear tires.

Let oil drain, once it moves from thin line pouring to drip trip, start jacking in a location you suspect will help, peer under car with your preferred lighting, and it's pouring a thin line again, you're onto something!

I recently did an oil change on the BMW and only let it drain for an hour, not an LHO drain (long, hot, overnight), and I didn't jack it in a way to make it tilt for max drippage -- and yeah, the oil was dirtier than I'm used to, soon after an oil change. Kinda bugs me... And I don't have a dipstick to get an oil sample with, all I can do is remove the fill cap and wipe it with a white paper towel and see what that gives me.
@Squankum, I also jack the car up so the oil pan drain hole is as low as possible and tilted to get as much out as possible.
 
OP
B

Bob Heine

ALLIANCE MEMBER
Joined
Oct 24, 2009
Messages
10,708
Location
Boca Raton, Florida
Every day something needs to be fixed around here. The pop-up drain in one of the two master bath sinks failed to pop up. Ordered a whole new unit but it appears the guts are the same. We'll see if it hold water but it would be nice if it's that simple a fix.

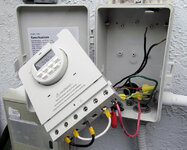
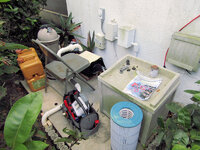
A more annoying failure is the mechanical timer on the pool pump. The little trip levers no longer turn the pump on or off. The timer works (I've replaced the timer) and this is the second one to exhibit this issue. If I turn it on manually, the timer gets to the shut-off time and doesn't shut off. If I turn it off manually the timer gets to the turn-on time and doesn't turn on. It just jams and the motor tries to make it move with no success.

Having replaced the timer once, using the old metal box, I am giving up and bought a digital timer. As I started disconnecting wires, I stopped and got the smart phone to take pictures. Phone keeps shutting itself off when I turn on the camera so I put it back on its charger and got the Canon.
Timer Replacement 1.jpg
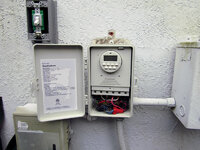
In addition to the timer, there's an on/off 240v switch, a pool light transformer and a FPL (Florida Power and Light) controller that can turn the pump off during peak power demand periods. There's another one on the electric water heater as well. The on/off switch and FPL controller don't turn the timer off, they only control power to the pump itself. It does mean there are four conduits going to the timer.

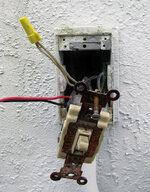
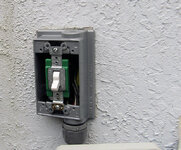
I wasn't planning to replace the on/off switch but when I opened the cover it looked pretty bad inside. Rather than wait until it shorts out or stops working, I decided to buy a new one.
Timer Replacement 2.jpg
The box extension ring seemed OK so I didn't order a new one. Strike One. As I started removing the conduit nuts, the plastic conduit between the timer and switch box dropped. The threaded end has snapped off some time in the past and the threaded piece is really stuck in the extension ring. To complicate things further, there are three wires (green, red and white running from the pool light transformer through the timer box and into the on/off switch box. The red and white ones are wire-nutted to black and white wires that come out of the box buried in the wall. The green wire just goes into the bowels of the wall with no simple wire nut connection. There's enough slack so I can re-connect them (solder and shrink tubing) inside the timer box) using those new pliers. OK, old timer box is gone...
Timer Replacement 3.jpg
With the broken elbow removed I tried to get the threaded part of the fitting out with an easy-out and failed completely. The extension ring is a mess, the #6-32 threads are rusty and unlikely to hold a fresh screw so it was Strike Two. The heads of the screws holding the extension ring to the box in the wall were too rusted to turn so I hit them with a drill and that heated and vibrated them enough so I could get them out.
Timer Replacement 4.jpg
I have a 90° conduit elbow and threaded ends as well as the gray CPVC glue in my supply shed. Amazon delivered the new switch and 3/4" to 1/2" reducer washers for the new plastic timer box so I may be able to get it back together tomorrow when Amazon delivers a new extension ring.

At least I have a relatively comfortable steel folding card table chair so I don't have to do this whole job kneeling among the pool pump plumbing lines.
 
Last edited:

madison069

Well-known member
Joined
Nov 5, 2010
Messages
4,225
Location
Monroeville, PA
I've replaced those manual timers several time at the church. I ended up going digital the last time and I've had no issues with it. This was all in a 1 year span. It seems those manual timer are junk these days.
 

floridafarmer

Well-known member
Joined
Nov 27, 2010
Messages
233
Location
Central Florida
Bob
I’ve never owned a corvette but for some reason I had a manual that I just found during a very infrequent shop cleaning event…. Let me know if you’d like it and I’ll drop it in the post.
 

Attachments

  • IMG_5341.jpeg
    IMG_5341.jpeg
    478.9 KB · Views: 16

Grizz1963

Well-known member
Joined
Jan 7, 2010
Messages
12,057
Location
Rochester, KENT. UK
Been a bit sick and out of sorts.

Just caught up with your boats Bob.

Weirdly, boats passed me by, despite being involved or entertained by a few over the years. Those magnificent boats are a sight to behold.

My one boating buddy was a river and ski fan, he always said BOAT stood for Break Out Another Thousand.


As far as your iguana problem goes….

You must be nearing “break even”

Good work from the pup. Never ever give up 😉
 

Squankum

Well-known member
Joined
Mar 28, 2011
Messages
7,861
Location
Southeast
Of course, none of that stuff is accessible until you remove the exhaust system and spare tire carrier.
Driveshaft Universals 5.jpg
I bought two solutitons: 1) a suction pump and 2) a drain plug kit.
Gear Oil Pump.jpg Draiin Plug Kit.jpg
The suction pump may or may not fully drain the differential but I plan to try that first. If it doesn't remove enough fluid or if there appears to be metal dust, I will use the template to locate the drain hole to make me comfortable, I may


Bob, the rear diff on my old Mercedes is almost that bad, should I want to remove the aluminum rear cover to re-seal it, or change the mounting bushings. But luckily, for maintenance, which the Germans of that era most certainly believed in, they have a normal drain plug and a normal fill plug on the side of the cast iron housing.

The old Durango is a 4x4 and all the front diff has (for now) is a stamped steel cover and a rubber fill plug. I've had good luck with that one using my pneumatic ****-O-Matic -- CAPRI vacuum bleeder with a bit of copper tubing large enough to **** gear oil through, that still fits in the brake bleeding rubber ****** on the hose. A gentle arc in the copper tubing allowed me to get down in there and **** until things were fairly dry.

And of course, if you don't like it, you can flll it, drive it around for a minute or a week, then do it again.

My theory, which is yanked out of my ****, is that fresh oil keeps the seals happy. (I also based this on knowing that motor oil has seal swell additives but I must admit, I have no idea what gear oils have or how long seal swell additive lasts.)
 
OP
B

Bob Heine

ALLIANCE MEMBER
Joined
Oct 24, 2009
Messages
10,708
Location
Boca Raton, Florida
What new pliers? This pliers addict must ask. Knipex Twin Grip?
@Squankum, I did buy the Knipex Twin Grip pliers but that's not the pair I'm referring to. Roger (@rharman) showed me a pair of wire soldering pliers that aren't magnetic. The new pool pump timer housing is plastic so using my old reliable magnetic alligator clip setup will not work quite as well. Here's Roger's post:
I found what appears to be an identical pair for a couple of bucks less:
I've replaced those manual timers several time at the church. I ended up going digital the last time and I've had no issues with it. This was all in a 1 year span. It seems those manual timer are junk these days.
Cody, I have had those manual timers on our pools for 49 years and replaced the electric motors a couple of times. The one that came with this house was installed in 1988 and worked fine until 2020. I replaced the guts of the timer and it started acting up last year so I bought another one and it is doing the same thing. Fool me once, shame on you, fool me twice, shame on me.
Bob
I’ve never owned a corvette but for some reason I had a manual that I just found during a very infrequent shop cleaning event…. Let me know if you’d like it and I’ll drop it in the post.
Mark, much as I'd love to have a C2 shop manual, it would have a short life with me. All of my Corvette friends have moved away or moved on to the Bowling Green in heaven.
@Bob Heine that switch looks old enough to have mercury in it. Did you disassemble it and play with it?
Mark, it didn't have any mercury but you know I would have played with it if it did. One of Liane's uncles worked for Weksler Instruments Corporation in Freeport, New York. They made thermometers so her uncle always had a pool of mercury at home. I used my tiny supply to shine up quarters. Between the lead and mercury in my childhood, it's no surprise my mind is the way it is.,
Jeesh, what a mess. This one definitely fits my time estimation formula....

Real Time = Estimated time * 2 (and move up to the next unit of measure)
ex: 20 minute job = 40 hours
Roger, I was thinking 60 minute job so 120 hours sounds about right. In fairness, it's probably going to be 120 elapsed hours but actual work being many 30-minute spurts of progress. The past few days is the perfect example. I didn't want to rely on the rubber washers on the timer housing so I needed some 1/2"-3/4" stepped washers. Only a day delay waiting for the parts (switch came in same order) for Home Depot shipping. When I tried to re-fit the cpvc elbow, it was a fail. Scrounged around in the shed's electrical bin and found some flex conduit that would work but I didn't have the Liquid Tight fittings. They arrived yesterday but too late to put them in -- Liane's noon doctor appointment was followed by a thrift store visit and a food store stop. Arrived home around 4:00 PM so no progress yesterday. Today was my 9:00AM stress test that finished at 12:30 PM. My 3:00PM maxillofacial surgeon appointment was rescheduled to next week so I made a little progress today. Got the switch box to timer box conduit installed and the six wires fed between them. Maybe more progress tomorrow -- when the long concrete drill bits arrive so I can drill the top mounting hole.
Timer Replacement 5.jpg
Been a bit sick and out of sorts.

Just caught up with your boats Bob.

Weirdly, boats passed me by, despite being involved or entertained by a few over the years. Those magnificent boats are a sight to behold.

My one boating buddy was a river and ski fan, he always said BOAT stood for Break Out Another Thousand.


As far as your iguana problem goes….

You must be nearing “break even”

Good work from the pup. Never ever give up 😉
Rian, sorry to hear you are feeling poorly. My cardiologist decided I might be too old and feeble to do the stress test on the treadmill so they gave me a couple of injections, for the Adenosine Stress Test. Prep for the stress test said no caffeine for 24 hours before the test and no food after midnight. They allow me to drink water but I didn't drink very much. Two nurses got the needle in a vein on the back of my hand on the third try. Back of my hand looks like a Shorty Safety Session gone bad.

I loved boating as a kid and always wished my father would get one. A friend of mine in high school had a runabout and he tried to teach me to water ski. I couldn't get up no matter how hard I tried. The year after I lost my arm a friend invited us to his parents' lake house. He offered to get me up on skis and I told him I was a complete failure at the sport. He said he was a great teacher so I went and looked at the boat. Not impressive, 15 feet long with a 30hp Evinrude. It also had a broken shift mechanism so the boat took off as soon as the engine started. He left a coil of tow rope floating between me and the boat and on the very first try I got up and was skiing. I loved it!
First Ski Boat 800.jpg
I wanted to do it again and that led to our first boat a few years later. I continued water skiing for another 20 years.

Everyone who owns a boat knows your friend's acronym for the hole in the water into which you pour money. A power boat has a special stigma: at all times a power boat has an electrical problem.

I'm with you on Jasmine putting us in the black on the iguana control system.
Bob, the rear diff on my old Mercedes is almost that bad, should I want to remove the aluminum rear cover to re-seal it, or change the mounting bushings. But luckily, for maintenance, which the Germans of that era most certainly believed in, they have a normal drain plug and a normal fill plug on the side of the cast iron housing.

The old Durango is a 4x4 and all the front diff has (for now) is a stamped steel cover and a rubber fill plug. I've had good luck with that one using my pneumatic ****-O-Matic -- CAPRI vacuum bleeder with a bit of copper tubing large enough to **** gear oil through, that still fits in the brake bleeding rubber ****** on the hose. A gentle arc in the copper tubing allowed me to get down in there and **** until things were fairly dry.

And of course, if you don't like it, you can flll it, drive it around for a minute or a week, then do it again.

My theory, which is yanked out of my ****, is that fresh oil keeps the seals happy. (I also based this on knowing that motor oil has seal swell additives but I must admit, I have no idea what gear oils have or how long seal swell additive lasts.)
@Squankum, I'm going to try the pump and I happen to have a coil of copper tubing that should make a very effective suction extension on the flexible nylon (vinyl?) tubing.
 
To avoid these ads, REGISTER NOW!

casmurbax

Well-known member
Joined
Sep 25, 2012
Messages
2,760
Location
Wilton, NY
Hi Bob,

I feel your pool pump/timer pain. I was working with new everything when I wired my pool pump and I still had issues with doing that. I stepped away from the audience that was watching me from their shaded area, they did occasionally ask me if I wanted help, I politely declined. They only wanted me to move faster so they could get into the pool, they didn't dare get into it while I was wiring it up.

edit I see you posted while I was typing my original post.

Nice job on the new work,
 
Last edited:

Squankum

Well-known member
Joined
Mar 28, 2011
Messages
7,861
Location
Southeast
Roger (@rharman) showed me a pair of wire soldering pliers that aren't magnetic. The new pool pump timer housing is plastic so using my old reliable magnetic alligator clip setup will not work quite as well.

Ah,I remember that discussion. And tonight I realize that what we call a "third hand tool" you call a "second and third hand" tool.

In bicycle land, the "third hand tool" was used to squeeze brake pads against the wheel rim so you could adjust things from there. (I have no idea what goes on with hydraulic brakes.)

1707984794577.png

It was also the name of a business that sold bike tools and components:

1707984582195.png


All the itty bitty parts that a bike mechanic might need came from another catalog, which my hazy memory says was related to the tool catalog:


1707984705601.png
 

y'sguy

Well-known member
Joined
May 1, 2010
Messages
1,341
Location
Tulsa, Oklahoma
@Squankum, Thanks for reminding me of this tool. At the end of my high school and early years of college, I worked part-time as a mechanic and sales guy at a local bike shop. The third-hand tool was one of many specialized tools we used to do our jobs. This was a time of the beginning of a huge bike boom or resurgence if you will. I can't begin to recall how many bikes my fellow mechanics assembled and repaired. It was great to be a part of it. A ten-speed craze, haha. I also recall customers getting upset at us for not being able to order and fill orders from the factory at the time. The owner got pretty wealthy during that time but they worked for it for sure.
Looking back now, I realize that this job was a good hands-on job requiring mechanical abilities that I have taken for granted.
 
OP
B

Bob Heine

ALLIANCE MEMBER
Joined
Oct 24, 2009
Messages
10,708
Location
Boca Raton, Florida
Hi Bob,

I feel your pool pump/timer pain. I was working with new everything when I wired my pool pump and I still had issues with doing that. I stepped away from the audience that was watching me from their shaded area, they did occasionally ask me if I wanted help, I politely declined. They only wanted me to move faster so they could get into the pool, they didn't dare get into it while I was wiring it up.

edit I see you posted while I was typing my original post.

Nice job on the new work,
John, at least no one is vulching to go in the pool. It's good the pool is cool because there doesn't seem to be an algae problem yet.
Patience My ***.jpg
Today I helped a kid who broke down across the street. His Ram pickup, towing his yard maintenance trailer had a flat front tire. He had a cross wrench for the 22mm lug nuts but one of them was a 23mm. Loaned him a couple of sockets and a breaker bar. Then his little floor jack couldn't lift the truck high enough to remove the tire. When I went to open the middle garage door where the '72 Corvette and my two floor jacks live, the little quarter horse opener couldn't lift the door (it's the original Liftmaster contractor model that came with the house). I decided to release the opener and open the door manually. No biggie.

When the kid returned with a fresh used tire and finished mounting it, he returned my tools and jack and I put them away. Then I lowered the door and pushed the button to re-engage the trolley. It refused to return to its connection so I tried pushing and pulling, tying ropes to the mechanism to re-align it and got out my 3-foot long screwdriver, extension poles and worked myself into a three hour frenzy.

The Corvette is up on jackstands and the body is lifted off the frame with allthread rods so I can't get in a good spot to force the trolley back into the shoe. I removed the connector arm and lowered the door manually. Then I realized two things: 1) I don't know where the key for the garage door is and 2) the lock bar has never lined up with the hole in the track. I put a 1/4-20 bolt and wingnut through a hole in the track right next to a roller so the door can't be opened.

Tomorrow is another day.
Ah,I remember that discussion. And tonight I realize that what we call a "third hand tool" you call a "second and third hand" tool.

In bicycle land, the "third hand tool" was used to squeeze brake pads against the wheel rim so you could adjust things from there. (I have no idea what goes on with hydraulic brakes.)

It was also the name of a business that sold bike tools and components:

All the itty bitty parts that a bike mechanic might need came from another catalog, which my hazy memory says was related to the tool catalog:
@Squankum, in my childhood, my bicycle tools were a screwdriver and Crescent wrench. I now have a couple of special bicycle tools but Mrs. Heine has banned me from riding my bike. Florida has the highest bicycle fatality rate in the country so I caved.
@Squankum, Thanks for reminding me of this tool. At the end of my high school and early years of college, I worked part-time as a mechanic and sales guy at a local bike shop. The third-hand tool was one of many specialized tools we used to do our jobs. This was a time of the beginning of a huge bike boom or resurgence if you will. I can't begin to recall how many bikes my fellow mechanics assembled and repaired. It was great to be a part of it. A ten-speed craze, haha. I also recall customers getting upset at us for not being able to order and fill orders from the factory at the time. The owner got pretty wealthy during that time but they worked for it for sure.
Looking back now, I realize that this job was a good hands-on job requiring mechanical abilities that I have taken for granted.
Alan, I have to agree that bicycle repair was a gateway to everything tool related in my life. My brother would go weeks without being able to ride his bike until my father could get around to fixing it. I couldn't wait so I fixed mine myself. When I realized it was possible to repair a flat or put a chain back on, I took on my brother's bike repair as well.

I was an adult when we got our first 10-speed bikes. Liane and I had matching men's and ladies Schwin Varsity bikes in brown metallic livery. We acquired them in 1968 and Liane even brought hers to Australia in 1989. She sold it right before we returned to the states in 1991 -- for more than it cost in 1968 -- and the woman who bought it was thrilled. I vividly remember my anxiety attack the first time I took the rear wheel off. The chain path on the derailleur made no sense at all.
 

drivesitfar

Well-known member
Joined
Oct 23, 2013
Messages
36,066
Location
Pacific Northwest
I’ve had more than a few springs break on my old garage single wide doors so putting a screwdriver into a slot to keep door sort of locked until I replaced springs was my go to.

I have two newer lift master door openers now that work great and quiet but their controls went bad and had to be replaced a couple years ago.

Keep kickin and I’m sure that kid appreciated your tools and help!!
 
OP
B

Bob Heine

ALLIANCE MEMBER
Joined
Oct 24, 2009
Messages
10,708
Location
Boca Raton, Florida
I’ve had more than a few springs break on my old garage single wide doors so putting a screwdriver into a slot to keep door sort of locked until I replaced springs was my go to.

I have two newer lift master door openers now that work great and quiet but their controls went bad and had to be replaced a couple years ago.

Keep kickin and I’m sure that kid appreciated your tools and help!!
I've used vice grips to block the track when we went on vacation.
That is the usual way to hold the door open while you are changing springs or fixing the cables or other door components.
@drivesitfar, @rharman and @Wiz02 , I've only had one spring break and that was on one of the original doors the house came with. I have also used Visegrips to control the garage door travel many times.

The original doors were so flimsy, leaning on them would leave a dent. Our house was built in 1988, four years before Hurricane Andrew hit Florida. In 2001 our homeowner insurance company informed us the house had to be inspected by a structural engineer (on our dime) to be sure the house would meet the new codes proposed in our county the next year. I had already replaced the roof and had storm shutters but the three gable ends of the house needed some additional bracing. Cost me a couple of two-by-fours but the big deal was the garage doors. The three doors had no wind braces so they failed the inspection, which meant our premium would go from $1,500 to $3,000.

Having three garage doors replaced was going to cost about $3,600 but I thought I could buy braces and upgrade them myself. That was going to cost about $300 but would require stronger springs with the additional weight. That would require another engineering review with no guarantee the doors would pass the wind load requirement. I had already insulated the garage doors so I was not a happy camper.

All this happened in 2001, two years after I retired for the second time. I had a year to do something about the garage doors. I was 56 years old so I couldn't take money out of my 401k accounts for another three plus years and we were living on my IBM pension and savings from my job at AOL. Money was tight but we weren't suffering. Home Depot sold code compliant garage doors for just under $400 each so I decided to buy three and do it myself. In 2001 we got a gummint stimulus check for $1,200 so the doors only cost me time and effort to install them.

I took the old doors down one at a time and salvaged the foam insulation panels. The first door took two days to install. I followed their instructions but it turns out I wasn't strong enough to safely lift the whole garage door with no spring assist. I disconnected the panels from each other and rolled each section up onto the horizontal section of the track. Visegrips held each section in place until I had all four panels connected overhead. Then it was springs and safety wires and several lower and lift cycles to get the tension right. The other two doors took less than a day each. Turned out the extra weight was more than the 1/4 hp Liftmaster openers could reliably handle so I upgraded two doors with 1/2 hp Craftsman units.

I should have paid extra for insulated doors but I had already insulated the original doors. Unfortunately, those flimsy doors not only had no horizontal brces, they had no vertical bracing so I ended up cutting and fitting pieces of foam board and filled gaps with Great Stuff foam in a can. I thought about covering the inside of the doors with white aluminum flashing but decided it was a garage, not a man cave. Over time the spray foam darkens so I painted the one we use most often. I may someday paint the other two....
Staircase (L).JPG
 
OP
B

Bob Heine

ALLIANCE MEMBER
Joined
Oct 24, 2009
Messages
10,708
Location
Boca Raton, Florida
I get nervous doing 240V wiring so I'm extra careful when working on it. The pool timer is a scary job for me. I only did this because I have time on my hands, I'm cheap and I don't trust Florida trades people to do the job right.

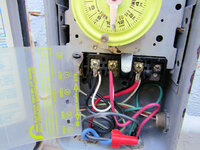
I took photographs of the wiring before I took it apart. OK, not immediately before but right after I removed the first wire. Luckily I took a photograph when I started replacing the timer motor in 2017. It only involvd the two small white wires going to lugs 1 and 3 (to get 120v to the timer motor). I wasn't paying real close attention to the empty lug on the far right. It's supposed to be the switched second leg to the pool pump motor. When FPL installed their conservation box (allows them to remotely shut off the pool pump when power demand is high) they disconnected that leg from the timer and connected it to the blue wire with the red wire nut. I'm guessing interrupting one leg of the 240V supply is enough to turn off the pump.
Pool Timer 7.jpg
When I looked at the wiring diagram for the new switch, I was a little confused by the labels. Rather than 1--2--3--4 and Line and Load it had this:
Digital Wiring Diagram.jpg
I scanned, edited and printed just FIG8 so I could refer to it. I also printed that first photo on an 8.5x11 sheet of paper. I used them to give myself a pep talk.

First up was the switch and other than adding a ground wire to the new switch it went relatively smooth. For some reason the old switch didn't have a ground lug so I had to add a ground wire, pigtail and special ground wire nut. By smooth, I mean I only had to take the switch back out once to flip it over so it would be like every other switch in my life that is flipped UP to turn it on.
Timer Replacement 6.jpg
The next challenge was attaching multiple wires with different diameters to the timer lugs. The 120V timer wires had flat spade connectors that were clamped in flat slots. I didn't think two round different diameter wires would make a good connection in those slots, especially since two of those slots would have three wires going into them. Fortunately I have a rather large collection of crimp connectors. No way insulated crimp connectors would stack in the tight space in the box so I used non-insulated ones:
Timer Replacement 7.jpg
I invested in a Pertronix crimper years ago and it came with multiple crimp dies, including a set for non-insulated connectors.
Timer Replacement 8.jpg
First trial was on a solid 12-gauge wire and the crimp connector went on nice and tight (I couldn't move it or pull it off). Of course, I installed the wire in the wrong place but because I had two printed cheat sheets I was able to correct it right away.
Timer Replacement 9.jpg
Fast forward an hour and a half and all of the connections are tight, all the wires are stuffed into the box and I'm ready for a test.
Timer Replacement 10.jpg
Breaker didn't trip, switch turned the pool pump on and I called it a success. I couldn't find a simple switch cover so I put the old one back on. I installed the cover inside the timer and started putting tools in my carrier.
Timer Replacement 11.jpg
As I got ready for bed I noticed the pool pump was still running hours after the timer should have turned it off. I re-read the instructions and it turns out the time and schedule setting process has to be done AFTER the timer switch is installed and powered up. I spent ten minutes this morning going through the setup process and it appears to have worked. I'll know for sure around 6:00 PM today.
 
Last edited:
OP
B

Bob Heine

ALLIANCE MEMBER
Joined
Oct 24, 2009
Messages
10,708
Location
Boca Raton, Florida
Good job! I hear you on the 240....extra double careful when messing with that...
Jeff, when we lived in Australia I was warned not to mess with the wiring in the place we rented. Only electrical work I did was replacing light bulbs. The place was brand new and the builder put in recessed lighting using E27 sockets (just like US). The flood lights were just over $15 each and I was replacing two or three a month.
I only get bit by 240V once, it stung a little.


Wiring job looks good! Now I have more terminal to get and another terminal crimper. I'll just have to add it to my amazon wish list for now though.
Cody, I was in the attic of our first house, replacing the R3 insulation with R19 and came across a Romex cable that wasn't connected to anything. It brushed against my arm and I thought something bit me. I discovered it was a 240V cable the PO attached to a window A/C unit. Luckily only one wire brushed me and I wasn't well grounded.

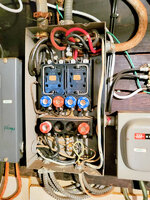
When the PO moved out, he took the A/C with him and pushed the wire through the hole in the soffit and walked away. Some idiot (me) filled the two empty fuse holders with new fuses when we moved in. The house had 100-amp service with a 8-fuse panel, something like this one:
100 Amp fuse panel.jpg
The two fuses for the A/C were in a small second box alongside the main panel.
 
Last edited:

gearhead1960

ALLIANCE MEMBER
Joined
Mar 21, 2019
Messages
1,864
Location
Manassas, VA, a small blot in history
Jeff, when we lived in Australia I was warned not to mess with the wiring in the place we rented. Only electrical work I did was replacing light bulbs. The place was brand new and the builder put in recessed lighting using E27 sockets (just like US). The flood lights were just over $15 each and I was replacing two or three a month.

Cody, I was in the attic of our first house, replacing the R3 insulation with R19 and came across a Romex cable that wasn't connected to anything. It brushed against my arm and I thought something bit me. I discovered it was a 240V cable the PO attached to a window A/C unit. Luckily only one wire brushed me and I wasn't well grounded.

When the PO moved out, he took the A/C with him and pushed the wire through the hole in the soffit and walked away. Some idiot (me) filled the two empty fuse holders with new fuses when we moved in. The house had 100-amp service with a 8-fuse panel, something like this one:
100 Amp fuse panel.jpg
The two fuses for the A/C were in a small second box alongside the main panel.
Does that qualify as your 2nd luckiest day?
 
OP
B

Bob Heine

ALLIANCE MEMBER
Joined
Oct 24, 2009
Messages
10,708
Location
Boca Raton, Florida
WARNING: Long, boring post that contains nothing relevant to my garage, shop, house or cars.

I've been spending a fair amount of time with my doctors. My primary care physician examined my mouth/sinus fistula and said it was time to see a couple of specialists. Also collected blood and urine. He contacted an ENT (ear nose and throat) doctor he knew and asked which surgeons she would recommend. His staff contacted the maxillofacial surgeon and ENT surgeon and set up appointments for me. Test results came back with good news: my bad cholesterol is 91. If this keeps up I'll be asking to get off the statins I'm taking.

Next up was my cardiologist who had scheduled me for a stress test. He decided not to put me on the treadmill so it was going to be an injection to dilate my arteries. Prep for the stress test was no caffeine for 24 hours before the test and nothing to eat or drink after midnight. No problem -- but that meant I showed up somewhat dehydrated. It took two nurses to get a needle into the scar tissue that used to be my veins. The next day, my blood thinner, the stabbings and Jasmine's accidental scratches on my arm, it looked like I lost a really rough cage fight. On the bright side, the pre- and post-stress test scans showed no blockage in any of my coronary arteries or the ones in the image area.

The following week the maxillofacial surgeon's office called to postpone my visit another week. I'm now at the point of ending the day's activities at 3- or 4-o'clock in the afternoon because of the sinus headache on the right side of my face. When I do get to see the surgeon, he has his assistant do a cranial CT scan. Apparently this is the new piece of standard equipment in oral surgeon's offices. I thought this would be a dental process and with dental insurance being a waste of money ($360 a year premiums to cover max $300 in procedures) I expected to spend a chunk of my childrens' inheritance once again. Nope, it's a medical procedure and 100% covered by Medicare and our Aetna supplement. Surgeon schedules me for bone graft surgery to repair my jaw for the last week of March, two days after our 62nd anniversary. Looks like we can share a solid food meal.

Started this week with a visit to the ENT surgeon. Another cranial CT scan but without any lead vest. Yup, the infection has spread to the whole left sinus with signs of a slight infection in the right side above my eye. His earliest party date is April 16 so the government will get first dibs on my wallet surgery. Now the ENT surgeon is going to contact the maxillofacial surgeon to postpone that surgery until after my sinuses heal. Probably this summer when Florida and the sun gently touch.

Tomorrow I see my hormone oncologist for my quarterly injection -- luckily it's in my **** cheek and not the crime scene attached to my shoulder.
 
OP
B

Bob Heine

ALLIANCE MEMBER
Joined
Oct 24, 2009
Messages
10,708
Location
Boca Raton, Florida
I have managed to work on a few things in between doctor visits.

I knew I had a set of larger easy-outs but I couldn't remember where I put them. I keep all my taps, dies and related bits in the three small drawers at the top of the Harbor Freight 26" stack. I keep a lot of drill bit sets in one of the cabinets in the shop but couldn't find the gray blowmold case with the clear window in either location. It reminds me of the Ambrose Bierce "The Damned Thing" short story: an animal whose color is outside the visible spectrum is stalking the storyteller.
https://en.wikipedia.org/wiki/The_Damned_Thing_(short_story)
Tap & Die Drawers.jpg
I found the box on the second search. The easyout collection is now where it belongs, in one of the drawers with the taps & dies. The blowmoold case is headed to the landfill.
Easyouts.jpg
(I have no idea why I bought that giant tap.)
 
OP
B

Bob Heine

ALLIANCE MEMBER
Joined
Oct 24, 2009
Messages
10,708
Location
Boca Raton, Florida
When I was working on the '87 Corvette I bumped the top of the windshield washer's plastic tank. Apparently the designers expected these Corvettes would spend a lot of time mud bogging because the tank is huge. When I looked closer, not only was the opening at the top crumbling, the bottom had several non-original drainage slits. I thought about buying one of the reasonable priced used ones on eBay but figured a 37-year old plastic container from another car wouldn't be a huge step up. After several months of my multiple personalities discussing the matter, the least intelligent and least frugal one prevailed. I put a new reproduction windshield washer tank in my basket at Zip Corvettes.
Tank.jpg
Before I pulled the trigger on the new tank, I removed the electric pump from the bottom of the old one and tested it. It made noises like a motor but the pump didn't ****. That *****. I added a new pump to the basket and pulled the $129.22 trigger.
Pump.jpg
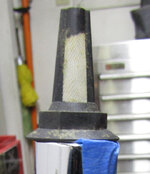
The original motor was inside a failed condom that came off in a number of pieces and no one seems to offer new condoms. While it isn't a trailer queen (I don't own a trailer), the Vette doesn't spend a lot of time in the rain (after all, it's a 'leaker') so I'm going to live on the edge with a ******** washer pump and motor. I was able to remove the pump without any tools. There's a witches' hat filter/nut inside the tank that holds it in place and with many small rotational wiggles I got it off. It cleaned up reasonably well.
Filter & Nut.jpg
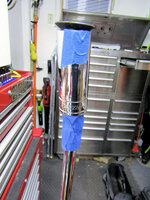
It was going to be a challenge to get the new pump attached to the tank so I Googled the project and it's not that bad. A long extension and a tight fitting socket should do the trick. Some painters tape will make a tight connection between the 22mm witches' hat and a deep socket It has to go around a curve in the tank so a universal might be needed to align everything.
Universal.jpg
Turns out you need more than a couple of layers of painters tape to control that ancient universal but my least frugal personality had already purchased a set of HF wobble extensions. It's more than 12-inches deep so a second extension held in the vice should do it. The wobble allowed just enough misalignment to put the nut in the right spot.
Pretty Close.jpg
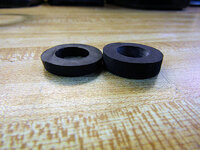
Wow, this is going unexpectedly well. I got the threads on the pump started and thought the finish line was in sight. Every time I got the threads started, the least little movement and it popped off. Absolute certainty that the moment you throw something away you will need that something. Turns out the new pump comes with a new rubber washer that's way more generous than the original.
More or Less.jpg
Once I have an additional half turn on the pump threads, it's the home stretch. I still have to put some water in the tank to be sure that dent in the old washer is compressed but I'm calling this one done and dusted.
Done and Dusted.jpg
 
OP
B

Bob Heine

ALLIANCE MEMBER
Joined
Oct 24, 2009
Messages
10,708
Location
Boca Raton, Florida
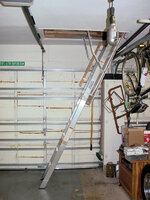
Sunday morning my 60-year old son and his 32-yeard old eldest son came over to install the new aluminum attic staircase. They spared us their usual pre-dawn arrival and showed up around 9 o'clock. This grandson runs the Heine Site Construction company along with his father. They do high-end remodelling, which is a booming business in South Florida. Some rich people often buy nice homes, tear them down and build bigger and fancier ones in their place. Other rich people buy really really nice homes and gut them so the place matches their taste. Heine Site goes after the latter group.

Anyway, they took down the 36-year old pull-down wooden ladder/staircase and installed the new aluminum one. Took them about 90 minutes, including leafing through the instructions for 3 seconds.
New Attic Stair.jpg
Liane was thrilled they were done so soon. Because no good deed ever goes unpunished, she suggested they might be able to take down that tree I've been nibbling away at. Another 90 minutes and there was a large pile of logs and branches out front at the end of the driveway. The tree is gone. Moments later so were my son and grandson.
Tapebuia 16.jpg
Now the dog yard has a clear view of our power and telephone pole. The view from the house is blocked by a maple tree. It's time for the Florida insect crowd to chow down on another tree stump.
Tapebuia 17.jpg
 
To avoid these ads, REGISTER NOW!
Top Bottom