Beerhippie
Well-known member
Having spent the last few evenings and Saturday bringing an old 1911 Reed vice back to life, I felt my daily-user in the shop needed some TLC.
Moving from something considered a high-end, collectable, made in USA tool to what many on the internet seem to consider a piece of MIC junk not worth its weight in scrap metal should be interesting.

First thing to mention it that this 25-30 year old vise is not the complete POS folks would have you believe. It's spent its life bolted to a work bench in a brewery shop, where it has been used and abused by a lot of different people--not all of them brought up to respect tools. I've used it hard--to the point of what many would call abuse--and it's taken it and still works.
The rotating jaws are a feature I've become so used to that I have trouble using a "normal" vise! A co-worker took it apart a number of years ago and the lock on the rotating mechanism hasn't quite worked right since, so that's one of the thing I want to address today. Otherwise, it's just cleaning the old, grungy lubricants off and refreshing it. Nothing heroic today.
Here it is, broken down, if anyone wonders how a rotating-jaw vise works:


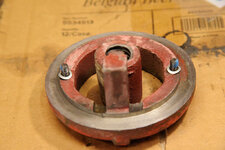
In the first picture, the long cylinder, below the dynamic jaw and slide, goes through the big bearing surface on the front of the body. It extends to just flush with the similar bearing surface on the back end, where the smaller part to the left of it anchors with the two cap screws. Obviously, there needs to be some play between these two parts, as clamping the jaws shut tightens them together, locking them against the flanges at either end of the body by pulling the nut, mounted to the back half, tight. There is no lock collar. The castellated nut and big washer lock the lead screw in place at the far end of the slide.
Anyhow, the problem I've been having is that I can't get the two ends of the rotating mechanism properly tightened, with them just slopping around or fully locked all the time. Before my earnest co-worker took it apart to "fix" it, there was no play there, but it would occasionally bind up. I'm thinking there should be some sort of spring involved? Maybe two small compression springs or sprung washers on those bolts?
Unfortunately, I didn't have a chance to see it when my co-worker took it apart the first time, so it's all guess work, unless someone here knows what I'm missing.
TFL--
Moving from something considered a high-end, collectable, made in USA tool to what many on the internet seem to consider a piece of MIC junk not worth its weight in scrap metal should be interesting.
First thing to mention it that this 25-30 year old vise is not the complete POS folks would have you believe. It's spent its life bolted to a work bench in a brewery shop, where it has been used and abused by a lot of different people--not all of them brought up to respect tools. I've used it hard--to the point of what many would call abuse--and it's taken it and still works.
The rotating jaws are a feature I've become so used to that I have trouble using a "normal" vise! A co-worker took it apart a number of years ago and the lock on the rotating mechanism hasn't quite worked right since, so that's one of the thing I want to address today. Otherwise, it's just cleaning the old, grungy lubricants off and refreshing it. Nothing heroic today.
Here it is, broken down, if anyone wonders how a rotating-jaw vise works:
In the first picture, the long cylinder, below the dynamic jaw and slide, goes through the big bearing surface on the front of the body. It extends to just flush with the similar bearing surface on the back end, where the smaller part to the left of it anchors with the two cap screws. Obviously, there needs to be some play between these two parts, as clamping the jaws shut tightens them together, locking them against the flanges at either end of the body by pulling the nut, mounted to the back half, tight. There is no lock collar. The castellated nut and big washer lock the lead screw in place at the far end of the slide.
Anyhow, the problem I've been having is that I can't get the two ends of the rotating mechanism properly tightened, with them just slopping around or fully locked all the time. Before my earnest co-worker took it apart to "fix" it, there was no play there, but it would occasionally bind up. I'm thinking there should be some sort of spring involved? Maybe two small compression springs or sprung washers on those bolts?
Unfortunately, I didn't have a chance to see it when my co-worker took it apart the first time, so it's all guess work, unless someone here knows what I'm missing.
TFL--
Last edited: