To avoid these ads, REGISTER NOW!

Above 1200 Sq/FT The Never Ending Retirement Garage/Shop Projects

Wokspaces above 1200 squarefeet.
To avoid these ads, REGISTER NOW!
OP
O

ODIS

Well-known member
Joined
Apr 30, 2012
Messages
2,110
Location
Pacific Northwest
Odis, those brakes are very interesting, please as you learn, share the details. Thanks
Good morning, Joel!

The following is a comments from one of the fellows at the 356 Registry:

“That is the whole 60mm Carrera front brake setup. Vented backing plates, wheel cylinder spacers, longer brake bleeders, longer brake spring "nails", special longer brake line fittings, and probably steel brake shoes. The rear brakes should have vented backing plates, longer studs and wheel spacers. You can't tell just by observation if the car was delivered that way or not. The Carrera brake setup used to be easily available, used.
And now Martin Willis can renew the drum linings if needed. These brakes provided a useful fade resistance on the racetrack although nothing like the disk brakes. However, on the street they amplify all the inherent minor problems drum brakes have.”

Others have indicated the brakes are not original to this car and would have to agree especially since the rear brake assemblies look to be standard OE.. Next questions are: Added value to the car? Parts availability? Poor performance for “street” use?(as indicated above). Since a ”little old lady” will be driving the car, remove and install OE parts?


Also, a note on the swing axles. It seems the swing axles were modified equipment from VW and were used up to the start of the 356 A model.

IMG_5195.jpeg

Thanks for your post!
 
Last edited:
OP
O

ODIS

Well-known member
Joined
Apr 30, 2012
Messages
2,110
Location
Pacific Northwest
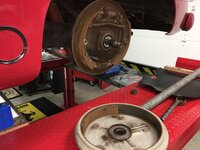
Pulled the brake drum this afternoon and was happy to see that most everything looked pretty good. A little corrosion on the brake drum from not being used, but other than that, nothing leaking and that is good. One small item was missing and that is the star wheel keeper leaf spring. As luck would have it, have a couple of these in the parts closet. Looked on line for these but no joy and not going to spend hours searching for them.

Tomorrow, will see if the wheel cylinders are operable and if so, will close it up and move on to the left side and then the rear brakes and check on their proper operation. Completing these tasks, will power bleed the system.

IMG_5209.jpegIMG_5208.jpegIMG_5210.jpeg
 
OP
O

ODIS

Well-known member
Joined
Apr 30, 2012
Messages
2,110
Location
Pacific Northwest
@ODIS thank you for the brake information, fascinated how the brake cooling was installed. I find the safety wire intriguing also!
An A&P mechanic would probably have some words for the efforts on the safety wire here but we are not going over 100 mph and we can also just pull over to the side of the road if something is amiss.

A bit more on the conversations on the front brakes:

I also see that the front spindles have been updated to the later, stronger A/B versions.
"had issues when raced" Yes they did. A fellow vintage driver tried them because new they cost about half what a set of used cost. At the first practice the liners spun. The 6 keys were added by the seller, which caused 6 hot spots. Finally the aluminum drums cracked. Bob got a set of real Porsche drums which work fine of course. I was spared that experience because I started out with used Porsche drums. When the liners wore thin, I took Leonard Turnbaugh's advise that Martin Willis could successfully reline race drums. He can.

60mm brakes don't stop any better than the standard 40mm. Either can lock up the wheel. 60mm brakes just go longer before fading. This is because of their greater heat capacity, greater area, and better cooling through the vented backing plates. It is unlikely that 40mm brakes will fade on the street, however I suppose that with a heavily loaded 356 rapidly descending a Rocky Mountain pass on a curvy road, it is possible.


My take on these “Fake GT” brakes is since they are after market and they add little to the overall stopping power of the car, they are nothing more than a novelty item and add no significant value to the car. This Speedster would be a much better value with the OE brake parts installed.

On the evaluation of the wheel cylinders, one of them is inoperable due to corrosion. Don’t know the history of servicing and will be my recommendation to replace all brake cylinders with ATE brand as they are sourced by Porsche….. More expensive, but why take a chance on lesser quality parts. On the low end, cylinders car be purchased for $55 where the ATE are $230 each.

Could also send the cylinders off to White Post Restorations and have them sleeved with either SS or brass and they would be good for more than a lifetime. Have gone this route on my Corvettes, ‘63 Cab, and as other drum brake cars come up for this service, they too will get the same treatment from White Post.

IMG_5215.jpegIMG_5213.jpeg


More to follow.

Odis.
 
Last edited:

mmsheb

Well-known member
Joined
Mar 30, 2008
Messages
365
Location
Wisconsin
Morning Odis - Following along as always and it caught my attention when you wrote, "Could also send the cylinders off to White Post Restorations and have them sleeved with either SS or brass ..."
Have you a preference of SS or brass? Pros and cons of each? I'm thinking ahead for when I will need to do this on my MG TD.
Thanks,
Mike in WI (very cold this morning at 0 degrees)
 
OP
O

ODIS

Well-known member
Joined
Apr 30, 2012
Messages
2,110
Location
Pacific Northwest
Morning Odis - Following along as always and it caught my attention when you wrote, "Could also send the cylinders off to White Post Restorations and have them sleeved with either SS or brass ..."
Have you a preference of SS or brass? Pros and cons of each? I'm thinking ahead for when I will need to do this on my MG TD.
Thanks,
Mike in WI (very cold this morning at 0 degrees)

The above is a pretty good outline of the differences in material, installation and durability between SS and Brass.

Also, think it would be appropriate to call the folks at White Post and get their recommendation on the material to use for your application.

Have a couple of brake cylinders lined in SS and contemplating using these on the Speedster, but, want to wait and hear back from the owner on the direction she would like to go. Also going to suggest to replace all of the soft lines as well.

The initial reason my brake services included sleeving the components was because they were OE parts and that is preferential to me. Replacement after market cylinders are very affordable and were made in China….. Going to avoid using these if at all possible.

During your rebuild on the TD, you might consider replacing all the hard/soft lines as well then use DOT 5 fluid. No more maintenance on the brake system save for the friction material as it wears down.

Yeah, cold temperatures here too, but only to the low teens thanks to the ocean as some of my pals that live up in the hills, they were low single digits cold. In just 6 or 7 months from now, will be complaining about the heat.

Thanks for your post. Always great to see you here!
 

mmsheb

Well-known member
Joined
Mar 30, 2008
Messages
365
Location
Wisconsin
Thank you for your response and the great suggestions. Will be ready with what direction to take next time brake work is needed.
Have a great week ahead.
Mike in WI
 
OP
O

ODIS

Well-known member
Joined
Apr 30, 2012
Messages
2,110
Location
Pacific Northwest
Continuing on with the 356 Speedster project, fitting new parts to old parts is always interesting. This new return spring for the accelerator pedal was a tough one to get installed. Looks easy and it would be if I had three hands. Used vice grips to secure the spring to the base plate, used a longer SS tube for the long arm and levered it down to where the pedal could be fitted and at the same time, slide the axle through the openings and have everything aligned….yeah, that’s how it’s done…

IMG_5222.jpeg

Have also been working on the heater control mechanism. It was completely disassembled, cleaned, lubricated, and the body painted. Twist the black knob counter clockwise to get heat into the cabin. That knob broke from its axle and would need a new knob and they are readily available but wanted to preserve the patina of the old one. Found a bit of “high impact polymer” from the stash of parts that I’m gonna need someday, chucked it up in my lathe, turned it to fit with about .002 interference and pinned it to the axle along with a drop of superglue. Works and looks just fine. Only took a few minutes to make, at least, that is what I’m telling everyone.

IMG_5232.jpeg

This car, under current ownership of 40+ years, has never had heat to the cabin. Have all the new linkage installed to the heat exchangers and just need to connect the pull wires to the above mentioned control mechanism. Have hours invested in screwing with this system…. All because the connection pivot points on all of the exchangers and heat valves were bent beyond recognition and alignment is critical to smooth operation. Further, the heater cable tunnels were full of **** that needed to be cleaned out and re-lubricated. That was fun……

IMG_5230.jpeg

On to the rear brakes to discover one of the brake shoes has had the friction material delaminate from the shoe. Lucky the metal shoe never made contact to the drum. The friction material is in the drum.

IMG_5224.jpeg


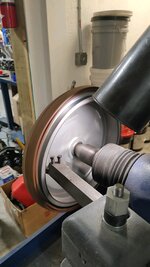
New brake shoes are needed for both sides (L & R) and pretty sure the drums were out of round so these were sent to a fellow who is trusted to turn the drums and arc the new shoes to fit the drums. No need to ”bed” the shoes through driving, they will fit the arc of the drums perfectly.IMG_5244.jpeg

IMG_5245.jpeg

While that work is out to be completed, no better time to clean the backing plates and paint them. My impromptu, spray booth with overspray evacuation all set up. Couple of coats with Rustoleum and we are good to go! Further, have replaced all the hard/soft lines, installed new wheel cylinders and a new MBC as well. All from a very old German company called ATE. They are nearly jewel like in quality and their price reflects the attention to detail and construction.

IMG_5229.jpeg

IMG_5236.jpeg

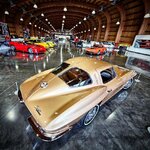
Received the following picture from the LeMay Museum as a FB press release to get more folks in to see the Corvette collection. Think they did a great job capturing the main exhibit floor, and um, of course, my car.

60A5E4365A9547D8B22BB3958218607A.jpeg

More to follow and sooo happy to get out of January which seemed to last the whole year!

Take care and send my best.

ODIS
 
Last edited:
OP
O

ODIS

Well-known member
Joined
Apr 30, 2012
Messages
2,110
Location
Pacific Northwest
Dan, John is pointing out the safety wire as shown doesn't prevent the bolts from loosening. This video will probably **** 22-point something minutes out of your life but it's pretty thorough.
mentioned earlier that a A & P mechanic would have some serious issues with the safety wiring. Put a wrench on these and they were very tight.... probably rusted/fused to the bolts. Anyway, safety wiring here not by my hand. Great info. on how to do it correctly.
 
Last edited:
OP
O

ODIS

Well-known member
Joined
Apr 30, 2012
Messages
2,110
Location
Pacific Northwest
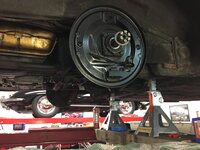
Brakes installed:IMG_5255.jpeg


New fluid, shoes adjusted but will need to road test and readjust.

IMG_5261.jpeg

Installing LED lights. A shot of pre & post install:
IMG_5263.jpeg

IMG_5265.jpeg

New tires on and installed. Car is starting to look pretty good!

IMG_5269.jpeg

Still to do is to get instrument lights working, install LED headlights, fit the soft top, detail the car, test drive. Maybe a lot will get completed this next week.

A little fun driving the FGT to Cars & Coffee last Saturday.

IMG_5258.jpeg

Thanks again for following along.

Odis.
 

Attachments

  • IMG_5245.jpeg
    IMG_5245.jpeg
    524.9 KB · Views: 38
  • IMG_5244.jpeg
    IMG_5244.jpeg
    412.1 KB · Views: 40
Last edited:
To avoid these ads, REGISTER NOW!

thammel

Well-known member
Joined
Oct 3, 2005
Messages
2,245
Location
Maryland
Seeing your Nebraska license plates reminded me of the 3 days I stayed in Lincoln.... from 9/11/2001 to 9/14/2001. On a United flight from the east coast to CA at 8am departure, somewhere near Lincoln the pilot said we had to land quickly due to reports of terrorism. What an experience. We were so blessed to not be one of the United planes that were hijacked.
 

loganb

ALLIANCE MEMBER
Joined
Dec 29, 2011
Messages
5,623
Location
Omaha, NE
Seeing your Nebraska license plates reminded me of the 3 days I stayed in Lincoln.... from 9/11/2001 to 9/14/2001. On a United flight from the east coast to CA at 8am departure, somewhere near Lincoln the pilot said we had to land quickly due to reports of terrorism. What an experience. We were so blessed to not be one of the United planes that were hijacked.

You were closer to the President that day then a lot of people ever get! He spent a couple hours at Offut AFB in Omaha on 9/11 before heading back to DC
 
OP
O

ODIS

Well-known member
Joined
Apr 30, 2012
Messages
2,110
Location
Pacific Northwest
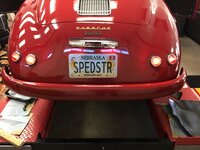
Nebraska plates!
Don't know the city, but yes, from that state. As a side note, my dad's family are from McCook. Would visit there almost every summer when growing up. In my teen years would stay there for a month or so and hang with my cousins. Of course, we talked of drinking beer and I bet my cousins about how many I could bang back. Off to have a few in Oberland, KC, which is pretty close to McCook and as you know legal drinking age was 18. Not the 3.2 beer we drank at home, they served up the 6.0 stuff……Hugged the toilet that night.......
That's a big difference with the new LED lights. Brighter is better!!

:beer:
Installing LED headlights too. Just waiting on some gaskets to finish the install. Also installed license plate and backup lights with LED bulbs. Really makes a difference. Once the car is back together, will post some shots of the lights in action.
I love following along here as the pictures and writeups are great and always learn a lot as I know nothing about Porsches other than they look expensive and fun!

Looking forward to keeping my eyes out for the Speedster on nice sunny days if it ever returns to it's registered state :)
Thanks, loganb! The owner still has strong ties to Nebraska, so the car could in fact end up back there!
Morning Odis. It's difficult for me to determine, but in the 2nd photo of your Friday posting is the brake drum painted or what is the finish? Great work as always.
Thanks,
Mike in WI
Hello, Mike! Brake drums are aluminum. We punched out the studs and did a light polish on the drums, not to concours standards, but a nice finish. Going to install wheel covers (Baby Moons) as the car was delivered with these.
Seeing your Nebraska license plates reminded me of the 3 days I stayed in Lincoln.... from 9/11/2001 to 9/14/2001. On a United flight from the east coast to CA at 8am departure, somewhere near Lincoln the pilot said we had to land quickly due to reports of terrorism. What an experience. We were so blessed to not be one of the United planes that were hijacked.
What a horrible day that was. I'll Never Forget!
You were closer to the President that day then a lot of people ever get! He spent a couple hours at Offut AFB in Omaha on 9/11 before heading back to DC
Absolutely changed our way of life.

Have most everything completed that was on the punch list. On my second pass of polishing which means there are 6 hours into this process. Tomorrow will hit all the gaps; doors, engine lid, frunk, and the area under the decos and get rid of all the old polish someone slathered all over the place. If it is nice this weekend, time for a drive!

IMG_5283.jpeg


IMG_5284.jpeg


IMG_5270.jpeg
 
Last edited:

mmsheb

Well-known member
Joined
Mar 30, 2008
Messages
365
Location
Wisconsin
Thanks for the info on the brake drums. The clean and polish looks great. Too bad they will be covered up with the baby moons, but we all know what's under there.
Mike in WI
 
OP
O

ODIS

Well-known member
Joined
Apr 30, 2012
Messages
2,110
Location
Pacific Northwest
A little more work completed on the Speedster. Couple of months ago, out for a test drive and the Tach started to make a ton of noise. It worked but the needle was violently swinging all over the place.

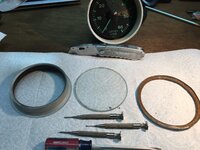
Honestly, the hardest part of the process was removing the bezel from the housing without damaging the glass. Slowly bending the chrome bezel away from the housing without putting any bends in it seemed to work just fine with an assortment of small pry bars:

IMG_5414.jpeg

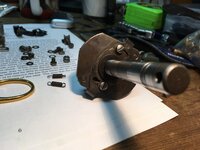
Once apart, the inner workings were surprisingly simple. A central shaft where the tach cable is attached and on that shaft is a round magnet. It resided inside of a “can” that is attached to the display needle. Faster the magnet spins, the higher the RPM indicated:

IMG_5417.jpeg

The central shaft and the magnet are easily removed from its housing which exposes the bushings for that mechanism. A good hot bath in the ultrasonic and most everything is clean and ready for some synthetic moly based grease. The indicator shaft just needed a bit of fine oil like 3in1 or similar:

IMG_5419.jpeg

After cleaning everything up, reassembly was pretty easy. Getting the bezel back on along with the glass and shroud was a bit testing, but with the aid of some clamps and wood shims, was able to get it back in as one piece. To keep it together after burnishing the edge of the bezel, used small amounts of super glue to make sure it stays together. Also marked the location of where the super glue is so the next guy can fight the good fight in opening up this instrument when I’m long dead and gone…

IMG_5422.jpeg

IMG_5423.jpeg

IMG_5430.jpeg

Was a fun and satisfying project. Had this been sent out for repair, would have been close to $800 or more along with a couple of months lead time…

Thanks for taking a look.
 
Last edited:
OP
O

ODIS

Well-known member
Joined
Apr 30, 2012
Messages
2,110
Location
Pacific Northwest
As far as a tune-up for the Speedster, it just has never seemed to run just right. Putting a timing light on the engine after static timing to 5* BTDC showed that it was getting to full advance at around 15-1800 RPM……. Way too soon as 30* is specified at just prior to 3K RPM. Further, the car always had a hard time to get back to idle of around 8-900 RPM. Advance springs must be weak and the advance weights are probably very dirty and anything else that pivots, is probably caked with super old grease. Yeah, time to rip this sucker apart..

This is the central shaft out of the distributor where everything that can be disassembled was removed and cleaned/lubricated.

IMG_5437.jpeg

This is where the advance weights live and the associated posts, and spring attachment points. The posts with the wear marks are the pivot points for the advance weights. The experts say these need to be replaced, and, not being an expert, they were kept as is. Made sure the appropriate lubrication was used here and polished up the weights to remove all the **** that accumulated on them over the years. New springs in place and ready to attach them to the weights:

IMG_5436.jpeg

This is the assembled distributor and where the feeler gauge is, are the spring attachment posts. They should be about .004 inches from the body of the distributor and when this project was started, they were at over .046 inches away. Interesting.

IMG_5432.jpeg

IMG_5431.jpeg

Also installed a new insulation kit which keeps the points separated from ground. Now, 30* advance @ 3K RPM, stable idle when backing off the throttle. Always like it when a plan comes together.

IMG_5438.jpeg

Points set at ~.016 and dwell @ 50 +/-. Nice!

Thanks for following along.

BTW, it most always seems that carb problems can be solved with a good electrical tune up, adjust/clean/remove for new points, set dwell then timing, adjust the valves,…. Presto! A great running engine…. Unless there are issues with the carbs… But of course there are problems!
 
Last edited:
OP
O

ODIS

Well-known member
Joined
Apr 30, 2012
Messages
2,110
Location
Pacific Northwest
After the work was completed on the ignition, this engine still ran like ****. On to the next area of concern are the carbs. The majority of Porsche 356 are fitted with Zenith 32 NDIX Carbs. Normals (base hp - 60hp), to Supers at 75 hp all had the same carbs with the difference in jetting and Venturi for the higher hp engines.

The carb on the right had the most issues and clearly, looking at the top of the intake manifold where it is saturated with liquid gas should set off the alarm bells.

IMG_5312.jpeg

Looking at the external features of this unit reveals some “home spun” fixes like using some wood veneer to plug a hole and some liberally applied brazing on the accelerator adjustment rod and other missing parts on the throttle body….

IMG_5324.jpeg

IMG_5330.jpeg

As the tear down continued, discovered that the floats were actually “sinkers” with both bulbs nearly full of gas. Reaching out to the good members of the 356 Registry, was able to get the parts needed and were given to me. So very generous and these members were rewarded with a gift certificate to Griot’s Garage.

IMG_5384.jpeg

A couple of shots of the exploded view of the 32 NDIX with the last shot of the parts ultrasonic cleaned/painted (throttle body) and ready for reassembly:

IMG_5331.jpeg

IMG_5374.jpeg

Assembled and calibrated to factory specifications. Float level to be set at 18.5mm below the top of the carb body and the accelerator pump set to deliver .02 - .03cc of fuel with successive two pumps of the throttle lever. Yeah, need to capture the squirted out fuel in a graduated cylinder to make these measurements…

All new gaskets, accelerator pump, float valve, replaced floats, new accelerator pump adjustment rod and the hole filled with JB Weld. This carb should be good to go.

IMG_5382.jpeg

Looking Oh So Pretty!

This car has never ran better for at least 20 miles after which, it started to miss at low speed/idle. Most of you know the problem now.

Thanks again for following along.
 
To avoid these ads, REGISTER NOW!
Top Bottom