To avoid these ads, REGISTER NOW!

What did you do "IN" your garage today?

To avoid these ads, REGISTER NOW!

PhantomEB

Well-known member
Joined
Feb 6, 2006
Messages
6,846
Location
Medicine Hat, AB, Canuckistan
Another Alberta clipper moving thru town these next few days so plans are to put the quad back out and continue reorganizing the DD side….AGAIN. Want that side empty in case of them having issues(not so much mine, but hers).

afternoon consists of NASCAR race in Atlanta and see if this new whip fixes up my welder So I can get back on the inner fenders of the bronco. Been looking at alternative places to put my battery which would make it damn easy to boost it or others….
 

PhantomEB

Well-known member
Joined
Feb 6, 2006
Messages
6,846
Location
Medicine Hat, AB, Canuckistan
That sounds like a 'make something worthwhile out of old stuff' project.

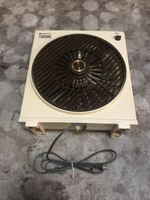
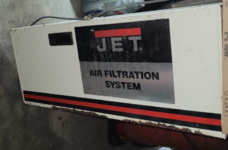
I was out hunting the ads in Bob Heine's neck of the woods, I'm probably one of the few people on-here who live south of Bob. I came across this item, a JET air purifier with a remote control, 3 speeds and a max. airflow of 1,000 cfm. Maybe I can set up a curtain system spray booth, and, BAM! take my paint efforts up a notch.
1708841476218.png


I haven't decided where/how to place it, but I'm thinking about it.

nadogail, how-often are you changing those filters? The filters are taped together in series, so you have one (taped-together) filter, of five elements, and the fan is on the back-side so that the incoming air passes-through the filters before reaching the box fan?
My better half would love me to get one….wonder how they would work for welding and grinding fumes.
 

66HertzClone

ALLIANCE MEMBER
Joined
Dec 6, 2006
Messages
4,053
Location
Long Valley, NJ
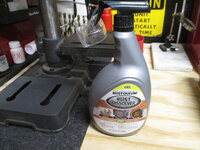
Started cleaning up my table top Craftsman drill press. The flat machined surfaces were getting pretty rough looking with surface rust and dirt from years of use. I used Rust-oleum Rust Dissolver Gel. Stuff works great. Spread it around and let it sit for a half hour then used a small metal brush to scuff it around. Wiped off excess and final clean with water and a rag. The results speak for themself. The bottom plate look just lik the top plate when I started. 1708748948495.jpeg1708748897019.jpeg1708748852350.jpeg
After seeing this I realize I need to do the same thing to my drill press. Did you apply anything to the cleaned surfaces to preserve this?
 

tarmy

Well-known member
Joined
May 28, 2014
Messages
4,714
Location
Nor Cal
That sounds like a 'make something worthwhile out of old stuff' project.

I was out hunting the ads in Bob Heine's neck of the woods, I'm probably one of the few people on-here who live south of Bob. I came across this item, a JET air purifier with a remote control, 3 speeds and a max. airflow of 1,000 cfm. Maybe I can set up a curtain system spray booth, and, BAM! take my paint efforts up a notch.

1708841476218.png


I haven't decided where/how to place it, but I'm thinking about it.

nadogail, how-often are you changing those filters? The filters are taped together in series, so you have one (taped-together) filter, of five elements, and the fan is on the back-side so that the incoming air passes-through the filters before reaching the box fan?
You may want to see if that can even be used for paint fumes/vapors. I have one and it is a dust collector. The motor may not be set up to handle airborn vapor and may actually ignite it. Not sure but I have heard of paint fumes that can combust. Mine is set up to have an outside paper filter and an internal cloth baffled filter that gets the fines. Good luck.
 

Outlawmws

Well-known member
Joined
Aug 9, 2011
Messages
39,340
Location
The Badlands
I haven't had time to look into it yet, but the drill works fine on the second battery. I'll hit the battery contacts with contact cleaner; not a lot of opportunity for getting a tool/abrasive inside the battery contacts, but I'l give that a shot too.


Yeah, I'm expecting to have to replace. It's a 20V Dewalt, I've had it quite a while now and its been a good drill and the drill is in good shape. . I'll pop it open and see if maybe it's something obvious if contact cleaning doesn't do the trick. At least it has screws holding it together, and I'm pretty sure I have the bit needed in my "everything" set. I'm so sick of companies heat sealing things like this together...

Contact cleaner did nothing, asn as you wil see was a waste of contact cleaer:

4 T-10 "tamperproof" screws and a bit of prying and it was open:

DeWalt 20V battery a.jpg

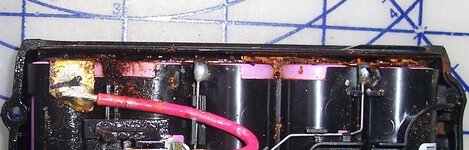
This was what I first saw and knew It had issues:

DeWalt 20V battery b.jpg


Leakage? waterdamage? I don't know. this may have been the one that was "lost" in the back of my Samurai for something like 2 years...

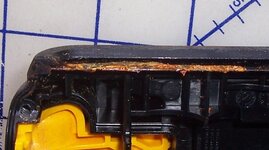
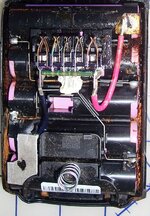
Some more prying:

DeWalt 20V battery c.jpg

DeWalt 20V battery d.jpg


So i'l attempt some cleanup (Vinegar like for Alkaline? I'll have to look up lithium and see which PH it uses, but it may not matter much if this was water.

In any case, shopping for a new one.
 
Last edited:

Outlawmws

Well-known member
Joined
Aug 9, 2011
Messages
39,340
Location
The Badlands
I (and many others) use a single edge razor blade to remove the worst of the surface rust on Cast Iron machined surfaces. it works great and often is all that is needed.

My Most recent pass: a Rockwell shaper/router mounting plate Before:

E1 rockwell 5056A shaper tabel ext.jpg


After: Is it perfect and shiny? No, but it is completely serviceable, and a wipe down with Phosphoric acit wil do the staining

Rockwell 5056A Shaper after.jpg


The motor may not be set up to handle airborn vapor and may actually ignite it.

My Jr HS wood-shop class had a fire in the paint booth stack. Luckily one of the shop teachers, was able to but it out with a fire extinguisher. but lesson learned! (no it wasn't me... IIR some kid smoking...)


But these require explosion proof motors and wiring for paint. And don't mix welding and painting in the same booth...

For small parts I used to use a huge cardboard box., and a Heat lamp for curing. It kept paint over-spray off the rest of the workspace.
 

Wrench97

Well-known member
Joined
Jun 23, 2018
Messages
12,166
Location
Southeastern Pa
Contact cleaner did nothing, asn as you wil see was a waste of contact cleaer:

4 T-10 "tamperproof" screes and a bit of prying and it was open:

DeWalt 20V battery a.jpg

This was what I first saw adn knew It had issues:

DeWalt 20V battery b.jpg


Leakage? waterdamage? I don't know. this may have been the one that was "lost" in the back of my Samurai for something like 2 years...

Some more prying:

DeWalt 20V battery c.jpg

DeWalt 20V battery d.jpg


So i'l attempt some cleanup (Vinegar like for Alkaline? I'll have to look up lithium and see which PH it uses, but it may not matter much if this was water.

In any case, shopping for a new one.
Toss them before they short and start a fire.
 

rayra

Well-known member
Joined
Dec 1, 2014
Messages
4,724
Location
Escaped from Los Angeles
Contact cleaner did nothing, asn as you wil see was a waste of contact cleaer:

4 T-10 "tamperproof" screes and a bit of prying and it was open:

DeWalt 20V battery a.jpg

This was what I first saw adn knew It had issues:

DeWalt 20V battery b.jpg


Leakage? waterdamage? I don't know. this may have been the one that was "lost" in the back of my Samurai for something like 2 years...

Some more prying:

DeWalt 20V battery c.jpg

DeWalt 20V battery d.jpg


So i'l attempt some cleanup (Vinegar like for Alkaline? I'll have to look up lithium and see which PH it uses, but it may not matter much if this was water.

In any case, shopping for a new one.
Those look like 18650 cells. Pretty common / available, you could probably replace them without great cost, might be worth trying in order to salvage the tool battery.
I've seen a lot of amazing and alarming mass power storage assemblies on YouTube using those cells, folks trying to emulate Tesla's 'Power Wall' solutions. Apparently those reclaimed cells are used in lots of things.
 

Outlawmws

Well-known member
Joined
Aug 9, 2011
Messages
39,340
Location
The Badlands
Back to Batteries for the DeWalt 20V Max batteries - anyone have any experience with the many non-DeWalt branded batteries? lots of options, and in sizes from 1.5 AH to 5 AH. (mine is 1.3... from 2016, made in Malaysia with Samsung batteries and these are overall testing at >8V? but the charger thinks they are "Done")
 
Last edited:

Outlawmws

Well-known member
Joined
Aug 9, 2011
Messages
39,340
Location
The Badlands
Pretty common / available, you could probably replace them without great cost,

Not really, same cost to buy a set of 5 as a welded unit as to buy a DeWalt pack. I'm not going to try to weld/solder a plate onto loose batteries either. I didn't aver do Ni-Cads either. I did see Samsung individual replacements at about $5 each -not worth the hassle.
 

Magnum440d100

Well-known member
Joined
Dec 2, 2018
Messages
3,581
Location
Indiana
Started in the garage, finished in the kitchen (put next to my coffee maker so I don’t forget the carb in the AM).


Bossman has an international 284 needing a carb. $450 for a used/needing rebuilt (same as what we have), and $90 for a rebuild kit.

When I first started working there, it didn’t run. We did a quick and dirty clean/rebuild, and it idled all damn day but not when it went off idle.

No dirty pics, as I got home Friday and immediately disassembled to soak in chemdip until this morning.

Got it stripped to its most basic form, cleaned up/cleaned out, painted the cast iron with the only high heat paint I have, hand made EVERY gasket, and reassembled.

If this works, the tractor will finally be out of our way Lmao. Then I can park on gravel instead of MUD!
 

Attachments

  • IMG_3343.jpeg
    IMG_3343.jpeg
    765.9 KB · Views: 29
  • IMG_3342.jpeg
    IMG_3342.jpeg
    816.4 KB · Views: 23
  • IMG_3341.jpeg
    IMG_3341.jpeg
    772.9 KB · Views: 44

cannuck

Well-known member
Joined
Nov 30, 2021
Messages
4,662
Location
Rural SK
Still in the later stages of getting backyard home shop back up to full function. As I had mentioned before, bought a mess of canadian made 4 x 7 bins to replace the rigid plastic originals that have turned very brittle after 39 years. Today's task was to get the AN/NAS rivets sorted, binned and labelled. I only keep universal head and 100 degree countersunk in AN3/4/5 to a few lengths so not big space, but a lot of time to sort as many co-mingled. Blind rivets in next session.
 

rzims

Well-known member
Joined
Oct 25, 2006
Messages
461
Location
Grass Valley, CA
I bought this oak file cabinet back in the early 80s at an unfinished furniture store and had them shoot it with clear.
The drawer slides have since failed and we don't need it in the office any longer so I'm sanding it just enough that it will take paint, then I'll paint it, put some new drawer slides on and use it in the shop.
Not sure what I'll actually use it for, but its real wood and pretty stout so I'll find a use...I did notice spray cans fit in it upright with a bit of room to spare....
cabinet after sanding.jpgcabinet before.jpg
 
To avoid these ads, REGISTER NOW!

Outlawmws

Well-known member
Joined
Aug 9, 2011
Messages
39,340
Location
The Badlands
Back to Batteries for the DeWalt 20V Max batteries - anyone have any experience with the many non-DeWalt branded batteries? lots of options, and in sizes from 1.5 AH to 5 AH. (mine is 1.3... from 2016, made in Malaysia with Samsung batteries and these are overall testing at >8V? but the charger thinks they are "Done")


No Joy on getting the cleaned up pack to charge, Sits on the charger for a minute, then say's "Done". All that happens on the drill is the light flashes on, then off. Forward or reverse, as expected, same results. The other battery is fine...


So any thoughts on Non Dewlat Branded batteries?
 

Bob Heine

ALLIANCE MEMBER
Joined
Oct 24, 2009
Messages
10,709
Location
Boca Raton, Florida
Those appear to be exactly the glides I used for the hutch.
@rayra, the cabinet interiors are 31 inches deep and the drawers are 28.5 inches. I bought 28 inch full extension slides:
https://www.amazon.com/gp/product/B0009VLFE0/?tag=atomicindus08-20
The slides were the biggest expense of the project. OK, the dovetail kit, which was ~$200, was more but I'll get to use the dovetail jig on other projects. Here's the one I bought:
 

kaymccampbell

Well-known member
Joined
Feb 27, 2015
Messages
29,627
Location
Upstate New York
I haven't had time to look into it yet, but the drill works fine on the second battery. I'll hit the battery contacts with contact cleaner; not a lot of opportunity for getting a tool/abrasive inside the battery contacts, but I'l give that a shot too.


Yeah, I'm expecting to have to replace. It's a 20V Dewalt, I've had it quite a while now and its been a good drill and the drill is in good shape. . I'll pop it open and see if maybe it's something obvious if contact cleaning doesn't do the trick. At least it has screws holding it together, and I'm pretty sure I have the bit needed in my "everything" set. I'm so sick of companies heat sealing things like this together...
With a DeWalt, you can get the board. A real DeWalt or a decent copy. Other brands, not so much. Some of the DeWalt batteries just use a thermistor buried in the middle of the cells. Pray for one of those.
 

Outlawmws

Well-known member
Joined
Aug 9, 2011
Messages
39,340
Location
The Badlands
With amount of rust in the welded bridging bars, I think its toast.

The board has the two main posts for 20V right and left, plus I think 6 "sensor" contacts to the charger. (in pairs upper and lower terminals) then it has 4 bare wires connecting the bridges to the board, probably to the charger; so I doubt its a simple thermistor.

DeWalt 20V battery Connectons 1.jpg


A big glop of RTV coveres the wire side of the board, and half the board:

DeWalt 20V battery Connectons 2.jpg
 

Jim_No_Garage

Well-known member
Joined
Jan 15, 2011
Messages
3,322
Location
Millington NJ
I had a fail and a head-scratcher today.

The fail - son brought over a Sanyo EF362 fan that was running loud. Stock image - not mine.


1708898974221.png

I pulled it apart to get to the motor and it was totally gunked up. This is where I went wrong. I should have lubed the rotor and tried to get it moving freer. Instead I pulled it apart and attempted to remove the rotor. This is where I really went wrong. When pulling the rotor it took the front bushing out of the case with it. The oil/grease was like glue. I had to pull the stator out of the casing to refit the front bushing and can't get everything aligned. I also think I broke a wire or 2 as the leads were crunchy from age. They sell for $100 used so it's worth something if working. Son it going to look for parts. Live an learn I guess.

The head scratcher was when Mrs No_Garage's 2019 Ford "Infocenter" went DOA when starting the car at the grocery store. The reverse camera was NLA and the radio too. Climate control is seperate so that was fine. We stopped for gas and it didn't resolve itself. We got home, let it sit for a few and it "Rebooted" just fine. We will keep an eye on it for a bit.

Cheers

Jim
 

Crazyjake8493

Well-known member
Joined
Sep 26, 2014
Messages
3,982
Location
Upstate NY
Wired up a switch in the truck bed with constant power so I can turn on the lights inside the cap at night without the key in the truck.

There's also a third brake light on the cap but it occurred to me that the wire at the truck's brake lights are a shared turn/brake wire, so I'll have to run wire all the way from the truck's third brake light to power the cap's third brake light.

Probably won't do it, not really worth the trouble.
 

Snip's

Well-known member
Joined
Apr 29, 2017
Messages
1,867
Location
Ohio
Awhile back when I was painting my HUOT drill bit organizer with RustOleum hammered paint, I noticed changes in the hammered effect based on paint temperature... I noticed when I painted with a chilled can I got more of the hammered effect...

I ran a test today and documented the conditions...
Paint: RustOleum Hammered Silver
Sample on the left... Paint can temperature 49.5F
Sample on the right... Paint can temperature 90.7F
Room temperature 52F
Humidity... 54%

The sample on the right had a smoother finish which gave the silver a darker gray tint...
Both samples got a single heavy coat...
IMG_3560.jpg
 
Last edited:

kaymccampbell

Well-known member
Joined
Feb 27, 2015
Messages
29,627
Location
Upstate New York
No Joy on getting the cleaned up pack to charge, Sits on the charger for a minute, then say's "Done". All that happens on the drill is the light flashes on, then off. Forward or reverse, as expected, same results. The other battery is fine...


So any thoughts on Non Dewlat Branded batteries?
Don't. They typically give you half the labeled ah rating.
Here's some real Dewalt batteries for a decent price. I bought some for my changing yellow ecology.
 

rayra

Well-known member
Joined
Dec 1, 2014
Messages
4,724
Location
Escaped from Los Angeles
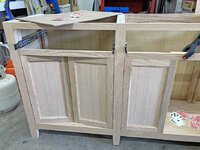
Doors installed and adjusted, the gap sizing is working out nice. Using playing cards as shims is a really easy technique.
Only problem with the Berta knockoff euro hinges bein able to open 110deg, they also close 110deg+. They really need an interior stop, otherwise they close inward. Another drawback of inset hinges and doors. I improvised a stopgap stop and since my drawers could also benefit from such, I chose to just cut an appropriately-sized disc with a 2" hole saw and use the ready-made drilled center hole to mount the disc to the back of the face rail between drawers and doors. Offset downward, the top protrudes a little over 1/8" and the lower edge by about 1/4". The top stops the drawers and the bottom stops the doors. I just used some scrap veneer ply for these, I might execute them again in oak, later, if I can't find some manufactured limit-stops that I can use.

I still need to fashion a set of adjustable shelves for the interior, 3 should suffice but I might make 4, I have the surplus materials in hand.
Then it is disassembly, beveling all the exterior edges, then finish sanding in advance of staining. Maybe I start staining on Tuesday.


eta
... and the three interior shelves are sized and assembled. Some 3/4"x3/4" oak offcuts glued to front edges. MIGHT put edge banding on their sides. But I always put a good sized piece of solid oak on the front edge of any oak-veneer plywood to partly act like a stiffener.
 

Attachments

  • dining hutch 90 THE DOORS.jpg
    dining hutch 90 THE DOORS.jpg
    105.5 KB · Views: 26
  • dining hutch 91 THE DOORS.jpg
    dining hutch 91 THE DOORS.jpg
    102.3 KB · Views: 17
  • dining hutch 92 stops.jpg
    dining hutch 92 stops.jpg
    75.8 KB · Views: 15
  • dining hutch 921 stops.jpg
    dining hutch 921 stops.jpg
    53.7 KB · Views: 19
  • dining hutch 93 overall progress.jpg
    dining hutch 93 overall progress.jpg
    99.4 KB · Views: 19
Last edited:

Wrench97

Well-known member
Joined
Jun 23, 2018
Messages
12,166
Location
Southeastern Pa
Wired up a switch in the truck bed with constant power so I can turn on the lights inside the cap at night without the key in the truck.

There's also a third brake light on the cap but it occurred to me that the wire at the truck's brake lights are a shared turn/brake wire, so I'll have to run wire all the way from the truck's third brake light to power the cap's third brake light.

Probably won't do it, not really worth the trouble.
Does it have a trailer hitch harness at the rear of the frame?
 

nadogail

Well-known member
Joined
Jan 23, 2009
Messages
32,061
Location
Coronado, CA
That sounds like a 'make something worthwhile out of old stuff' project.

I was out hunting the ads in Bob Heine's neck of the woods, I'm probably one of the few people on-here who live south of Bob. I came across this item, a JET air purifier with a remote control, 3 speeds and a max. airflow of 1,000 cfm. Maybe I can set up a curtain system spray booth, and, BAM! take my paint efforts up a notch.

1708841476218.png


I haven't decided where/how to place it, but I'm thinking about it.

nadogail, how-often are you changing those filters? The filters are taped together in series, so you have one (taped-together) filter, of five elements, and the fan is on the back-side so that the incoming air passes-through the filters before reaching the box fan?
I built a box of 5 filters and taped them to the suction side of the fan. That way the fan blades are pulling filtered air and staying pretty clean. The whole thing sits on a platform of plywood with curbs around it and it is suspended from the ceiling joists with Jack Chain.
 

WildBill

ALLIANCE MEMBER
Joined
Aug 20, 2021
Messages
2,030
Location
PNW
Taking apart this Ford Fusion hybrid battery pack to build smaller battery packs. Cool Panasonic square batteries. They are 3.7v 5ah each and whole deal is 280v DC, two 140v banks, little scary. Probably just explode my heart if I screw up trying to get them apart. I am much more scared of high voltage DC than AC. Came out of wrecked Fusion, whole pack is good. Uses 7.5mm 12 point nuts, anybody know where I can find that socket? Making a tweaked 5/16th work for now. Battery.jpg
 

Jgaz

Well-known member
Joined
Dec 16, 2016
Messages
1,713
Location
AZ
Doors installed and adjusted, the gap sizing is working out nice. Using playing cards as shims is a really easy technique.
Only problem with the Berta knockoff euro hinges bein able to open 110deg, they also close 110deg+. They really need an interior stop, otherwise they close inward. Another drawback of inset hinges and doors. I improvised a stopgap stop and since my drawers could also benefit from such, I chose to just cut an appropriately-sized disc with a 2" hole saw and use the ready-made drilled center hole to mount the disc to the back of the face rail between drawers and doors. Offset downward, the top protrudes a little over 1/8" and the lower edge by about 1/4". The top stops the drawers and the bottom stops the doors. I just used some scrap veneer ply for these, I might execute them again in oak, later, if I can't find some manufactured limit-stops that I can use.

I still need to fashion a set of adjustable shelves for the interior, 3 should suffice but I might make 4, I have the surplus materials in hand.
Then it is disassembly, beveling all the exterior edges, then finish sanding in advance of staining. Maybe I start staining on Tuesday.


eta
... and the three interior shelves are sized and assembled. Some 3/4"x3/4" oak offcuts glued to front edges. MIGHT put edge banding on their sides. But I always put a good sized piece of solid oak on the front edge of any oak-veneer plywood to partly act like a stiffener.
Nothing wrong with the stops you made for the doors, very clever.
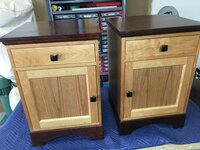
Since you are making shelves, I’ll share how I set my inset doors flush on a pair of cherry nightstands that I built. I used the interior shelf as a stop.

The nightstands
IMG_3060_Original.jpeg
The interior shelf was adjusted to get the door flush and then screwed to the shelf pins in a couple places.
IMG_4192.jpeg
On other note: This last pic really shows how the solid cherry edge band on the plywood shelf doesn’t darken near as much as the other banding when it isn’t exposed to light.

Nice work on your hutch. You made impressively quick progress.
 

Motorman55

Well-known member
Joined
Apr 10, 2016
Messages
2,652
Location
South Jersey
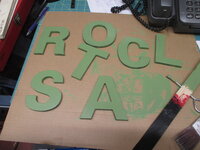
Painted up some wood letters for another sign I'm making for the garage/workshop. Not going to say what just yet, but I should have it done by tomorrow night. I''l post more pics then.

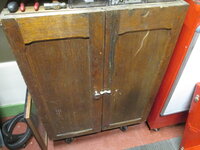
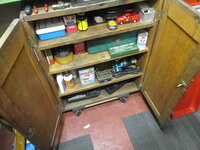
Also cleaned up this old oak cabinet, which I got for free last week, and put it in the new office. This will get painted to blend in with the rest of the office color scheme. Until then its been put to work holding some things.
 

Attachments

  • IMG_8702.JPG
    IMG_8702.JPG
    605.1 KB · Views: 30
  • IMG_8705.JPG
    IMG_8705.JPG
    812.9 KB · Views: 30
  • IMG_8704.JPG
    IMG_8704.JPG
    889.2 KB · Views: 16
To avoid these ads, REGISTER NOW!
Top Bottom