To avoid these ads, REGISTER NOW!

What did you do "IN" your garage today?

rayra

Well-known member
Joined
Dec 1, 2014
Messages
4,724
Location
Escaped from Los Angeles
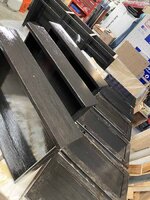
well I've brushed satin poly on the door backs and drawers and about to do the exterior of the cabinet. Couldn't find 'wipe-on' except on Amazon and the seller wanted 4x the price of regular.
Another reason not to use Oak is its deep graining / voids. Just generates tons of air bubbles. I really should have taken the trouble to make a spray booth and sprayed a thinned product, like I did with my office bookcases. Maybe I should have waxed it instead.
I'm brushing the satin poly on thick and repeatedly brushing it down to level it out and break bubbles. I dont want to have to sand it down and put a 2nd coat on.
So it's going to take a long time to dry and I wont get to the door fronts until tomorrow. Problem becomes room to lay everything out as it cures. I can do the door fronts tomorrow and maybe the tops of the interior shelves tomorrow. And maybe set the countertop on top of the cabinet to apply the poly.


Still very wet in this photo and I note that it is passing a lot of light thru to the wood beneath the stain. They looked completely black before application. Will have to see what happens when the satin poly cures.
 

Attachments

  • dining hutch 120 satin poly wet.jpg
    dining hutch 120 satin poly wet.jpg
    81 KB · Views: 73
To avoid these ads, REGISTER NOW!

rzims

Well-known member
Joined
Oct 25, 2006
Messages
461
Location
Grass Valley, CA
Well, after seeing how tall the built-ins were going to be, the boss decided she didn't want them to go all the way to the ceiling. She'd rather a shelf on the top that she can put "stuff" on....plants, brickabrack, whoknowswhat.....
So, today I cut them down a bit. Thankfully I had just mocked them up and hadn't glued them yet so it wasn't that big of a deal. Anyway, got them cut down, glued, screwed and assembled and got the first coat of primer on them.
Although it's getting so cold now(snow this weekend) that it might be Spring before they're actually dry enough to get the second coat on :) 1st coat primer.jpg
 

rayra

Well-known member
Joined
Dec 1, 2014
Messages
4,724
Location
Escaped from Los Angeles
Just stopped applying poly to the outer faces of the cabinet. The inner doors and drawers are dry, drawer faces look really good. I had a few foam brushes, they worked a lot better this evening than the **** chicom bristle brushes I used earlier.
But I left so much stain on the wood (twice) that the poly is lifting some of it, transferring it to the brushes and into the quart can I was working out of, which is now taking on some black tint. Doesn't matter much, I have enough pieces to go that I will use it all. But it means I have to get a fresh can for coating the brown pieces. And I'll be wasting some of that, pouring it into a temp container so I don't also contaminate that can.

When I build the Buffet, I'll try some proper staining technique and wipe off most of it. See what happens. But these pieces will be on adjacent walls, so they need to match as best I can manage.
 

Attachments

  • dining hutch 121 satin poly dry drawers.jpg
    dining hutch 121 satin poly dry drawers.jpg
    81.6 KB · Views: 40

PassnThru

Well-known member
Joined
Jan 5, 2010
Messages
6,512
Location
Bowling Green KY
Finding stuff - reminds me of yesterday my wife needed some good double stick tape for something and I thought I had some in my main toolbox. I didn't. But when I looked in one of the top chest drawers something caught my eye - leaning against the side of the drawer. It was a stainless steel precision ruler - one that I lost years ago and never found. I went through that box multiple times looking for it and never found it. It's only about 7" long and maybe an inch tall and somehow over all these years it managed to stand on it's edge flat against the edge of the drawer going unnoticed. And no - it's not magnetic (I checked) - it just got in that tiny space between the side and the drawer liner and that kept it upright for years.
It was in a drawer on the right side clinging to the left side - a drawer I use fairly often. I guess I normally open the drawer from the center of the box so I couldn't see that side of the drawer. I guess yesterday was the first time I had opened that drawer from a position where I could see that side of it. But for years it never fell - it just clung to the side.
It is truly amazing how things can hide for years from multiple searches and then just - appear.

I'm not saying it was aliens but.....
 

Outlawmws

Well-known member
Joined
Aug 9, 2011
Messages
39,334
Location
The Badlands
Put stuff away. I discovered they now make D-cell sized USB rechargeable Lith-ion batteries! I ordered a set of 8 for my LED converted Angle flashlights (or any other old school D-cell things -Yes they make them for C-cell as well.

I've become a big fan of USB charged everyday items. it makes them doubly portable. Leaving personal electronics out of it:
  • small portable hanging fan/light (The fan saved my **** driving through the central valley last fall trying to get my non charging Van home...)
  • Charger for the 18650 L-ion batteries - used in my new fave daily use flashlight
  • these D-cell L-Ion batteries
  • and eventually, a USB charger for my electric toothbrush for travel/camping
  • More to come I'm sure...
 

rharman

Well-known member
Joined
Apr 22, 2012
Messages
8,914
Location
SoCal
Installed by new "big brakes" on my track day car, and safety wired the two-piece brake rotors. I may have to trim the wheel weights down to make sure no contact between the weights and caliper. It's about a sheet of paper's worth of gap between the two.

EP3 Rotor Wiring_2024.jpg EP3 Caliper to Wheel Weight.jpg
Ahhh.... The safety wire Nazis have nothing to complain about on the rotor bolts... :cool:
 

kaymccampbell

Well-known member
Joined
Feb 27, 2015
Messages
29,626
Location
Upstate New York
Unwrapped presents. Moved a little shelf a few inches. Hung some little flip out boxes near the compressor n water heater. Loaded them with compressor, compressed air, and hydronic heat parts.
Cut up and assembled part of a HF cabinet. Hung it in the woodshop to be a charging cabinet. Wired it with a timer. Used a new soldering station to help put it together. Moved the chargers and batteries into their new home.
Put handles on the welding supplies lockers.IMG_20240301_101342.jpgIMG_20240301_222206.jpgIMG_20240301_223140.jpg
 
Last edited:

niget2002

Well-known member
Joined
Oct 2, 2012
Messages
11,265
Location
Josephine, TX
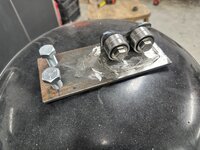
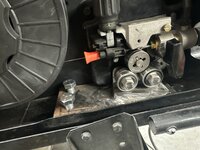
Milled a small piece of aluminum to mount the new extruder on the printer.

Lost track of time and wished I had started with hanging the new shop clock first.

1000002263.jpg
1000002264.jpg

Unrelated, but my son finished putting his chess pieces into cad. I did the knight and explained what I was doing as I did it. Then he did the queen with my supervision and guidance. Then I left while he did the rook and bishop.

He did have to come get me from the shop at one point, but he mostly did them both himself. I helped do the scallops on the top of the rook and the mouth on the bishop as those were a little more complicated.

I'll post a picture of the rendering of them tomorrow.
 

Chilliwack Murray

Well-known member
Joined
Dec 10, 2012
Messages
1,507
Location
Chilliwack BC
Update from many pages back… Finally got #2 cylinder cleaned up on the Dodge, rings are gapped and the new piston and injectors are ready to go in. Working everyday really interferes with my personal life.

I don’t know that I could’ve done all that honing without the topside creeper I bought myself. It was a bit of work with just a 280.


IMG_4621.jpeg

IMG_4911.jpeg
 

Old Man Roger

Well-known member
Joined
Apr 6, 2017
Messages
17,894
Location
Palm Coast Florida
Just stopped applying poly to the outer faces of the cabinet. The inner doors and drawers are dry, drawer faces look really good. I had a few foam brushes, they worked a lot better this evening than the **** chicom bristle brushes I used earlier.
But I left so much stain on the wood (twice) that the poly is lifting some of it, transferring it to the brushes and into the quart can I was working out of, which is now taking on some black tint. Doesn't matter much, I have enough pieces to go that I will use it all. But it means I have to get a fresh can for coating the brown pieces. And I'll be wasting some of that, pouring it into a temp container so I don't also contaminate that can.

When I build the Buffet, I'll try some proper staining technique and wipe off most of it. See what happens. But these pieces will be on adjacent walls, so they need to match as best I can manage.
Nice, the clear brings out the grain.
 

niget2002

Well-known member
Joined
Oct 2, 2012
Messages
11,265
Location
Josephine, TX
Unrelated, but my son finished putting his chess pieces into cad. I did the knight and explained what I was doing as I did it. Then he did the queen with my supervision and guidance. Then I left while he did the rook and bishop.

He did have to come get me from the shop at one point, but he mostly did them both himself. I helped do the scallops on the top of the rook and the mouth on the bishop as those were a little more complicated.

I'll post a picture of the rendering of them tomorrow.
Here's said chess pieces rendered. Now I need to get the 3d printer printing again so we can print them.

chess_pieces_final.png
 

rayra

Well-known member
Joined
Dec 1, 2014
Messages
4,724
Location
Escaped from Los Angeles
Well, after seeing how tall the built-ins were going to be, the boss decided she didn't want them to go all the way to the ceiling. She'd rather a shelf on the top that she can put "stuff" on....plants, brickabrack, whoknowswhat.....
So, today I cut them down a bit. Thankfully I had just mocked them up and hadn't glued them yet so it wasn't that big of a deal. Anyway, got them cut down, glued, screwed and assembled and got the first coat of primer on them.
Although it's getting so cold now(snow this weekend) that it might be Spring before they're actually dry enough to get the second coat on :) 1st coat primer.jpg
How are you attaching those to the wall? It would help deter an attack on the safe, if they first had to tear up the surrounding shelving.
 

rzims

Well-known member
Joined
Oct 25, 2006
Messages
461
Location
Grass Valley, CA
How are you attaching those to the wall? It would help deter an attack on the safe, if they first had to tear up the surrounding shelving.
The outside pieces will be anchored to studs on the wall. My goal is to get the face frames to overlap the safe just a bit which will kind of lock it in place. My office is also in the basement with a solid core locked door.....besides, we kinda live out in the sticks so never had a problem (yet)
 
To avoid these ads, REGISTER NOW!

stonesfan68

Well-known member
Joined
Apr 19, 2012
Messages
2,764
Location
Houston, TX
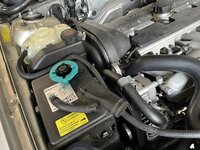
Took way too long to replace an eight inch section of coolant hose on the C70. The job would have gone more quickly if I had been able move the power steering pump. Unfortunately, when I went to loosen the belt tensioner it broke at the place where the bit was inserted to move the tensioner. I couldn't believe it happened. The tensioner is less than a year old and made by ContiTech- it isn't a cheap eBay part. I was able to remove the hose and replace it, but it sure would have been a lot easier with the pump out of the way.

Now I have a future project where I get to cut the serpentine belt off and replace the tensioner. Ah, the joy of working on old cars.

IMG_1182.jpg
 

PassnThru

Well-known member
Joined
Jan 5, 2010
Messages
6,512
Location
Bowling Green KY
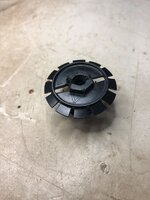
Our 22 Explorer had a rattle around the drivers side passenger door at around 65 and more - climbed under today to look. Found a loose plastic retainer that holds up a felt underbody cover. It wouldn't tighten so I took it out and replaced it with two nuts and washers. Took it out and problem fixed. I didn't really like the nuts and washers though - didn't have the right washers to really hold the felt and I just didn't want them rusting - better to have the plastic back. Took a look at it and decided if I could get at least one set of the arms to grip it would probably tighten. Cable tie to the rescue - it now tightens up enough to not rattle. Would have done both sets but had a clearance issue on the top one.
Retainer 1.jpgRetainer 2.jpg
 

Bessy

Well-known member
Joined
Dec 18, 2012
Messages
995
Location
Ontario, Canada
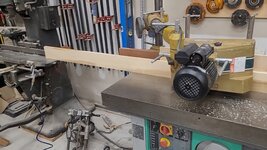
Working on a door for a friend of mine, which I've put off way too long. Got four of seven pieces glued together and clamped/caulled, three more to go, but working alone I opted to glue it up only so far first, then continue with the remaining three once the first four are together. Man I really really need to build a big bench/outfeed table instead of working on saw horses!
 

rayra

Well-known member
Joined
Dec 1, 2014
Messages
4,724
Location
Escaped from Los Angeles
Very high winds in Vegas today, glad I have a good vapor mask while poly-coating in my closed up garage.
Got the last of the satin poly on the cabinet body and door fronts, pictures are still wet.
Discovered I need longer screws for the knobs on the drawers, still haven't drilled the doors, haven't decided where to position the knobs.
Shoving lunch in my face before applying poly to the brown / 'Provincial' countertop and shelves.


eta wet poly satin on the brown parts. I'm going to need to wet-/block-sand the top with 400- or 800-grit and apply a 2nd coat to the top. Despite tack rag and a fresh sponge brush, there's lots of tiny grit in it. So there's another couple days added.

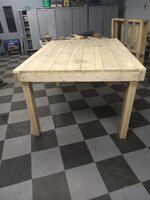
Don't think I like the look of the countertop, may be oak veneer, but the veneer graining just makes it look like lacquered plywood (which is in essence what it is). I may have to make a proper top by jointing some proper planks. And I can recoup this countertop as interior shelving.
Going to need some proper parallel clamps for that counter glue-up. F-clamps are too flexible and can impart forces you don't want when trying to make a flat panel.
 

Attachments

  • dining hutch 122 satin poly doors wet.jpg
    dining hutch 122 satin poly doors wet.jpg
    111.1 KB · Views: 28
  • dining hutch 123 pre-poly countertop.jpg
    dining hutch 123 pre-poly countertop.jpg
    96 KB · Views: 28
  • dining hutch 124 poly countertop wet.jpg
    dining hutch 124 poly countertop wet.jpg
    132.1 KB · Views: 25
Last edited:

rayra

Well-known member
Joined
Dec 1, 2014
Messages
4,724
Location
Escaped from Los Angeles
Added a phone mount to one of my vehicles. I won't have a chance to try it until it gets a bit warmer. I'm not sold on the positioning but there weren't very many options on this interior.

gj_186.JPG
How about a suction cup mount low on the windshield? Get it up nearer to line of sight so you don't look down while driving.
I have one high in my Suburban and it has been plenty strong enough without other support. Down low the phone cradle could rest on the dash.
 

Swanny1953

ALLIANCE MEMBER
Joined
Jul 28, 2010
Messages
1,082
Location
Lucas, TX
How about a suction cup mount low on the windshield? Get it up nearer to line of sight so you don't look down while driving.
I have one high in my Suburban and it has been plenty strong enough without other support. Down low the phone cradle could rest on the dash.
What he said - I have one of these in my '69 Vette and the positioning is spot on. Of course, comes off the windshield every so often, but what suction cup mount doesn't? This one is very adjustable.
 

T_Roze

Well-known member
Joined
Nov 5, 2013
Messages
481
Location
Edmonton Alberta
Got these girls all cleaned up and tuned up.

New fire pot and rod in one, and just a good clean on the others internals. Quick sand and paint on the cart occupying one as the boss had a slight fire in it one afternoon, much to her dismay. Not a huge deal as it usually wears a winter cover anyways, so I wasn’t going for perfection. The stand alone got a full strip down to bare steel and new paint, as it was a marketplace find that someone started and gave up on. New fire pot and rod and away she goes.

They did pineapple ribs just fine :)
IMG_3545.jpeg
 

Attachments

  • IMG_3549.jpeg
    IMG_3549.jpeg
    911.1 KB · Views: 36

frankthezapper

Well-known member
Joined
Apr 22, 2014
Messages
99
Location
Brunswick Heads, NSW, Australia
Wow - you’re on a roll with your spring cleaning!

What do you do with old PC parts? I’m going to assume most of them go to the landfill as recycling would probably not be worth the time. I’ve got nothing against recycling - we do it religiously, I hate waste, but how does one extract value from old pc parts?
I pull the magnets from old hard drives, they are super strong, and they have attachment plates attached
 

HPRifleman

Member Emeritus
Joined
Nov 18, 2019
Messages
767
Location
Wayne, IL
How about a suction cup mount low on the windshield? Get it up nearer to line of sight so you don't look down while driving.
I have one high in my Suburban and it has been plenty strong enough without other support. Down low the phone cradle could rest on the dash.
The phone is just there to change music to the bluetooth speaker. It won't be looked at very much and I didn't want anything blocking my vision through the glass. The design of the car already has some huge blind spots as it is.
 

rayra

Well-known member
Joined
Dec 1, 2014
Messages
4,724
Location
Escaped from Los Angeles
The phone is just there to change music to the bluetooth speaker. It won't be looked at very much and I didn't want anything blocking my vision through the glass. The design of the car already has some huge blind spots as it is.
Down low, phone horizontal, touching the dash, you will probably find that the phone doesn't obstruct any line of sight, doesn't break the plane between your eye and the nose of the vehicle.
I have mine mounted this way in my old pickup, mostly because its USB cord is plugged into an inverter in the cigarette lighter socket.

In my Suburban, I went high for convenience and I'd added a dual USB port to the overhead console. I've turned the thing into a mess of distractions though. But at least the road is still in my field of vision when I'm looking at the phone screen.

Same goes for that tablet mount above the 2U entertainment head unit, the top of the tablet doesn't project above the line of sight to the front edge of my hood. It blocks nothing, in terms of vision.

I also used a low windshield mount with my '73 Firebird.

I've seen a few folks use 'RAM' ball mounts and attach their devices to their A-pillar. but unless you find or make a custom plastic shroud that wraps onto the A-frame - like a vac-formed gauge cluster - you'd have to make some holes in it, and that's probably not desirable.
 

Attachments

  • tower of babel.jpg
    tower of babel.jpg
    47.3 KB · Views: 40
To avoid these ads, REGISTER NOW!
Top Bottom