To avoid these ads, REGISTER NOW!

What did you do "IN" your garage today?

Old Man Roger

Well-known member
Joined
Apr 6, 2017
Messages
17,881
Location
Palm Coast Florida
Got these girls all cleaned up and tuned up.

New fire pot and rod in one, and just a good clean on the others internals. Quick sand and paint on the cart occupying one as the boss had a slight fire in it one afternoon, much to her dismay. Not a huge deal as it usually wears a winter cover anyways, so I wasn’t going for perfection. The stand alone got a full strip down to bare steel and new paint, as it was a marketplace find that someone started and gave up on. New fire pot and rod and away she goes.

They did pineapple ribs just fine :)
IMG_3545.jpeg
After really looking at those ribs I know they would be delicious, but at first glance it looked like hot dog doo. Sorry, but I can’t unsee it..lol
Took the head apart on the milling machine to replace the brake shoes. Then moaned and groaned about how expensive they are.
First world problems:pimpflash
 
To avoid these ads, REGISTER NOW!

Ultradog MN

Well-known member
Joined
Jan 20, 2024
Messages
798
Location
Twin Cities
My shop isn't as tidy as some but it WAS reasonably well organized.
Wedneday I turned it into a total hell hole.
I bought some pallet racking for the other stall and am moving everything that was on these wooden shelves over there.
I'm reusing the plywood shelf boards on the pallet racks so EVERYTHING had to get moved - to anywhere and everywhere.
It will be a week or two long project that I was dreading but I got it started.
Craigslist has been my friend.
Have sold about a dozen items and have half a dozen ads there for stuff I don't need anymore.
I made a bit more progress over the last few days. Have all the shelving out and since I had only taped the drywall with 1 coat before I built the wood shelving I'm wiping on some more mud.
These are 2x4 walls, 9'3" ceiling height. R15 insulation, 5/8" fire rated sheetrock. Now with two coats of Durabond on it.
I'll wipe on a coat of Plus 3 today.
Then sand it in a day or two - or maybe not sand - it's a garage... and prime and paint.
Then I can start the wiring.
 

Attachments

  • 23202443756.jpg
    23202443756.jpg
    484.7 KB · Views: 55

welder4956

Well-known member
Joined
Apr 8, 2010
Messages
3,084
Location
Birmingham, AL USA
Installed new front suspension system on the comet, got it back sitting level after doing a 1” drop on the rear suspension. Now have to reroute the transmission cooler lines and waiting on my manual rack and pinion conversion to ship from flaming rivers.IMG_2066.jpeg

Nice! What suspension kit did you use for the front? I've been weighing options for my Fairlane.
 

Lassen Forge

Well-known member
Joined
Apr 26, 2014
Messages
15,415
Location
The romantic hills of central Umbria, Italy,
Got more stuff put away and hung up, boards in the wire shelves so they're stronger and usable, and spread out my newly bought 80 KG (175 lbs) of path gravel on the slippery, gooey crappy path around my shop (going up a hillside) so I can actually get up the hill to our storeroom. Still need another 80 KG to do some parts (using some concrete reinforcing grate for now) but it beats sliding *** over teakettle on that gorilla snot surface. (Been there, done that, wore the mud)
 

Ultradog MN

Well-known member
Joined
Jan 20, 2024
Messages
798
Location
Twin Cities
Got my inner fenderskirts whipped up, and in…..not perfect so time to add in steel to the apron so drivers side can be notched out too for shock tower thus letting it sit lower in the back.97A09626-D879-40FE-9A73-C6363C68A2FA.jpeg
Hard to tell from here but aside from the color, the letters on your grill look nearly identical to these.
 

Attachments

  • 232024121519.jpg
    232024121519.jpg
    1.3 MB · Views: 26

Bob Heine

ALLIANCE MEMBER
Joined
Oct 24, 2009
Messages
10,709
Location
Boca Raton, Florida
I also used a low windshield mount with my '73 Firebird.
@rayra, when @HPRifleman mentioned the blind spots in his C3 Corvette, I had to comment. The C3s have a very low seating position, low and steeply slanted windshield, bulging fenders and gigantic sail panels behind your head. I have both a C3 and C4 Corvette and the visibility in my C4 is much better. I snatched this view from a Facebook video and it shows the driver perspective but I suspect the camera is above the driver's line of sight. The steering wheel has been replaced with a significantly smaller one so that's not blocking the field of view like a stock 15-inch one does as well. Also note how helpful the two rearview mirrors are.
C3 Corvette Point of View.jpg
 

Mike65

Well-known member
Joined
Mar 7, 2007
Messages
3,118
Location
Horse Pasture, Va.
It is a nice partly sunny 64° day, so I decided to install the backup camera on my 05 F150. The camera I got is integral to the tailgate handle. I hooked up the RCA wire to the head unit & ran the wire through a rubber gromet under the driver's side sill plate & followed the trucks wire harness to the rear. Hooked up the backup camera wire to the harness from the head unit, & zip tied the camera harness to the trucks harness. Took me about 2 hours to do
 

rayra

Well-known member
Joined
Dec 1, 2014
Messages
4,724
Location
Escaped from Los Angeles
@rayra, when @HPRifleman mentioned the blind spots in his C3 Corvette, I had to comment. The C3s have a very low seating position, low and steeply slanted windshield, bulging fenders and gigantic sail panels behind your head. I have both a C3 and C4 Corvette and the visibility in my C4 is much better. I snatched this view from a Facebook video and it shows the driver perspective but I suspect the camera is above the driver's line of sight. The steering wheel has been replaced with a significantly smaller one so that's not blocking the field of view like a stock 15-inch one does as well. Also note how helpful the two rearview mirrors are.
C3 Corvette Point of View.jpg
I understand that sort of thing.
 

Attachments

  • fbproperht.jpg
    fbproperht.jpg
    20.8 KB · Views: 16
  • firebird.jpg
    firebird.jpg
    17.8 KB · Views: 19

rayra

Well-known member
Joined
Dec 1, 2014
Messages
4,724
Location
Escaped from Los Angeles
Messing about, installing the various hardware bits on the dining hutch and doors. The knobs are probably too big for the doors, they span right to the inner edges of the door pairs. But the smaller test knob looked lost on the drawer faces. Continuing to install the larger and if we think they won't work out I can always use them on the kitchen drawers. Won't really know until the doors are installed and doors hinges / gaps fully adjusted

Made a two-sided jig for drilling the knob holes in the cabinet doors, it's working well and will get used on the buffet too. Or any future doors of the same proportions.
I also dug out my cache of old knobs and cabinet handles, fishing for some longer mounting screws (found them). I'm tempted to use a bunch of these mismatched knobs on my long row of hanging cabinets. And oh look, there's this handy jig. Their doors are 3/4" white melamine-coated particle board, so it will only take a few minutes. I'll take a small mercy on those afflicted with OCD and at least make the knobs on each pair of doors the same.

Pretty sure I'm moving the dining hutch inside tomorrow.
 

Attachments

  • dining hutch 127 THE KNOBS.jpg
    dining hutch 127 THE KNOBS.jpg
    108.6 KB · Views: 35

Old Man Roger

Well-known member
Joined
Apr 6, 2017
Messages
17,881
Location
Palm Coast Florida
I have a friend who owns a ton of rental properties (100+) and a bunch of storage units. He sends me pics almost daily asking if I want stuff people left in houses/apartments, and gives me first dibs on abandoned storage units a couple times a year. I sell most of it but it's hard not to end up with a bunch of stuff I don't need cluttering up my place, just because it's free.
I’d probably be a hoarder with a friend like that..lol
1709501811917.png

That's like looking up a horse's nose. A goofy horse.
A thing of beauty.
 
To avoid these ads, REGISTER NOW!

rayra

Well-known member
Joined
Dec 1, 2014
Messages
4,724
Location
Escaped from Los Angeles
I’d probably be a hoarder with a friend like that..lol

A thing of beauty.
It was, I miss it. But I got my hand crushed under it in 2001 and was it scarring both physically and mentally and I just couldn't work on it anymore. Wound up selling it. Far as I know it is still out there somewhere.

/

All the hutch hardware reinstalled and readjusted, all the removable pieces staged inside the house and the hutch itself ready to be moved inside the house tomorrow.
But I just now realized I forgot to cut, fit, stain and poly coat the decorative trim molding that is undergirding the edge of the countertop. I'll try to get it prepped right now while the hutch is still conveniently in the garage. I can install the trim late in the week, after the hutch is in place (and loaded).

Feeling better about the two-tone as it nears completion. There is a lot of black and dark wood tones throughout the living, dining, dinette and kitchen. So it's all going to work together.

/we ever move again it might all just get painted a different color scheme
 

Attachments

  • dining hutch 127 THE KNOBS.jpg
    dining hutch 127 THE KNOBS.jpg
    108.6 KB · Views: 32
  • dining hutch 128 almost done.jpg
    dining hutch 128 almost done.jpg
    76.9 KB · Views: 29
  • dining hutch 129 almost done.jpg
    dining hutch 129 almost done.jpg
    83.4 KB · Views: 28
  • dining hutch 130 almost done.jpg
    dining hutch 130 almost done.jpg
    100 KB · Views: 34
  • dining hutch 131 almost done.jpg
    dining hutch 131 almost done.jpg
    143.8 KB · Views: 36

rayra

Well-known member
Joined
Dec 1, 2014
Messages
4,724
Location
Escaped from Los Angeles
1709501811917.png

That's like looking up a horse's nose. A goofy horse.

'hey! got a carrot? snuffle maybe an apple? do ya? maybe some sugar cubes?? snort'

im]
OUx1U3ZfRDdEMD0.jpg
 

southalabama

Well-known member
Joined
Jan 10, 2011
Messages
5,541
Location
Brewton AL
Played Jinga with the sandblasting booth trying to get in its future home in my shop. It was dads and when we closed the business he brought it home but didn’t have room to make it operational again. He was so looking forward to having it in my shop available with the flip of a switch. Death came suddenly for him and a surprise for us all. I’m left finishing some of his projects and those of my own. Blast booth is now rising To the top of my list.
 

Old Man Roger

Well-known member
Joined
Apr 6, 2017
Messages
17,881
Location
Palm Coast Florida
It was, I miss it. But I got my hand crushed under it in 2001 and was it scarring both physically and mentally and I just couldn't work on it anymore. Wound up selling it. Far as I know it is still out there somewhere.

/
That’s right, I forgot about your hand. I have similar feelings about chainsaws..lol
 

vwpieces

Well-known member
Joined
Apr 28, 2020
Messages
5,925
Location
Hills, PA
This is the 3rd Castrol clock i have repaired, restored for a buddy. Was the filthiest one so far.
20240302_234258.jpg

The knurled tiny nut for the minute hand ran away when I wasn't looking. Spent more time looking for it than it took to make another one.
20240303_200656.jpg

Needed to make hardware store run on this beautiful day. So the 1963 CB77 was the pick. My lowes no longer stocks flourescent starters, but they had the 18in tube.
20240303_165453.jpg

Clock mechanism torn apart, cleaned and lubed. Light working, polished the lens cover. Cover had scratches from second hand scraping it for years. Will see if it keeps running and keeps time. Gear sets for clock are available but if it works... 20240303_201648.jpg
 

vwpieces

Well-known member
Joined
Apr 28, 2020
Messages
5,925
Location
Hills, PA
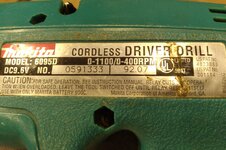
Been messing with my Old 9.6V stick batteries for my Makita drill made in 1992. After watching this vid...

Both batteries are replacement Tenergy brand NiMh. Both stone Dead and needed a boost from the bench PS to get the charger to try charging. Using an 1157 12V bulb for discharge. Initially they were only at a minute of bulb lighting before dying. Now on about 8 or 9th charge/discharge, the bulb is staying lit for 45+min.
More out of "will it work" than anything... but if they actually hold up to some use, I will use the drill again. Keep it in the basement woodshop.
20240303_233250.jpg
20240303_234716-jpg.2066378


Also recently spent too much time repairing my Milwaukee Gen2 M12 hammer drill. It started having intermittent stopping and sometimes dead. Giving it a smack sometimes revived it. Afterr having it apart 3 times I was actually able to fix it. The PCB ring under clutch was moving and not getting contact, also when it moved, the magnet on the speed 2 switch was not registering for soft starts on lower clutch settings. Some crazy glue after centering the ring has made it work like new again.
 

Attachments

  • 20240303_234716.jpg
    20240303_234716.jpg
    817.2 KB · Views: 359
Last edited:

larry4406

Well-known member
Joined
Jan 27, 2006
Messages
19,604
Location
Northern Virginia
This is the 3rd Castrol clock i have repaired, restored for a buddy. Was the filthiest one so far.
20240302_234258.jpg

The knurled tiny nut for the minute hand ran away when I wasn't looking. Spent more time looking for it than it took to make another one.
20240303_200656.jpg

Needed to make hardware store run on this beautiful day. So the 1963 CB77 was the pick. My lowes no longer stocks flourescent starters, but they had the 18in tube.
20240303_165453.jpg

Clock mechanism torn apart, cleaned and lubed. Light working, polished the lens cover. Cover had scratches from second hand scraping it for years. Will see if it keeps running and keeps time. Gear sets for clock are available but if it works... 20240303_201648.jpg
Nice vintage Honda!

Good work on the clock too!
 

rayra

Well-known member
Joined
Dec 1, 2014
Messages
4,724
Location
Escaped from Los Angeles
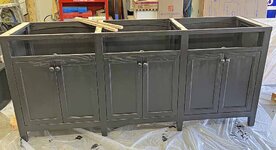
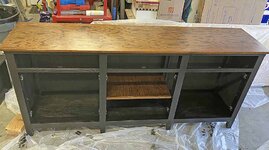
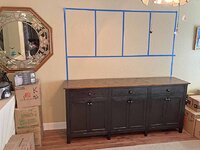
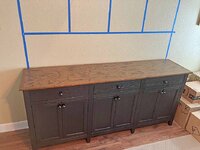
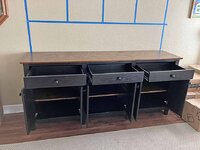
Ta-DA! 23 days in the doing. Over a year in the consideration and note-making.

Buffet construction starts tomorrow. I hope to finish it in 16-18 days. Will be 66-68" long and 2 drawers / 4 doors. Same in all other respects. Some parts of it are already fashioned.
 

Attachments

  • dining hutch 132 in place.jpg
    dining hutch 132 in place.jpg
    105.9 KB · Views: 28
  • dining hutch 133 in place.jpg
    dining hutch 133 in place.jpg
    101.5 KB · Views: 28
  • dining hutch 134 in place.jpg
    dining hutch 134 in place.jpg
    108.2 KB · Views: 30
Last edited:

LeeG

Well-known member
Joined
Nov 29, 2012
Messages
1,532
Location
Phoenix, AZ
Spent an hour or so working on bicycles for the neighbors kids. I let them do as much as they can. New inner tubes, front brakes, handlebar grips, and adjustments as needed.

Then I had some lathe and welding work to fix some strap winders for another neighbor. Was a good day.

Lee
 

Jim_No_Garage

Well-known member
Joined
Jan 15, 2011
Messages
3,322
Location
Millington NJ
On Sunday we made a Lowes run for some oak shoe molding for the kitchen, and then stained it to something approaching the color of the cabinetry. The cabinets are sort of a pickled oak. The floor guys are coming Thursday first thing. I am doing the shoe molding install so I need to be ready for Thursday night. This was also a test run for staining the 2 new doors we purchased to full the opening of a cabinet we cut down to make a taller refrigerator fit in the existing opening.

This evening I sat and chatted with my son while he soldered up the wiring harness to connect a touch panel radio head unit in his Suburban. I'm thinking that a speaker replacement/upgrade is next on the list.

Cheers

Jim
 

Jgaz

Well-known member
Joined
Dec 16, 2016
Messages
1,713
Location
AZ
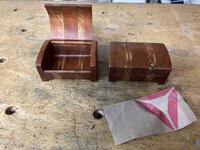
Put the last coat of finish on a couple of bandsaw boxes. Good drying weather in Phoenix today.
IMG_4218.jpeg
I usually lightly scuff the wiping finish between coats with some 400 grit.
After the last coat I use a section of paper grocery bag like I would sandpaper.
Just enough abrasive to knock off the dust nibs but not enough grit to scratch the finish.

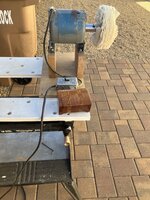
I decided to polish these two a bit more with my buffer set up.
IMG_4222.jpeg
Not very flattering light in the last picture
 

southalabama

Well-known member
Joined
Jan 10, 2011
Messages
5,541
Location
Brewton AL
I’d been painting wood shelves for this cabinet. I’d miscounted and was one short so finished painting it earlier today.

The cabinet is probably a Lyon. It was some type of equipment cabinet at an AT&T microwave office. The equipment was long gone by the time dad got the cabinet in the mid 80’s. He had four more in his shop. He gave me this one. The cabinet is 7 feet tall and is a heavy sob. For now mom wants to keep the other four.

Not sure on the layout of the bins. Just played around with some Akro bins to get a feel for it. I’d bought the Akro bins on various Amazon deep discounts. 70 percent off retail.

Have a business trip coming up and just wanted to feel like I almost finished something.
 

Attachments

  • BFE59440-316A-4916-A6E7-CF2C103EC3F1.jpeg
    BFE59440-316A-4916-A6E7-CF2C103EC3F1.jpeg
    742.4 KB · Views: 47
To avoid these ads, REGISTER NOW!
Top Bottom