To avoid these ads, REGISTER NOW!

What did you do "IN" your garage today?

To avoid these ads, REGISTER NOW!

rayra

Well-known member
Joined
Dec 1, 2014
Messages
4,724
Location
Escaped from Los Angeles
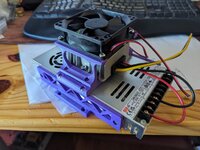
Made a little power supply stack for the 3d printer.

24v power supply.
12v 20a buck converter.
24v cooling fan.

I already had all this on hand, which is why I did it this way.

1000002277.jpg
Very cool. I'd go absolutely nuts with a 3D printer (or a computer-controlled router table, for that matter). I've almost deliberately NOT looked into that tech. But it sure would be nice for a lot of things.
Is there a data library of shapes you can cobble together, or do you have to design it all?
 

Jgaz

Well-known member
Joined
Dec 16, 2016
Messages
1,713
Location
AZ
Does the spalting come out that light in the birch, or did you do something special to it to highlight it?
That‘s the way it comes out. Some pieces are lighter than others.

The boxes had a coat of boiled linseed oil applied first that really seemed to darken the cherry on these two.
The BLO was followed by a couple of coats of thinned spar varnish (50/50 with mineral spirts) applied as lightly as possible.
 

rayra

Well-known member
Joined
Dec 1, 2014
Messages
4,724
Location
Escaped from Los Angeles
That‘s the way it comes out. Some pieces are lighter than others.

The boxes had a coat of boiled linseed oil applied first that really seemed to darken the cherry on these two.
The BLO was followed by a couple of coats of thinned spar varnish (50/50 with mineral spirts) applied as lightly as possible.
Do you thin it to aid penetration or to fight bubbles? Been having a tough time fighting the poly on the oak voids. ~3 weeks I should be applying poly to the buffet build and I'm fishing around for solutions.
 

niget2002

Well-known member
Joined
Oct 2, 2012
Messages
11,265
Location
Josephine, TX
Very cool. I'd go absolutely nuts with a 3D printer (or a computer-controlled router table, for that matter). I've almost deliberately NOT looked into that tech. But it sure would be nice for a lot of things.
Is there a data library of shapes you can cobble together, or do you have to design it all?
There's sites like printables.com where you can download pre-made designs. But I typically design my own in fusion 360. Most companies provide drawings you can import and design around. McMaster carr has designs for most of their products. There's also onshape for designing parts where you can pull from other people's designs.
 

Jgaz

Well-known member
Joined
Dec 16, 2016
Messages
1,713
Location
AZ
Do you thin it to aid penetration or to fight bubbles? Been having a tough time fighting the poly on the oak voids. ~3 weeks I should be applying poly to the buffet build and I'm fishing around for solutions.
I thin it to help it flow out easier to help eliminate bubbles and brush marks.

This article details my go to finish for years.

Lately, I’ve deviated from the above formula and use the boiled linseed oil separately as a first coat on some woods mostly to add color.
In my experience, if the BLO is used as part of the wiping varnish mixture as in the above article the finish will take much longer to dry completely.
I didn’t find this to be an issue in my basement shop in Michigan but here in Phoenix where there’s lots of airborne dust it seemed to be a problem.

As you would expect, the drawback to thinning the varnish is that more coats have to be applied for the same protection on something like your project.

I almost replied to your post with basically this info but didn’t want it to be one of those “you know what you should have done” posts.
 

rayra

Well-known member
Joined
Dec 1, 2014
Messages
4,724
Location
Escaped from Los Angeles
I thin it to help it flow out easier to help eliminate bubbles and brush marks.

This article details my go to finish for years.

Lately, I’ve deviated from the above formula and use the boiled linseed oil separately as a first coat on some woods mostly to add color.
In my experience, if the BLO is used as part of the wiping varnish mixture as in the above article the finish will take much longer to dry completely.
I didn’t find this to be an issue in my basement shop in Michigan but here in Phoenix where there’s lots of airborne dust it seemed to be a problem.

As you would expect, the drawback to thinning the varnish is that more coats have to be applied for the same protection on something like your project.

I almost replied to your post with basically this info but didn’t want it to be one of those “you know what you should have done” posts.
Feel free. It all goes into the 'general fund of knowledge' folder.

I used BLO many years ago on a replacement CNC-machined walnut stock for my Garand, it gave me the look I wanted and has been very long lasting. About the same time I switched to oiling outdoor woods instead of shellac / varnish. We had a long wood-shrouded bench / cover for a roll up pool cover that was a real bear in the SoCal sun. I got tired of sanding and refinishing it every couple years, so just started washing and oiling it every year. That slatted cover is the backdrop in this Garand picture -
 

Attachments

  • garandbeautyshot.JPG
    garandbeautyshot.JPG
    30.6 KB · Views: 69

Mike65

Well-known member
Joined
Mar 7, 2007
Messages
3,119
Location
Horse Pasture, Va.
Cut up a bunch of cardboard boxes for recycling, Tested out the new backup camera on my 05 F150 in the daylight & early this morning when it was dark. I put LED bulbs in the backup light for added lighting with the backup camera. I can now see directly behind the truck when trying to back up.
 

Houdini5150

Well-known member
Joined
Mar 17, 2022
Messages
570
Location
Arizona
Replaced the 2 fluorescent bulbs in the garage. Went with the bright daylight ones lol not sure that was a good choice. the light is kinda weird in there eh its ok though. I have one light fixture and then the door opener...

Found an old license plate in my car when I was putting tools away under rear storage- hung that plate up on my back wall. now I have 3 up there
 
To avoid these ads, REGISTER NOW!

JEFFREYWisconsin

Well-known member
Joined
Oct 9, 2021
Messages
380
Just barely rubbed a big oak tree with the back of my Jeep, ripped the old license plate holder off. I feel like the tree rash on my plate adds a certain character. Anyway, I put a new holder on today and it has a light again too! Bonus.
 

Attachments

  • IMG_1854.jpeg
    IMG_1854.jpeg
    538.7 KB · Views: 83
Last edited:

Motorman55

Well-known member
Joined
Apr 10, 2016
Messages
2,652
Location
South Jersey
Raining outside today so no working on the new shed. Instead I cut and glued down some 3/4" aluminum edge trim on the wood top of the gray metal shelving. Did the 45o andgle cuts on the corners. Not perfect but good enough. Going to round the corners just a little once the adhesive dries so the cuts won't be as bad when I run into it.

Yeah, I could use spring style clamps.
 

Attachments

  • IMG_8717.JPG
    IMG_8717.JPG
    890.2 KB · Views: 59
  • IMG_8718.JPG
    IMG_8718.JPG
    697.2 KB · Views: 58

rayra

Well-known member
Joined
Dec 1, 2014
Messages
4,724
Location
Escaped from Los Angeles
Busy afternoon of woodcutting after a morning in a surgical suite getting some cortisone injected in my left hip.

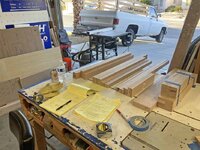
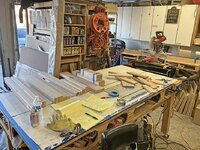
Came very close with the wood estimate, also managed to use a bunch of the longer / wider offcuts from the hutch build. The Box of Oak (TM) is getting either very short or very narrow. I may do some fingerjointing or glue-ups of those remnants to make the interior vertical stiles that will support the drawers and shelves. Those pieces need to be 2.5"W x 29.75"H and I need 8. Or I may cut them from poplar. I have enough of that left to make 5pcs.
But I'm also still needing the oak plank wood to make the drawer boxes. Drawers sides (4) 16.25"L and (4) 29"L. That's maybe 1x6x10' + 1x6x6'. Or maybe (2) 8' pcs. TBD.

The new miter station setup with stop block made things real fast (put an 80 tooth blade on it, crosscutting oak). Fresh 50T combo blade on the TABLE saw also helped ripping oak. Only made a mistake on two pieces end panel top rails. And a little cut planning and choices in the original dimensions pays off. I try to keep things under 32" to get three full lengths out of 8' boards. Likewise making upper and lower face frame rails at 3" and 2.25" which together with a saw kerf consumes almost the entire width of a 1x6. Just a few slivers left over.
The random jumble of pieces on the work table are the fresh remnants.

The neatly ordered bunches are the parts to make the back and front face frames and the end frames and the door frames and the false fronts of the drawers. So right now I have everything cut for all the exteriors. Excepting the luan panels. I don't have enough remnant of that to make all the back and end and door panels / centers AND the drawer bottoms. Nor wide enough for the two back panels. I'm less than an inch short on panel width for the back, I COULD narrow the entire buffet by 2" and use the partial sheet I have and get the back and both ends glued up tomorrow, without having to make yet another store run.

Tomorrow will be forming the arched top rails for the back and end face frames and slot cutting and kreg pocket drilling and maybe routing the door frames. At least TRY to have all the parts to start overnight glue-ups. I once again failed to do that today, so caught up in batch cutting and maximizing wood use that near the end of the day I had nothing ready to glue up. /sad trombone

But I think this Buffet build is going to go REALLY fast. I don't really have to figure anything out as I go, this time. Just execute.
 

Attachments

  • buffet build 007 woodpecker.jpg
    buffet build 007 woodpecker.jpg
    69.3 KB · Views: 49
  • buffet build 006 sliver of waste.jpg
    buffet build 006 sliver of waste.jpg
    92.1 KB · Views: 35
  • buffet build 005 oak offcuts.jpg
    buffet build 005 oak offcuts.jpg
    73.6 KB · Views: 36
  • buffet build 004 big batches.jpg
    buffet build 004 big batches.jpg
    108 KB · Views: 38
  • buffet build 003 big batches.jpg
    buffet build 003 big batches.jpg
    151.6 KB · Views: 56
Last edited:

joendoodle

Active member
Joined
Aug 24, 2017
Messages
42
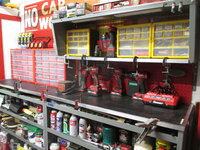
After finishing a brake job, then dumping out my tray of 3/8" sockets, picked 'em up and organized 'em.. then since I had the organize it bug.. converted my rolling cart to carry my impact wrenches, impact sockets, and all the fancy brake job tools I own.

Still organizing: Rearranged my bookshelves such that my frequently used shop manuals were closer, and the old "1970's and 1980's") shop manuals are harder to get to.
 

bugnut

ALLIANCE MEMBER
Joined
Jul 14, 2012
Messages
4,009
Location
Central Ohio
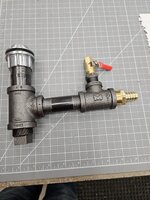
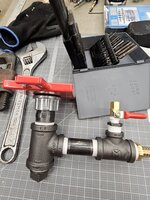
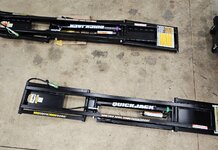
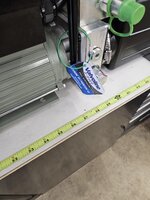
A couple very productive hours spent in the shop today. After what seemed like a dozen trips to the hardware built the siphon assembly for my blast cabinet, installed, tested and finished. After completing that was able to uncrate and assemble the new quickjacks, managed to bleed them and they are ready for use! It was a stellar day for me!
 

Attachments

  • 20240223_094933.jpg
    20240223_094933.jpg
    933.8 KB · Views: 42
  • 20240303_104905.jpg
    20240303_104905.jpg
    875.8 KB · Views: 40
  • 20240303_104910.jpg
    20240303_104910.jpg
    822.7 KB · Views: 35
  • 20240305_135018.jpg
    20240305_135018.jpg
    716.3 KB · Views: 36
  • 20240305_135743.jpg
    20240305_135743.jpg
    768.9 KB · Views: 37

joendoodle

Active member
Joined
Aug 24, 2017
Messages
42
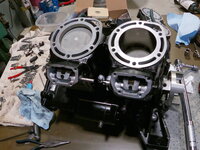
Several years ago I replaced the OEM (manual) mirrors in my F150 w/ remote, heated turn signal, puddle light extendable trailer towing mirrors.. I ran the wires for but never hooked up the heated mirror feature. Well finally I built a timing circuit and now that winter is almost over :) I hooked 'em up (you can see the new button below the heater controls)
Heated mirror control.jpg
 

whateg01

Well-known member
Joined
Mar 13, 2006
Messages
11,544
Location
doo dah, kansas, usa
Several years ago I replaced the OEM (manual) mirrors in my F150 w/ remote, heated turn signal, puddle light extendable trailer towing mirrors.. I ran the wires for but never hooked up the heated mirror feature. Well finally I built a timing circuit and now that winter is almost over :) I hooked 'em up (you can see the new button below the heater controls)
Heated mirror control.jpg
What did you use for a timer?
 

GrayFlattop

Well-known member
Joined
Jan 18, 2018
Messages
1,051
Location
Chicago
Unpacked the new 30 liter ultrasonic cleaner to replace the 22 liter ultrasonic cleaner that went up in smoke (Heating element).

Sorted and organized some fasteners. Made a game plan for the upcoming weekend's work. Then went back to work - my full time job is really getting in the way of working around the house.
 

rayra

Well-known member
Joined
Dec 1, 2014
Messages
4,724
Location
Escaped from Los Angeles
Buffet work continued this morning and after more notes / sketching I figured I needed to shorten to overall length of the cabinet body by 2" so I could make full use of some remnant luan in the rear face frame / panels. The big remnant piece I had on hand was just a little too narrow to span the original widths.
So I chopped 1" off all the front and back face frame horizontal rails and drawer false fronts. And 1/2" off of all the door frame rails. Then diced the luan for the back panels and for the 4 door panels. And had enough for one drawer bottom. Still need the other door bottom and the two end face frame panels. I'm liking the slightly narrower proportions better anyway. I was stretchign things out to have only 2 drawers / 4 doors, at 68.5"L. 66.5" now isn't a whole lot better, but still an improvement.
Last thing before lunch I ran all the door frame pieces thru the router to form those frames.
We went out at lunchtime to our cruddier Home Depot and failed to get the new sheet of luan or a decent 8'L oak plank, misremembered which HomeDepot had the good luan panel type. But we'll get that tomorrow on the north edge of town after an afternoon Imax showing of Dune2. And the oak plank.
But did get the poplar 1x3 so I can but all the interior door and drawer support vertical stiles.

So later this afternoon I can make room on the work table and glue up the 4 doors. And maybe the front face frame too. Or maybe work on forming the arched top rails for the back and end panels.
But first I have to head out back for some irrigation repairs and tree pruning and sowing some granular fertilizers. It's nice and sunny and 68F out there, need to make the most of it.
 

Attachments

  • buffet build 008 door frame routing.jpg
    buffet build 008 door frame routing.jpg
    116.7 KB · Views: 32

02Xterra

Well-known member
Joined
Oct 1, 2015
Messages
525
Location
Lynchburg, Va
Trying to figure out an electrical issue with my '95 Eclipse

full


Also cut a spare piece of red oak to make a block to mount an old pencil sharpener I got from an estate sale.

full


full
 
To avoid these ads, REGISTER NOW!
Top Bottom