To avoid these ads, REGISTER NOW!

Help with Luxury Vinyl Plank floor

GarageDan

Well-known member
Joined
Dec 27, 2012
Messages
221
Hey y'all!

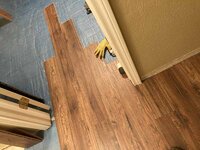
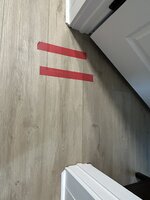
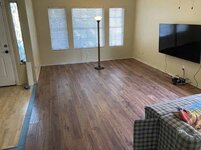
Lots of good advice here, so I'm hoping you can help me with my floor. Outside the bedroom door the planks didn't line up great and it didn't bother me until I was done. So this is a board in the middle of the floor locked in by two bedrooms and a stair landing. As you can see in the video, it's a little loose around the edge and I think the floor underneath must be uneven. I was wondering if I could inject something underneath it? I'm really lost here and don't know what to do. But, I'm afraid if I don't do something it will not only bother my wife, but it will catch on something and tear the floor up. Any suggestions are appreciated.

 
To avoid these ads, REGISTER NOW!

cgrutt

Well-known member
Joined
Mar 4, 2016
Messages
8,356
It looks like it wasn't locked together properly. I had that happen in a floor I was installing for a friend of mine and had to pull apart the flooring to nearest wall and reinstall making sure they are completely locked together. Some boards took quite a bit of effort to lock. There is a steel tool that has a couple of bends in it that you hook around one side and hit with hammer that helped. You really don't want to leave that as it is or will be a tripping hazzard.

ETA I believe the flooring was pretty inexpensive from Home Depot if that is same stuff it was a bear to install. Good luck regardless.
 

aquinob

Well-known member
Joined
Oct 7, 2014
Messages
239
Location
Portsmouth, VA
I agree, its not locked together. Now how you get it to do that is the question. Not sure about all brands but the flooring I put down recently (Pergo) in a motorhome, you had to start at one side and work all the way to the other. If you were doing two rooms, then you would take the planks out from one room continuing to the next. You cant try and work both rooms separately and try and meet in the middle, there is too much material to try and pull together if that makes sense.

Might be better if you take some pics of both rooms so we can get a better idea of what it going on.
 

rayra

Well-known member
Joined
Dec 1, 2014
Messages
4,724
Location
Escaped from Los Angeles
It looks like it wasn't locked together properly. I had that happen in a floor I was installing for a friend of mine and had to pull apart the flooring to nearest wall and reinstall making sure they are completely locked together. Some boards took quite a bit of effort to lock. There is a steel tool that has a couple of bends in it that you hook around one side and hit with hammer that helped. You really don't want to leave that as it is or will be a tripping hazzard.

ETA I believe the flooring was pretty inexpensive from Home Depot if that is same stuff it was a bear to install. Good luck regardless.

Addendum to that, cut a waste piece that you can lock onto the piece you are trying to move, and put the tool on that scrap piece instead of beating on the lock bead on the side of the pieces.
Good idea on the ends too, when you try to close end gaps after the fact.

Also a bunch of short vids on youtube illustrating using double-sided tape to temp attach blocks to the surface and beat on the blocks instead of directly on the flooring. The OP will as mentioned above need to disassemble to properly engage that missed / gapped side joint. There's no good way to beat it together without destroying it. At best you could put some krazy glue in there with a needle tip applicator and fake it, but odds are high it won't look good.

I ran a continuous pattern throughout much of our house, 3yrs ago. Living, Dining, basically front to back door and off down a T-hallway with angled corners, a bedroom office, inside closets, etc. That metal bar tool with the bent ends was invaluable. Took a LOT of work to get that long main run straight and true and keep it that way while adding more to fill in the main rooms. Working backwards, because I needed the full plank to land just right to frame a travertine entryway. Huge PITA.
 

Attachments

  • sparta flooring 08.jpg
    sparta flooring 08.jpg
    50.9 KB · Views: 39
  • sparta flooring 09.jpg
    sparta flooring 09.jpg
    52.4 KB · Views: 38
  • sparta flooring 26.jpg
    sparta flooring 26.jpg
    51 KB · Views: 36
  • sparta flooring 25.jpg
    sparta flooring 25.jpg
    74.1 KB · Views: 36
  • sparta tile foyer 15.jpg
    sparta tile foyer 15.jpg
    68.3 KB · Views: 37
OP
G

GarageDan

Well-known member
Joined
Dec 27, 2012
Messages
221
Addendum to that, cut a waste piece that you can lock onto the piece you are trying to move, and put the tool on that scrap piece instead of beating on the lock bead on the side of the pieces.
Good idea on the ends too, when you try to close end gaps after the fact.

Also a bunch of short vids on youtube illustrating using double-sided tape to temp attach blocks to the surface and beat on the blocks instead of directly on the flooring. The OP will as mentioned above need to disassemble to properly engage that missed / gapped side joint. There's no good way to beat it together without destroying it. At best you could put some krazy glue in there with a needle tip applicator and fake it, but odds are high it won't look good.

I ran a continuous pattern throughout much of our house, 3yrs ago. Living, Dining, basically front to back door and off down a T-hallway with angled corners, a bedroom office, inside closets, etc. That metal bar tool with the bent ends was invaluable. Took a LOT of work to get that long main run straight and true and keep it that way while adding more to fill in the main rooms. Working backwards, because I needed the full plank to land just right to frame a travertine entryway. Huge PITA.
I know the tool you're talking about and used it. In fact I had a good experience with 1500sf, it's this one spot. I remember working on this and had a devil of a time as it's on top of the stairs landing, around the door frames, with walls that must not have been that square. I finally got it connected, but it must not have been well because it has separated. It's a continuous run out of one bedroom, into the hall and back into the other. I can't pull up all the planks to fix it the way you. I could get a matching threshold and install. That would give me some help - or would it?
 

dave*99

Well-known member
Joined
May 5, 2009
Messages
4,277
Location
Coastal NJ
I know the tool you're talking about and used it. In fact I had a good experience with 1500sf, it's this one spot. I remember working on this and had a devil of a time as it's on top of the stairs landing, around the door frames, with walls that must not have been that square. I finally got it connected, but it must not have been well because it has separated. It's a continuous run out of one bedroom, into the hall and back into the other. I can't pull up all the planks to fix it the way you. I could get a matching threshold and install. That would give me some help - or would it?
Sometimes this happens because there is insufficient gap at the edges of the floor. For instance - flooring passes from bedroom into hallway. Contracts, hits wall in hallway under the baseboard trim. Separates near bedroom doorway.
 

KSJeff

Well-known member
Joined
Dec 19, 2011
Messages
764
Location
Andover, Kansas
Sometimes if I got a high seam or a partial lock like that I could put a large block over it (like a 6"x3" piece of 1" hardwood) and beat it in with a deadblow. You can also see if you can coax it over with a slightly dragging hit from one side to the seam. If not, you're going to have to pull it back up. I used a 3lb deadblow when I put mine in. All of the various vinyl planks I've put in have required more pressure to seat than the old laminate flooring. Good luck.
 

K13

Well-known member
Joined
Oct 24, 2007
Messages
2,233
Location
St. Albert, AB Canada
Definitely not locked together. You could try getting some good double sided tape, tape a wood block on top of the floor by the area that has not locked and hammer against the block to try and lock the pieces back together. The issue may be there is not enough room for the flooring to move enough to lock. Putting a foot on the block helps keep it from torturing off.
 
Last edited:
To avoid these ads, REGISTER NOW!

duneslider

Well-known member
Joined
Jan 20, 2013
Messages
2,267
Location
Riverton, Utah
Its been a while since I have read the instructions but I believe a lot of them say you should put thresholds between rooms in doorways like that. It can be tough to keep it together going room to room like that. If the whole area on one side or the other shifts it will pull apart at the weak link which is the small doorway. At this point, it is pretty hard to fix what you have.
 

rayra

Well-known member
Joined
Dec 1, 2014
Messages
4,724
Location
Escaped from Los Angeles
I know the tool you're talking about and used it. In fact I had a good experience with 1500sf, it's this one spot. I remember working on this and had a devil of a time as it's on top of the stairs landing, around the door frames, with walls that must not have been that square. I finally got it connected, but it must not have been well because it has separated. It's a continuous run out of one bedroom, into the hall and back into the other. I can't pull up all the planks to fix it the way you. I could get a matching threshold and install. That would give me some help - or would it?
You might have to. Besides the open seams between runs on both sides, you've got a bad gap at the door jamb corner in the bottom right of the image. I can't tell from your looking-down imagery, did you undercut those door jambs or did you try to cut the flooring pieces to fit around them?
I've purposefully done big thresholds in door jams as a way to break boundaries between disparate floor tiling. And doing something like that there would allow you to split that flooring across the centerline of the doorway and compress those open seams, then remove whatever you must for a threshold or even a narrow transition strip. It will be a little odd placement, but with a matching strip akin to what I showed against the entryway tile you could correct the errors in the least objectionable way.
 

PCustoms

Well-known member
Joined
Jul 23, 2011
Messages
23,403
Location
VT
Second the threshold idea.

There's some issues with that spot that are going to be very difficult to fix without damaging the locking feature. Cut it, add the threshold strip and be done.
 

Steve W.

Well-known member
Joined
Mar 27, 2019
Messages
1,260
Location
Southwest oHIo
This is one reasson why I like glue down LVP over click.

That is why I have Professionals do my flooring.
We were looking at LVP for our home renovation project. Found that the color and pattern that we liked was click-together with a padded underside. Walking on the sample in the store was like walking on Pergo, a rather hollow sound (which I detest).

As a testament to my desire for silent walking, we are pouring a new sub-floor in our family room tomorrow. It's a ranch house on a slab. After adding 12 feet to the front of the garage, the previous owners converted the back half of the garage to a family room. Since it was a shallow step lower, they laid 2x4s on edge, then put a layer of 1/2" plywood, followed by an offset layer of 3/8" plywood. The transition from original slab to the wood floor has been uneven, getting worse over the years. The wood has been removed and tomorrow will be replaced with concrete, so our glued-down LVP will be just as silent as the rest of the house. :cool:

.
 

dave*99

Well-known member
Joined
May 5, 2009
Messages
4,277
Location
Coastal NJ
We were looking at LVP for our home renovation project. Found that the color and pattern that we liked was click-together with a padded underside. Walking on the sample in the store was like walking on Pergo, a rather hollow sound (which I detest).

As a testament to my desire for silent walking, we are pouring a new sub-floor in our family room tomorrow. It's a ranch house on a slab. After adding 12 feet to the front of the garage, the previous owners converted the back half of the garage to a family room. Since it was a shallow step lower, they laid 2x4s on edge, then put a layer of 1/2" plywood, followed by an offset layer of 3/8" plywood. The transition from original slab to the wood floor has been uneven, getting worse over the years. The wood has been removed and tomorrow will be replaced with concrete, so our glued-down LVP will be just as silent as the rest of the house. :cool:

.
I’m torn on the trade offs for the main living space. I don’t like squishy LVT. I don’t like rock hard flooring. What thickness / padding arrangement are you using?
 

rayra

Well-known member
Joined
Dec 1, 2014
Messages
4,724
Location
Escaped from Los Angeles
We were looking at LVP for our home renovation project. Found that the color and pattern that we liked was click-together with a padded underside. Walking on the sample in the store was like walking on Pergo, a rather hollow sound (which I detest).
I liken it to a tap dance noise.
Our original floor was like that, detested it, and some ***** tenant had wet mopped it repeatedly and it was destroyed.
One of the first things we got busy on, before we even moved all our stuff out of storage. Which made changing floors a lot easier. Took me a lot longer to get around to the travertine tiling etc.
 

Steve W.

Well-known member
Joined
Mar 27, 2019
Messages
1,260
Location
Southwest oHIo
I’m torn on the trade offs for the main living space. I don’t like squishy LVT. I don’t like rock hard flooring. What thickness / padding arrangement are you using?
We went with the rock hard. The vinyl itself is only about 1/8" and has NO padding on it.

As mentioned earlier, house is on a slab. We have padding and carpet in the three bedrooms and living room, the rest of the house is vinyl flooring, basically the traffic areas. That includes bathrooms, kitchen, dining room, hallways and family room. When the new concrete in the family room is ready, we will go in to continue with wiring, insulation, drywall, etc., finishing up with an area rug in front of the couch.

.
 

Fixr

Well-known member
Joined
Dec 23, 2012
Messages
9,708
Location
SW VA
We didn't do LVT, but we did click cork planks. The underlayment cushion gave it a little bit of sound insulation instead of hearing it squeak on the subfloor. We really like that part. But the requirement to leave a gap at the walls meant the seams opened up at the ends of random planks. Gaps opened up in the middle of the room depending on how traffic pushed the planks. Having several 80lb German shepherds at any given time playing vigorously contributed to that. They also created more surface patina than we planned for.

We plan to replace the cork planks with click LVT. We will minimize the gap at the walls, and we will glue the end joints in the area where playing dogs opened up the joints. Otherwise, we'll stick with what we did before. We'll also choose something with a thick wear layer.
 

Hakeem

Well-known member
Joined
Jan 22, 2024
Messages
1,278
Location
Chicago
Floating floors are installed with a ~1/4” gap along the wall to allow for temperature expansion. It looks like the top plank in your video drifted into this space, enabling the other planks to come free. Compounding the issue is that it looks like this is at the bottom of a stair landing so those pieces will be subject to a fair amount of force and traffic.

The fix is simple, just remove the piece(s) of trim that cover the planks you need to move and then tap them back into place with a floor puller and installation tool. Use heavy objects to weigh the neighboring planks down or else they will be likely to come loose as well. Hopefully none of the locking lugs are broken but if they are, replace the planks.
 
To avoid these ads, REGISTER NOW!
Top Bottom