To avoid these ads, REGISTER NOW!

What did you do "IN" your garage today?

kbeefy

Well-known member
Joined
Sep 14, 2013
Messages
3,467
Location
Harington, Eastern Washington
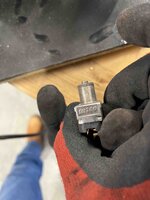
Had a chirp in the beltline of my 2005 F250, time to do pulleys and tensioner.

20240306_111003.jpg

20240306_135601.jpg


Drivers side OK, Passenger side tight! It's in there somewhere....
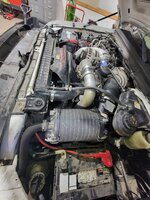
20240306_151159.jpg

There it is....

20240306_144148.jpg

Since I had to pull the Drivers Battery, Air Cleaner, and plastic cold side intercooler charge tube, I might as well put this metal cold side back in.

20240306_144248.jpg

Done. No more chirp.

(some pics were post job.... because)
 
To avoid these ads, REGISTER NOW!

Outlawmws

Well-known member
Joined
Aug 9, 2011
Messages
39,332
Location
The Badlands
Nothing in the garage. Waited for a delivery of my new "office" (my office is my easy chair). Cats are freaked out and trying to figure out what just happened...

Going to take some getting used to for me too, but I'm already loving not having the "table" for the laptop (13" 1X12) on my knees!
 

mikegt4

Well-known member
Joined
Sep 12, 2005
Messages
3,277
Location
sw ohio
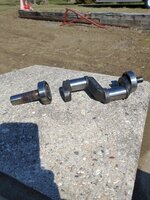
A few months ago my Emglo gas powered 2 stage 4 cylinder compressor suffered what appeared to be a crankshaft failure. I finally got around to taking it apart and indeed the crank was cleanly broken just inside of the support bearing. Oddly enough the inside of the compressor looked as if it had low hours on it, surprisingly clean, even the original factory hone marks still intact on the cylinder bores. I had bought it over 10 years ago from a gentleman who owned a duct cleaning business and had bought out a competitor who was retiring and this compressor was excess inventory for him. It was a little dirty but cleaned up nicely. I expected that it had been run hard cleaning ducts so the purchase price of $370 reflected that, a new one at the time was $2500. Now it looks like it might have been purchased new not long before the original owner decided to retire and in fact had low hours on it when I acquired it. The crankshaft at the break looks to have had an inclusion of some sort in the casting. A new crank, crank support roller bearings (damaged) and gaskets should put it back in operation. In the meantime I have been using my 3hp CH electric powered compressor but it is slow and weak compared to the Emglo. I had gotten use to the Emglo's 15.5 cfm output (runs blast cabinet just fine) and it's 0-175 psi in about 45 seconds (small tank).
 

Attachments

  • IMG_1836.JPG
    IMG_1836.JPG
    437.2 KB · Views: 47
  • IMG_20240303_131442755.jpg
    IMG_20240303_131442755.jpg
    1 MB · Views: 44
  • IMG_20240303_131343721.jpg
    IMG_20240303_131343721.jpg
    626.6 KB · Views: 43
  • IMG_20240302_173400993.jpg
    IMG_20240302_173400993.jpg
    385.7 KB · Views: 63

Ultradog MN

Well-known member
Joined
Jan 20, 2024
Messages
798
Location
Twin Cities
I made ...
Well,
I finished the mud and primed and painted it. Color is kind of froufrou but I had a gallon of light blue and a gallon of light yellow in the basement so I mixed them together and rolled if on.
I finished the new electrics - save for one outlet on the far end - was one short.
The upper row is 110V, lower is 220V three phase off an RPC.
Now I can start moving my machines against that wall and get my shop cleaned up.
I'm getting close to having a normal shop again.
Yay!
 

Attachments

  • 26202416122.jpg
    26202416122.jpg
    393.4 KB · Views: 66
Last edited:

rd65

Well-known member
Joined
Sep 29, 2017
Messages
2,841
Location
Granite Falls, WA
I finished assembling this 800cc, 120hp Yamaha Waverunner engine........installed, aligned, rebuilt the carbs, and started hooking "stuff" up.
Were those the ones that got the new choke plates? The holes in the stock ones were too large, so Yamaha had a bulletin to replace the plates with ones w/ smaller holes. What a pain in the ***. Did more than a few of those.
 

PWC Repair

Well-known member
Joined
Dec 27, 2012
Messages
3,193
Location
Arkansas
Were those the ones that got the new choke plates? The holes in the stock ones were too large, so Yamaha had a bulletin to replace the plates with ones w/ smaller holes. What a pain in the ***. Did more than a few of those.
Don't know......I've never even heard about that. They start very easily with a tad bit more low speed jetting and lower popoff.
 

jshillin

Well-known member
Joined
Nov 9, 2008
Messages
5,620
Location
PA
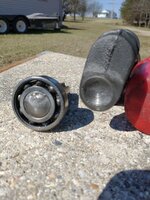
The sun was finally shining here in PA, so I didn't pull it in my garage and worked on it in the driveway. My daughter's friend said she couldn't see anything at night, so I told her to bring it over. Her high beam was burnt out and I don't know how any light shined through those cloudy lenses. I sanded and polished the lights, then finished with the Cerakote kit with wipe on clear. The kit works pretty well, I have used it a couple of times the last couple of years with good success. I did hit the plastic up front with Solution Finish as well.

20240303_110313.jpg20240303_122535.jpg
 

Blue Chips

Well-known member
Joined
Jan 25, 2012
Messages
199
Location
Maine
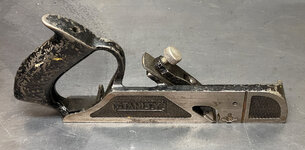
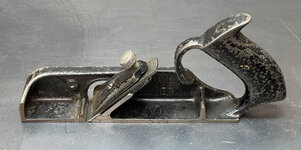
Got this old Stanley No. 191 rabbet plane the other day and decided to do a little restoration work on it. It was already in fairly good shape, so it was a simple restoration. It was a bit rusty here and there, the blade needed sharpening, the bottom/sole needed to be trued up a bit, the depth stop/gauge was missing, and the paint wasn't pretty any more.

stanley-191-2-reduced-image.jpg
stanley-191-1-reduced-image.jpg

I got a replacement depth gauge from someone on eBay, then I bead blasted a few parts and sharpened the blade:

191-plane-bead-blasted-reduced-image.jpg

I painted the body and lever cap/clamp, burnished a few surfaces, blued (with gun bluing) a couple of parts, trued the bottom/sole a bit, and reassembled it.

191-plane-side-view-without-depth-gauge-reduced-image.jpg
191-plane-left-side-reduced-image.jpg
191-plane-right-side-with-depth-gauge-reduced-image.jpg

Done, and ready to make shavings.
 
Last edited:

NUTTSGT

Super Moderator
Staff member
Joined
Sep 14, 2009
Messages
51,148
Location
Northern Central Ohio
Got this old Stanley No. 191 rabbet plane the other day and decided to do a little restoration work on it. It was already in fairly good shape, so it was a simple restoration. It was a bit rusty here and there, the blade needed sharpening, the base needed to be trued up a bit, the depth stop/gauge was missing, and the paint wasn't pretty any more.


191-plane-right-side-with-depth-gauge-reduced-image.jpg

Done, and ready to make shavings.
Hopefully, I cut this quote correctly.

That rehab in that picture is frame quality and perfect for the shop/den/ office wall
 

rayra

Well-known member
Joined
Dec 1, 2014
Messages
4,724
Location
Escaped from Los Angeles
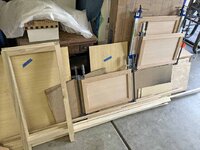
Buffet is indeed going fast. Taking a little break, running out of time today. Just need to form and verify the arched luan panels for the rear face frame. Finished shaping all the face frame rails and stiles. Arches, slots, etc. Later this evening I'll pick up the luan sheet and the last pieces of oak needed for the end panels and drawers.
Tomorrow I should start gluing up the face frames and substructure. Ought to have the cabinet body assembled by the end of this weekend. And all the rest of the parts fashioned and fitted by next Friday / Ides of March.


A plastic lid for a 5gal bucket makes an excellent solvent tray for cleaning sap and resins off your 10" saw blades.
The blades will just fit in the bottom of a 5gal bucket, too, good for soaking in something, but tougher to work the teeth with a scrub brush.
 

Attachments

  • buffet build 013 face frame parts ready.jpg
    buffet build 013 face frame parts ready.jpg
    121.8 KB · Views: 25
  • buffet build 012 slotting.jpg
    buffet build 012 slotting.jpg
    134.4 KB · Views: 20
  • buffet build 011 forming arches.jpg
    buffet build 011 forming arches.jpg
    89.4 KB · Views: 18
  • buffet build 010 doors assembled.jpg
    buffet build 010 doors assembled.jpg
    87.5 KB · Views: 19
  • buffet build 009 sawblade cleaning.jpg
    buffet build 009 sawblade cleaning.jpg
    253.3 KB · Views: 22

Wiz02

Well-known member
Joined
Jul 13, 2007
Messages
2,399
Location
Southeastern PA
Brought linesman, needle nose pliers, prybar, hammer, screwdriver assortment, drill, spade bits, impact, NM, wire nuts and some electrical boxes from the garage into the bathroom.

Every existing receptacle, the lighting fixture and fan are in the wrong place for the remodel.

When I made the recess for the new medicine cabinet, naturally a cable, actually 2 cables, were in the stud bay and needed to be rerouted. Some of the existing cables were now too short to reach the new fixture locations, so tomorrow I will add a box in the attic.

I thought that the job would take a day, haha, more like a week at the speed that I work at these days, especially in the attic.
 

Jgaz

Well-known member
Joined
Dec 16, 2016
Messages
1,712
Location
AZ
Buffet is indeed going fast. Taking a little break, running out of time today. Just need to form and verify the arched luan panels for the rear face frame. Finished shaping all the face frame rails and stiles. Arches, slots, etc. Later this evening I'll pick up the luan sheet and the last pieces of oak needed for the end panels and drawers.
Tomorrow I should start gluing up the face frames and substructure. Ought to have the cabinet body assembled by the end of this weekend. And all the rest of the parts fashioned and fitted by next Friday / Ides of March.


A plastic lid for a 5gal bucket makes an excellent solvent tray for cleaning sap and resins off your 10" saw blades.
The blades will just fit in the bottom of a 5gal bucket, too, good for soaking in something, but tougher to work the teeth with a scrub brush.
A Frisbee flying disk also works well for soaking a 10” blade.
I soak my saw blades in Washing Soda
 

PolishX

Active member
Joined
Dec 30, 2022
Messages
31
Location
Wasilla Alaska
Got this old Stanley No. 191 rabbet plane the other day and decided to do a little restoration work on it. It was already in fairly good shape, so it was a simple restoration. It was a bit rusty here and there, the blade needed sharpening, the bottom/sole needed to be trued up a bit, the depth stop/gauge was missing, and the paint wasn't pretty any more.

stanley-191-2-reduced-image.jpg
stanley-191-1-reduced-image.jpg

I got a replacement depth gauge from someone on eBay, then I bead blasted a few parts and sharpened the blade:

191-plane-bead-blasted-reduced-image.jpg

I painted the body and cap/clamp, burnished a few surfaces, blued (with gun bluing) a couple of parts, trued the bottom/sole a bit, and reassembled it:

191-plane-side-view-without-depth-gauge-reduced-image.jpg
191-plane-left-side-reduced-image.jpg
191-plane-right-side-with-depth-gauge-reduced-image.jpg

Done, and ready to make shavings.
That's gorgeous, I scored a Stanley 78 that was never used a few weeks ago
 
To avoid these ads, REGISTER NOW!

PWC Repair

Well-known member
Joined
Dec 27, 2012
Messages
3,193
Location
Arkansas
A few months ago my Emglo gas powered 2 stage 4 cylinder compressor suffered what appeared to be a crankshaft failure. I finally got around to taking it apart and indeed the crank was cleanly broken just inside of the support bearing. Oddly enough the inside of the compressor looked as if it had low hours on it, surprisingly clean, even the original factory hone marks still intact on the cylinder bores. I had bought it over 10 years ago from a gentleman who owned a duct cleaning business and had bought out a competitor who was retiring and this compressor was excess inventory for him. It was a little dirty but cleaned up nicely. I expected that it had been run hard cleaning ducts so the purchase price of $370 reflected that, a new one at the time was $2500. Now it looks like it might have been purchased new not long before the original owner decided to retire and in fact had low hours on it when I acquired it. The crankshaft at the break looks to have had an inclusion of some sort in the casting. A new crank, crank support roller bearings (damaged) and gaskets should put it back in operation. In the meantime I have been using my 3hp CH electric powered compressor but it is slow and weak compared to the Emglo. I had gotten use to the Emglo's 15.5 cfm output (runs blast cabinet just fine) and it's 0-175 psi in about 45 seconds (small tank).
That bearing at the break appears to have been spinning in the case as well.......possible the crank was slightly bent. Smear a bit of bearing retainer compound or anaerobic case sealant in that bearing pocket upon reassembly to make sure it stays put.
 

Fixr

Well-known member
Joined
Dec 23, 2012
Messages
9,709
Location
SW VA
Brought linesman, needle nose pliers, prybar, hammer, screwdriver assortment, drill, spade bits, impact, NM, wire nuts and some electrical boxes from the garage into the bathroom.

Every existing receptacle, the lighting fixture and fan are in the wrong place for the remodel.

When I made the recess for the new medicine cabinet, naturally a cable, actually 2 cables, were in the stud bay and needed to be rerouted. Some of the existing cables were now too short to reach the new fixture locations, so tomorrow I will add a box in the attic.

I thought that the job would take a day, haha, more like a week at the speed that I work at these days, especially in the attic.
Basic rule of project time estimation:

Figure out how long it should take, accounting for everything that could conceivably go wrong.

Multiply by two.

And adjust to the next largest unit of time.

So, one day project? Two weeks.

It's exponential depending on complexity of the project, and how many people are involved. When you get to government or corporate level, a closet project becomes a career.

Signed, Mr. Been There Done That. And exaggerates a bit.
 

mikegt4

Well-known member
Joined
Sep 12, 2005
Messages
3,277
Location
sw ohio
That bearing at the break appears to have been spinning in the case as well.......possible the crank was slightly bent. Smear a bit of bearing retainer compound or anaerobic case sealant in that bearing pocket upon reassembly to make sure it stays put.

I have been concerned about that. When the crank broke the bearing became heavily loaded trying to support the very heavy flywheel cantilevered outside of the case, not to mention the belt tension and load from the 8 hp motor reving up against the governor. Fortunately the pump internals stopped immediately as the break was perpendicular to the crank's axis. I could spin the flywheel over with zero resistance after the break. It took what I would consider a normal amount of effort to remove the bearing from the cast iron case. I am replacing both crankshaft bearings as a matter of course. Parts are easy to get and for the most part reasonably priced. Some sort of retaining sealant might be a good belt and suspenders policy.
 

Wrench97

Well-known member
Joined
Jun 23, 2018
Messages
12,164
Location
Southeastern Pa
I have been concerned about that. When the crank broke the bearing became heavily loaded trying to support the very heavy flywheel cantilevered outside of the case, not to mention the belt tension and load from the 8 hp motor reving up against the governor. Fortunately the pump internals stopped immediately as the break was perpendicular to the crank's axis. I could spin the flywheel over with zero resistance after the break. It took what I would consider a normal amount of effort to remove the bearing from the cast iron case. I am replacing both crankshaft bearings as a matter of course. Parts are easy to get and for the most part reasonably priced. Some sort of retaining sealant might be a good belt and suspenders policy.
Make sure not to over tighten the belt.
I've seen diesel engine break crankshafts from someone cranking down on the fan belts.
 

rayra

Well-known member
Joined
Dec 1, 2014
Messages
4,724
Location
Escaped from Los Angeles
More slicing and dicing, working on gluing up various 5-pc panels, trimming the interior poplar frames to finished widths of the end panels. In the middle of tuning up the pieces for the rear face panels. On track for putting the Buffet carcass together this weekend.
Looking at the clock and trying to finish the day with the gluing and screwing together of the rear face frame & panels.
Taking a detour for final shaping on the plywood base piece, which passes thru the three subframe hoops. Might get that glued up and clamped, first.
Also a closeup on the luan product I'm using, which is pretty nice. It's a very thin plywood whose outer surfaces are made from very long slivers, all oriented the same direction and when it's pressed it looks much like woodgrain. AND one side is close to red oak in coloration and the other side has higher contrasting strands. I'm liking it a lot.
 

Attachments

  • buffet build 014 interesting luan.jpg
    buffet build 014 interesting luan.jpg
    92.3 KB · Views: 21
  • buffet build 015 end panels.jpg
    buffet build 015 end panels.jpg
    71.7 KB · Views: 18
  • buffet build 016 doors and frames.jpg
    buffet build 016 doors and frames.jpg
    106.9 KB · Views: 15
  • buffet build 017 drawer box thinning.jpg
    buffet build 017 drawer box thinning.jpg
    73.1 KB · Views: 15
  • buffet build 018 rear frame parts.jpg
    buffet build 018 rear frame parts.jpg
    122.6 KB · Views: 16

rayra

Well-known member
Joined
Dec 1, 2014
Messages
4,724
Location
Escaped from Los Angeles
Repaired the dye from where the roof leaked on the kayak and messed it up.

Amazing touchup, I would have never expected that to work well.


/

Was well on the way to assembling the rear face frame and panels tonight but got word we're having company tomorrow a couple weeks ahead of when expected and it's a Chinese Fire Drill here now trying to make ready. So much for furniture-building momentum.
 

Attachments

  • buffet build 019 grows in brooklyn.jpg
    buffet build 019 grows in brooklyn.jpg
    129.1 KB · Views: 13
Last edited:
To avoid these ads, REGISTER NOW!
Top Bottom