To avoid these ads, REGISTER NOW!

What did you do "IN" your garage today?

GreenIron

Well-known member
Joined
Sep 26, 2021
Messages
2,092
Location
A bit north of the GOA
I have been retired for 2,385 days, still have too many projects on the go.
2,589 days here.
Was supposed to retire a year earlier but was asked to stay onboards for another year. The company's offer was too good to pass-up. ;)
I also have many, many project. A recent back issue (herniated disk) set me back ~3 months but I'm slowly getting back into action, although at a slower pace. I'm training my brain to not lift heavy items by myself. It's nice that my wife is retired also. She is in much better shape than I am. Depending on the weather, she walks once or twice per day (4-1/2 to 9 miles in total).

Back on topic:
I installed door guides for the sliding door yesterday. You can view it here.
 
To avoid these ads, REGISTER NOW!

kbeefy

Well-known member
Joined
Sep 14, 2013
Messages
3,467
Location
Harington, Eastern Washington
Never seen a pop top with windows like that, what did you get that off of?

They were made by Chef's campers back in the 70's and 80's. Small custom shop in Central Washington, long since gone.
I've only seen a couple of these tops, and this was the first time I'd seen one in person.

What it looks like up....

PopTopOpen02.jpg
 

Hooked

Well-known member
Joined
Sep 24, 2010
Messages
445
Location
League City, Texas
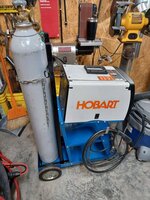
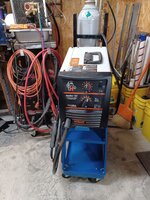
Reassembled the top shelf and new bottle rack on the modified HF welder cart. I didn't like how low the original safety chains were positioned to hold the gas bottle in place, so I made a taller rack. Then changed the oil and filter on the Cub Cadet, blew out the air filter and gave it a wash.

20240320_105510.jpg

20240320_105527.jpg

20240320_110304.jpg
I'm interested in a picture or two and maybe some details of your grinder stand. I'm considering mounting mine on a stand but haven't come up with a reasonable design for the base to be confident it isn't going to tip over easily.
 

Brent T

Well-known member
Joined
Sep 29, 2018
Messages
459
Location
Arizona, USA
Reassembled the top shelf and new bottle rack on the modified HF welder cart. I didn't like how low the original safety chains were positioned to hold the gas bottle in place, so I made a taller rack. Then changed the oil and filter on the Cub Cadet, blew out the air filter and gave it a wash.

20240320_105510.jpg

20240320_105527.jpg

20240320_110304.jpg

20240320_110322.jpg

20240320_110420.jpg

20240320_110438.jpg
Nice! I need to do this as well. Those original safety chain mounts weren't very well thought out. They're flimsy and in the way.
 

Swanny1953

ALLIANCE MEMBER
Joined
Jul 28, 2010
Messages
1,082
Location
Lucas, TX
3,034 days retired here (retired at 62+, now 71). Wasn't necessarily my choice on timing, but haven't missed the rat race, other than the camaraderie of our team - we built a great company that continues to grow!
In garage today, couple of things -
1. Had Safelite come repair 2 chips in the Ram windshield. One had started to spiderweb a bit.
2. Discovered small leak in GTO radiator, and finally got it back from radiator shop. Got everything connected back up and pulled vacuum - ****, won't hold vacuum. Now to find the new leak that allows pressure/vacuum to drop faster than before repair.
3. Replaced battery in '16 Cadillac CTS-V. Not the easiest process as it's buried in the trunk and not a lot of instructions available on the net for getting it out. Trial and error figured it out - now good to go. Hopefully, the weird "dancing" I've seen in the Que system will disappear.
 

welder4956

Well-known member
Joined
Apr 8, 2010
Messages
3,084
Location
Birmingham, AL USA
I'm interested in a picture or two and maybe some details of your grinder stand. I'm considering mounting mine on a stand but haven't come up with a reasonable design for the base to be confident it isn't going to tip over easily.
When we moved into our present house in 1989, the previous owner had installed an 8 foot satellite dish and had left an extra 3" schedule 40 pipe mounting pole under the back porch. It laid there for about 10 years until I bought a bench grinder and needed somewhere to mount it. So I mounted it on the workbench and used it there for another 10 years or so until I decided to build a stand for it. I found a piece of 1" thick steel plate for the base at the local steelyard that had already been cut to 11.5" x 18.5" for about $10. The mounting plate for the grinder is 1/2" steel plate cut to fit the grinder base and has two 3/8" bolts welded to the top to hold it in place. I cut a 3 foot section of the 3" pipe and welded it all together. The water cup is just a short piece of the 3" pipe welded on a piece of 1/4" plate. I don't have any issues with it moving during use due to the weight. The base plate alone weighs 60 pounds. One of these days I'll clean it up and paint it.

20240321_185130.jpg

20240321_185221.jpg

20240321_185216.jpg
 
Last edited:

rayra

Well-known member
Joined
Dec 1, 2014
Messages
4,724
Location
Escaped from Los Angeles
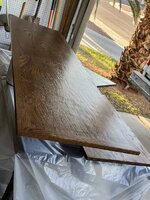
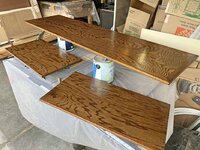
Wed. I finished the 2nd staining on the brown shelves and countertop.

Today was the 1st day of polyurethane work. Meh results. Will need to knock down some grit in the countertop finish and coat it again tomorrow. Rest is ok. Depending on how the door front faces come out, I'm done coating the black parts.

So Friday finish the finishing and this weekend install the top and all the hardware and let everything air out for 2-3 days before bringing it into the house.
 

Attachments

  • buffet build 059 poly.jpg
    buffet build 059 poly.jpg
    73.8 KB · Views: 28
  • buffet build 058 poly.jpg
    buffet build 058 poly.jpg
    116.5 KB · Views: 22

PassnThru

Well-known member
Joined
Jan 5, 2010
Messages
6,512
Location
Bowling Green KY
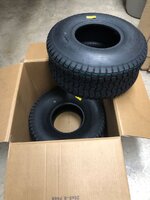
Ordered new rear tires for the riding mower earlier this week - they arrived today.
To my surprise - they arrived in a box in a recognizable format. Not like the front tires I ordered last year that were so strapped down and deformed that it took work to get them into a shape that could be mounted.
Same brand - same seller as the front tires. Maybe the continuous complaints from people changed their shipping method finally.
Rear mower tires.jpg
 

rayra

Well-known member
Joined
Dec 1, 2014
Messages
4,724
Location
Escaped from Los Angeles
Ordered new rear tires for the riding mower earlier this week - they arrived today.
To my surprise - they arrived in a box in a recognizable format. Not like the front tires I ordered last year that were so strapped down and deformed that it took work to get them into a shape that could be mounted.
Same brand - same seller as the front tires. Maybe the continuous complaints from people changed their shipping method finally.
Rear mower tires.jpg
Were they strapping the other ones to get them to fit in a smaller box?
 

kbeefy

Well-known member
Joined
Sep 14, 2013
Messages
3,467
Location
Harington, Eastern Washington
I've received small tires before that were squished into a square shape. Straightening them out and maybe letting the sit in the sun for a bit returned them to normal. I've had trouble with older tires not wanting the rubber to return to it's original shape.
 

kbeefy

Well-known member
Joined
Sep 14, 2013
Messages
3,467
Location
Harington, Eastern Washington
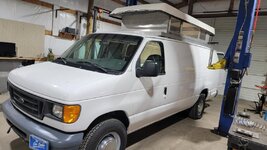
Back to the van.....

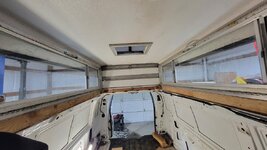
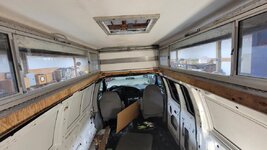
It would be much easier if I could lift by the fiberglass top. The side frames of this thing are metal with glass and it weighs quite a bit. Guessing in the 350# neighborhood.


My add-on lifting points worked, though I didn't think their location thru to the end. Located in the corner, they are too close to the van roof for the jack handles to move. So I flipped them over. It's a bit cumbersome, but it works. They are also a tiny bit to long, so I have to take both ends of them off to get the roof all the way down.


18822-albums1662-picture48958.jpg


Top goes up


18822-albums1662-picture48961.jpg


Inside


18822-albums1662-picture48960.jpg


18822-albums1662-picture48959.jpg


It's obvious that I'll be needing to lift this roof multiple times while fitting it, I need a better technique.


I figured out last night that if I use all of my lift adapter extensions, I can lift one end of the roof, or two arms.


18822-albums1662-picture48962.jpg


If I had another set of extensions I could lift the entire roof.


I go rummaging about and find a couple pieces of tubing that are about right. Hey, I get to use my new cold cut saw!


18822-albums1662-picture48968.jpg


Man that things nice. Now to stick some stuff together.


18822-albums1662-picture48963.jpg


Hey look, extra extensions!


18822-albums1662-picture48969.jpg


While rummaging, cutting and welding I come up with another genius idea.


18822-albums1662-picture48964.jpg


Saddles! Now the whole roof is on the lift, even better than half of it was before.


18822-albums1662-picture48965.jpg

Thats it for today, no real progress but it should make future progress easier. And I got to play with my saw and welder.
 

E-RX7

Member
Joined
Mar 22, 2024
Messages
17
I've had a new torpedo heater for awhile now and this morning it was cold so I thought I'd give it a run for the first time in the garage while I swept the floor and cleaned the rafters. It definitely didn't have any problems warming up the garage quick, think I'm gonna love using that thing next winter.
 

DGersic

Well-known member
Joined
Mar 12, 2017
Messages
6,383
Location
DeKalb, IL
Cleaned up my inlaws vacuum cleaner, so SWMBO can use it. She’s helping clean out the house. Cleaned the beater bar, put a new bag in. Tested it, seems to work fine. Was reported as “not sucking”, but I dunno. It’s an Oreck. The only thing it has is a power switch, a motor, a belt, and a beater bar. There’s very little to go wrong.

Cleaned everything out of the living room. Carpet installers coming in the morning. That will mostly wrap up the living room remodel I’ve been working on since early January. Looking forward to being done with this one.

Started a minor thing, cleaning up the drapery rod for the living room. Was supposed to be easy, just wash up everything and reassemble. No.

On disassembly, the “master carrier” things were completely worn out.

IMG_4472.jpeg

One side, the plastic slide part is half gone. Those pieces fell out while taking it apart. Both sides, the plastic is worn away, and it’s cutting in to the mounting rivets,

Spent most of the afternoon trying to track down a replacement. No idea on the brand name / manufacturer. No idea how old it is, but probably over 40 years. It came with the house, and we’ve been here over 30.

Talked to several “drapery rods are us” places, nobody recognizes it, or has anything like it. One guy said he’s been in the drapery business for over 40 years, and has never seen one that looked like this.

A sane person would replace it. But that’s not happening. I have no special attachment to this rod, but the mounting holes for it are in the plaster wall I just finished painting. And the new drapes measured to fit this rod and those mounting holes are arriving next week.

IMG_4474.jpeg

I have 40 new rings to install, so I scrapped a couple of the old ones. Cutting the rivets didn’t work well, but heating them with a soldering iron did. I salvaged four of the plastic slide pieces from some that weren’t badly worn.

IMG_4473.jpeg

I cut the rivets off the carriers, and removed the remains of their slides.

IMG_4476.jpeg

A trip to the hardware store netted me four 4-40 x 3/4” screws, washers, and nuts. I’m not sure this is going to work, or last, but I think it will. Assembled the carriers with their new bits & pieces.

Cut the hardware off two of the new rings, and mounted them to the carriers, like the old ones were before.

IMG_4477.jpeg
IMG_4478.jpeg

And I have a workable solution. Rod needs to be cleaned up and restrung with some new cord. I should get that done tomorrow, then I can mount it on the wall before the drapes arrive.

So much for an easy and quick clean up.
 

kaymccampbell

Well-known member
Joined
Feb 27, 2015
Messages
29,625
Location
Upstate New York
Ordered new rear tires for the riding mower earlier this week - they arrived today.
To my surprise - they arrived in a box in a recognizable format. Not like the front tires I ordered last year that were so strapped down and deformed that it took work to get them into a shape that could be mounted.
Same brand - same seller as the front tires. Maybe the continuous complaints from people changed their shipping method finally.
Rear mower tires.jpg
Where'd you order them from? My rider is due for new shoes all round.
 

Mike65

Well-known member
Joined
Mar 7, 2007
Messages
3,117
Location
Horse Pasture, Va.
Did a little work on the Mustang, opened the hood & found out one of the hood hinges is bent. Tried to make new fuel lines, worked at it for about one hour got frustrated & gave up. I could not get it to fit properly to my liking. I might just end up buying pre-bent lines & be done with it.

@kaymccampbell Try looking at Jacks Small Engines.com I have purchased stuff for a snowblower from them when we lived in NJ with great results. They even sell lawn mower & snowblower tires.
 
Last edited:
To avoid these ads, REGISTER NOW!

Hooked

Well-known member
Joined
Sep 24, 2010
Messages
445
Location
League City, Texas
When we moved into our present house in 1989, the previous owner had installed an 8 foot satellite dish and had left an extra 3" schedule 40 pipe mounting pole under the back porch. It laid there for about 10 years until I bought a bench grinder and needed somewhere to mount it. So I mounted it on the workbench and used it there for another 10 years or so until I decided to build a stand for it. I found a piece of 1" thick steel plate for the base at the local steelyard that had already been cut to 11.5" x 18.5" for about $10. The mounting plate for the grinder is 1/2" steel plate cut to fit the grinder base and has two 3/8" bolts welded to the top to hold it in place. I cut a 3 foot section of the 3" pipe and welded it all together. The water cup is just a short piece of the 3" pipe welded on a piece of 1/4" plate. I don't have any issues with it moving during use due to the weight. The base plate alone weighs 60 pounds. One of these days I'll clean it up and paint it.

20240321_185130.jpg

20240321_185221.jpg

20240321_185216.jpg

Thanks for the details. I've been considering using a discarded brake rotor but don't think they are heavy enough but welding another plate to one would probably do the trick.
Appreciate the info.
 

rd65

Well-known member
Joined
Sep 29, 2017
Messages
2,841
Location
Granite Falls, WA
Ordered new rear tires for the riding mower earlier this week - they arrived today.
To my surprise - they arrived in a box in a recognizable format. Not like the front tires I ordered last year that were so strapped down and deformed that it took work to get them into a shape that could be mounted.
Same brand - same seller as the front tires. Maybe the continuous complaints from people changed their shipping method finally.
Rear mower tires.jpg
I ordered up a set of these for the YT3000. Will just do the front for now, rears still look ok. Went something a bit more aggressive than the stock set. https://www.amazon.com/gp/product/B071CVQKH5/?tag=atomicindus08-20 I tried to upload pic the other day, maybe it was too big. Emailed it to myself at work and resized.
 

Attachments

  • 20240315_130622_resizedMowerTire.jpg
    20240315_130622_resizedMowerTire.jpg
    979.2 KB · Views: 17

welder4956

Well-known member
Joined
Apr 8, 2010
Messages
3,084
Location
Birmingham, AL USA
Thanks for the details. I've been considering using a discarded brake rotor but don't think they are heavy enough but welding another plate to one would probably do the trick.
Appreciate the info.
You might go to a truck repair shop and see if they have a discarded brake drum from a semi. Those make a great base for a grinder or vise stand.

Not mine >
homemade-grinder-stand-13.jpeg
 

rd65

Well-known member
Joined
Sep 29, 2017
Messages
2,841
Location
Granite Falls, WA
You might go to a truck repair shop and see if they have a discarded brake drum from a semi. Those make a great base for a grinder or vise stand.

Not mine >
homemade-grinder-stand-13.jpeg
Here's mine. Tried in vain to pay for the hub but they wouldn't take my money. I need to check the welds again as I used a Klutch 140 and that material was a bit thick. First time I had welded in 35+ years, first time using mig - we didn't have those in high school.
 

Attachments

  • 20201026_184843.jpg
    20201026_184843.jpg
    382.4 KB · Views: 50

PassnThru

Well-known member
Joined
Jan 5, 2010
Messages
6,512
Location
Bowling Green KY
Had the afternoon off and the new valve stems came in today around noon so I mounted the new rear tires for the mower. I really need to figure out a way to bolt the rim to something to keep it in place during the mounting. That last side is a pain when the rim can move around on you. Literally need three spoons and that's tough by yourself.
But they got mounted - first tire took air and seated the bead without any problems. I still haven't gotten the second tire aired up yet. I've tried straps and everything - it's like it's a totally different tire. I may have spoke too soon earlier about what good shape they were in when they arrived - the one I'm having trouble with was in the bottom of the box and apparently got flattened some. It's way off even with straps.
Giving up on that today - hit it again tomorrow when fresh and try to figure something out.
At least I got one done.
Mower rear tire.jpg
 

rd65

Well-known member
Joined
Sep 29, 2017
Messages
2,841
Location
Granite Falls, WA
Had the afternoon off and the new valve stems came in today around noon so I mounted the new rear tires for the mower. I really need to figure out a way to bolt the rim to something to keep it in place during the mounting. That last side is a pain when the rim can move around on you. Literally need three spoons and that's tough by yourself.
But they got mounted - first tire took air and seated the bead without any problems. I still haven't gotten the second tire aired up yet. I've tried straps and everything - it's like it's a totally different tire. I may have spoke too soon earlier about what good shape they were in when they arrived - the one I'm having trouble with was in the bottom of the box and apparently got flattened some. It's way off even with straps.
Giving up on that today - hit it again tomorrow when fresh and try to figure something out.
At least I got one done.
Mower rear tire.jpg
if you have tried straps around the middle of the tire, try removing the valve stem. the added airflow can sometimes help.
 

02Xterra

Well-known member
Joined
Oct 1, 2015
Messages
525
Location
Lynchburg, Va
Took apart and painted a cheap Wilton 6" clamp I acquired recently. Someone used it for welding, so I had a few bits of weld spatter to grind off. Wire-wheeled the handle, threaded portion and foot, and then cleared them. Came across a nice looking spray paint at O'Reilly's while getting something else and wanted to try it out. Dupli-color's Engine Enamel: 'Detroit Diesel Alpine Green'. Definitely will be painting more things thing color in the future!

full


full
 

jblnut

ALLIANCE MEMBER
Joined
Jan 17, 2015
Messages
7,139
Location
In the Middle of MN
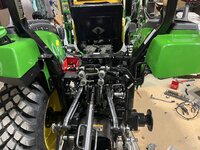
I tackled the rear and loader hydraulic additions today on the 2038r. This about 10min in …..
IMG_0895.jpeg


This was 7hrs in lol Doesn’t look much different lol. Both kits are Deere kits and the rear kit is really well done.
IMG_0899.jpeg

Evidence I did something !!
IMG_0900.jpeg

The 3rd function out the front leaves a lot to be desired. I don’t like how these couplers line up. May have to get some different fittings to get them away from the frame.
IMG_0901.jpeg
 

Outlawmws

Well-known member
Joined
Aug 9, 2011
Messages
39,332
Location
The Badlands
Spent most of the afternoon trying to track down a replacement. No idea on the brand name / manufacturer. No idea how old it is, but probably over 40 years. It came with the house, and we’ve been here over 30.


Brand is Kirsch (Still in existence) and that is probably a custom decorative rod from the early 70's I worked in a drapery shop a few months in HS making those rods up, and occasionally installing them - they made similar "sliders" for "one size fits all", but the good stuff is the cut to fit rods.
 

PassnThru

Well-known member
Joined
Jan 5, 2010
Messages
6,512
Location
Bowling Green KY
if you have tried straps around the middle of the tire, try removing the valve stem. the added airflow can sometimes help.
Oddly - the tires came with a dent in the middle - almost as if they had manufactured them planning to strap them flat during shipment.
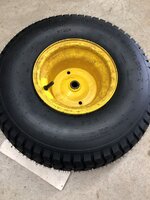
A strap in the middle doesn't help at all - I've done a ******** each side which helped close up the gap but just didn't quite get there. Part of the problem is that the ******** the side does bow the sidewall out but by the time I'm getting close to closing the gap it starts deforming the sidewall so I no longer have a round bead area.
Removing the valve stem and using a blow gun is a good idea - crank up the regulator on the compressor and really get the air in there. I'll redo the straps tomorrow and try that first.
 

kaymccampbell

Well-known member
Joined
Feb 27, 2015
Messages
29,625
Location
Upstate New York
Oddly - the tires came with a dent in the middle - almost as if they had manufactured them planning to strap them flat during shipment.
A strap in the middle doesn't help at all - I've done a ******** each side which helped close up the gap but just didn't quite get there. Part of the problem is that the ******** the side does bow the sidewall out but by the time I'm getting close to closing the gap it starts deforming the sidewall so I no longer have a round bead area.
Removing the valve stem and using a blow gun is a good idea - crank up the regulator on the compressor and really get the air in there. I'll redo the straps tomorrow and try that first.
Or a shot of ether and a blow torch. Wear earmuffs.
 

rayra

Well-known member
Joined
Dec 1, 2014
Messages
4,724
Location
Escaped from Los Angeles
Spent time this afternoon wetsanding the Buffet countertop and interior shelves, knocking the grit down before applying a second coat of satin poly. It went pretty well. Just waiting for it to flash off before I take a couple more pics.
Rest of the Buffet work is just installing the countertop and hardware while it sits in the garage for a couple more days, airing out. Probably move it into the house on Monday and load it later in the week.
18 days since I started work on it. A record pace for me.
 

Attachments

  • buffet build 060 wetsanding.jpg
    buffet build 060 wetsanding.jpg
    119.1 KB · Views: 23
  • buffet build 061 2nd poly.jpg
    buffet build 061 2nd poly.jpg
    108.6 KB · Views: 20
  • buffet build 062 2nd poly.jpg
    buffet build 062 2nd poly.jpg
    113.5 KB · Views: 20

Mr.zippy

Well-known member
Joined
Apr 27, 2020
Messages
2,221
Location
Wyoming
Water pump on a Cadillac Northstar engine. I don't think it needed the pump, but the housing plate gasket failed and it was weeping. I figured if I was into it that far, I'd replace the pump. Pump is a cartridge type. Takes a special socket to take out and put the new one in. I'll fire it up tomorrow and see if it was a success. Wish they would put drain plugs on all radiators........
 
To avoid these ads, REGISTER NOW!
Top Bottom