To avoid these ads, REGISTER NOW!

What did you do "IN" your garage today?

RPH

Well-known member
Joined
Dec 17, 2006
Messages
4,190
Location
Michigan Thumb
Found a 1996 e4od transmission for the 1991 ford f250. Brought it home where it promptly spilled fluid all over the floor.
Will clean spill up and prepare for a full rebuild of a 1996 model transmission with upgrades.
I actually feel more comfortable in this trans than the Camaro’s TH-350.
 
Last edited:
To avoid these ads, REGISTER NOW!

stonesfan68

Well-known member
Joined
Apr 19, 2012
Messages
2,764
Location
Houston, TX
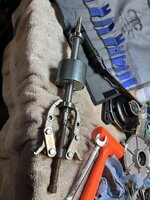
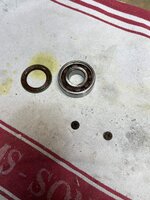
My pool pump has been making some really bad noise. I turned the speed down on the motor and "limped" it for a week while I gathered bearings and a seal. It wasn't too bad of a job. I spent $45 on parts versus ~$750 for a new motor and drive assembled. Surprisingly, it was the rear bearing that failed. My previous experiences have found the drive end bearing failed because the shaft seal leaked and let water into the bearing.

It took longer than it should have because I broke two bolts. Fortunately, the bolt heads snapped off and I was able to continue the disassembly. I was able to remove one broken bolt and retap the threads. The other bolt remains stuck- I decided not to press my luck going further after I broke the extractor!

I feel pretty pleased with myself, if I do say so myself.


IMG_1239.jpg
IMG_1242.jpg
 
Last edited:

jimkinney

Well-known member
Joined
Jan 3, 2009
Messages
303
Location
Florida's Space Coast
Thanks.
Yeah, the gear is very heavy!
21" in dia and 78 lbs. on the bathroom scale. Had to get my neighbor to help me get it up there.
I made a good mount for it. It won't fall.
Looks nice.

I made a clutch clock for my son after replacing said clutch in his G-35. It's not that heavy, but needs a nail into a stud, or large insert into drywall.
 

GrayFlattop

Well-known member
Joined
Jan 18, 2018
Messages
1,051
Location
Chicago
Opened all the boxes that came with the welder, took the manual inside (breakfast reading) and that was about it for the welder since I want to finish another project first. Rearranged /extended a few sections of black iron (compressed air) pipe in the garage to accommodate the new (used) air compressor (different location). Only had to thread three pieces, so that went quick. Then I ran conduit from the motor starter to the new location, pulled the wires and terminated them.

Took a quick snack break, then back out to the garage to put oil in the pump, double checked everything and hit the switch. Everything was fine, but the pressure switch was set incorrectly (cut out too high) so I turned it off manually. Once the motor was off, something was leaking loudly - the pressure switch. At that point it was time to wrap things up for the day. I have several pressure switches on the shelf, so it’s not a big deal. BUT it will have to wait until next weekend.
 

GrayFlattop

Well-known member
Joined
Jan 18, 2018
Messages
1,051
Location
Chicago
My pool pump has been making some really bad noise. I turned the speed down on the motor and "limped" it for a week while I gathered bearings and a seal. It wasn't too bad of a job. I spent $45 on parts versus ~$750 for a new motor and drive assembled. Surprisingly, it was the rear bearing that failed. My previous experiences have found the drive end bearing failed because the shaft seal leaked and let water into the bearing.

It took longer than it should have because I broke two bolts. Fortunately, the bolt heads snapped off and I was able to continue the disassembly. I was able to remove one broken bolt and retap the threads. The other bolt remains stuck- I decided not to press my luck going further after I broke the extractor!

I feel pretty pleased with myself, if I do say so myself.


IMG_1239.jpg
IMG_1242.jpg
Nice shop towels!
 

micromind

Well-known member
Joined
Sep 24, 2023
Messages
3,105
Location
Fernley, Nevada, about 30 miles east of Reno.
Opened all the boxes that came with the welder, took the manual inside (breakfast reading) and that was about it for the welder since I want to finish another project first. Rearranged /extended a few sections of black iron (compressed air) pipe in the garage to accommodate the new (used) air compressor (different location). Only had to thread three pieces, so that went quick. Then I ran conduit from the motor starter to the new location, pulled the wires and terminated them.

Took a quick snack break, then back out to the garage to put oil in the pump, double checked everything and hit the switch. Everything was fine, but the pressure switch was set incorrectly (cut out too high) so I turned it off manually. Once the motor was off, something was leaking loudly - the pressure switch. At that point it was time to wrap things up for the day. I have several pressure switches on the shelf, so it’s not a big deal. BUT it will have to wait until next weekend.

Sometimes simply tightening the screws on the back of a pressure switch will stop it from leaking. Some switches don't even have screws on the back........
 

PWC Repair

Well-known member
Joined
Dec 27, 2012
Messages
3,191
Location
Arkansas
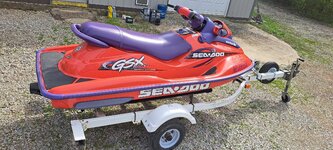
I put the final detailing touches on this 26 year old Seadoo I fixed up. This thing only has 78 original hours! It is officially for sale!

On to the next one..........saving the 2 strokes!!
 

Attachments

  • 20240321_152248_072847.jpg
    20240321_152248_072847.jpg
    948 KB · Views: 31
  • 20240321_152221_072707.jpg
    20240321_152221_072707.jpg
    1.1 MB · Views: 29
  • 20240321_151833_072525.jpg
    20240321_151833_072525.jpg
    537 KB · Views: 26
  • 20240321_152212_072619.jpg
    20240321_152212_072619.jpg
    1 MB · Views: 28

rayra

Well-known member
Joined
Dec 1, 2014
Messages
4,724
Location
Escaped from Los Angeles
Buffet brought in, basically done. 21 days after starting its build (I did cut and assemble a few structural parts a few weeks ago while building the hutch base). We'll fill it up with stuff later this week.
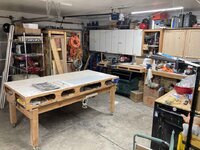
Got a bunch of tidying up to do in the garage this week and some workshop mods to do before I resume making furniture in May. Resurfacing my big rolling work table, making a new router table insert and fence / sawdust collector setup for that. Making some other mods and workbench mods utilizing T-tracks, making some quick-change mountings for various ammunition reloading tools. And trying to make some major reductions in the boxes of stuff stored in the garage.
 

Attachments

  • buffet build 065 done.jpg
    buffet build 065 done.jpg
    108.7 KB · Views: 36
  • buffet build 066 done.jpg
    buffet build 066 done.jpg
    127.2 KB · Views: 36
  • buffet build 067 done.jpg
    buffet build 067 done.jpg
    115.4 KB · Views: 35
To avoid these ads, REGISTER NOW!

Jgaz

Well-known member
Joined
Dec 16, 2016
Messages
1,711
Location
AZ
@rayra
Not my bench but some interesting ideas. I like the width extension “outriggers”.

IMG_1639_Original.jpeg
If I was building my woodworking bench over again for my current garage I’d make it a bit longer but narrower. (I think)

I‘m already using modified HF F clamps as hold downs in the dog holes on my bench and I LOVE them.
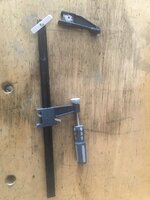
IMG_5753_Original.jpeg
IMG_5707_Original.jpeg
 
Last edited:

rayra

Well-known member
Joined
Dec 1, 2014
Messages
4,724
Location
Escaped from Los Angeles
@rayra
Not my bench but some interesting ideas. I like the width extension “outriggers”.

IMG_1639_Original.jpeg
If I was building my woodworking bench over again for this garage I’d make it a bit longer but narrower. (I think)

I‘m already using modified HF F clamps as hold downs in the dog holes on my bench and I LOVE them.
IMG_5753_Original.jpeg
IMG_5707_Original.jpeg
Well that's a neat idea and a good use for the clamps whose plastic jaw boots I've misplaced. I frequently use those clamps on the edge of the truss-boxed tabletop.

I haven't checked Ron Paulk's youtube channel lately, but the guy is forever refining his portable workshop tool and bench ideas, a few years ago he had a 'Total Station' idea that allowed all sorts of attachments and extensions. He has some really good ideas about efficiency in arrangements and work.

My big worktable needs new heavy duty casters and it's currently sized to the same deck height as my table saw to serve as a feed table. The trussed box top of the table is also split in two longitudinal halves, a couple screw out and I can sling half of it and some sawhorses into the back of my Suburban and use it as a workstation while working on something at someone else's house. Both halves are just screwed into the top of a rolling chassis made out of framing lumber.
The new top will be melamine-coated particle board again, I'm liking that pretty well for the surface. And I intend to finally bore those dog holes across a bunch of it, in some strategic areas.
My table is 42" x 84", 3.5' x 7'. It works pretty well when docked against the wall under the hanging cabinets as well. I only drag it out front and center when I'm working on the bigger projects, and I can finally see the end of those in this house.

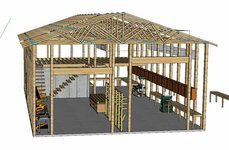
A future rebuild might turn it into a fully-featured and enclosed base cabinet with drawers, shop vac dust-control plumbing etc. I'll have to finally reach the end of my priority list before I get around to that version. But I'd like to do it someday. I intend to have something like that as the hub of the future TX Barndo.
I'd like to incorporate some form of slim drawer top box into the body of the workbench, for router bits, chisels, saw blades etc.
And still retain the ability to dismount half of the benchtop to use as a portable workstation.
 

Attachments

  • Furniture Building Powers ACTIVATE.jpg
    Furniture Building Powers ACTIVATE.jpg
    85.5 KB · Views: 33
  • barndominium009.jpg
    barndominium009.jpg
    65.3 KB · Views: 32
  • barndominium010water.jpg
    barndominium010water.jpg
    140.1 KB · Views: 35

Wrench97

Well-known member
Joined
Jun 23, 2018
Messages
12,163
Location
Southeastern Pa
All of this to replace a marker light:

MARKER LIGHT.jpg
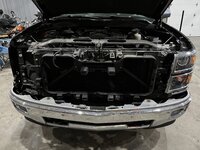
I did a Ford Police interceptor utility (Explorer) today same tear down because the low beam headlight was out.................It's LED and not replaceable you change the head light assembly only a mere $845.64 cost from Ford with no aftermarket available ...........................
 

Wiz02

Well-known member
Joined
Jul 13, 2007
Messages
2,399
Location
Southeastern PA
I did a Ford Police interceptor utility (Explorer) today same tear down because the low beam headlight was out.................It's LED and not replaceable you change the head light assembly only a mere $845.64 cost from Ford with no aftermarket available ...........................
Sounds like a business opportunity for some enterprising entrepreneurs.
 

niget2002

Well-known member
Joined
Oct 2, 2012
Messages
11,253
Location
Josephine, TX
Got the last 3 coaming lip strips on the sides today. One before work. One after work. Last one after dinner.

I was playing with strips for the front and back before putting the last strip on. The 1/8" mahogany strips can't take the bend to laminate the front and back.

I'm going to have to research building a small steam box to steam the strips so they can take the curve.
 

kaymccampbell

Well-known member
Joined
Feb 27, 2015
Messages
29,625
Location
Upstate New York
I did a Ford Police interceptor utility (Explorer) today same tear down because the low beam headlight was out.................It's LED and not replaceable you change the head light assembly only a mere $845.64 cost from Ford with no aftermarket available ...........................
Somehow, I'd be figuring out how to make it repairable.
 

GarageHobbyist

Well-known member
Joined
Feb 18, 2024
Messages
366
Location
Illinois
This weekend we cleaned and organized some more. It’s really starting to get in good shape.
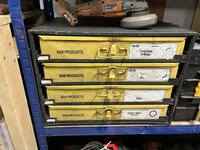
Today I dug out this set of parts drawers that I brought home from work about 2 years ago, and finally have a place to put it! Now that I know it fits on that shelf I’ll clean it up and give it some new paint.

It still is full of o-rings that are surprisingly still usable. I am going to bag and label those, and use this cabinet for nuts, bolts, and other hardware.

Excuse the floor in front of the shelf. Those are welders I am selling sitting on top of my two cases of Grizzly sale casters 😅
IMG_4604.jpegIMG_4605.jpeg
 

DeeDubz

Well-known member
Joined
Nov 20, 2019
Messages
1,451
Location
Socal
Installed a CP4 disaster kit by S&S diesel. While taking my manifold plenum off I noticed a coolant leak from the radiator hose coming off the main core and going to the top of the block. It was also leaking on the down spout as well. Replaced with OEM 180 bucks... I wasnt expecting it to be that much.
 

Attachments

  • IMG_7283.jpg
    IMG_7283.jpg
    948.2 KB · Views: 43
  • IMG_7279.jpg
    IMG_7279.jpg
    497.6 KB · Views: 41
  • IMG_7282.jpg
    IMG_7282.jpg
    778.7 KB · Views: 37

Mike S.

Well-known member
Joined
Jan 16, 2022
Messages
272
Location
Charlotte, NC
I put new front lower control arms on the '08 RL along with new inner and outer tie rods. Drained and filled the transmission, transfer case and rear diff. New front brake pads and the rears got new rotors and pads.

oldNewControlArm.jpg


For the wife's '09 Pilot, I installed the OEM harness for the trailer lights. I also drained and filled the transmission and rear diff.

pilotTrailerLights.jpg
 

Bessy

Well-known member
Joined
Dec 18, 2012
Messages
995
Location
Ontario, Canada
Finished up the final sanding on that door I was building for the neighbour's basement workshop. It will be mounted as a sliding door. He has the hardware at home and he's not quite ready to mount so I'm not sure when I'll get an installed shot of it. Neighborhood also sent a photo of my previous door I made for them a few years ago, (second photo with the dark stain). I'll be happy to get this one out of the shop, because it's been taking up quite a bit of space.
 

Attachments

  • IMG-20240324-WA0002.jpeg
    IMG-20240324-WA0002.jpeg
    372.7 KB · Views: 26
  • IMG_20240323_195543.jpg
    IMG_20240323_195543.jpg
    267.4 KB · Views: 26

NWOhioChevyGuy

Well-known member
Joined
Feb 20, 2007
Messages
1,945
Location
Buckeye Hill (Morenci, MI)
So in our build the “Mudroom” is getting worked on currently. I pulled a large cabinet from the Highschool we both went to prior to it being demolished back in 2008 I believe.

This cabinet fits nicely but the wife wanted it to fill the wall floor to ceiling. So I built this “shelf” for it to sit on.

Sanding today, painting tomorrow, installation Saturday.IMG_8581.jpeg
IMG_8580.jpeg
 
Last edited:
To avoid these ads, REGISTER NOW!
Top Bottom