To avoid these ads, REGISTER NOW!

What did you do "IN" your garage today?

To avoid these ads, REGISTER NOW!

Skiff Builder

Well-known member
Joined
Jun 7, 2016
Messages
1,783
Location
Southern NJ Coast
Getting close to finishing all the work I can do on the boat build while inside the shop. A hundred small jobs with one or two bigger ones.

Got the bilge pumps /switches/ hoses rigged. A 1500 gph main with a 3700 gph high water backup. The ratings are over blown on these. The decks are not fully self tending , so will see some water in the bilge.

Big job is Canvas and upholstery. Never done it or run a sewing machine- yet😳- we will see how it goes.
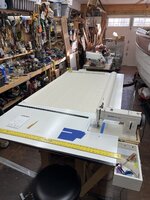
Bought a new basic industrial - same as a sailrite but not all the bells and whistles. 1/3 the cost. Tore it down, oiled the **** out of it, ran it for awhile unloaded, checked everything out. Sewed a bunch of blue shop rags to get the feel and get excess oil off.

Knocked together a quick and dirty 4x8 smooth top for the bench and built a box to flush mount the machine in.

IMG_2638.jpegIMG_2639.jpeg
 

PWC Repair

Well-known member
Joined
Dec 27, 2012
Messages
3,189
Location
Arkansas
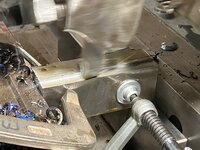
I welded a wheel bracket back onto the mower deck and fired it up so the wife could mow.
Then I fought the weedeater a bit.........bad gas
fought the weedeater some more.........pull rope broke
fought it some more to change the rope and wind the spring
fought weedeater some more, not pulling fuel........aluminum filter thingy corroded shut.
fought the weedeater some more........FINALLY running and carb adjusted
......now the string won't come out........DONE fighting with the weedeater
.........2.5 hours of my life wasted!!!
 

rayra

Well-known member
Joined
Dec 1, 2014
Messages
4,724
Location
Escaped from Los Angeles
Mostly post- furniture building cleanup, getting tools squared away and started staging materials for the next project out there in a few weeks, revamping and upgrading my big rolling work table.
As well as bagging and storing a bunch of remnant cabinetry hardware, until it is needed again in May.
Also did some car maintenance and just general tidying up.

And just ordered some new 3.5"H heavy duty locking swiveling casters for the table. The ones I have on it turned out to be too flimsy and the rubber 'tires' are mushing off the casters. The new ones are the same overall height so the table will remain the same deck height as my table saw.

I've got a bunch more of uselessly-small scrap lumber to sort for the brick oven or the trash barrel, depending what it is.


eta

somehow left the above hanging, unposted. I've got the casters and oops, I wanted 3.5" total installed height, what I bought was 3.5" caster wheels and the entire mount is nearly 5". Nothing major, I'm re-working the entire bench anyway, so with the extra caster height I can lose the shims I put between the wheeled chassis and the trussed-box workbench tops to match the height of the new table saw. And will have it all apart so trimming the legs to a new correct height will be straightforward.

While adding in the new phenolic resin router insert I'm going to work a little duct plumbing magic to so the shopvac hose can just be jammed into an external port on the side of the bench, instead of finagled inside the bench to the router itself.
 

DGersic

Well-known member
Joined
Mar 12, 2017
Messages
6,382
Location
DeKalb, IL
Going to Menards yesterday, my brakes felt funny. No loss of braking, just didn’t feel right. Went out this morning to find a puddle under the left rear wheel. Crawled under to look, looks like it’s the cylinder. The brake line is intact, top of the baking plate is dry. Bottom of the backing plate is dripping. So, I guess I’m doing brakes.

Washed the shutters and spread them out to dry.

Got the cord to restring my traverse rod, and spent a while getting it all back together and adjusted. Had to cut a tiny wedge shim on my bandsaw to mount the cord tensioner.
 

LeonardY

Well-known member
Joined
Apr 16, 2011
Messages
5,107
Location
Southern California
I finally heard from the solar installers. They called last week said permits were approved and installation was on the 1st. I asked, "This isn't an April's fools joke?" They said no.

Didn't hear from them all this week. I called the sales rep. Who is a personal friend. She got on their ***. Heard from them yesterday. I have not had any other communication until now. I asked where the batteries were going to be installed. He had to get back to me. Called today to say they were in the garage. Here's the garage part. I told them I didn't want them in the garage during the original walk through. So either the pre-inspection guy didn't tell them or engineering ignored the instructions.

I spent the afternoon taking pictures in the garage and showing them why I wasn't moving a 800 lb mill. Or any other floor tools. I had told them there wasn't any room in the garage in the beginning.

They are going to find another location outside but that will entail re-submitting the permits. But they would still install but not on the 1st.
The installation was going to be on the second. So it was an April's Fools joke.

The project manager apologized and said they would make it right. They don't want a unsatisfied customer.

Sorry for the rant...
 
Last edited:

kbeefy

Well-known member
Joined
Sep 14, 2013
Messages
3,461
Location
Harington, Eastern Washington
Turns out these sucked...

20240321_095811.jpg

Because of the proximity to the van roof/wall I had to use them upside down, and since they were too tall I had to take the head and base off. And I have to crank them one at a time, at the floor level on my hands and knees.

This works much better.

20240328_103533.jpg

Making this much easier....

20240328_101151.jpg

Only takes about 10 minutes, by myself, instead of 40 minutes with the previous method.
 

BonzoHansen

Well-known member
Joined
Jun 24, 2005
Messages
1,742
Location
NJ
This is why we can't have nice things.

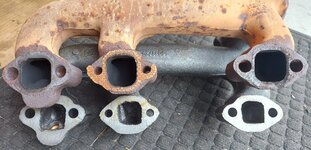
So my 93 K1500 had an exhaust manifold gasket leak. Years ago I had already had that manifold off. And I knew it would be a total ***** to get back on because it's got that warped thing going on that these manifolds get.

So I see the dorman replacement manifolds have excellent reviews everywhere I look. So against my better judgment I buy the replacement dorman part and this is what I got. Non existent exhaust ports. That's not going on my truck.

20240322_171005.jpg

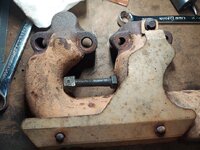
I don't want headers, so let's make this work. I have remflex gaskets on order, and a new spreader tool because mine is MIA. but those tools don't fit between 1 & 3, so I did this and it appears to have worked as I was able to bolt in in 1 & 3 now. 5 is still no good lol.

Now I wait for my order to arrive and have a dead truck in the driveway.
20240322_193106.jpg
Apparent success! The home made spreader and a regular spreader did the trick. New remflex gaskets are in. Hopefully after a few heat cycles is still good.
20240329_150523.jpg
Replaced a broken sway bar link while I was at it. And now I have a laundry list of to-do's for this truck in the fall.
 

Magnum440d100

Well-known member
Joined
Dec 2, 2018
Messages
3,581
Location
Indiana
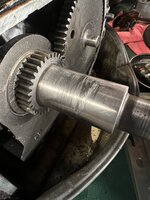
Can’t find a crank locally for this Briggs 15hp.

I can get one off the ‘bay for $40.

But I thought I’d see about polishing it up. It looks like the “grooves” were just aluminum buildup. Got that cleaned up.


Ok ok ok.


I’ve resigned to installing a bigger engine. This is just to see how much full send I can send it with some shade tree shenanigans.
 

Attachments

  • IMG_3590.jpeg
    IMG_3590.jpeg
    666.2 KB · Views: 32
  • IMG_3591.jpeg
    IMG_3591.jpeg
    673.1 KB · Views: 31
  • 73344447821__DA242927-8D62-491A-A0B3-2A663991FDD2.jpeg
    73344447821__DA242927-8D62-491A-A0B3-2A663991FDD2.jpeg
    590.6 KB · Views: 29

Outlawmws

Well-known member
Joined
Aug 9, 2011
Messages
39,328
Location
The Badlands
Nothing as its EOQ for work - but I'm planing out the move of the "TV Room" (Fam Rm) to the "New TV Room" (Living rm) along with loosing a Leather couch and Chair a double recliner, and an upholstered chair and ottoman; and incoming to the LR in two weeks are two powered recliners, and a double powered recliner/couch.

My "office setup" ( primordially my new recliner, and my old Harp table that holds my Ltop "at rest" moves to the Fam room. Fun for all! Many many details but those get swallowed up by the larger moves... Prep starts this w/e..., but I posted a calendared "operations plan"
 

welder4956

Well-known member
Joined
Apr 8, 2010
Messages
3,084
Location
Birmingham, AL USA
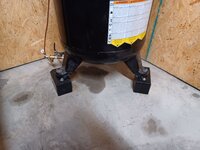
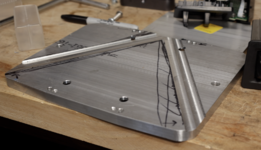
When I replaced the automatic drain valve on the compressor, the elbow for the drain tube was contacting the floor so I shimmed the compressor feet with 1/4" plates. Still think it needs more clearance so today I cut some spacers from scrap 4 x 4 to bolt to the anchors in the floor. Then I cut 3 3/16" steel plates, drilled 2 holes in each one to attach to the top of the 4 x 4, and welded a 1/2" x 2" bolt on each one to bolt the compressor feet down. All the materials used were things I already had, so no out of pocket cost. Tomorrow I will test fit, paint and install.


20240329_172049.jpg

20240329_172103.jpg

Also sprayed primer and black paint on the engine cradle I made a couple of months ago.

20240329_192057.jpg
 
Last edited:

micromind

Well-known member
Joined
Sep 24, 2023
Messages
3,105
Location
Fernley, Nevada, about 30 miles east of Reno.
When I replaced the automatic drain valve on the compressor, the elbow for the drain tube was contacting the floor so I shimmed the compressor feet with 1/4" plates. Still think it needs more clearance so today I cut some spacers from scrap 4 x 4 to bolt to the anchors in the floor. Then I cut 3 3/16" steel plates, drilled 2 holes in each one to attach to the top of the 4 x 4, and welded a 1/2" x 2" bolt on each one to bolt the compressor feet down. Tomorrow I will test fit, paint and install.


20240329_172049.jpg

20240329_172103.jpg

Also sprayed primer and black paint on the engine cradle I made a couple of months ago.

20240329_192057.jpg

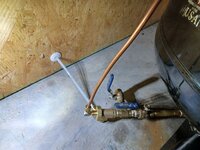
What kind of an elbow? I always use a street 90 because if the pipe gets broken it’ll break at the outside of the 90 and I won’t have to remove the broken piece from the bottom of the tank, just replace the street 90.
 

welder4956

Well-known member
Joined
Apr 8, 2010
Messages
3,084
Location
Birmingham, AL USA
What kind of an elbow? I always use a street 90 because if the pipe gets broken it’ll break at the outside of the 90 and I won’t have to remove the broken piece from the bottom of the tank, just replace the street 90.
I used a street ell. It was not the ell coming out of the tank, it was the one coming out the side of the automatic drain valve for the plastic condensate drain tubing.

1000001134.jpg
 
To avoid these ads, REGISTER NOW!

southalabama

Well-known member
Joined
Jan 10, 2011
Messages
5,541
Location
Brewton AL
After an out of town trip to the zoo only had a few minutes. Tried the flapper wheel on the grinder to see how it would handle the paint and gunk on a military surplus vidmar cabinet. It works great. The drawers are great shape but the other three sides kinda rough. Huge wheels and appears to have been on a flight line. The plan is to put three together. Put a top across all three. As far as the three sides put old barn or fence wood and hang stuff on it. Got the idea from one I’ve seen here.

Edited to add the pic that gave me the idea to cover the bad sides of the cabinets. Member Boyd
 

Attachments

  • DE9103C6-5906-4402-953F-3FDB33A84026.jpeg
    DE9103C6-5906-4402-953F-3FDB33A84026.jpeg
    772 KB · Views: 62
  • 3B940650-C5BA-4B69-AB90-609755E5D464.jpeg
    3B940650-C5BA-4B69-AB90-609755E5D464.jpeg
    994.8 KB · Views: 56
Last edited:

PhantomEB

Well-known member
Joined
Feb 6, 2006
Messages
6,817
Location
Medicine Hat, AB, Canuckistan
Pretty much looked at the bronco, tidied up garage bench and ordered parts.

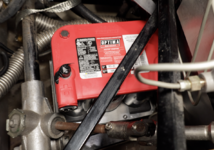
today will be strip the wiring harness in the engine bay and start labelling things. really need to figure out the ignition switch/starter solenoid then the charging system so this truck is not on the charger all this next month.
 
Last edited:

backupbeeper

Well-known member
Joined
Mar 21, 2023
Messages
132
Installed a Mr Cool mini split .

Took me and a helper about 7 hours , including building the pad outside .

We already had the wiring available outside for the existing unit for the upstairs storage ,we installed last year , I made it large enough to handle the mini split too .
 

Bessy

Well-known member
Joined
Dec 18, 2012
Messages
995
Location
Ontario, Canada
Went out with good intentions to clean up the shop, but ended up getting sidetracked by a project. I've got a ton of short stock (1' to 3' in length that varies in width. I've been meaning to do something with it for a long while, but haven't come up with the right spot or the right method for organization. Decided today to just start cutting and see where I got. So far, I'm planning on a 6' tall unit, 26" wide, 32" or so deep. The back will have two non-swivel casters mounted so that I can pick the front up with a fridge cart, tilt it back, and roll it out of the way as needed, and I may add a pair of leveling feet up front if it's at all wobbly.

The plan is to have a series of 1/2" or 3/4" thick shelves (whatever scraps I have in the shop already), and possibly some 1/4" plywood dividers to separate species. At bench height, I will cut it back to about 12-15" deep for the remaining 37" of height, for shorter lengths. I'm not getting crazy with milling, so I figure this is one of the few projects in the shop that will get a coat of paint instead of leaving it as raw wood (I have yet to choose a colour). I haven't exactly figured out where this will live yet, either in the single stall out of the way or at one end or the other of the (future) miter station. The important thing is to get it built and stocked at this point.
 

smackey05

Well-known member
Joined
Oct 21, 2009
Messages
792
Location
Massachusetts
Lot's of people have been complaining about the cheap ($50) Ford trailer brake controllers you can buy on certain auction sites instead of from a licensed Ford Dealer ($230). I bought one of each to take them apart. Honestly, I don't think the cheap one is actually made by Ford. Same P/N and revision #. No heat sinking, different boards... no wonder why it doesn't work.

Did a full YouTube video comparing these two and an off-branded one. It's crazy there are manufacturers out there creating copies of units..

1711842131026.png


Here is a $100 unit. Some have had alleged overheating issues and melting according to the reviews.....
1711842142282.png
 

LeonardY

Well-known member
Joined
Apr 16, 2011
Messages
5,107
Location
Southern California
Lot's of people have been complaining about the cheap ($50) Ford trailer brake controllers you can buy on certain auction sites instead of from a licensed Ford Dealer ($230). I bought one of each to take them apart. Honestly, I don't think the cheap one is actually made by Ford. Same P/N and revision #. No heat sinking, different boards... no wonder why it doesn't work.

Did a full YouTube video comparing these two and an off-branded one. It's crazy there are manufacturers out there creating copies of units..

1711842131026.png


Here is a $100 unit. Some have had alleged overheating issues and melting according to the reviews.....
1711842142282.png
Kind of fits with the old adage. "You get what you paid for."
 

Magnum440d100

Well-known member
Joined
Dec 2, 2018
Messages
3,581
Location
Indiana
Bringing home more junk.

Free is drying up, but $25 each for these. Worth it in parts on the rider.

Engine spins by hand. May be a runner. Maybe.


Push mower spins. Sounds like it has compression. Maybe a runner. Maybe.


I’ll mess with them eventually.
 

Attachments

  • IMG_3608.jpeg
    IMG_3608.jpeg
    1,006.1 KB · Views: 16
  • IMG_3610.jpeg
    IMG_3610.jpeg
    1.1 MB · Views: 24

PWC Repair

Well-known member
Joined
Dec 27, 2012
Messages
3,189
Location
Arkansas
The weather was just right, so I got 2 coats of epoxy "barrier" on the bottom and hood of the jet ski custom build. I like to roll the high build stuff on with foam rollers. No foggy overspray waste, and it builds thick in just a couple coats. Plenty on there to block flat.
 

Attachments

  • GOPR1939.JPG
    GOPR1939.JPG
    538.8 KB · Views: 24
  • GOPR1936.JPG
    GOPR1936.JPG
    475.3 KB · Views: 23
  • GOPR1938.JPG
    GOPR1938.JPG
    577.5 KB · Views: 22
  • GOPR1937.JPG
    GOPR1937.JPG
    431.8 KB · Views: 22
  • GOPR1940.JPG
    GOPR1940.JPG
    456.8 KB · Views: 23

ZRX61

Well-known member
Joined
Aug 15, 2006
Messages
28,716
Location
Solar Blight Valley, SoCal
I had an attack of the dumbasses...

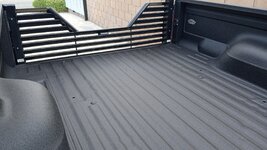
There was a break in the weather so I decided to put the tonneau cover back on the F350. The frame is four lengths of aluminum extrusion with pot metal corners that hold the four pieces together. The front/left corner doodad has a broken tab.
Anywho, I manage to get the frame on the bed rails & attach the four bows.
I pull the cover taut & start to press the snaps t hold it in place.
Sides were fine, no ******** way in hell was the rear going to snap in place.
Fought it for a while & then had an epiphany... all I need to do is cut a bit off the rear of each side extrusion. 1/8in might be enough. FFS.


AND...
The power went out today all over town, probably related to the sub-station we saw on fire as we drove past. However SCE has been doing maint work & turning the power off between 10pm & 6am, so it was possibly related to that as the lights were flashing this morning at 6am, even though the power was on last night.
We were out when the power went off at home
Get home from running errands...
Neither of us had house keys, garage door openers weren't working. Ended up having to break into the house... but not before breaking into the SB Honda to get a pry bar from the trunk... which of course set the horn blasting when I opened the door without the key.

Now I need to replace the + clamp on the battery & fix the security door on the side of the garage.

IMG-20240330-184849816.jpg

IMG-20240330-184900053.jpg
 
Last edited:

Skiff Builder

Well-known member
Joined
Jun 7, 2016
Messages
1,783
Location
Southern NJ Coast
The weather was just right, so I got 2 coats of epoxy "barrier" on the bottom and hood of the jet ski custom build. I like to roll the high build stuff on with foam rollers. No foggy overspray waste, and it builds thick in just a couple coats. Plenty on there to block flat.
Nice. I had always used System 3 Yacht Primer, but found a deal on this Pettit from Campers World of all places. $40 for the gallon unit, cleaned them out. Nice product, I think I applied with a 1/8 mohair roller.
 

niget2002

Well-known member
Joined
Oct 2, 2012
Messages
11,250
Location
Josephine, TX
I need to make a system like that for making a pair of snowshoes and also a pair of sleigh runners.

Is that a steamer or something else that is being used as one?
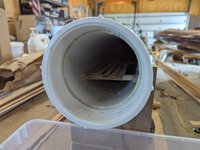
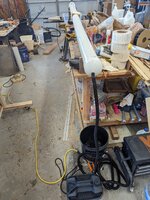
It's a Wagner steamer off of Amazon. I do not recommend the pvc pipe, though. After an hour, it started sagging in the middle and it started to put off a smell. I opened all the shop doors to get a breeze through it.

I managed to get 2 strips on the bow and stern of the kayak. Only three more to go, then I get to do some sanding and prepping to fiberglass the coaming.
 

XJSuperman

Well-known member
Joined
Jan 26, 2018
Messages
3,088
Location
Central Iowa
For once I am responding to this thread on the actual day of activities.
The truck got its new diff cover just outside the garage.
Tools were put away.
Tractor brackets got some touching up.
I tested out some metal polish to see what I'm up against on a set of wheels.
The shed got rearranged
Cracked a cold one.
 
To avoid these ads, REGISTER NOW!
Top Bottom