To avoid these ads, REGISTER NOW!

What did you do "IN" your garage today?

To avoid these ads, REGISTER NOW!

Mike65

Well-known member
Joined
Mar 7, 2007
Messages
3,111
Location
Horse Pasture, Va.
Finished the intermediate fuel line for the Mustang from the back of the front torque box to the fuel filter. Cut it to length and bent it to follow the floor pan & made bubble flares on both ends. Also made bubble flares on both ends of the front line from the back of the torque box to the engine compartment. Sorry no pics, maybe tomorrow.
 

rayra

Well-known member
Joined
Dec 1, 2014
Messages
4,724
Location
Escaped from Los Angeles
Dug up my box of telescope accessories and found my solar filter for trying to take eclipse photos. But TX weather where we are aiming to go now says scattered thunderstorms on Monday. Might have to settle for a great lightning show, instead of being able to see the eclipse.
 

Attachments

  • solar filter.jpg
    solar filter.jpg
    76.4 KB · Views: 17

ZRX61

Well-known member
Joined
Aug 15, 2006
Messages
28,716
Location
Solar Blight Valley, SoCal
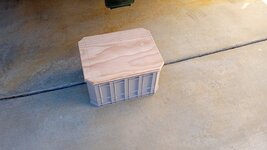
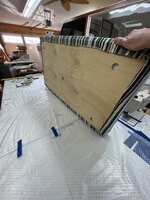
Picked up a 4x8 of 3/4 ply for the F350 bed. Pulled out a piece of 2x8 3/4 ply I had left over from another project & made a seat for the tailgate. Ran a 3/8 round-over bit around both sides. Then used part of what was left over for my OMS* for the Dually.
Piece on the tailgate won't be bolted in place

Tomorrow is varnish day.

IMG_20240401_165610247.jpg

*Old Man Step using a Kobalt crate from Lowes. Just need to bolt the wood to the crate.

IMG_20240401_165629892.jpg

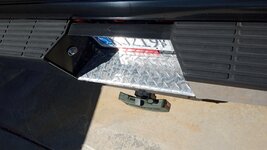
Also picked up an off cut of aluminum diamond plate from Pattons this morning & cut it to fit the step on the rear bumper. Not sure what coating is on the bumper, but it was slicker than teflon snot.

IMG_20240401_150101064.jpg
 
Last edited:

Snip's

Well-known member
Joined
Apr 29, 2017
Messages
1,866
Location
Ohio
No pics during as I was in crisis mode.....a cylinder failed on my quickjacks and one side was all the way up while the other was slowly falling down......Luckily no damage to myself, the car, or the jacks but talk about a pucker moment! :oops:
1712009355251.png
For a little extra safety (anti pucker)...
You can locate a couple of extra jack stands at the rear of the QuickJacks...

Screen Shot 2024-04-01 at 8.22.31 PM.png
 

Skiff Builder

Well-known member
Joined
Jun 7, 2016
Messages
1,783
Location
Southern NJ Coast
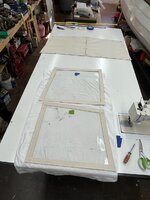
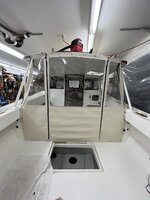
Started making canvas pieces for the boat. Flat stuff first- window covers, companionway "door" and window.
Sailrite has extensive detailed videos on many projects for boat, camper, car. Spending nights watching and learning.
Best thing is their double face tape. I can cut everything and assemble the whole pc , than take it to the machine.

I just tell myself that the fabric is wood and sew mach is a bandsaw.

Machine is doing well. Went through 9 layers of 12 oz canvas no issues. Learning how to modulate the "accelerator pedal" to go slowly. Once in awhile you relax your foot and it takes off on you.
The bobbins run out fairly quick.
Spent two 12 hour days working it- good foul weather work.

Even figured out how to do a zipper that actually works- thks Sailrite.IMG_2642.jpegIMG_2643.jpegIMG_2644.jpegIMG_2651.jpegIMG_2653.jpeg
 

npp

Well-known member
Joined
Dec 6, 2012
Messages
296
For a little extra safety (anti pucker)...
You can locate a couple of extra jack stands at the rear of the QuickJacks...

Screen Shot 2024-04-01 at 8.22.31 PM.png
Why would you not put it up to the top and then lower until the locks on both sides are engaged. Never had a problem with mine.
 

welder4956

Well-known member
Joined
Apr 8, 2010
Messages
3,084
Location
Birmingham, AL USA
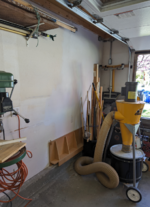
Moved the windshield and back glass for the Fairlane up off the floor and out of the way, then screwed a couple of eye bolts in the wall to use a ratchet strap to make sure they stay there.

20240401_154019.jpg

Then I chopped up a pair of old steel ramps and dropped them in the trash. I didn't trust them on my vehicles and thought it was time to make sure no one else risked using them. After that I made a run to the landscape supply to pick up 8 rolls of pine straw and spread them along the back fence.
 
Last edited:

larry4406

Well-known member
Joined
Jan 27, 2006
Messages
19,576
Location
Northern Virginia
Started making canvas pieces for the boat. Flat stuff first- window covers, companionway "door" and window.
Sailrite has extensive detailed videos on many projects for boat, camper, car. Spending nights watching and learning.
Best thing is their double face tape. I can cut everything and assemble the whole pc , than take it to the machine.

I just tell myself that the fabric is wood and sew mach is a bandsaw.

Machine is doing well. Went through 9 layers of 12 oz canvas no issues. Learning how to modulate the "accelerator pedal" to go slowly. Once in awhile you relax your foot and it takes off on you.
The bobbins run out fairly quick.
Spent two 12 hour days working it- good foul weather work.

Even figured out how to do a zipper that actually works- thks Sailrite.IMG_2642.jpegIMG_2643.jpegIMG_2644.jpegIMG_2651.jpegIMG_2653.jpeg
Nice work!

On a scratch built boat, do you have to have some sort of USCG inspection or local inspection to get registration and insurance?
 

OldGuyYardSale

New member
Joined
Apr 2, 2024
Messages
4
Tools are gone. That was easy. 5/2/24

Friend passed away two weeks ago. 92 years young. 3 VN tours Marine. Great guy.
Wife asked me to go thru the garage and keep any and all in there.
Many tools will be for sale and I will keep some. Many odd items such as 3 skulls. 1 buffalo and another cow with blue/green rocks all over it.
I will be listing them here and elsewhere. This is in Arizona. Shipping might be just too much for some items. Local pickup is the way to go.IMG_1701.JPGIMG_4769.JPG
 
Last edited:

Snip's

Well-known member
Joined
Apr 29, 2017
Messages
1,866
Location
Ohio
Why would you not put it up to the top and then lower until the locks on both sides are engaged. Never had a problem with mine.
The jack stands would not be supporting the weight... They would be set down from the top as in the picture...
Only there to catch the side if one side drops because of a cylinder seal failure, when QuickJacks are lowering...
They are there to catch the side that starts lowering uncontrollable... Belt and suspenders kind of thing...
If all looks good, then the jack stands are pulled out of the way... Seals work until they don't...
 

Mike65

Well-known member
Joined
Mar 7, 2007
Messages
3,111
Location
Horse Pasture, Va.
I spent about 1 hour in the garage/shop after work this morning. I bent the remaining section of the fuel line for the Mustang from the fuel filter to the fuel tank. I made the part of the line where the hose from the line goes to the filter, so I made sure it was not too short. Now I just need to trim it shorter & bubble flare both ends & mount all 3 lines & install the hose sections.
 

Burt Shaver

Well-known member
Joined
Dec 7, 2023
Messages
1,280
Location
Iroquois, Ontario Canada
EB8D4F2C-A9F7-483D-BB99-5EFD8B2CE83A.jpegEB19ACF2-A5DE-489C-AD21-DF91373C3FF6.jpeg9E347BEA-0B13-4F0D-B09E-3276B66D0564.jpeg230B2D61-6A47-40A1-9431-D9B2CB764FA8.jpeg
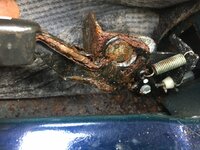
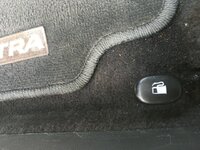
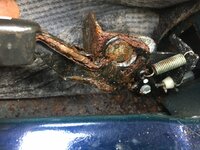
I’ve been working on getting my son’s first car ready for safety inspection on and off the last 2 months. 09 Hyundai Elantra we had bought for 800.00. I have everything done that was listed in the pre inspection, just had to figure out why the fuel door would not open with the lever. Took the panels off in the trunk and was able to open the door by bending and pulling the cable for the fuel door so I figured the problem was at the lever on the floor to the left of the drivers seat. Took the seat out and plastic trim so I could get the carpet up enough to inspect and ultimately remove the lever. I tried initially to lubricate the lever with WD-40 but it was severely corroded so I took it out, kept spraying it, brushing at it with little steel brush. Put it in the vice and tried tapping it with a hammer and punch. After a half hour I was just about to give up and order a new one when it moved a hair. So I kept at it, got it moving good, cleaned it up, painted the part of the arm that was visible, lubricated it with some silicone spray, reinstalled it and working good now.😀
 

Attachments

  • AB1D1608-B5EF-4EE1-9777-E6859018576A.jpeg
    AB1D1608-B5EF-4EE1-9777-E6859018576A.jpeg
    124.6 KB · Views: 20

brit vet

Well-known member
Joined
Aug 15, 2017
Messages
265
Location
Manchester, England
Plugged in and stocked the beer fridge for the first time in two years 🍻 Last year I clad the outside of the garage with Yorkshire Board. A 6" x 3/4" pressure treated plank and had to leave one elevation where the horses were often ******* as they would have chewed it. Got that wrapped up this long weekend now the horses have their own barn but far from perfect battling high winds and rain

20240316_171711_resized.jpg

20240401_192015_resized.jpg
 
To avoid these ads, REGISTER NOW!

Wrench97

Well-known member
Joined
Jun 23, 2018
Messages
12,158
Location
Southeastern Pa
Plugged in and stocked the beer fridge for the first time in two years 🍻 Last year I clad the outside of the garage with Yorkshire Board. A 6" x 3/4" pressure treated plank and had to leave one elevation where the horses were often ******* as they would have chewed it. Got that wrapped up this long weekend now the horses have their own barn but far from perfect battling high winds and rain

20240316_171711_resized.jpg

20240401_192015_resized.jpg
So the beer is for the horses?
Wasn't there a song about that :lol:
 

welder4956

Well-known member
Joined
Apr 8, 2010
Messages
3,084
Location
Birmingham, AL USA
I spent about 1 hour in the garage/shop after work this morning. I bent the remaining section of the fuel line for the Mustang from the fuel filter to the fuel tank. I made the part of the line where the hose from the line goes to the filter, so I made sure it was not too short. Now I just need to trim it shorter & bubble flare both ends & mount all 3 lines & install the hose sections.
What is your weapon of choice for making bubble flares? I have a couple to do myself.
 

Crazyjake8493

Well-known member
Joined
Sep 26, 2014
Messages
3,977
Location
Upstate NY
Only thing I did in the garage was unload a metal shelving unit from mom's house. Put it in a temporary spot for now. It'll be perfect for oil, filters, and other fluids. Need some good spring weather so I can pull some stuff outside and reorganize the inside more easily.
 

Skiff Builder

Well-known member
Joined
Jun 7, 2016
Messages
1,783
Location
Southern NJ Coast
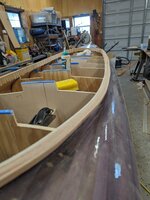
1st shot at upholstery. Couple of platform cushions. Of course the Admiral wanted striped fabric, so a little extra pressure keeping things lined up. Used good firm foam and very light ACX plywood. Came out pretty good and tight.

Than onto vinyl covered cockpit cushions. Used EVA flotation foam. These required sewing "box" cushion style. Had to really sew straight and figure dimensions in order to keep corners tight. First attempt got repurposed as a zippered chart/ document holder🤨
Made adjustments and got 2nd attempt decent. Got all 3 done in a long long day.
Still have screens, windshield cover, etc. You could go on and on with this......IMG_2657.jpegIMG_2656.jpegIMG_2655.jpegIMG_2670.jpeg
 

The Bean

Well-known member
Joined
Dec 24, 2021
Messages
1,829
Location
Delaware Valley (SE PA)
I worked on cast iron and brass lantern restoration for my front door. I considered replacing it with new but sentimental value and real value of this original can not be beat. I have the porcelain socket and glass panes to reinstall after I paint it.

Also, there's a second matching one by the garage.

1712103356897.png

20240402_135747.jpg
 
Last edited:

vwpieces

Well-known member
Joined
Apr 28, 2020
Messages
5,925
Location
Hills, PA
Had some Fun times in the shop recently.
1983 Jetta had a low tire. Found leaking valve stem, easy nuff, new stem installed. Well, didnt feel like the valve was tightening in New stem.
And then....... SPOOOsh! the brass guts blew out the the NEW stem. Another New stem... Good this time.

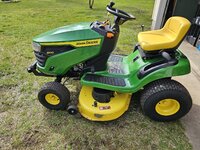
Did first mow last week, house smelled like gasoline the next day. Old mower has a pinhole in gas tank. Mower is tired and I have a spare engine... Just swap it, 20 min job. Engine off in 5 min and pulled the blade holder.
HMMM, shaft on old engine longer than the replacement.
Old engine back on.
And to Save time once again, I'll swap the tank and carb as one unit. Done! and now wont start.
OK old carb on New used tank. Should work... it did run before! Nope.
Pulled spark plug, wet.. Cleaned and dried. No workie.
Pulled spark plug Again, Wet... Cleaned and dried. It sputtered.
Pulled spark Plug AGAIN, wet... cleaned and dried and It Work, It Works!!
Yeah old engine was rolled around, flipped and what not, because I didn't think it was going back in initially. Also do not think it was the Other carb, after the 3 spark plug cleanings.
2 Hours later the 20min job was DONE.

Today my Cheapest Chinese 200A HF Tig welder on Amazon arrived. Unpacked it and plugged it in to make sure it powers up.
A buddy came over, showed him the Tig and a few other cool projects. Laughed at my previous antics.
Started talking about SHtuff and went to show him a few things on the internet.
Now the Shop WiFi not working.
Just spent the last hour trying to figure out WhyTF the shop internet no workie. Everything in house is up and speedy. Wet rainy day so that is in the back of my mind. Shop is powerline ethernet. After turning things off and On again I come back into shop... I Find Chinesium high frequency Tig was left On. Turn off and magically the internet works again. Wonder how many times I'll go through that once I start learning to use the Tig.

Got this cool Sign to fix up. Wish it was mine but it's only visiting.
Cleaned it up and got it working. New bulbs too since it is brittle and kinda hard to get apart.
20240402_162338.jpg

Also buttoned up this Mercedes for a friend. 1980 European 280SL hard and soft tops. 4spd trans and hand crank windows, small bumpers and big emblem grill. Pretty cool one for being in USA. Ran like garbage, new injectors and fuel filter got it dialed in. But didn't last long, another fuel filter and tank screen. Told him to put some miles on it and see what happens. Filter #3 and Then the rad sprung a leak. Odd rad for being 4spd, no trans cooler... Had a nice used one shipped from UK. Rad installed with no issues and did fuel filter #4 just to be sure. Off to find a new home it goes...


20240330_201305.jpg
 

GarageHobbyist

Well-known member
Joined
Feb 18, 2024
Messages
366
Location
Illinois
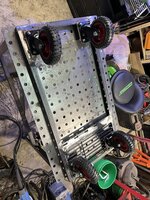
Got to this point on my welding cart. All of it is scrap except the casters (the Grizzly casters!) and the box.

Well… the box I “won” from a store returns auction house, originally for more tool storage. The pictures looked ok, but they were pretty dark. When I got it home the top drawer slides were blown out, and it was hit pretty hard so there are all kinds of issues. Figured I might as well get some use out of it 🤷🏼‍♂️

IMG_4779.jpeg
IMG_4780.jpeg
 

LeonardY

Well-known member
Joined
Apr 16, 2011
Messages
5,107
Location
Southern California
Solar installers showed up. The guys were great.

There was a lack of communication with the customer (me) and the design group. So my install proceeded but it now has to go back through permit. I told the pre-inspection person that I didn't want the batteries in the garage. Not to mention it wouldn't fit.
They submitted the plans with the all the equipment in the garage without discussion with me.

Once we decided on locations. There was a number miscommunications between Design and the installers.

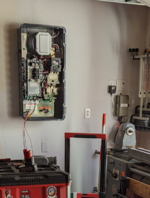
The installers mounted the control box.
1712122395333.png
And a shutdown switch.
1712122742255.png
Then they found that they didn't need either one. Then installed this.
1712122477000.png
What the ....

The batteries were installed on the side of the house. They didn't have to remove these.
1712122592285.png

Conduit installed.
1712122962079.png

Panels installed.
1712123096578.png

The guys told me that it could be done in a day but my paperwork was really janky.

They will be back tomorrow to pull wires and finish up.
 
Last edited:

bugnut

ALLIANCE MEMBER
Joined
Jul 14, 2012
Messages
3,998
Location
Central Ohio
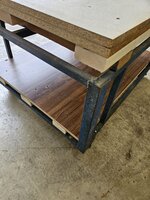
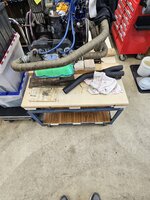
Finished up the small rolling stand and could not have an unloaded flat surface. Raised the working height, put the freshly cut tops on and cleaned out the wheels, fresh lube for the axle and swivels, didn't realize I had a redhead in the shop!
 

Attachments

  • 20240401_102401.jpg
    20240401_102401.jpg
    744.9 KB · Views: 25
  • 20240401_102407.jpg
    20240401_102407.jpg
    812.5 KB · Views: 22
  • 20240401_102646.jpg
    20240401_102646.jpg
    849 KB · Views: 23
  • 20240401_103705.jpg
    20240401_103705.jpg
    824.9 KB · Views: 25
  • 20240402_111203.jpg
    20240402_111203.jpg
    1.2 MB · Views: 25
  • 20240402_111208.jpg
    20240402_111208.jpg
    1.1 MB · Views: 26
  • 20240402_122618.jpg
    20240402_122618.jpg
    1.2 MB · Views: 27
  • 20240402_122637.jpg
    20240402_122637.jpg
    1,000.5 KB · Views: 31

welder4956

Well-known member
Joined
Apr 8, 2010
Messages
3,084
Location
Birmingham, AL USA
God idea

What material are
You using for the spacers ?
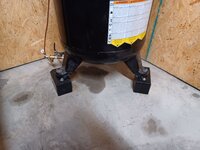
Scraps of 4x4 lumber painted black and bolted to the existing anchor bolts on the floor, leftover 3/16 x 3 flat bar on top with a 1/2-13x2 bolt welded to the center bolted to each foot and two 1/4x3 lag bolts to the 4x4.
20240329_172103.jpg

20240329_172049.jpg
 
Last edited:
To avoid these ads, REGISTER NOW!
Top Bottom