To avoid these ads, REGISTER NOW!

What did you do "IN" your garage today?

To avoid these ads, REGISTER NOW!

BonzoHansen

Well-known member
Joined
Jun 24, 2005
Messages
1,742
Location
NJ
Finished mulching. For now at least, I didn't buy enough lol. Split and relocated some hostas, took out 2 shrubs I hated. Ryobi cordless sawzall ftw :)

Then I started on the Z. Pulled the plugs. I told you it was rich.
20240421_145031.jpg

Starting with an ignition tune up. This week it'll get plugs, wires, cap/rotor. It's time. Maybe I'll finally set the rev limiter lol.

I'll pull the carb and just check for obvious issues. See if i find anything.

Fun times
 
Last edited:

kaymccampbell

Well-known member
Joined
Feb 27, 2015
Messages
29,622
Location
Upstate New York
Loaded up Ubuntu on the new shoptop. Installed the old shoptop SSD. Transferred all my files from the SATA SSD to the NVME SSD. Everything happens faster than I can keep up with. Click on it and it's there. Mounted it on the back of the monitor.

Changed oil n filters on the tractor. Pulled the bagger. Installed the mulch plate. Removed, welded and reinstalled the mower belt guards. Changed out the blades.
 

Motorman55

Well-known member
Joined
Apr 10, 2016
Messages
2,650
Location
South Jersey
Made a couple small adjustments to my 74 FLH Harley (random pic enclosed) and went for a nice ride. Temperature was a nice brisk mid-50's degrees, perfect riding with the Winter Windshield still attached. Not too many cool days left in Jersey and soon I'll have to take this windshield off for the summer.

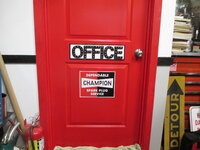
Anyway, I came back and finished the 'OFFICE' sign. Cut a piece of previously painted fiberboard to size. Glued on the wood letters and added a black border pinstripe. Next I measured five times for just for good measure and pre-drilled and mounted the sign on the door with small brass nails.

The next big step for that door is to cut out the upper panel and replace it with a glass widow kit made just for that mod.
 

Attachments

  • IMG_8874.JPG
    IMG_8874.JPG
    729 KB · Views: 29
  • IMG_8876.JPG
    IMG_8876.JPG
    643.8 KB · Views: 23
  • IMG_8653.JPG
    IMG_8653.JPG
    936 KB · Views: 24
Last edited:

Prospecter

Well-known member
Joined
May 16, 2015
Messages
2,443
Location
Maine
Loaded up Ubuntu on the new shoptop. Installed the old shoptop SSD. Transferred all my files from the SATA SSD to the NVME SSD. Everything happens faster than I can keep up with. Click on it and it's there. Mounted it on the back of the monitor.

Changed oil n filters on the tractor. Pulled the bagger. Installed the mulch plate. Removed, welded and reinstalled the mower belt guards. Changed out the blades.
Wow! Busy day!
 

kaymccampbell

Well-known member
Joined
Feb 27, 2015
Messages
29,622
Location
Upstate New York
Wow! Busy day!
Indeed. Here's what the new PC looks like.
Ryzen 7 5700U, 5ghz wireless, two NIC cards, HDMI video, 4 USB ports, 512 GB NVME SSD, extra SATA port, 32 GB RAM.
IMG_20240421_184510.jpg
 

Roger M

Well-known member
Joined
Oct 11, 2022
Messages
151
Location
Snohomish, WA
Trying to find the source of slop in the Cougars steering. The ball joints, idler arm, steering linkage all seemed pretty tight/solid. I end up pumping a fair amount of grease int the steering box and doing about a 1/8 of a turn adjustment on it.

That got rid of almost half the play, so I'll probably turn it in another 1/8-1/4. Anyhow, much better than it was.
 

Attachments

  • 20240421_161340.jpg
    20240421_161340.jpg
    1.2 MB · Views: 23

kaymccampbell

Well-known member
Joined
Feb 27, 2015
Messages
29,622
Location
Upstate New York
Trying to find the source of slop in the Cougars steering. The ball joints, idler arm, steering linkage all seemed pretty tight/solid. I end up pumping a fair amount of grease int the steering box and doing about a 1/8 of a turn adjustment on it.

That got rid of almost half the play, so I'll probably turn it in another 1/8-1/4. Anyhow, much better than it was.
Any chance the garrison valve is sloppy? They were a real pain point as they aged.
 

whateg01

Well-known member
Joined
Mar 13, 2006
Messages
11,505
Location
doo dah, kansas, usa
Started getting my new old Ryobi bt3000 up and running. Bought 2 at bargain prices because one was missing the sliding table which is what makes it special and the other is missing most of the motor, and a few other pieces. Found a few other things that need repair so I'll get parts ordered and they'll be here when I get back from this week's work trip.

20240421_170551.jpg
 
Last edited:

Mikeske

Well-known member
Joined
Apr 28, 2017
Messages
2,131
Location
Washington State
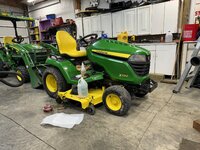
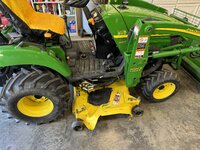
Gave the garden tractor some attention today but it is the same as the bigger tractor and that scrub the tractor down, cleaning everything and removing the grass stains and inspecting for any damage then wax it. I am getting there as I already used the garden tractor three times in the past 4 weeks to mow and I normally do the scrub and wax job earlier but having to put everything on hold while having cataract surgery I can finally see clearly and I also shut off a few of the lights in the shop as it was to bright for me now. Having cataracts everything was dingy well not anymore and that is a plus. IMG_0984.jpeg
 

Prospecter

Well-known member
Joined
May 16, 2015
Messages
2,443
Location
Maine
Gave the garden tractor some attention today but it is the same as the bigger tractor and that scrub the tractor down, cleaning everything and removing the grass stains and inspecting for any damage then wax it. I am getting there as I already used the garden tractor three times in the past 4 weeks to mow and I normally do the scrub and wax job earlier but having to put everything on hold while having cataract surgery I can finally see clearly and I also shut off a few of the lights in the shop as it was to bright for me now. Having cataracts everything was dingy well not anymore and that is a plus. IMG_0984.jpeg
Ah, yes. Maintaining our bodies does get in the way of maintaining our equipment! :unsure:
 
To avoid these ads, REGISTER NOW!

Houdini5150

Well-known member
Joined
Mar 17, 2022
Messages
570
Location
Arizona
The baby got a new little kiddy scooter and when I was helping her ride it, it would hardly turn with the handle turned all the way.. I thought it was a little weird and odd so I was like lemme take it apart to see why it is so difficult.

I unscrew the cover and right away see the steering arm is held into place to steer with a nut and bolt and well the bolt was the only thing in the hole and it was sitting there do to friction. Once I tightened that up problem solved. Now how to figure out how to get my 21 month old baby to ride it :D
 

02Xterra

Well-known member
Joined
Oct 1, 2015
Messages
525
Location
Lynchburg, Va
Acquired my dad's Craftsman 10" table saw that I grew up building all kinds of projects on. It had been in my brother's possession since Dad got a new Delta, but it wasn't being used.. so now I've got it in my garage.

full


It had been sitting for a while, so the cast iron surface needed some work
full


full


The original router died a while ago, so I've taken that off for now; I do have a nice dado blade set for it and I'm planning to build a crosscut sled and make a zero clearance insert very soon.
 

NUTTSGT

Super Moderator
Staff member
Joined
Sep 14, 2009
Messages
51,130
Location
Northern Central Ohio
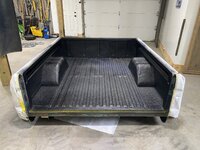
Figured out why the rear-most of the 4 bows on my truck tonneau cover doesn't stay on the mounts. I had them all slotted in place from the front side of the mounts. The rear one has fallen into the bed twice.
Turns out the rear one should be slotted in place from the rear.
I know my last cover, the bows were a different length and needed to be put in, in order.
 

stioc

Well-known member
Joined
May 2, 2005
Messages
1,317
Location
SoCal
Made a house-call for a family member's car, he's a young kid bought his first car that needs a little TLC. The coolant reservoir tank was cracked. Also, changed the intake manifold runner control valve gasket which was creating a vacuum leak and a surging idle.
taurus reservoir 2.jpg
taurus reservoir 1.jpg
 

Ben Buck

Well-known member
Joined
Dec 30, 2010
Messages
7,302
Location
S. W. Ohio
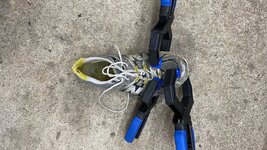
I liquid nailed one of my old gym shoe lookin things, to get more mileage out of them !!

Now, I know there is ShoeGoo & possibly other glue lookin stuff- But a tube of liquid nails was close by !

Clamped them .
Make the most of what you have !!

I should get maybe another 1000 miles of these !!

Hundred years from now- who friggin cares ! AC6A3726-CB70-484E-A332-05037B4A69EE.jpeg8119C2F8-EFE2-4C11-88A8-C97F2AEBB8FD.jpegE39E49FB-8DB2-4D0C-A015-A7FDCDFF7A77.jpeg
 

Mike65

Well-known member
Joined
Mar 7, 2007
Messages
3,111
Location
Horse Pasture, Va.
Trying to find the source of slop in the Cougars steering. The ball joints, idler arm, steering linkage all seemed pretty tight/solid. I end up pumping a fair amount of grease int the steering box and doing about a 1/8 of a turn adjustment on it.

That got rid of almost half the play, so I'll probably turn it in another 1/8-1/4. Anyhow, much better than it was.

@Roger M Check the P/S control valve the ball stud in those are notorious for loosening up.
 

Blue Chips

Well-known member
Joined
Jan 25, 2012
Messages
199
Location
Maine
A simple welded repair.

I've been working on our new driveway/garage project. To help prepare the driveway route for removing topsoil and installing crushed stone underlayment, I was using a chain connected to the hook on top of the front bucket on my loader/backhoe to pull out some tree stumps (maybe 6-inch diameter) by the roots. I managed to pull about eight or nine of them, until one of the stumps resisted my efforts and the hook snapped. I don't know if the hook already had a flaw in it, but in any case the hook was history.

broken-hook-on-loader-bucket-smaller-image.jpg

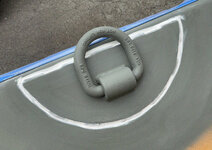
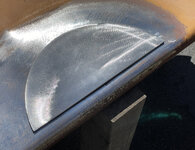
First, I ground off the old hook, cleaned the area around it, and found a semicircle scrap of 3/16" steel to use as a reinforcing plate.

reinforcing-plate-being-fitted-smaller-image.jpg

Rather than replace the broken hook with another hook, I ordered a weld-on tie-down ring, which I thought would be more versatile for my usage. I prefer using straps over chains for most purposes.

The tie-down ring bracket had beveled edges, and I welded the bracket to the plate with a two-pass, full-penetration weld.

tie-down-ring-welded-to plate-close-up.jpg

I then tacked the reinforcing plate in place prior to welding the edges.

tie-down-ring-welded-onto-plate-smaller-image.jpg

After welding the edges of the plate, I primed the area with self-etching primer and sealed the edge with (IIRC) paintable polyether urethane marine sealant to prevent water from getting behind the plate.

ring-plate-welded-primed-sealed-smaller-image.jpg

Then a couple of coats of more-or-less matching paint.

pulling-ring-welded-sealed-painted-smaller-image.jpg

That should do the job, I think. :)
 

Mikeske

Well-known member
Joined
Apr 28, 2017
Messages
2,131
Location
Washington State
Finally finished servicing, cleaning and doing the spring preparation work on both the small tractor and the bigger tractor. I then put the 62" deck on the bigger tractor as the ground has firmed up and I can do the mowing with it in a faster manner. I just take off the front end loader (5 minute to remove) and the backhoe (another 5 minutes to remove and then I have my dedicated mower. Note: this is NOT a drive over mower deck but still only takes about 10 minutes to install and another 5 minutes to remove. IMG_0999.jpegIMG_1002.jpegIMG_1003.jpeg
 

Motorman55

Well-known member
Joined
Apr 10, 2016
Messages
2,650
Location
South Jersey
I've been looking for some type of fexible rubber or plasic edging to finish off the top edge of the custom Lexan windshield I made for my 74 FLH Harley's Winter Windshield.

Today I found something that's not too thick or wide and fit over the thickness of the Lexan perfectly. I think it does the job of keeping with the original vintage look of the windshield. Needless to say, I'm very satisfied with the finished product.

Of course I would find the edging just when its nearing time to take the windshield off for the warm weather.1713839554383.jpeg
 

Attachments

  • IMG_8886.JPG
    IMG_8886.JPG
    885 KB · Views: 28
  • IMG_8888.JPG
    IMG_8888.JPG
    727 KB · Views: 29
  • IMG_8890.JPG
    IMG_8890.JPG
    643.2 KB · Views: 30

kaymccampbell

Well-known member
Joined
Feb 27, 2015
Messages
29,622
Location
Upstate New York
I've been looking for some type of fexible rubber or plasic edging to finish off the top edge of the custom Lexan windshield I made for my 74 FLH Harley's Winter Windshield.

Today I found something that's not too thick or wide and fit over the thickness of the Lexan perfectly. I think it does the job of keeping with the original vintage look of the windshield. Needless to say, I'm very satisfied with the finished product.

Of course I would find the edging just when its nearing time to take the windshield off for the warm weather.1713839554383.jpeg
You shoulda asked. Door edge lace is my go-to for neatening up.
 
To avoid these ads, REGISTER NOW!
Top Bottom