To avoid these ads, REGISTER NOW!

What did you do "IN" your garage today?

To avoid these ads, REGISTER NOW!

DGersic

Well-known member
Joined
Mar 12, 2017
Messages
6,379
Location
DeKalb, IL
Was puttering around in the garage this morning, cleaning up and putting some stuff away. It’s garbage day, heard the truck, so went out to retrieve my cans. Neighbor was standing on the sidewalk looking toward their house. I turned to see what they were looking at (sparrow on the roof) and noticed that a piece of aluminum trim was missing. There’s a bare board showing. “Hey, where’d that go?”

So we hunted around in the bushes and found a piece. Ok, so hang on, let me get a ladder and something to reattach it with, we’ll get that fixed up. There’s a storm coming. Thus begins the ugly hack repair.

IMG_4596.jpeg

The horizonal piece was off. The nails that held it are gone. Then I realize that it’s not a single piece. Whoever did this must have been using up scrap or something. The part on the left was cut to follow the roofline on the left, and was hacked off on the right in a sort of curve. Really rough, like it was done with a sawzall or something. Also, it was installed on top of the fascia piece, you can see the paint discoloration line. Whatever piece was on the right, is gone missing entirely.

I don’t have any white aluminum on hand, not even a scrap. And I’m not keen on running to the store to buy a coil for this. So, what do I have? About 10’ of gutter left over from a replacement. Hm. So, I hacked off a foot of gutter, and unfolded it “flat”. Cut to size, and bend a lip on the bottom. I trimmed the ugly end of the other piece. A few roofing nails, all I had on hand, and at least there is something there again.

It’s not good enough to be half-assed. Is that quarter-assed then?

Got my ladder and tools away before the rain started.


IMG_4604.jpeg

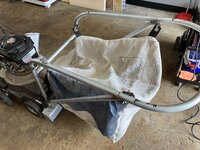
Made the mounting tabs for my yard vac handle. They need to be welded on.

IMG_4599.jpegIMG_4600.jpeg

Working on getting my speedometer to read correctly. It’s about 15% low right now (60 indicated is almost 70 via GPS). So out with the old (44T grey) and in with the new (38T blue). Will test it tomorrow if it’s not raining.
 

atch

Well-known member
Joined
Apr 4, 2006
Messages
843
Location
Columbia, Missouri
Got a new tube put in the garden tiller tire. What a job! I believe that the smaller the tire the harder it is to work on. Old tube was not repairable.

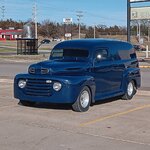
Changed the oil/filter in Clarence, the 1948 Ford panel truck.

Started to flush out the coolant and got the old emptied. I'll refill tomorrow.

It was cold enough to light off the wood stove and use up (get rid of) some scraps and small firewood.
 

Jgaz

Well-known member
Joined
Dec 16, 2016
Messages
1,705
Location
AZ
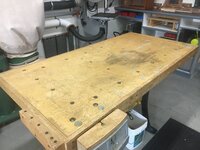
Workbench reassembled, with the nice clean new beveled melamine tops. New bigger casters are gloriously smooth and run over even small children without getting bogged down. All four casters swivel and have brakes.
I want to drill a matrix of dog holes in the top, and I really ought to do that before I stuff all my tools and accessories back inside the bench. And I still need to mount some T-tracks and make a custom router fence. But not today.
I’ve been adding dog holes to mine for the last 15+ years.
IMG_1471_Original.jpeg
 

DeeDubz

Well-known member
Joined
Nov 20, 2019
Messages
1,450
Location
Socal
Changed oil in the F250. I seem to always make a mess. Glad most of the cardboard caught it.
 

Attachments

  • IMG_7475.jpg
    IMG_7475.jpg
    575.3 KB · Views: 44

PhantomEB

Well-known member
Joined
Feb 6, 2006
Messages
6,817
Location
Medicine Hat, AB, Canuckistan
699B522C-7A38-4C42-B2CD-0612697C4731.jpeg

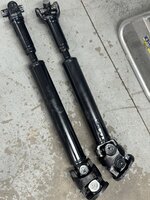
installed my newly built driveshafts. Shop told me most of the parts are coinciding with what would be used in a f350. Perfect for my one ton EB.

kinda want to flip the slip yoke portion of the drive shafts so it’s at the tcase end by the double cardan which would ease my mind of crawling over logs, stumps and rocks.

now to do one hell of a shop cleansing as I am missing my car keys lol.
 

Prospecter

Well-known member
Joined
May 16, 2015
Messages
2,443
Location
Maine
I felt kind of like I was monopolizing this thread, so I started a separate one. "Plugger Workshop." I'm not up to the quality of content so many of you maintain, but for the few misguided individuals who might be interested in the workshop addition and minor doings. . . that's where to look.
 

zanyad

ALLIANCE MEMBER
Joined
Apr 26, 2018
Messages
2,834
Location
NE Ohio
I’ve been adding dog holes to mine for the last 15+ years.
IMG_1471_Original.jpeg
That's not even two holes a year! Are you gnawing the holes? :evil:
 

phred

Well-known member
Joined
Apr 23, 2009
Messages
527
Location
NC
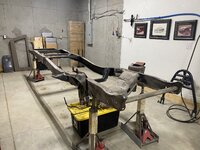
Prepped the bottom of the cab for epoxy primer and stripped all the hangers and brackets from the rear of the ‘66 frame. Getting ready for 4 link and coil overs. Front will get stripped and a mustang 2 front cradle will go in.
 

Attachments

  • 7228B8FD-E52D-46A8-90B3-A043E92FEFDF.jpeg
    7228B8FD-E52D-46A8-90B3-A043E92FEFDF.jpeg
    895.4 KB · Views: 21
  • 3AFD8305-1C75-4945-9CC0-43603400E99A.jpeg
    3AFD8305-1C75-4945-9CC0-43603400E99A.jpeg
    888.3 KB · Views: 20

rayra

Well-known member
Joined
Dec 1, 2014
Messages
4,724
Location
Escaped from Los Angeles
I’ve been adding dog holes to mine for the last 15+ years.
IMG_1471_Original.jpeg
PRobably what I should have done, only where and when I need them. As it is I overenthusiastically drilled a grid of (49) 3/4" holes AND beveled their top edges. Exposing a lot of thirsty particle board. It was probably a mistake.

Tomorrow I'm going to try to router the slots to install the T-tracks flanking the new router plate / insert. At some point soon I'll need to scratch-build a shiny new router fence / vac attachment. I have a vac fitting on the router base below the insert, but I've been seeing some odd sawdust buildup and ejection thru other holes in the baseplate that I wouldn't expect to happen under suction of a vac. So I have to figure out what's happening there. And how I might put vacuum suction both above and below the bit.

I'm also thinking about encapsulating the router section of the table, trying to better contain the mess, Or not.
 

Attachments

  • worktable rework 08.jpg
    worktable rework 08.jpg
    141.7 KB · Views: 18
To avoid these ads, REGISTER NOW!

ZRX61

Well-known member
Joined
Aug 15, 2006
Messages
28,716
Location
Solar Blight Valley, SoCal
The plan was to wash the F350 & then hit a local car show. Instead I took it to the local car wash & had them take care of that. Then I hit the car show, listened to people say nice things about it & was given a spiffy little plaque.
When I got home I got under the truck & continued cleaning up under there... During which I managed to knock a magnetic flashlight off the frame rail & artfully prevented it hitting the ground by intercepting it with my nose. Not too much claret was spilled.
For some reason it doesn't always like starting on the front tank.
 

Jgaz

Well-known member
Joined
Dec 16, 2016
Messages
1,705
Location
AZ
PRobably what I should have done, only where and when I need them. As it is I overenthusiastically drilled a grid of (49) 3/4" holes AND beveled their top edges. Exposing a lot of thirsty particle board. It was probably a mistake.

Tomorrow I'm going to try to router the slots to install the T-tracks flanking the new router plate / insert. At some point soon I'll need to scratch-build a shiny new router fence / vac attachment. I have a vac fitting on the router base below the insert, but I've been seeing some odd sawdust buildup and ejection thru other holes in the baseplate that I wouldn't expect to happen under suction of a vac. So I have to figure out what's happening there. And how I might put vacuum suction both above and below the bit.

I'm also thinking about encapsulating the router section of the table, trying to better contain the mess, Or not.
Don’t second guess yourself. I think a grid of holes is the way to go.
Table looks great.

Does this picture give you any ideas?
IMG_1639_Original.jpeg
 

rharman

Well-known member
Joined
Apr 22, 2012
Messages
8,904
Location
SoCal
It will at some point. Not for this season. I have the 2016 Acura ILX Pikes Peak car for "all out" racing if need be.

Acura-ILX-Endurance-Racer-42294.jpg

Just read a Popular Mechanics article about Lucy Block and the electric car she drove at Pikes Peak. And, her 16 year old daughter driving the Porsche belonging to her late father. Wow, what a touching story.
 

rharman

Well-known member
Joined
Apr 22, 2012
Messages
8,904
Location
SoCal
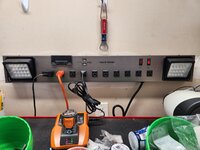
Took advantage of the Rockler Woodworking 50% off sale and picked up two 10 outlet, 2 USB port lighted power straps. $49 was half off....put one over the garage tool box/Bench.

I saw yours, I liked it, I ordered it. Only 25% off for me, but worth it. 👍🏻

I looked at that at my Rockler. I liked it but just didn't want to take up that much space on my pegboard. If they had any left, I could have got it at 75% off the last couple of weeks. Store lost their lease and is closing. Likely tomorrow is last day. I went there 3-4 weeks ago when it was 25% or 50% off and the store was basically empty. Very sad.

It was always busy. Surprised they aren't just relocating but they've been there forever. Likely had a very good lease rate and current rates wouldn't be feasible. Just my guess.
 
Last edited:

budo55

Well-known member
Joined
Sep 25, 2010
Messages
107
Location
Pure Michigan
I looked at that at my Rockler. I liked it but just didn't want to take up that much space on my pegboard. If they had any left, I could have got it at 75% off the last coupe of weeks. Store lost their lease and is closing. Likely tomorrow is last day. I went there 3-4 weeks ago when it was 25% or 50% off and the store was basically empty. Very sad.

It was always busy. Surprised they aren't just relocating but they've been there forever. Likely had a very good lease rate and current rates wouldn't be feasible. Just my guess.
***** that they closed. Luckily for me mine re-located down a few stores in the complex to a much larger location.
 

atch

Well-known member
Joined
Apr 4, 2006
Messages
843
Location
Columbia, Missouri
That is one beautiful ride!
Thanx man.

Cleaned up & put away all the garden tools my wife & I had out for planting the flowers.
@atch that is one beautiful Ford truck.
Again thanx.

Two recliners in the back and a big screen would make that a great road trip vehicle. :beer:
I've owned this thing 51 years and don't have any idea how many miles I've put on it. MANY. Odometer was broken most of those years. As far east as DC/York PA and as far west as Bonneville salt flats. And I've slept in it quite a few times. With the top chopped 5" there's not much room for a TV.
 

Jgaz

Well-known member
Joined
Dec 16, 2016
Messages
1,705
Location
AZ
Thanks!
Good to know! I hadn't seen this style before, so as soon as I did I knew I had to build one
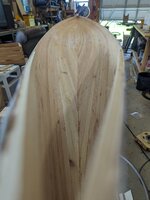
Here’s an older picture of mine, probably fine tuning a frame before glue up.
IMG_5759_Original.jpeg
I don’t know how you plan to apply clamping force but I found a length of threaded rod as shown above easier to use than a screw clamp. YRMV. Just my experience.
 

DGersic

Well-known member
Joined
Mar 12, 2017
Messages
6,379
Location
DeKalb, IL
Got the bag hook tabs welded on.

IMG_4605.jpeg

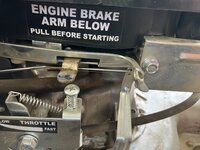
Started working on how to deal with the engine brake.

IMG_4606.jpeg

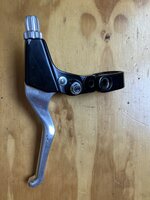
It was cable actuated, designed for a lawnmower with a safety handle. I don’t have one of those. In fact, the blades are enclosed, and being able to leave it running to use the small branch chipper is a feature. I had been using this mountain bike brake lever with “parking brake” button.

IMG_4609.jpeg

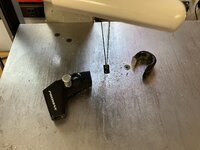
Started modifying it to fit

IMG_4611.jpeg

But now I think I have a better idea. Maybe. Need a trip to Farm & Fleet for parts before continuing.

IMG_4589.jpeg

Test drive with the new speedometer dive gear was successful, it’s now reading within 1 MPH of GPS app on my phone.
 

GarageHobbyist

Well-known member
Joined
Feb 18, 2024
Messages
366
Location
Illinois
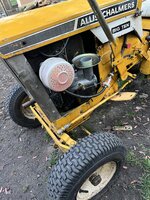
I took the motor off a Harbor Freight drill press I found in a trash pile a couple years ago and had been sitting around since. It worked, but had a lot of wobble and needed to be cleaned up/blasted. Finally decided it wasn't worth it and took the motor, mount, and switch out for future projects.

Then I had this going on. I've tried the new carb the previous owner had installed, tried the original that was taken off and looked good/clean, and bought a new one myself. I pretty much am at a timing issue. I'm going to check the points and make sure the intake gaskets are good just to be sure These engines have some timing adjustment in the coil, but you have to pull the engine for that. The drive shaft attaches to the flywheel, so you can't get to anything with it in the tractor
IMG_5059.jpeg
IMG_5057.jpeg
 

Skyman

Well-known member
Joined
Nov 9, 2021
Messages
1,224
Location
Central Maryland
A sheared flywheel key can allow the timing to slip far enough to where the engine will kick back against the recoil starter, and yank the handle right out of your hand. You'll have strong spark, but it'll be arriving at the wrong time.
 

02Xterra

Well-known member
Joined
Oct 1, 2015
Messages
525
Location
Lynchburg, Va
Here’s an older picture of mine, probably fine tuning a frame before glue up.
IMG_5759_Original.jpeg
I don’t know how you plan to apply clamping force but I found a length of threaded rod as shown above easier to use than a screw clamp. YRMV. Just my experience.
Very cool! I had planned to just use a big squeeze clamp, but will definitely remember this. Thanks for the insight!
 

Old Man Roger

Well-known member
Joined
Apr 6, 2017
Messages
17,829
Location
Palm Coast Florida
Thanx man.


Again thanx.


I've owned this thing 51 years and don't have any idea how many miles I've put on it. MANY. Odometer was broken most of those years. As far east as DC/York PA and as far west as Bonneville salt flats. And I've slept in it quite a few times. With the top chopped 5" there's not much room for a TV.
I guess I’d settle for a couple recliners and a good sized laptop. :badteeth:
 

Magnum440d100

Well-known member
Joined
Dec 2, 2018
Messages
3,581
Location
Indiana
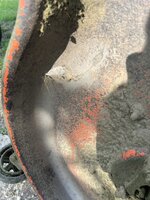
Deck on my Ariens broke yet again. I should say MY WELDS FAILED lol IMG_3882.jpeg

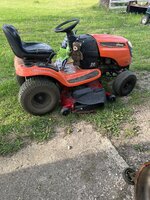
So quickest solution? Buy another deck. Err. Whole mower…IMG_3869.jpeg

It too has a failing mount (I knew before I paid. But it was only $100, and the mower has other parts I NEEDED) IMG_3878.jpeg

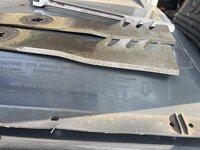
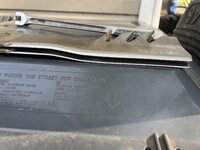
Pulled my Amazon mulching specials off and cleaned up the knicks. IMG_3879.jpegIMG_3880.jpegIMG_3881.jpeg

Then threw the deck on the mower and went mowin IMG_3883.jpeg


I’m not too concerned about this deck failing. It will absolutely.

But I have ordered the parts to assemble the simplicity champion zero turn deck. When Jacks ships those out, I’ll rebuild the deck and start using that zero turn.

I’ll still be keeping the Ariens and my FOUR broken decks for it, as I do like using it to do the first mow of the season and uncover the deadfall and mandrel breakers.

Little by little I guess.
 
To avoid these ads, REGISTER NOW!
Top Bottom