To avoid these ads, REGISTER NOW!

What did you do "IN" your garage today?

PhantomEB

Well-known member
Joined
Feb 6, 2006
Messages
6,858
Location
Medicine Hat, AB, Canuckistan
19E8A7FD-1E1E-47BF-A486-02BF425060EE.jpeg
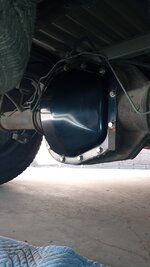
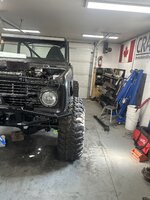
Moved the bronco out 2’ more from the wall to give myself some more room to do wiring and brakes on it.

ADC2446F-613A-431C-AC58-03F7EA36BE8A.jpeg

when I came home last week from camping the trailer was put on the other side of the gravel pad and put the truck there instead as it’s just as level there and way more elbow room when I finally find a minute to put the new mud flaps on the truck. Just saving up to get my bigger tires for it first so I know how far out to put the flaps.
 
To avoid these ads, REGISTER NOW!

Burt Shaver

Well-known member
Joined
Dec 7, 2023
Messages
1,296
Location
Iroquois, Ontario Canada
I concur.
Wondered if a soak would have freed the piston ring or did if need more direct means.
I had it soaking for a year lol, not to free the ring or anything, just because I wanted everything well lined while it was sitting till I got to looking at it. When I took the cylinder off I could see it was stuck in the ring groove, measured the ring end gap after I got it out, and it was worn so ordered in some new ones. I need to get back at this boat, but have obligations. Oh well September 5th is my goal to be done, so lots of time still
 

DGersic

Well-known member
Joined
Mar 12, 2017
Messages
6,390
Location
DeKalb, IL
I was out of town the last couple of weeks. While I was gone, the final piece I needed for the yard vac modifications arrived from China via eBay. An M6 right and left thread coupling nut. (Surprisingly, I can’t find a US source for these, even McMaster Carr doesn’t carry such a thing.)

After a couple of failed attempts, I turned a left threaded M6 bolt in to a threaded hook.

IMG_4977.jpeg

And with that and a right threaded bolt, I now have the engine safety brake defeated.

IMG_4978.jpeg

Still needs full assembly and testing, but I think I’m done with the modifications to this thing now. I’ll need a good day to get some paint on the handle, and it’s ready for fall yard cleanup.
 

Blue Chips

Well-known member
Joined
Jan 25, 2012
Messages
199
Location
Maine
I was out of town the last couple of weeks. While I was gone, the final piece I needed for the yard vac modifications arrived from China via eBay. An M6 right and left thread coupling nut. (Surprisingly, I can’t find a US source for these, even McMaster Carr doesn’t carry such a thing.)

I don't know if the thread pitch is what you need, or if the threads extend far enough into the nuts, but McMaster-Carr does carry some M6 left-hand thread to right-hand thread "thread adapters," which I would call coupling nuts or sleeve nuts because of their length:

https://www.mcmaster.com/products/left-hand-threaded-coupling-nuts/
https://www.mcmaster.com/91998A122/
https://www.mcmaster.com/97372A124/
 

Outlawmws

Well-known member
Joined
Aug 9, 2011
Messages
39,349
Location
The Badlands
Late start but got the Allen bolt with the stripped hex socket loose, then out on the right locking huh, and then everything else off; and have the hub and rotor in my vise. the bolts holding the rotor on are sneering at me...
OK had dinner had a think on it, and setup for:

1) an impact socket, as the hammer impact won't be doing my std 14MM socket any good,
2) 1/2" drive so I can get a longer lever -forget the hammer impact
3) set up to lock it so it stops slipping on the vise jaw (and I really had it cranked..)
4) made sure I had my body behind the longer lever

Success!

This was the difference: 3/8 could not cut it the 1/2" did (I'm sure the "lock" helped)

Tvan rotor.jpg

Starting cleanup for reassembly now... But mostly this will finish tomorrow
 
Last edited:

southalabama

Well-known member
Joined
Jan 10, 2011
Messages
5,541
Location
Brewton AL
I stripped. Heard a buzzing and swatted. Kept hearing it. Felt something so I came out of my shirt. Was afraid I was about to be stung. It was some kind of beetle. I’d pruned trees before coming in so it likely dropped on me then. It apparently liked me and didn’t want to leave. It met my shoe.

Have some help coming soon to wall up a 20x20 portion of the shop so I started uncovering the materials. Had my brother over to hold some unistrut. Getting ready for a bracket on the outside of the shop to hold a mini split.
 

Attachments

  • 6451E2D1-F66C-412B-90FC-A8BE942BF601.jpeg
    6451E2D1-F66C-412B-90FC-A8BE942BF601.jpeg
    1,023.9 KB · Views: 87

DGersic

Well-known member
Joined
Mar 12, 2017
Messages
6,390
Location
DeKalb, IL
I don't know if the thread pitch is what you need, or if the threads extend far enough into the nuts, but McMaster-Carr does carry some M6 left-hand thread to right-hand thread "thread adapters," which I would call coupling nuts or sleeve nuts because of their length:

https://www.mcmaster.com/products/left-hand-threaded-coupling-nuts/
https://www.mcmaster.com/91998A122/
https://www.mcmaster.com/97372A124/

Ah, thanks. I didn’t need anything specific, could have used SAE bolts just as easily. Was looking at coupling nuts, not “thread adapters”.
 

Fixr

Well-known member
Joined
Dec 23, 2012
Messages
9,710
Location
SW VA
It can be challenging to search for things when industry nomenclature isn't consistent. I often stumble across the things I've been searching for accidentally...sometimes a week or two after I needed them. :)
That demonstrates the value of keeping a paper McM catalog in the bathroom to peruse while doing your business. You can learn terminology for lots of stuff you didn't even know existed!
 

four.cycle

Well-known member
Joined
Oct 19, 2015
Messages
29,364
Location
Tacoma, Washington
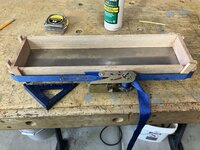
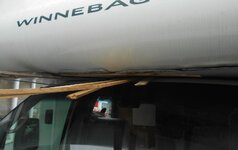
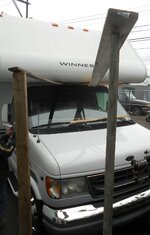
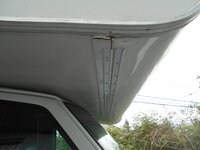
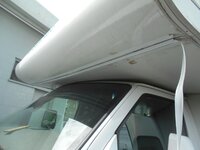
Not my garage, and I did very little of the work other than jamming that white plastic trim strip into that aluminum channeling because I have the longest arms of the three of us.
Buddy got a screamin' deal on this Class C "Minnie Winnie", but about a week after taking ownership, the front end of the thing came unbuttoned. Local "Motorhome Repair Shop" quoted him $8K-$9K for repairs. Other buddy had a different plan of attack and came in at far less than the other guys. A bit unorthodox, but it seems to have done the trick. We'll see how it pans out when he takes it out next.
 

Attachments

  • Winnebago 052524 01.jpg
    Winnebago 052524 01.jpg
    899.2 KB · Views: 70
  • Winnebago 052524 02.jpg
    Winnebago 052524 02.jpg
    537.4 KB · Views: 55
  • Winnebago 052524 03.jpg
    Winnebago 052524 03.jpg
    499.4 KB · Views: 54
  • Winnebago 052524 04.jpg
    Winnebago 052524 04.jpg
    371.8 KB · Views: 55
  • Winnebago 052524 05.jpg
    Winnebago 052524 05.jpg
    390.4 KB · Views: 53
  • Winnebago 052524 06.jpg
    Winnebago 052524 06.jpg
    343.5 KB · Views: 53
  • Winnebago 052524 07.jpg
    Winnebago 052524 07.jpg
    422.4 KB · Views: 52
  • Winnebago 052524 08.jpg
    Winnebago 052524 08.jpg
    283.5 KB · Views: 55

Outlawmws

Well-known member
Joined
Aug 9, 2011
Messages
39,349
Location
The Badlands
Two set backs on the T-van brake job:

The Warn locking hubs I bought that were supposed to fit this van have a different spline than the axles have... - So the auto hub got cleaned up and put back.

Then the brake pads only half work? Same PN as what I used to cripple home with, but I only used the inside pad as I could not compress the pistons completely with the tools I had in the parking lot I was broke down in. That side fits - the other side nees a longer plate for the pad? I think I got the pads for the 2WD van, not 4WD...

So back to the parts store for a return and re-order...

Here is the old rotor and the pad that was working against the mess: Probably 400 miles on this:

T-van brakes a.jpg

Worse in profile:


T-van brakes b.jpg
 
To avoid these ads, REGISTER NOW!

Mikeske

Well-known member
Joined
Apr 28, 2017
Messages
2,131
Location
Washington State
It has been raining all day today so back on the tractor and continue cleaning and working the deck today. I stripped a bolt taking off the third blade to sharpen it and I got lucky as it stripped just as it broke loose. Since I am retired mechanic and the blades were replaced a couple years ago came with three extra bolts. I found the bolts and so I had a perfect match and used that. I also had a friend ask me how I kept the tractor in such good condition and how the paint has held up so well I told him it is always stored in a garage and under cover when not used. I had the tractor since 2007 and it gets this treatment every year IMG_1251.jpegIMG_1250.jpegIMG_1249.jpeg
 

ODIS

Well-known member
Joined
Apr 30, 2012
Messages
2,110
Location
Pacific Northwest
Fun project today building this carb bench. 12v pump and a little gas tank from Amazon, the rest of the parts are from my “gonna use it someday” collection.

Momentary switch mounted in an old door fixture, power wire from a battery charger that failed, the base is a cast off glue laminated beam, carb held in place with brass inserts for 1/4-20 bolts.

This should be just fine for setting the floats and accelerator pump output for the Zenith 32 NDIX carbs on my 356 Porsches.


IMG_5524.jpegIMG_5528.jpegIMG_5525.jpeg
 
Last edited:

GreenIron

Well-known member
Joined
Sep 26, 2021
Messages
2,092
Location
A bit north of the GOA
I laid these hand tools on the fab table to inspect.

I picked these up at the local second-hand store. Someone dropped off (donated) a small bag of tools.
I rummaged through the bag and pulled out what I wanted. I asked the owner, "How much for these tools"? She said, "You can have them." :) I said, "Thanks."
IMG_6859.jpg


1/2" S-K Ratchet. Works well, no slippage.
IMG_6861.jpg


5/8" Craftsman evolv ?
12mm Craftsman combination.
IMG_6860.jpg


1/4", 3/8" and 1/2" Pittsburg wabble extensions. They're not high quality but come in handy.
IMG_6863.jpg
 

DAVE94LIGHTNING

Well-known member
Joined
May 24, 2024
Messages
198
Set up another fabrication workbench. This one holds different tools when in use, hydraulic bender, press brake, sheet metal brake etc.. 1/2” steel top and heavy gauge steel tube for the frame. Stripped, sanded, painted and waxed the steel top after some
surface rust removal.
 

Attachments

  • IMG_6479.jpeg
    IMG_6479.jpeg
    744 KB · Views: 32
  • IMG_6481.jpeg
    IMG_6481.jpeg
    884 KB · Views: 32
  • IMG_6487.jpeg
    IMG_6487.jpeg
    921.7 KB · Views: 31
  • IMG_6523.jpeg
    IMG_6523.jpeg
    1.3 MB · Views: 28

nadogail

Well-known member
Joined
Jan 23, 2009
Messages
32,069
Location
Coronado, CA
More organizing a very little cleaning.

Spoke with a neighbor who has agreed to take a completed project off my hands. My completed project, which was a lot of fun as I built it is about 2/3 of a project he wants to build for himself. I will be glad to get the floor space in my Workshop.

Cut more boards for the Elevated Raised Bed Planter Boxes. Stopped for Lunch and my Afternoon Nap.
 

welder4956

Well-known member
Joined
Apr 8, 2010
Messages
3,084
Location
Birmingham, AL USA
Opened the door for the first time in 3 weeks (just got home yesterday from our Yosemite/Sierra/Sequoia/Sedona trip, plus a stop in DFW area to visit an old friend). Got the riding mower key and mowed the overgrown lawn, then got out the string trimmer and blower to clean up the mess. Then put everything away and put the trimmer and blower batteries on the charger.
 

hobie18

Well-known member
Joined
Apr 29, 2024
Messages
1,181
Fun project today building this carb bench. 12v pump and a little gas tank from Amazon, the rest of the parts are from my “gonna use it someday” collection.

Momentary switch mounted in an old door fixture, power wire from a battery charger that failed, the base is a cast off glue laminated beam, carb held in place with brass inserts for 1/4-20 bolts.

This should be just fine for setting the floats and accelerator pump output for the Zenith 32 NDIX carbs on my 356 Porsches.
Awesome.
A little unclear on how this works. Airflow? Fuel air danger?
Still awesome.
 

jskicet

Well-known member
Joined
Apr 26, 2020
Messages
216
Location
Western NC Mtns
Being we just put new asphalt on our driveway I thought I would keep the UPS/Fed Ex trucks from tearing up the driveway in front of my house. I built a parcel shed for them to drop the packages off near the entrance of our driveway. We are a private rural community so I'm not worried about them being stolen. Anyway, going to stain it tomorrow and I have signage coming from some folks on Etsy. I tried to use scraps from around the garage being I just finished the interior so I had some leftover. Only had to go to Lowes once!.IMG_6920.jpegIMG_6922.jpeg
 

rzims

Well-known member
Joined
Oct 25, 2006
Messages
461
Location
Grass Valley, CA
Well, not in the shop, but part of the day was "for the shop"
Got the conduit installed for wiring from the main panel to the shop. Unfortunately, main panel and shop are at opposite ends of the property so had to spend a bunch of time in the unfinished, under house area. mice, insulation, general dust and dirt make it a less than fun place to run conduit. conduit3.jpgconduit2.jpg

Also had a call with the water filtration people to talk about how to fix the 15 year old system installed by the previous owner. We're on a well and dealing with really high iron. looks like they're suggesting a chlorine injection system to replace the green sand/calcite system currently in place.water system.jpg
 
To avoid these ads, REGISTER NOW!
Top Bottom