To avoid these ads, REGISTER NOW!

Fascia Issue with Hurricane Bracket Question

A&P mechanic

Well-known member
Joined
Sep 6, 2012
Messages
324
Location
FL
Hi GJ,

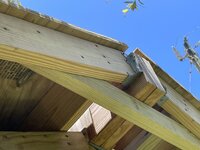
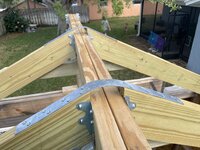
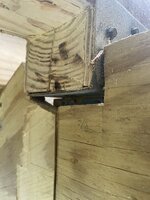
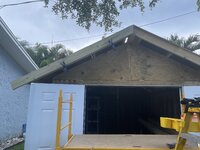
  • What is the best way to fix the fascia on the gable end?
  • How would you fix this?
  • Is there another option that I am not aware of and should do instead?
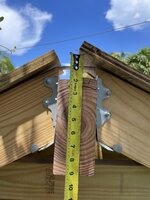
I plan to use aluminum fascia wrap but am open to other options. In hindsight, I should not have installed hurricane brackets on the on the gable end because now the fascia does not sit flush.

One option is cutting the sheathing flush with the fascia but then the fascia at the bottom end and ridge board would poke out farther than the fascia.

Another option is if I add more fascia (original fascia becomes sub fascia), I would need 1.25 inches of more fascia to make it ~ flush with the sheathing and may need to add a small strip of sheathing on the top.

This is my first shed build. My current focus is the fix the gable end fascia. Next, I will add a drip edge > underlayment > ridge vent and shingles.

Thanks in advance!
 

Attachments

  • 1.jpg
    1.jpg
    587.5 KB · Views: 157
  • IMG_2545.jpg
    IMG_2545.jpg
    613.1 KB · Views: 146
  • IMG_2542.jpg
    IMG_2542.jpg
    533 KB · Views: 134
  • IMG_2543.jpg
    IMG_2543.jpg
    1.4 MB · Views: 129
  • IMG_2544.jpg
    IMG_2544.jpg
    1.6 MB · Views: 135
To avoid these ads, REGISTER NOW!

PCustoms

Well-known member
Joined
Jul 23, 2011
Messages
23,433
Location
VT
I'm not sure that's the right bracket, but it's there, so...

If that is needed ALL holes must be used.

As far as the Gable end, I don't see fascia, I see a rafter. Add some nice trim from your ridge beam down to the eve, all the ugly brackets are then hidden.
 

Firebrick43

Well-known member
Joined
May 12, 2015
Messages
14,195
Location
West central Indiana
There is no reason for the hurricane straps at the facia board on the rafter tails. Get rid of it and just use some construction screws from the face of the board into the rafter. at the top use an inside bracket with simpson strong tie screws. Or use some simple roll strapping and go up and over the rafter and back down to the rafter tie with bracket nails in shear into the tie and maybe a few on the inside of the rafter. Roll strapping is thin enough not to cause issues with the rake trim board.

I second PCustoms statement that all holes must be used with proper screws or nails

On the roof rake use a 1x board to build it out before your trim board is put up
 
OP
A

A&P mechanic

Well-known member
Joined
Sep 6, 2012
Messages
324
Location
FL
I'm not sure that's the right bracket, but it's there, so...

If that is needed ALL holes must be used.

As far as the Gable end, I don't see fascia, I see a rafter. Add some nice trim from your ridge beam down to the eve, all the ugly brackets are then hidden.
Good point, I was calling that rafter on the gable end fascia as I wanted to use that rafter face as fascia. I realize now that is not the fascia.

You guys are right! I just looked at the catalog and those brackets are missing screws, thanks for pointing that out and I will add those this weekend.
I am skeptical a rafter bracket goes on that end.

I have never seen a fascia installed like that.

Thank you for the insight, I will leave the rafter bracket LRU26Z on the bottom since it is already installed.

There is no reason for the hurricane straps at the facia board on the rafter tails. Get rid of it and just use some construction screws from the face of the board into the rafter. at the top use an inside bracket with simpson strong tie screws. Or use some simple roll strapping and go up and over the rafter and back down to the rafter tie with bracket nails in shear into the tie and maybe a few on the inside of the rafter. Roll strapping is thin enough not to cause issues with the rake trim board.

I second PCustoms statement that all holes must be used with proper screws or nails

On the roof rake use a 1x board to build it out before your trim board is put up

I have construction screws (Simpson 2.5” framing screws) holding the fascia onto the rafters also. I also have metal coil strap going across the rafters but it is covered up now with sheathing. The picture of the strapping is a few weeks old. I just did an internet search for “Simpson inside bracket” and that would have worked perfect, except everything’s already attached. It is good to know that exists for the future though.

Just noticed, the username and holes missing hardware is suspicious.

@A&P mechanic you don't work for Boeing, do you?

Hahaha!
That is the funniest quote I have heard all week! Missing fasteners off a Boeing door, guy with a username of A&P is working on a shed that is missing fasteners… hmm haha! No, I do not work for Boeing and work a smaller aviation company.

Odd assembly, but it's where you are at.

If it was me; I would put a 1x on the face/end of the sheeting & 2x's that the brackets are fastened to.
Drip edge over the 1x then aluminum facia will slide up under drip edge.

GJ wisdom with all these posts helps out again!
Ok, I will add fascia to the rafter face and a small strip of more ¾” plywood on top. The rest of the sheathing on the walls and roof is 3/4". The fascia will probably be another 2x6” with aluminum fascia wrap and a drip edge.
Thanks for the "how to" guys!
 

Attachments

  • IMG_2547.jpg
    IMG_2547.jpg
    1.1 MB · Views: 70
  • IMG_2549.jpg
    IMG_2549.jpg
    407.3 KB · Views: 72
  • IMG_2548.jpg
    IMG_2548.jpg
    936.3 KB · Views: 70
  • IMG_2298.jpg
    IMG_2298.jpg
    711.7 KB · Views: 80

mike93lx

ALLIANCE MEMBER
Joined
Dec 9, 2013
Messages
37,886
Location
Richmond, VA
Good point, I was calling that rafter on the gable end fascia as I wanted to use that rafter face as fascia. I realize now that is not the fascia.

You guys are right! I just looked at the catalog and those brackets are missing screws, thanks for pointing that out and I will add those this weekend.


Thank you for the insight, I will leave the rafter bracket LRU26Z on the bottom since it is already installed.


I have construction screws (Simpson 2.5” framing screws) holding the fascia onto the rafters also. I also have metal coil strap going across the rafters but it is covered up now with sheathing. The picture of the strapping is a few weeks old. I just did an internet search for “Simpson inside bracket” and that would have worked perfect, except everything’s already attached. It is good to know that exists for the future though.


Hahaha!
That is the funniest quote I have heard all week! Missing fasteners off a Boeing door, guy with a username of A&P is working on a shed that is missing fasteners… hmm haha! No, I do not work for Boeing and work a smaller aviation company.


GJ wisdom with all these posts helps out again!
Ok, I will add fascia to the rafter face and a small strip of more ¾” plywood on top. The rest of the sheathing on the walls and roof is 3/4". The fascia will probably be another 2x6” with aluminum fascia wrap and a drip edge.
Thanks for the "how to" guys!
This isn't the way to do it. You're supposed to either ghost us or tell us we are just being a bunch of nannies.

:)

Good luck with the rest of the build.
 

PCustoms

Well-known member
Joined
Jul 23, 2011
Messages
23,433
Location
VT
What's your plan for roofing?

Along with the fascia, you should review the drip edge/overhang before you get too far ahead
 

The Cobbler

Super Moderator
Staff member
Joined
Oct 24, 2013
Messages
25,967
Location
Niagara Region, Ontario, Canada
I admire people that try to do stuff on their own, you have some fixing to do tho. I'm tired and off to bed,or I could concentrate more & give some possible help. but as well, pressure treated wood is not the best against aluminum .
 
OP
A

A&P mechanic

Well-known member
Joined
Sep 6, 2012
Messages
324
Location
FL
The plan for the roofing is Owens Corning UDL50 underlayment, Owens Corning ridge cap (carton of 4ft strips), drip edge (~ aluminum), fascia wrap (~ aluminum), and soffits (~ aluminum),.

I just did an internet search Cobbler and is right. The copper in pressure treated wood does corrode aluminum fascia. The whole roof is pressure treated, rafters, ridge board, sheathing etc.

  • Do you recommend I use aluminum drip edge or coated galvanized steel or something else? Same question with fascia wrap?

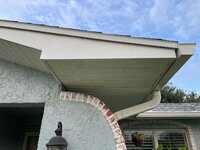
I already bought 20ft of aluminum drip edge from HD. I did not get the other 30 ft at HD because what was in stock at HD looked rough (dinged up with bent edges) So, I will check out a farther away HD. On my house I have vinyl fascia wrap and plastic soffit vents. I just checked my drip edge on the house and it is not magnetic, so I thin it is aluminum. I would like whatever I do on the shed to match or be an upgrade to the house. This is why I chose aluminum but now after learning aluminum corrodes with PT fascia, I may change materials.

  • Speaking of roofs, what length of roofing nail should I use?

I think a 1 inch ring shanked nail is sufficient. The way I interpret the building code below is since the sheathing is ¾ inch + ~ 3/16 inch shingles = a 1 inch nail. I would like it if the nail did not poke through the sheathing so I do not ever hit my head on the nail. I searched online and it looks like the sheathing might be held on better when the ring shanked nails poke through the sheathing.

For the underlayment, I plan to put underlayment under the drip edge and add another pieces of underlayment on the top edge of the drip edge per the below pasted code.

Pasted from the FL building code

“R905.2.5 Fasteners.

Fasteners for asphalt shingles shall be galvanized steel, stainless steel, aluminum or copper roofing nails, minimum 12-gage [0.105 inch (3 mm)] shank with a minimum 3/8-inch-diameter (9.5 mm) head, complying with ASTM F1667, of a length to penetrate through the roofing materials and not less than 3/4 inch (19.1 mm) into the roof sheathing. Where the roof sheathing is less than 3/4 inch (19.1 mm) thick, the fasteners shall penetrate through the sheathing.

905.2.8.5 Drip edge.

Provide drip edge at eaves and gables of shingle roofs. Overlap to be a minimum of 3 inches (76 mm). Eave drip edges shall extend 1/2 inch (13 mm) below sheathing and extend back on the roof a minimum of 2 inches (51 mm). Drip edge shall be installed over the underlayment. Self-adhering ASTM D1970 underlayment may be installed over a primed drip edge flange. There shall be a minimum 4 inch (51 mm) width of roof cement installed over the drip edge flange or the self-adhering underlayment. Drip edge shall be mechanically fastened a maximum of 12 inches (305 mm) on center. Where the Vasd as determined in accordance with Section R301.2.1.3 is 110 mph (177 km/h) or greater or the mean roof height exceeds 33 feet (10 058 mm), drip edges shall be mechanically fastened a maximum of 4 inches (102 mm) on center.”
 

Attachments

  • house fascia.jpg
    house fascia.jpg
    708.6 KB · Views: 45
Last edited:

Firebrick43

Well-known member
Joined
May 12, 2015
Messages
14,195
Location
West central Indiana
A layer of underlayment will isolate the pressure treated from the aluminum but you should probably use SS trim nails and roofing nails as galvanized especially the thin electroplated galvanized will corrode quickly
 

PCustoms

Well-known member
Joined
Jul 23, 2011
Messages
23,433
Location
VT
I would expect some underlayment under the aluminum would be enough to protect it
Pretty much your only option.

As far as I know, The only thing not corroded by ACQ lumber are some specific hardware coatings, plastic and copper.
 
OP
A

A&P mechanic

Well-known member
Joined
Sep 6, 2012
Messages
324
Location
FL
I plan to use 316 stainless ring shanked roofing nails in a length of ~ 1 inch on the roof.
Per the recommendation, I will look into use SS fasteners in the fascia instead of the Simpson framing screws. I used Simpson framing screws to fasten all the other PT wood together since I could use an 1/4" impact driver. I own a palm nailer but not a framing or a roofing nail gun. The Simpson website says the framing screws are coated with

"Quik Guard® Coating
Quik Guard coatings are proprietary coating systems that consist of an electroplated zinc base layer and organic top coats. The corrosion resistance is equivalent to hot-dip galvanization (ASTM A153, Class D) in some exposures and in most non-marine environments, and described by ICC-ES, AC257 Exposures 1 and 3."
 
To avoid these ads, REGISTER NOW!

mike93lx

ALLIANCE MEMBER
Joined
Dec 9, 2013
Messages
37,886
Location
Richmond, VA
I plan to use 316 stainless ring shanked roofing nails in a length of ~ 1 inch on the roof.
Per the recommendation, I will look into use SS fasteners in the fascia instead of the Simpson framing screws. I used Simpson framing screws to fasten all the other PT wood together since I could use an 1/4" impact driver. I own a palm nailer but not a framing or a roofing nail gun. The Simpson website says the framing screws are coated with

"Quik Guard® Coating
Quik Guard coatings are proprietary coating systems that consist of an electroplated zinc base layer and organic top coats. The corrosion resistance is equivalent to hot-dip galvanization (ASTM A153, Class D) in some exposures and in most non-marine environments, and described by ICC-ES, AC257 Exposures 1 and 3."
The Simpsons are fine for PT
 
OP
A

A&P mechanic

Well-known member
Joined
Sep 6, 2012
Messages
324
Location
FL
The Simpsons are fine for PT
Ok perfect, I will use the Simpson framing screws then in the fascia since the Simpson screws will be hidden with fascia.
I did not know about zip tape until just now. I will definitely put some type of underlayment under the aluminum whether it is zip tape or something else (y)
 

mike93lx

ALLIANCE MEMBER
Joined
Dec 9, 2013
Messages
37,886
Location
Richmond, VA
Ok perfect, I will use the Simpson framing screws then in the fascia since the Simpson screws will be hidden with fascia.
I did not know about zip tape until just now. I will definitely put some type of underlayment under the aluminum whether it is zip tape or something else (y)
Zip tape is great stuff. Just not cheap

You need to roll it out to make it stick properly
 

PCustoms

Well-known member
Joined
Jul 23, 2011
Messages
23,433
Location
VT
I would just use cheap underlayment/felt under the trim. You'll probably have extra from the roof.

You'll go broke buying zip or grace for that.
 
OP
A

A&P mechanic

Well-known member
Joined
Sep 6, 2012
Messages
324
Location
FL
Zip tape is great stuff. Just not cheap

You need to roll it out to make it stick properly

I would just use cheap underlayment/felt under the trim. You'll probably have extra from the roof.

You'll go broke buying zip or grace for that.
Good tip guys, I will use leftover underlayment under the fascia wrap!
If I run out of underlayment from covering the roof then I will pick up a roll of zip tape. (y)
 

PCustoms

Well-known member
Joined
Jul 23, 2011
Messages
23,433
Location
VT
Good tip guys, I will use leftover underlayment under the fascia wrap!
If I run out of underlayment from covering the roof then I will pick up a roll of zip tape. (y)

I recently added some flashing to a deck refurb, couldn't find vinyl flashing locally so used painted galvanized. I added strips of joist tape as extra insurance
 
OP
A

A&P mechanic

Well-known member
Joined
Sep 6, 2012
Messages
324
Location
FL
Hi guys,

I bought the 5/4 (actual 1 inch) x 6 inch x 8 ft boards to attach to the rafters to build out. I grasp the next step is ~ attach a trim board or a 2x board onto the bottom fascia and up to the ridge board. I saw a YouTube video where I should have notched out the 2”x8” ridge board to accommodate a 2”x6”. I could do that with a multi tool cutting blade and an electric planer but it would be a lot of work with not much room since it's installed. If I did notch it, I would remove the 2x4 collar tie permanently.

I think the better solution as recommended in this thread is to build out the rafter face with the 1x board to make it mostly flush then add a 2”x10” trim board. There is an air gap above the ridge board as shown in the picture, so a 2”x8” trim board would not cover everything and I would need a 2”x10”. I like aluminum fascia wrap but that would involve me wrapping a 2”x10” board.

Advice is always welcome. I will attach the 5/4”s boards next weekend and will post some pictures when I get everything squared away.

I added the missing SD10 2.5 inch screws in today to all of the brackets. (I took that picture before I added all the screws Lol, all the SD10s screws are installed) I picked up shingles, drip edge, the 5/4”x6” boards, and 1 ¼ inch ring shanked roofing nails this weekend.

Video below showing the ridge board should ideally be notched before install.

"How To Adjust Roof Framing Ridge for Fascia Board - Advanced Carpentry Tips"
 

Attachments

  • IMG_2556.jpg
    IMG_2556.jpg
    713.4 KB · Views: 33
OP
A

A&P mechanic

Well-known member
Joined
Sep 6, 2012
Messages
324
Location
FL
Hi GJ,

To give an update, per the great advice on here-I added a 1 inch board then a 2x8 board on the sub fascia. I also added a small strip of plywood sheathing on top. This fixed everything. I also went to town with an oscillating tool cut off blade and trimmed the ridge board on the front/back. Then I finished the roof.

I have a new fascia question…

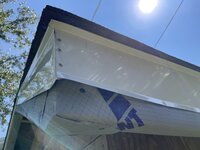
I have 2”x8” (actual 1.5”x7.25”) pressure treated fascia. I originally planned to put aluminum fascia wrap over the boards. I left a fingers width/ ~ ½ inch gap behind the drip edge to the fascia. After I finished the roof, I looked at the 8 inch aluminum fascia wrap at HD and I realized the size is made to fit fascia trim boards, not a 2x8. I had a bunch of roof underlayment left over, so I put underlayment over the fascia board because pressure treated wood corrodes aluminum.

How would you complete the fascia, even if it is another option and not wrap? (I could cut off the underlayment then paint the 2x8s etc.)

How would you wrap the fascia?

Does anybody make fascia wrap for 2”x8” (actual 1.5”x7.25”) boards?

Thanks in advance!
 

Attachments

  • trimmed ridge board.jpg
    trimmed ridge board.jpg
    810.5 KB · Views: 24
  • building sub fascia out.jpg
    building sub fascia out.jpg
    621.9 KB · Views: 23
  • eaves.jpg
    eaves.jpg
    898.6 KB · Views: 26
  • drip edge.jpg
    drip edge.jpg
    440.5 KB · Views: 23
  • latest shed picture.jpg
    latest shed picture.jpg
    1.1 MB · Views: 33

nmk_61802

Well-known member
Joined
Mar 6, 2008
Messages
965
Location
Central IL
How you plan to side and finish out soffits would help suggestions. However the most versatile of solutions is to purchase white AL coil stock and rent a brake (or give someone your dimensions and have them fab up what you need).
 
OP
A

A&P mechanic

Well-known member
Joined
Sep 6, 2012
Messages
324
Location
FL
How you plan to side and finish out soffits would help suggestions. However the most versatile of solutions is to purchase white AL coil stock and rent a brake (or give someone your dimensions and have them fab up what you need).
I plan to work my way top to bottom down the side of the shed. I finished the roof in order to keep everything dry inside. ~ Fascia cover first then aluminum soffits. After, house wrap then 4x8 sheets of hardi panel. I read the hardi panel gets damaged easily and that it's better to do the soffits/fascia first then the the hardi panel.

That's a unique idea of renting a brake and using coiled aluminum stock, I didn't know brakes can get rented out. I just did an internet search and HD rents brakes for $60 a day. Taking the dimensions to a sheet metal shop would also work (y)
 

nmk_61802

Well-known member
Joined
Mar 6, 2008
Messages
965
Location
Central IL
I plan to work my way top to bottom down the side of the shed. I finished the roof in order to keep everything dry inside. ~ Fascia cover first then aluminum soffits. After, house wrap then 4x8 sheets of hardi panel. I read the hardi panel gets damaged easily and that it's better to do the soffits/fascia first then the the hardi panel.

That's a unique idea of renting a brake and using coiled aluminum stock, I didn't know brakes can get rented out. I just did an internet search and HD rents brakes for $60 a day. Taking the dimensions to a sheet metal shop would also work (y)

Is it your plan to follow the bottom of the rafters with the soffit, or install it flat? If installing with the soffits, bending would be the best, as you can correct the bottom lip for the angle. If I read that correctly that you are installing AL soffit, you should do that first.... You nail the soffit up, then make the fascia trim long to cover and overlap the outside cut edge. Your Hardi and top trip will cover the inside cut edge.

The reason I asked about finishes, is the steps, trim and methods will vary slightly based on your finish goals.
 
OP
A

A&P mechanic

Well-known member
Joined
Sep 6, 2012
Messages
324
Location
FL
installing AL soffit, you should do that first.... You nail the soffit up, then make the fascia trim long to cover and overlap the outside cut edge. Your Hardi and top trip will cover the inside cut edge.
I plan on installing the soffit flat/horizontal. That is good advice installing the soffit first before the fascia cover! I have not researched the soffits yet but plan to watch YouTube videos on soffit installation this weekend.
 
OP
A

A&P mechanic

Well-known member
Joined
Sep 6, 2012
Messages
324
Location
FL
Is it your plan to follow the bottom of the rafters with the soffit, or install it flat? If installing with the soffits, bending would be the best, as you can correct the bottom lip for the angle. If I read that correctly that you are installing AL soffit, you should do that first.... You nail the soffit up, then make the fascia trim long to cover and overlap the outside cut edge. Your Hardi and top trip will cover the inside cut edge.

The reason I asked about finishes, is the steps, trim and methods will vary slightly based on your finish goals.
I walked around the house and looked at the soffit. I have angled soffits on the side with flat soffits on the front and back of the house. So, I am actually going to install sloped soffit so it matches the house.

  • Does J-channel go at the top and bottom of the sloped sections or does J-channel go only at the bottom with a nail holding it at the top?
    (I couldn't find an image via an internet search.) I'm going to pick up soffit, J channel and F channel this weekend. Thank you!
 

nmk_61802

Well-known member
Joined
Mar 6, 2008
Messages
965
Location
Central IL
I walked around the house and looked at the soffit. I have angled soffits on the side with flat soffits on the front and back of the house. So, I am actually going to install sloped soffit so it matches the house.

  • Does J-channel go at the top and bottom of the sloped sections or does J-channel go only at the bottom with a nail holding it at the top?
    (I couldn't find an image via an internet search.) I'm going to pick up soffit, J channel and F channel this weekend. Thank you!
You can do it multiple ways. Since you are looking at AL fascia, you don't really need the lower F/J channel. At the Fascia edge you just nail it up, the bent lip of the Fascia will cover the cut edge as said above. The only reason to use the trim on that edge IMO is if you are using vinyl Fascia which needs the trim to snap over so it can move.

At the building it is really your choice. Since you don't have siding/ top trim already installed, that will cover the cut edge if you choose to nail it tight. If you do install the F/J at the building, it will be covered up anyway when you install siding & top trim.

FYI, this advice assumes you are using AL soffit too. If using vinyl soffit only nail the outside edge tight, and let the inside float to allow it to move.

Also, I am not a professional siding installer, but I have done a lot of vinyl siding across full buildings and well as repairs for family and friends. So my advice my advice may or may not be worth what was paid for it.
 
OP
A

A&P mechanic

Well-known member
Joined
Sep 6, 2012
Messages
324
Location
FL
You can do it multiple ways. Since you are looking at AL fascia, you don't really need the lower F/J channel. At the Fascia edge you just nail it up, the bent lip of the Fascia will cover the cut edge as said above. The only reason to use the trim on that edge IMO is if you are using vinyl Fascia which needs the trim to snap over so it can move.

At the building it is really your choice. Since you don't have siding/ top trim already installed, that will cover the cut edge if you choose to nail it tight. If you do install the F/J at the building, it will be covered up anyway when you install siding & top trim.

FYI, this advice assumes you are using AL soffit too. If using vinyl soffit only nail the outside edge tight, and let the inside float to allow it to move.

Also, I am not a professional siding installer, but I have done a lot of vinyl siding across full buildings and well as repairs for family and friends. So my advice my advice may or may not be worth what was paid for it.
When doing sloped soffit, that makes sense not needing the channel at the bottom edge since it will be covered up with the fascia wrap and it also makes sense not needing the channel at the building because it should ~ get covered up with hardi board trim.

I picked up the aluminum soffit today at the big box store. I also picked up J and F channel before I read the GJ reply. I will probably return the J and F channel but I want to install a few feet of soffit first to make sure it goes smooth before I return the channel.

Thank you for the insight and reply!
 

Attachments

  • IMG_2645.jpg
    IMG_2645.jpg
    911.7 KB · Views: 13
OP
A

A&P mechanic

Well-known member
Joined
Sep 6, 2012
Messages
324
Location
FL
To close out the thread:
The shed is complete and thank you for all the insight!
 

Attachments

  • Shed inside.jpg
    Shed inside.jpg
    881.4 KB · Views: 4
  • Completed Shed.jpg
    Completed Shed.jpg
    807.5 KB · Views: 9
To avoid these ads, REGISTER NOW!
Top Bottom