To avoid these ads, REGISTER NOW!

What did you do "IN" your garage today?

Magnum440d100

Well-known member
Joined
Dec 2, 2018
Messages
3,581
Location
Indiana
Oh man, still workin on electrical stuff.

Got the old turn signal switch cut out. Literally. IMG_4570.jpeg
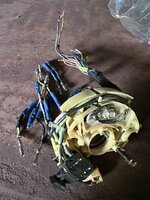
Got the new switch installed and pinned correctly IMG_4569.jpeg
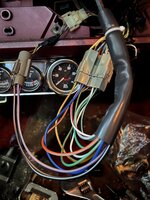
Still have to solder/heat shrink the dash side of the harness, but doing this eliminated some of this shenanigans IMG_4538.jpeg

Got the cornering lamps (lower) working again IMG_4568.jpeg
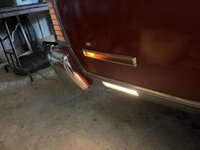

But then the passenger turn signal stopped working. Took the lens off, and discovered more of my grampas shenanigans IMG_4567.jpeg

Now on the hunt for a good used passenger turn signal assembly. Fun times.
 
To avoid these ads, REGISTER NOW!

Motorman55

Well-known member
Joined
Apr 10, 2016
Messages
2,648
Location
South Jersey
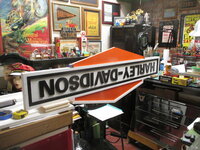
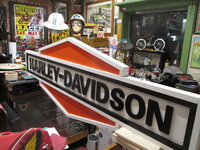
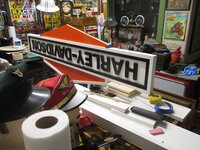
Found a spot to flip the sign over and set it on. Started working on the bottom arrow. Painted it orange, cut the white trim to size. Just have to wait for the paint to dry, then I'll glue and nail the white trim on. I'll get that done tomorrow. Almost done.1721370921371.jpeg 1721350684963.jpeg

Found a spot to flip the sign over and set it on. Started working on the bottom arrow. Painted it orange, cut the white trim to size. Just have to wait for the paint to dry, then I'll glue and nail the white trim on. I'll get that done tomorrow. Almost done.1721370921371.jpeg 1721350684963.jpeg
The Harley-Davidson sign is DONE! Step 3 completed with the additon of the white trim boards. All glued and nailed. I also drilled and screwed in the eye lags and ready to hang. The lags go thru the white and black trim board and into the flat sign board capturing all three layers.

The sign measures 59" Wide x 20" Tall x 1-1/2" Deep. Not sure how much it weighs. The Final Step will be deciding where to hang it from the ceiling so both sides can be seen. The ceiling being only 9 feet tall. 1721430728328.jpeg1721430702510.jpeg
 
Last edited:

niget2002

Well-known member
Joined
Oct 2, 2012
Messages
11,233
Location
Josephine, TX
*grumbling in "truck didn't start"

Had it in for warranty work last week. They decided the battery was fine so they replaced the cable to the starter.

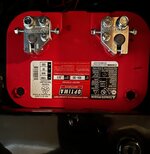
Today, it just gives the click of death again. I didn't have much time to troubleshoot, but I went to the battery display in the EVIC and it only shows 11.9v.

Hopefully they'll replace the battery this time.
 

welder4956

Well-known member
Joined
Apr 8, 2010
Messages
3,081
Location
Birmingham, AL USA
Not much today. First I cut 4 lengths of leftover 1/2" galvanized pipe 24" long to use as stakes for the garden trellis I repaired and drilled 2 holes in each one for attachment screws, then drove them in each corner and screwed them to the trellis.

20240719_130450.jpg

Then I spent the rest of the day looking for plugs for the smog ports on the back of the remanufactured engine that was delivered yesterday. I could have just used 5/8-11 x 1" bolts, but would rather have flush plugs. I also managed to pick up some engine paint and a few other items while running around. After looking at several auto parts and hardware stores, I decided to just order them online:

plugs.jpg
 

Copymutt

Well-known member
Joined
Sep 3, 2016
Messages
3,406
Location
Colorado
Entertained the Ford tech on his house call🤒. Mobil tech reprogramed my 2014F150. Now I shouldn’t have one of the major transmission failures. Lead Frame breakage from self inflicted downshift into 1rst at 70mph. Ford was forced to do it free as breaking traction at speed can pose a safety risk. He set up sat nav & reprogrammed the ECM not to tell the trans that the speed sensor thinks we aren't moving! Otherwise owners would pay for the repair.
 

Bessy

Well-known member
Joined
Dec 18, 2012
Messages
995
Location
Ontario, Canada
Cleaned off a flat surface (yay me!) and set up the - now assembled - laser on the bench next to my 13 year old computer, which continues to blue screen on me - add another project to the list.

Modelled up a mock up of my forstner bit tray that I will cut on the laser. I still need to add in the size markings, but I squirrelled and started modeling up the spacer that I will 3d print for between the tool box and the bandsaw, to aid in keeping the drill press more level. I'm going with trial and error as far as fit is concerned, because I don't really know an easy way to add any adjustability to it given the current design.

Since I needed the printer up and running for a focus block for the laser (PO hasn't found the one it came with), I finished that print up and decided to print another mount for DeWalt 20v tools, to hang my bandfile over by the welding area. It will hang next to the cutoff tool, under the portaband, angle grinders and recip saw.

In the morning I'll get up, run some junk to the recycling depot, and then continue making some progress on the shop!
 

Motorman55

Well-known member
Joined
Apr 10, 2016
Messages
2,648
Location
South Jersey
The Harley-Davidson sign is DONE! Step 3 completed with the additon of the white trim boards. All glued and nailed. I also drilled and screwed in the eye lags and ready to hang. The lags go thru the white and black trim board and into the flat sign board capturing all three layers.

The sign measures 59" Wide x 20" Tall x 1-1/2" Deep. Not sure how much it weighs. The Final Step will be deciding where to hang it from the ceiling so both sides can be seen. The ceiling being only 9 feet tall. 1721430728328.jpeg1721430702510.jpeg
Haven't decided exactly where the Harley-Davidson sign will go out in the shop just yet. Meanwhile I had to get it off the floor and out of the way so I can get back to making the trophies for my HOA Car Show in September.

I have it hanging from the ceiling in my office-display room. There's 7 feet of clearance when measured from the floor to the tip of the bottom arrow. Took the pic with a flash. That's why the sign looks bright and the rest of the office looks a little yellow.1721451982411.jpeg
 

welder4956

Well-known member
Joined
Apr 8, 2010
Messages
3,081
Location
Birmingham, AL USA
Entertained the Ford tech on his house call🤒. Mobil tech reprogramed my 2014F150. Now I shouldn’t have one of the major transmission failures. Lead Frame breakage from self inflicted downshift into 1rst at 70mph. Ford was forced to do it free as breaking traction at speed can pose a safety risk. He set up sat nav & reprogrammed the ECM not to tell the trans that the speed sensor thinks we aren't moving! Otherwise owners would pay for the repair.
I like that Ford dealers are making house calls for these types of things. They have been to my house 2 times to do the blower motor recall on the 2015 Expedition and parking brake harness recall on the 2023 F150. Saved me the time it takes to drive 30 minutes to the dealer, wait for the repair and drive home.
 

66HertzClone

ALLIANCE MEMBER
Joined
Dec 6, 2006
Messages
4,053
Location
Long Valley, NJ
Haven't decided exactly where the Harley-Davidson sign will go out in the shop just yet. Meanwhile I had to get it off the floor and out of the way so I can get back to making the trophies for my HOA Car Show in September.

I have it hanging from the ceiling in my office-display room. There's 7 feet of clearance when measured from the floor to the tip of the bottom arrow. Took the pic with a flash. That's why the sign looks bright and the rest of the office looks a little yelloN

Haven't decided exactly where the Harley-Davidson sign will go out in the shop just yet. Meanwhile I had to get it off the floor and out of the way so I can get back to making the trophies for my HOA Car Show in September.

I have it hanging from the ceiling in my office-display room. There's 7 feet of clearance when measured from the floor to the tip of the bottom arrow. Took the pic with a flash. That's why the sign looks bright and the rest of the office looks a little yellow.1721451982411.jpeg
Any chance you could use a couple of sections of drive chain for hanging the sign?
 

PhantomEB

Well-known member
Joined
Feb 6, 2006
Messages
6,817
Location
Medicine Hat, AB, Canuckistan
Cleaned up then made another mess last night after work.

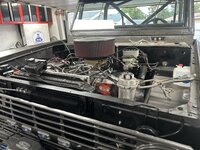
wiring harness pulled out of the 72 then started cutting and welding up a plate to my Saginaw PS bracket to hold the remote reservoir even higher up.

still need to enlarge the speed holes so the coil gets some air flow across it And sandblast at work before paint. need to locate exactly how high I can go yet keep it all under the hood.E62712FA-101F-4068-AA6F-725E153BDF64.jpegC89C10D2-77BD-42DA-AD25-9B7861804AD9.jpeg
 

Levaughn

Well-known member
Joined
Feb 17, 2015
Messages
1,406
Location
NY
My Dash Cam wasn't working. I looked at the adapter and the red light wasn't on (fuse was good) I swapped it out with another adapter and the camera worked. I was going to throw the adapter away, but decided to open it and take a peek. Low and behold the wire came off the retainer clip. I soldered it back on.
 

Attachments

  • thumbnail.jpeg
    thumbnail.jpeg
    147 KB · Views: 27

Jgaz

Well-known member
Joined
Dec 16, 2016
Messages
1,705
Location
AZ
Not much in the garage today other than clean up a bit. Just too hot.
Posted my design for a miter saw stop in the Homemade tools thread.

 
To avoid these ads, REGISTER NOW!

Copymutt

Well-known member
Joined
Sep 3, 2016
Messages
3,406
Location
Colorado
I like that Ford dealers are making house calls for these types of things. They have been to my house 2 times to do the blower motor recall on the 2015 Expedition and parking brake harness recall on the 2023 F150. Saved me the time it takes to drive 30 minutes to the dealer, wait for the repair and drive home.
Hmm, maybe the medical community could take a lesson.🤔
Did not realize they actually did mobile mechanic work. Assumed it was only software upgrades.
 

niget2002

Well-known member
Joined
Oct 2, 2012
Messages
11,233
Location
Josephine, TX
I bought a jump pack on Amazon with same day delivery. Ordered at 10am and it showed up at 1:30pm.

I plugged it in and it showed 75% charged. I skimmed the manual and went ahead and carried it out to the truck.

It jumped started the truck without any issues. I wish I had bought this thing years ago.

1000002946.jpg
 

Magnum440d100

Well-known member
Joined
Dec 2, 2018
Messages
3,581
Location
Indiana
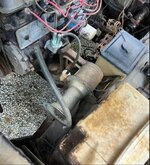
Got the rear tank hooked up to the engine.

I used old line and an old filter as I didn’t know what condition the metal line is in internally.

I ran it for a bit, and the fuel was clear (new tank/fresh fuel).

Now that I’ve flushed the metal line, I’ll install new rubber lines and a new filter properly.

Still awaiting the title in the mail before I do brakes and anything else major.
 

Attachments

  • IMG_4572.jpeg
    IMG_4572.jpeg
    983.2 KB · Views: 34

Wiz02

Well-known member
Joined
Jul 13, 2007
Messages
2,399
Location
Southeastern PA
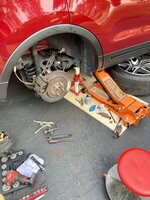
Brake pads and rotors on the Camaro. Never worked on Brembo calipers. Just knock out a couple of pins and you can remove the pads. Also easy to get the pistons to retract front and rear, no clamps needed.

Dealer wanted over $1k for the easiest brake job I've ever done. Funny how the wheels and tires keep getting heavier as I get older.
 

Snip's

Well-known member
Joined
Apr 29, 2017
Messages
1,865
Location
Ohio
Got the rear tank hooked up to the engine.

I used old line and an old filter as I didn’t know what condition the metal line is in internally.

I ran it for a bit, and the fuel was clear (new tank/fresh fuel).

Now that I’ve flushed the metal line, I’ll install new rubber lines and a new filter properly.

Still awaiting the title in the mail before I do brakes and anything else major.

Capture.JPG

AAAHHOOOGAH AAAHHOOOGAH :ROFLMAO:
 

coldh2o

Well-known member
Joined
May 21, 2013
Messages
1,441
Location
Ontario, Canada
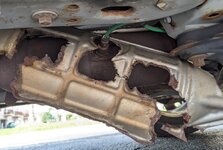
Took care of the heat shield rattle on my '08 CR-V for good by removing it. I had previously clamped the two halves together with large hose clamps, either last winter of the winter before. First started failing at the flange bolt holes. hs.jpghs2.jpg
Cue obligatory Honda quality comment...
 

HPRifleman

Member Emeritus
Joined
Nov 18, 2019
Messages
767
Location
Wayne, IL
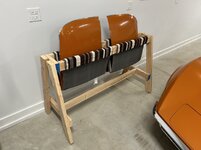
Whenever I take my old Chevy out for a spin, the T-tops are always removed. But I got tired of putting them on my workbench where they take up a lot of space and can get damaged. So today I built a holder for them.

I couldn't find anyone who has built something like this so I had to wing it. Four 2x4s, a couple of rugs, and a portion of my Saturday afternoon is all it took.

Intended to hold 10 lbs. of T-tops. Actually built to probably support an F-150.

gj_195.JPG
 

swsman

Well-known member
Joined
May 5, 2021
Messages
606
Location
Earthbound
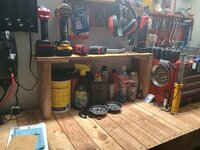
Built this small shelf out of wood scraps for my main work bench. Keeps things more organized and frees up some work space.

Also tried to remove a broken tie down bolt on my F250 truck bed, so far its a no go. This after having at it with PB Blaster, plumbers torch and vice grips. The only way to get at it is from underneath, might just run some self tappers to secure the tie down and call it good, bottom bolt is still there/functional.
 

Attachments

  • IMG_20240720_221522486_HDR.jpg
    IMG_20240720_221522486_HDR.jpg
    839.7 KB · Views: 54

Bessy

Well-known member
Joined
Dec 18, 2012
Messages
995
Location
Ontario, Canada
First tests done on ~7mm misc plywood that I had on hand. Test one (left) I had the laser set on the 4-6mm height setting based on the 3d printed gauge I made. Underwhelming... Moved it down to the >6mm setting and tried again. Still underwhelming. I'm going to source some thinner material this week, and give it another go, as well as try some of the other materials I can dream up.
 

Attachments

  • 17215775455202793904679234034948.jpg
    17215775455202793904679234034948.jpg
    538.2 KB · Views: 38

kaymccampbell

Well-known member
Joined
Feb 27, 2015
Messages
29,609
Location
Upstate New York
First tests done on ~7mm misc plywood that I had on hand. Test one (left) I had the laser set on the 4-6mm height setting based on the 3d printed gauge I made. Underwhelming... Moved it down to the >6mm setting and tried again. Still underwhelming. I'm going to source some thinner material this week, and give it another go, as well as try some of the other materials I can dream up.
How many passes, and at what speed are you running? And are you using air?
 

Bessy

Well-known member
Joined
Dec 18, 2012
Messages
995
Location
Ontario, Canada
How many passes, and at what speed are you running? And are you using air?
Single pass, using air first at full speed, then I think I reduced it to about half for the second. I wasn't expecting it to cut through, to be clear, but rather I was hoping for the circles to be a bit more circular, and there to be a bit more darkness/definition to the labelling along the top and side, and to the gradient at the bottom... but again, I've got a grand total of no experience in the realm of lasers.

Question for you, Kay, what laser (make/model) are you running by chance? You mentioned you had a 5w and then upped it to a 20w?
 

Snip's

Well-known member
Joined
Apr 29, 2017
Messages
1,865
Location
Ohio
My wife asked me the other day where the squeaking noise was coming from when driving the car...
I told her my ears couldn't hear any squeaking sound... She kept asking me... "Can't you hear the noise"...
I told her all I could hear was her talking about the squeaking noise...
I figured it was the the brakes getting down to the minimum thickness where the little metal probe starts squeaking when rubbing on the rotors... Got out the flashlight and gave a look/see through the wheel spokes... Yeah, they were getting down there...80,000 miles...
Went to the FORD dealer and got the HD pads front and rear...
Started at 8:00am and finished both rear, but it was getting warm out so I do the fronts in about a week
I used to do a brake job a lot quicker... It was fun getting the pistons to screw / retract back into the calipers...
I had to apply Armstrong torque....:ROFLMAO:

IMG_3982.jpg
 

rcktpwrd

Well-known member
Joined
Mar 5, 2008
Messages
1,101
Location
Raleigh, NC
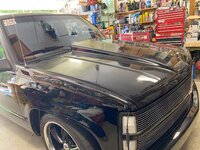
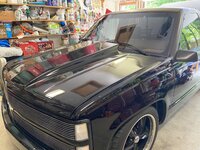
Got the hood aligned about as good as we could, no rubbing or binding on anything now.

IMG_7114.jpg

IMG_7113.jpg

Also had to remove and reinstall the wiper arms on the wagon. That also had a new windshield installed last week and they didn't get the arms back in quite the right place or the washer hose on one side. To cut the glass guy some slack the wiper arms are not the stock ones, we swapped them out a while back for ones from a mid '90's Buick sedan. The original arms use the single pin to hold the blades in place and didn't do a good job with that. The Buick arms use the J hook and also have two sprayers per arm.

IMG_7115.jpg

IMG_7116.jpg

We also took some of the interior out in preparation for getting the headliner redone and we have a new carpet to install.
 

kaymccampbell

Well-known member
Joined
Feb 27, 2015
Messages
29,609
Location
Upstate New York
Single pass, using air first at full speed, then I think I reduced it to about half for the second. I wasn't expecting it to cut through, to be clear, but rather I was hoping for the circles to be a bit more circular, and there to be a bit more darkness/definition to the labelling along the top and side, and to the gradient at the bottom... but again, I've got a grand total of no experience in the realm of lasers.

Question for you, Kay, what laser (make/model) are you running by chance? You mentioned you had a 5w and then upped it to a 20w?
Were I you, I'd knock the speed down to 300-500mm/min and run the laser at 90-95% power. I'd also include a double pass cut for one of those pictures.

If you're running lightburn, there's a calibration routine you can run to get more accurate dimensions, circular circles and squarer squares. You'll need it if you're going to be burning click boxes.

My machine is an Ortur Auferro Laser 2. New in the box. It was born 5 watts. I burned and sold enough craftsy stuff to pay for it. Then, after a couple years, I bought a Laser Tree LT-4LDS-V2. A sort of generic 20 watt module, which is the largest laser module I'd estimate could still run accurately on the Ortur gantry. Much larger and momentum n inertia would make it perform poorly. I've been very pleased with it so far.

I'm building up a collection of sketches for my next seasonal push. I'll probably turn them into lightburn files next month, and start to burn in September, after I do something about better ventilation, as the bigger laser makes quite the smoke cloud quicker than my designed-for-5-watt filter can handle.
 
To avoid these ads, REGISTER NOW!
Top Bottom