To avoid these ads, REGISTER NOW!

What did you do "IN" your garage today?

Blue Chips

Well-known member
Joined
Jan 25, 2012
Messages
199
Location
Maine
Did a little more work yesterday on my 1954 Dodge M37 restoration project. I'm currently restoring the headlights, and to that end, I blasted, etch-primed, and painted the brackets for mounting the lights on the fenders and also the cast zinc (pot metal) brackets that go under the light bodies.

I just received a new set of rubber bushings/grommets, which I installed yesterday in the mounting brackets. These are a notorious PITA to install, but I actually didn't have much trouble installing them. I suspect that a lot of people install NOS bushings that have been sitting around for years in a hot warehouse, and the rubber has hardened up to varying degrees. These may have been NOS bushings, but they were still quite pliable. I managed to install them with no tools other than my fingers and a dab of grease, but my fingers are a bit sore as a result. I left the whitish waxy storage coating on the bushings, as I think it added some needed lubricity that made it easier to slide the bushings the rest of the way through the holes after I got them started in the holes. I warmed up the bushings a bit first by letting them sit in the sun for a while, but I didn't want to get them so hot that I would lose the wax coating for installation. I'll clean off the wax coating later. The close-up shows an extra bushing with the wax cleaned off.
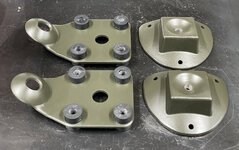
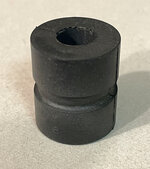
headlight-brackets-and-grommets.jpg grommet-headlight-bracket.jpg
 
To avoid these ads, REGISTER NOW!

zmotorsports

ALLIANCE MEMBER
Joined
Oct 20, 2009
Messages
21,452
Location
Northern Utah
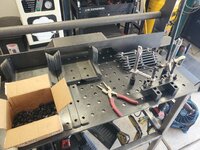
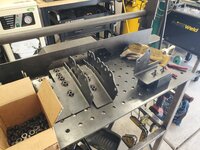
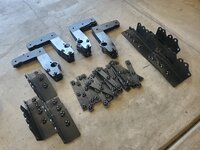
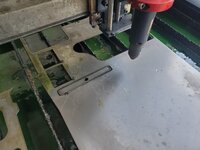
Sorry to bore all of y'all, don't have much else to contribute but this order is now done.
20240731_132402.jpg

20240801_120358.jpg

20240801_124302.jpg

20240801_133856.jpg

Although I already got 2 orders for custom one-off parts today so I'll knock those out tomorrow and/or this weekend.

Nice work.

When you order bulk fasteners for those large runs that will be welded do you just order them in black oxide finish, so you don't have to remove the zinc coating?
 

KwikFab

Well-known member
Joined
Jul 27, 2024
Messages
1,217
Location
Central Valley, CA
Nice work.

When you order bulk fasteners for those large runs that will be welded do you just order them in black oxide finish, so you don't have to remove the zinc coating?

Yep

Since the assemblies will get painted or powdercoated, the nuts don't need to be coated at all.

That and welding galvanized or zinc gets pretty nasty.
 

zmotorsports

ALLIANCE MEMBER
Joined
Oct 20, 2009
Messages
21,452
Location
Northern Utah
Yep

Since the assemblies will get painted or powdercoated, the nuts don't need to be coated at all.

That and welding galvanized or zinc gets pretty nasty.

Thanks for the response. It looked like just black oxide.

I generally don't do large runs of fasteners being welded so the fasteners I keep on hand are all zinc coated and then I just keep some on hand that have had the coating removed by being dipped in muriatic acid for the few I weld here and there. I hate welding that zinc **** and avoid it if I can.
 

KwikFab

Well-known member
Joined
Jul 27, 2024
Messages
1,217
Location
Central Valley, CA
Thanks for the response. It looked like just black oxide.

I generally don't do large runs of fasteners being welded so the fasteners I keep on hand are all zinc coated and then I just keep some on hand that have had the coating removed by being dipped in muriatic acid for the few I weld here and there. I hate welding that zinc **** and avoid it if I can.

Yep.

My first fab job some years ago would buy them in large bulk quantities, then get them blasted cause it was way cheaper that way (he was a cheap ***).

I'm not doing that in my small garage :ROFLMAO:
 

ZRX61

Well-known member
Joined
Aug 15, 2006
Messages
28,716
Location
Solar Blight Valley, SoCal
Found the perfect stiff plastic brush in the garage (wish I could recall where I got it), which combined with Dawn foaming dish soap, makes a great combo for scrubbing under the F350.

Edit: Brush has Autozone on it, will have to get a couple more.

Gave the trans three sessions of soap/scrub/rinse. Two on the right side, one on the left. Will investigate how it looks in the morning.
 
Last edited:

SweetD

Well-known member
Joined
Feb 8, 2010
Messages
3,265
Location
Rhode Island
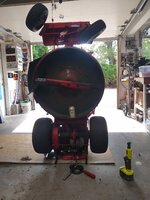
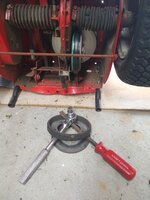
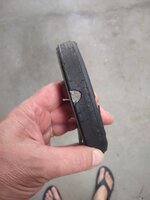
Well, the old (but great condition) Snapper rear-engine rider had a worn out friction wheel/drive disc. It was having a hard time hauling my somewhat fat a$$ up the berm! So about $15 and a YouTube tutorial video later, new one installed and she's shifting and hauling like new.
 

Attachments

  • IMG_20240801_162222131.jpg
    IMG_20240801_162222131.jpg
    717.7 KB · Views: 36
  • IMG_20240801_162205955.jpg
    IMG_20240801_162205955.jpg
    651.8 KB · Views: 32
  • IMG_20240801_164033955.jpg
    IMG_20240801_164033955.jpg
    307.6 KB · Views: 30

niget2002

Well-known member
Joined
Oct 2, 2012
Messages
11,231
Location
Josephine, TX
Went and got tools so I could mount a new key holder on the wall in the bedroom. The previous one used sticky tape and it kept falling down. This one mounts to the wall.

I was a little upset when it arrived. I only bought one on Amazon because I had other projects and didn't want to take the time to build one. This one showed up and it's a little kit you have to screw everything together. What's worse is my kit was missing two of the screws, so I had to go back out to the shop and find something to work.

All in all, it was cheap and it's cute, so I'll keep it.
 

Ben Buck

Well-known member
Joined
Dec 30, 2010
Messages
7,299
Location
S. W. Ohio
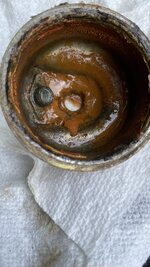
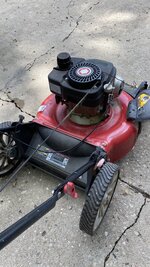
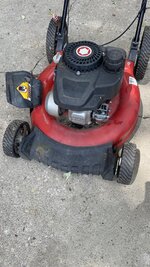
Found this today.

Now ,just outside the barn I started on it. Basically it looks great - But ! The colberator !!!

It’s most often the COLBERATOR that is the culprit!

What a disgusting mess !

I found one on the Amazon- $22.00 and change. Gonna try to get this cleaned up and running.

My daughter needs one for her new house.

Wish I had a ultrasonic cleaner, or someone close by that had one. Have to save up for one.


53AB4DC7-71EA-476D-B491-C74153524504.jpeg303BF65E-8A0D-4A7A-AA99-D3DB9720DC06.jpeg90D3562D-CD6A-430F-8429-3882676DC50B.jpeg682D596E-278C-4021-9E57-395BDB1D974F.jpeg
 

ZRX61

Well-known member
Joined
Aug 15, 2006
Messages
28,716
Location
Solar Blight Valley, SoCal
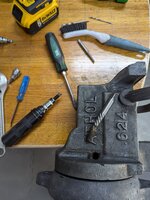
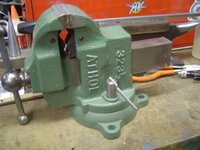
Working on cleaning up an Athol 624. Finally got it completely apart after a bit of a fight. The spring is toast so I've ordered a couple from McMaster to test fit


Need to do some wire brushing and then figure out a paint color for it
The trick with the springs is to compress it in another vise, put a couple of wraps of safety wire around it to hold it compressed, then snip the wire to release it once it's installed with the washer & cotter pin.

I'm partial to green....

Athol1ab.jpg

Athol1ac.jpg

Athol11aa.jpg
 
Last edited:

02Xterra

Well-known member
Joined
Oct 1, 2015
Messages
525
Location
Lynchburg, Va
The trick with the springs is to compress it in another vise, put a couple of wraps of safety wire around it to hold it compressed, then snip the wire to release it once it's installed with the washer & cotter pin.
Thank you! I did happen to come across that tidbit while searching thru some various vise threads recently. Definitely will have to remember that!

The jaws are pretty much worn smooth, I haven't figured out what to do about that yet as these aren't removable
 

ZRX61

Well-known member
Joined
Aug 15, 2006
Messages
28,716
Location
Solar Blight Valley, SoCal
Thank you! I did happen to come across that tidbit while searching thru some various vise threads recently. Definitely will have to remember that!

The jaws are pretty much worn smooth, I haven't figured out what to do about that yet as these aren't removable
& use the fattest cotter pin that will fit through the hole, & trim it to length before assembly. Just open the split end to a wide V.
 
To avoid these ads, REGISTER NOW!

kaymccampbell

Well-known member
Joined
Feb 27, 2015
Messages
29,608
Location
Upstate New York
Thank you! I did happen to come across that tidbit while searching thru some various vise threads recently. Definitely will have to remember that!

The jaws are pretty much worn smooth, I haven't figured out what to do about that yet as these aren't removable
Die grinder and a cutoff wheel make nice new crosshatches.
 

kaymccampbell

Well-known member
Joined
Feb 27, 2015
Messages
29,608
Location
Upstate New York
For these old vises you can usually recut them pretty well in the original grooves with a triangle file. Count your strokes for constancy.

Or optionally draw file them smooth. finish with a sharpening stone. No-mar jaws can be handy.
It's a vise, not a Monet. Zip, zip, zip, and it's working again.
 

Snip's

Well-known member
Joined
Apr 29, 2017
Messages
1,864
Location
Ohio
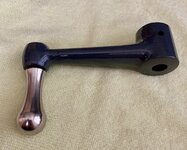
Nothing major...
I was able to reassemble my newly nickel plated knob on the crank using the soft jaws on my vise, without scratching the plating...
Yesterday, I added a final coat of paint to the crank and this morning I removed the painters tape...
I'll soon be able to start reassembly of the DP table lift mechanism...


IMG_4042.jpg
 

rd65

Well-known member
Joined
Sep 29, 2017
Messages
2,827
Location
Granite Falls, WA
I found one on the Amazon- $22.00 and change.
Be sure to check the price on Troy Bilt one, some of those amazon carbs are worse than the stockers. Looks like water in the fuel, be sure to drain the tank and flush the fuel line. That one should clean up fine with some brake cleaners and compressed air.
 

Fixr

Well-known member
Joined
Dec 23, 2012
Messages
9,709
Location
SW VA
I did medical research for a long time, including some surgical procedures, and medical instruments are very good. They are made well and there are a lot of specialty tools. The only thing we found was that German made are the best and don’t buy any from Pakistan. Those are cheap. I still have quite a few. Some in my garage and some small scissors, hemostats, and tweezers in with my fishing gear.
Whenever I have a procedure done, I ask if I can have the tools. I've gotten a few that way. I have also gotten my dentist to save worn picks & scrapers for me.
 

Blue Chips

Well-known member
Joined
Jan 25, 2012
Messages
199
Location
Maine
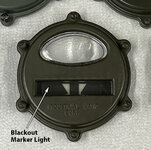
Did a little more work on my 1954 Dodge M37. As I might have mentioned in an earlier post, I want the front and rear turn signal/stop lights to retain their original form and basic appearance, but I want to increase their visibility when in use. One thing that I plan to do is substitute LED lamps for the original incandescent bulbs. The other thing will be to repurpose the "blackout marker light" slot of each light to serve as an additional amber or red light. The slot at the bottom of the light is the blackout marker light, as shown below. When the original blackout light was in use, it would only display two small, dim, modified triangles.

blackout-light-section-of-tail-light.jpg

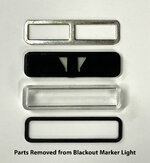
I removed the parts from the blackout marker light slot, as shown below:

parts-removed-from-blackout-marker-light-slot.jpg

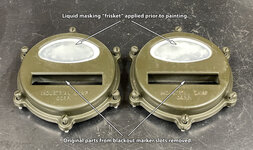
The plan is to replace the removed parts with a section of a modern red stop light lens for the rear lights and an amber turn signal lens for the front lights. But before doing that, I wanted to paint the light 'doors' the correct color. The two light 'doors' shown below are for the front turn signal lights.

You can see that the blackout marker light parts have been removed, and the glass lenses have been masked using a liquid "frisket" instead of masking tape, which was much easier to use than tape because of the shape of the lenses. It's important to allow the liquid frisket to dry thoroughly before painting.

light-doors-with-marker-light-pieces-removed-and-white-frisket.jpg

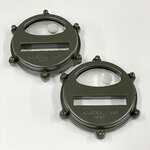
After spraying the light doors with Marine Corps green and allowing the paint to dry, it was easy to peel off the masking frisket:

peeling-off-masking-frisket.jpg

Here are the light doors after removing the masking frisket:

repainted-light-doors-after-removing-frisket.jpg

The next step will be to cut rectangular red and amber pieces out of some modern tail light and turn signal lenses for installation in the blackout marker light slots in the light doors. BTW, the glass turn signal lenses are clear, but I'll be using amber LEDs.
 

dwasifar

Well-known member
Joined
May 28, 2017
Messages
2,101
I did medical research for a long time, including some surgical procedures, and medical instruments are very good. They are made well and there are a lot of specialty tools. The only thing we found was that German made are the best and don’t buy any from Pakistan. Those are cheap. I still have quite a few. Some in my garage and some small scissors, hemostats, and tweezers in with my fishing gear.
I have a pair of dental extraction pliers I bought on ebay for the sole purpose of one day telling my wife, "These are for getting a straight answer to my yes/no question."

I'm waiting for my moment.

(And yes, she will appreciate the humor. Not gonna blow up my relationship for a joke.)
 

LeonardY

Well-known member
Joined
Apr 16, 2011
Messages
5,092
Location
Southern California
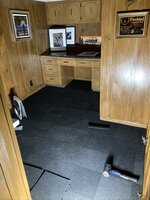
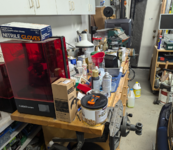
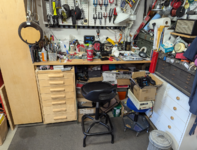
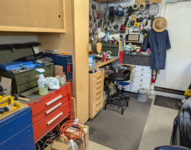
I've been living with this for awhile. All the every other week travel back and forth for my parents wore me out.
I am still lacking a lot of motivation but I got my **** in gear and started cleaning the two benches.
Before.
1722729987075.png
1722730036941.png
After.
1722730090785.png
1722730125459.png
1722730152900.png
Not perfect. I feel it's a good start.
Only stopped a couple times when I picked a tool up that dad had given me.
 

Bessy

Well-known member
Joined
Dec 18, 2012
Messages
995
Location
Ontario, Canada
Whipped together a quick and dirty tape holder to deal with a bunch of rolls of tape that are kicking around. Other than being a glorified shelf, it's not as functional as I was going for.

I spent most of the day trying to troubleshoot some issues in my 12 year old PC which continues to blue screen on me. Transferring files now so that I can reinstall windows and see if that fixes my issue.
 

kaymccampbell

Well-known member
Joined
Feb 27, 2015
Messages
29,608
Location
Upstate New York
Whipped together a quick and dirty tape holder to deal with a bunch of rolls of tape that are kicking around. Other than being a glorified shelf, it's not as functional as I was going for.

I spent most of the day trying to troubleshoot some issues in my 12 year old PC which continues to blue screen on me. Transferring files now so that I can reinstall windows and see if that fixes my issue.
Embrace the penguin. It's a chance to learn something new, and get a faster bitbox, without spending a dime.
 
To avoid these ads, REGISTER NOW!
Top Bottom