kaymccampbell
Well-known member
Absolutely. And green smoke came out and everything.When you were leaning over the crucible, did you cackle and mutter something about toe of newt and eye of bat?


Absolutely. And green smoke came out and everything.When you were leaning over the crucible, did you cackle and mutter something about toe of newt and eye of bat?
@DGersic, once you get it dialed in, you'll be infected with the dovetail disease. I caught it a few years ago and made some drawers for the shop. The dovetail joints make for a really sturdy drawer.
Yes sir!I'm that way for fingerjoints, I got a jig figured out for my little 1936 TS and every chance I get...
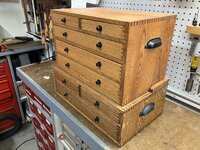
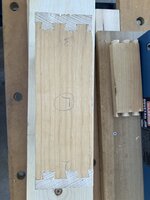
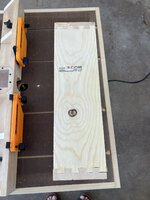
Once you have the router(s) set up to cut a good joint do you plan to dedicate that router full time to the dovetail jig?Started figuring out how to set up,and use my new dovetail jig.
First cut, needs work.
Secomd cut is better, but the alignment is still off.
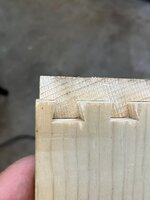
Once you have the router(s) set up to cut a good joint do you plan to dedicate that router full time to the dovetail jig?
A buddy of mine has one like @Bob Heine showed. Over a few years he aired a couple good ol’ used, porter cable 1001, single speed routers and leaves them dialed in.
Kay - what are you casting and what is the media (aluminum, brass, ...)? What is your furnace setup?Made a crucible lifter. Prepped the pediment mold for casting.
Things didn't go as well as I'd hoped, but better than they could have.
I just wanted to make sure it's is the newer style replacement with 6 injectors down at the end of the lines and the older single puck injector with 6 nozzles.Sorry Hobie, I missed your post. Tone ring?
CP-10723-6 from AutoZone
As others have mentioned, online will probably be a ton cheaper. You just have to make sure it specifically says no return line.
By the way, I got it running, not sure yet if the cold start issue is fixed, but at least the no start issue is fixed.
As Wrench suggested, I went ahead warranteed another spider injector, and while I had the intake off, it was easy to get to the distributor cap, so I warranteed the cam position sensor too.
We’ll see if it starts without issue in the morning, but at least it runs.
Thanks everyone for the help, if I still had all my hair I’d have been pulling it out this week.lol I can change a spider injector with my eyes closed now.
Jeezuz, we might need a thread on how many times auto parts failed.Changed out a defective blower motor resistor on the Expedition again. This was an Autozone part that I put in last week that decided to fail on high speed only. Ordered a new OEM part online and it was delivered last night. So I got out there early this morning before the heat cranked up and swapped it out. Seems to be working fine now, but I ordered a new connector pigtail also to be sure. That should be here later this week.
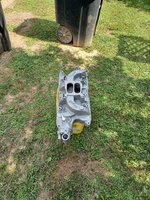
Today was also mow day after being out of town for a few days, so I grabbed the mower key and mowed front and back, then edged with the string trimmer. After that I was able to get a little more done on the parts for the rebuilt Mustang engine. I had ordered a new thermostat housing, so I bead blasted it and installed it on the intake manifold along with the vacuum tree, temperature sensor and heater hose fitting. Minor issue with the thermostat housing gasket that came with the new housing, but I had a new Felpro gasket that fit correctly.
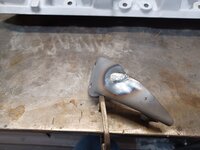
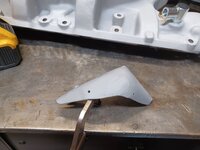
Also welded up a saw cut in the throttle cable bracket. I had cut it with a hacksaw to bend it for a better fit with a different intake, but apparently never welded the cut. I found it after bead blasting it and got a quick bead on it before we had to go to the market today. I'll clean it up tomorrow and paint it.
It would be a very short list. The woman is amazing.Kay - what are you casting and what is the media (aluminum, brass, ...)? What is your furnace setup?
Didn't know you were into casting as well. Probably easier to just have a short list of things you don't do!
If I still had the original setup, I’d probably remove the new fpr and re use the old damper. Just for piece of mind.I just wanted to make sure it's is the newer style replacement with 6 injectors down at the end of the lines and the older single puck injector with 6 nozzles.

What did I do in my garage today? Hopefully nothing, cause the truck started with no issues this morning.
 crossin finners for ya.
Right now I'm working on little railing pediments. Cast in aluminum. Small things seem tougher than big stuff. Go figure.Kay - what are you casting and what is the media (aluminum, brass, ...)? What is your furnace setup?
Didn't know you were into casting as well. Probably easier to just have a short list of things you don't do!


Maybe y'all can make a list for me.

For the future, I would recommend t-stat housing gaskets that are self adhesive and a set of studs threaded in the intake.After that I was able to get a little more done on the parts for the rebuilt Mustang engine. I had ordered a new thermostat housing, so I bead blasted it and installed it on the intake manifold along with the vacuum tree, temperature sensor and heater hose fitting. Minor issue with the thermostat housing gasket that came with the new housing, but I had a new Felpro gasket that fit correctly.

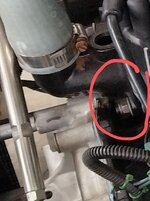
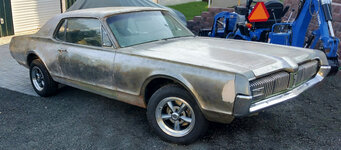
I just went through this a couple of days ago on my 67 cougar, was a pain getting the thermostat to stay in. I'm swapping to studs next time, thanks!For the future, I would recommend t-stat housing gaskets that are self adhesive and a set of studs threaded in the intake.
Once the intake is on the engine, both of them make swapping out the t-stat way more easier.
I can get you the part number for the gasket with the self adhesive on it.
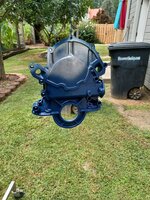
Are you going with the F4B for the vintage look? My mustang came with one but it felt pretty weak down low and swapping to an RPM made it seem like a totally different motor across the whole range. Much smoother. They look cool though, I thought about working on porting it but decided (for once) I wasn't qualified and just bought the RPM. Mine also was the version with the screwy thermostat area, was hard to get it to seal properly until I figured out I needed a thermostat housing without a little cutout area as the intake already had one. And some thermostats were too thick for the cutout so I had to try a couple. Later F4Bs did not have a thermostat cutout area and take a different housing that has one.Grabbed the string trimmer and made it halfway around the back fence, then grabbed some stakes and paracord to stake up a small tree that was leaning too much. By then it was too hot to do much more outside, so I moved inside to finish cleaning up my throttle cable bracket and new timing cover, then outside again to paint them. Also put a coat of clear engine paint on the intake manifold.



Thanks, I didn't know there was such a thing. A part number would be great.For the future, I would recommend t-stat housing gaskets that are self adhesive and a set of studs threaded in the intake.
Once the intake is on the engine, both of them make swapping out the t-stat way more easier.
I can get you the part number for the gasket with the self adhesive on it.
Truthfully I'm using it because I had it sitting on a shelf for the last 20 years. I think I picked it up at a swap meet for $20. I did not really like the Weiand X-celerator that was on the old engine. With the automatic transmission, it seemed to have a dead spot off idle but worked great at higher rpm. I think the RPM would have been a better choice and may swap one on later.Are you going with the F4B for the vintage look? My mustang came with one but it felt pretty weak down low and swapping to an RPM made it seem like a totally different motor across the whole range. Much smoother. They look cool though, I thought about working on porting it but decided (for once) I wasn't qualified and just bought the RPM. Mine also was the version with the screwy thermostat area, was hard to get it to seal properly until I figured out I needed a thermostat housing without a little cutout area as the intake already had one. And some thermostats were too thick for the cutout so I had to try a couple. Later F4Bs did not have a thermostat cutout area and take a different housing that has one.
Yeah, I think the X-celerator is pretty terrible for the street unless you have a really big motor, it has nothing below about 2500 rpm on normal street small blocks. At least that been my experience.Truthfully I'm using it because I had it sitting on a shelf for the last 20 years. I think I picked it up at a swap meet for $20. I did not really like the Weiand X-celerator that was on the old engine. With the automatic transmission, it seemed to have a dead spot off idle but worked great at higher rpm. I think the RPM would have been a better choice and may swap one on later.
My thermostat housing also has a step in it for the thermostat to seat plus there is a shallower one in the intake. I seated the thermostat in the housing and put the gasket over it with Ultra Black sealant on both sides of the gasket. Hopefully there won't be any leaks, but if there are I know what to look for. I did not see any issues with the thermostat thickness when tightening the bolts. Thanks for the heads up.
That's pretty much the configuration I have and now you have me wondering if I should go ahead and fix it now. I could weld the step on one of them and file/sand it flat.When I took it apart with both of them having the step area I could see that the thermostat had actually moved and eventually messed up the gasket. It was shifted at a slight angle and had worn through a chunk of gasket on one side.
Sorry, I didn't mean to get you stressed out about it. It could have just been my particular part combo, I think there were at least 3 versions of that intake over the years and dozens of housing designs.That's pretty much the configuration I have and now you have me wondering if I should go ahead and fix it now. I could weld the step on one of them and file/sand it flat.
So 3 cold starts with no issues. 1 more and I will call it fixed. I’ve become a bit of a pessimist when it comes to this truck.lol
Started a new shelf for Korrado parts and rearranged the other shelves to compensate.

Are the Koraddo parts on top, or below the Honda parts?
Trick question? LolWhat exactly was the final change to get 3 starts?
Trick question? Lol
But seriously, it’s not that simple. A year old aftermarket spider injector I believe caused the cold start issue, so I warrantied that, and it started fine for a few days.
Then one day the cold start issue returned, and the next day it turned into a no start. I then warrantied the few days old spider injector, and warrantied a few months old cam position sensor.
I suspect the spider injector caused the cold start issue, but I think the cam position sensor caused the no start.
I would have tried to start the truck between the new cps change, and the injector change, but I changed the cps while the intake was off for the injector change.
In the end, it got a new cam position sensor, and a new spider injector kit. Both parts had been change in the previous year, so I was reluctant to suspect them as the cause. Clearly I was wrong.lol