To avoid these ads, REGISTER NOW!

What did you do "IN" your garage today?

kaymccampbell

Well-known member
Joined
Feb 27, 2015
Messages
29,588
Location
Upstate New York
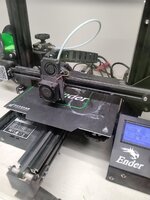
I need to try some lost PLA casting for some aluminum parts.

Today I finished up the construction on the Kayak. I glued on some more fiberglass layers on the bow and stern for abrasion resistance and cleaned up the underside of the coping lip.

When this epoxy dries, I'll start sanding everything down in prep for finishing. My plan at this point is to use some Automotive 2k clear. I've epoxied a test piece to test out the clear I already have. I need to check and see how much clear I have from a previous project. I think I have at least half a quart. Should be enough for 4-5 coats of clear on the kayak.
There's a few caveats. It ain't just heat scrap n pour, as much as my mind had edited it down to be, after almost 20 years of abstinence.;)
 
To avoid these ads, REGISTER NOW!

rd65

Well-known member
Joined
Sep 29, 2017
Messages
2,802
Location
Granite Falls, WA
Grandkids were with us most of yesterday so I didn't make it out to the shop but did get some long over-do projects done in the garage once their parents arrived. Installed a detachable box magazine kit in the Weatherby Vanguard and installed a Volquartsen Target Hammer kit in the 10/22 takedown.
 

Fixr

Well-known member
Joined
Dec 23, 2012
Messages
9,708
Location
SW VA
Normally if you have to run it with the choke on, I'd say you have a vacuum leak somewhere, but there aren't many places to for a leak on one of these. If it still surges once it's back together, start it up and then spray some brake cleaner around the intake and base of the carb; when the engine picks up rpm, you've found your leak.
Using some brake cleaners like that is an effective way to destroy your lungs with phosgene gas. Carb cleaner is much safer, or better yet propane.
 

Skyman

Well-known member
Joined
Nov 9, 2021
Messages
1,214
Location
Central Maryland
Using some brake cleaners like that is an effective way to destroy your lungs with phosgene gas. Carb cleaner is much safer, or better yet propane.
This ^^^. Phosgene gas is deadly. Definitely not worth the risk, if you aren't certain you know the chemical composition of the contents of the can, and certain that you also understand what the results might be.
 

rcktpwrd

Well-known member
Joined
Mar 5, 2008
Messages
1,095
Location
Raleigh, NC
last night, almost finished up with the Christmas light candy cane project. Have two more sets of lights to work on, 10 canes per string instead of the 5 canes all of these are.

IMG_7101.jpg

Got one string of lights with a break in the wire somewhere 😬

Found and replaced the bad/broken wire/solder joint in the set that was not working. Using my digital multimeter and a set of fine point tips I was able to isolate the bad spot without too much difficulty.
 

Magnum440d100

Well-known member
Joined
Dec 2, 2018
Messages
3,581
Location
Indiana
More clean up/clean out.


Being more strict on what to keep.


Got just a hair more organized. A little.

Still trying to figure out how I’m going to meld my construction tools into my garage. I’m thinking of just leaving everything in my packouts and putting them in a corner, but there are actually useful tools in there.
 

ZRX61

Well-known member
Joined
Aug 15, 2006
Messages
28,716
Location
Solar Blight Valley, SoCal
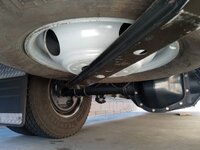
Decided to drop the spare wheel under the back of the F350, clean it & the brackets etc up. Got it all dismounted & outside. Got the tire & wheel looking all spiffy then started on the bracket that holds it in place.
Lots of soap, scrubbing & rinsing etc

Then wondered why the rinse water was looking very red... icon_think.gif as was my left hand... icon_problem.gif

Rinsed hand, 1/2in long slice right in the middle of my thumbprint. ******. Bandaid at the ready for when I remove thumb from the paper towel that is absorbing the claret.. icon_thumbdown.gif


Jim_No_Garage

Well-known member
Joined
Jan 15, 2011
Messages
3,317
Location
Millington NJ
Decided to drop the spare wheel under the back of the F350, clean it & the brackets etc up. Got it all dismounted & outside. Got the tire & wheel looking all spiffy then started on the bracket that holds it in place.
Lots of soap, scrubbing & rinsing etc

Then wondered why the rinse water was looking very red... icon_think.gif as was my left hand... icon_problem.gif

Rinsed hand, 1/2in long slice right in the middle of my thumbprint. ******. Bandaid at the ready for when I remove thumb from the paper towel that is absorbing the claret.. icon_thumbdown.gif


Candidate for "crazy glue" sutures? I've used it on finger slices in the past.
 

DGersic

Well-known member
Joined
Mar 12, 2017
Messages
6,354
Location
DeKalb, IL
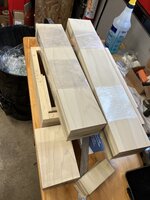
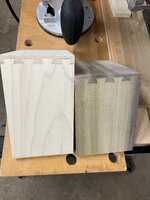
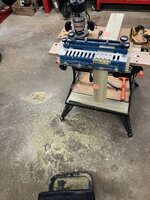
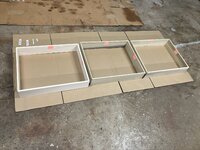
Making sawdust.

Got my boards ripped to height, cut to length, and dovetails cut.

IMG_5711.jpegIMG_5712.jpegIMG_5713.jpegIMG_5714.jpeg

I cut a bunch of extra dovetails on the cut-offs tuning in exactly where they need to be to get the front-side-back pieces vertically aligned.

Cut, check, adjust with a piece of paper as a spacer, lather rinse repeat.
 

ZRX61

Well-known member
Joined
Aug 15, 2006
Messages
28,716
Location
Solar Blight Valley, SoCal
Candidate for "crazy glue" sutures? I've used it on finger slices in the past.
Tegaderm & bandaid should be sufficient... after I was *spoken to* by roomie (retired nurse) about how a rinse with water from the hose & a paper towel wasn't exactly the correct protocol...
On the same hand I have a swollen finger from something that bit me yesterday. (The whole finger? *No, the one next to it*...)
 

ZRX61

Well-known member
Joined
Aug 15, 2006
Messages
28,716
Location
Solar Blight Valley, SoCal
Making sawdust.

Got my boards ripped to height, cut to length, and dovetails cut.


I cut a bunch of extra dovetails on the cut-offs tuning in exactly where they need to be to get the front-side-back pieces vertically aligned.

Cut, check, adjust with a piece of paper as a spacer, lather rinse repeat.
Isn't it just set the offset to the thickness of the wood or have I got that backasswards?
 
To avoid these ads, REGISTER NOW!

DGersic

Well-known member
Joined
Mar 12, 2017
Messages
6,354
Location
DeKalb, IL
Tegaderm & bandaid should be sufficient... after I was *spoken to* by roomie (retired nurse) about how a rinse with water from the hose & a paper towel wasn't exactly the correct protocol...
On the same hand I have a swollen finger from something that bit me yesterday. (The whole finger? *No, the one next to it*...)

She’s right. You need a paper towel AND 3M electrical tape.
 

DGersic

Well-known member
Joined
Mar 12, 2017
Messages
6,354
Location
DeKalb, IL
Isn't it just set the offset to the thickness of the wood or have I got that backasswards?

Sort of right. It’s fussy. The top piece you have to center the inboard edge under one of the jig fingers. The bottom piece you center the inboard edge between the jig fingers.

That’s close. Then make a test cut and find that your pieces are out of vertical alignment by 1/32”. Move the bottom piece 1/32” over, make a test cut, and find that it’s off by 1/64”. Repeat until aligned.

It does seem like there should be an easier way to set this up without so much fussing.
 

Jgaz

Well-known member
Joined
Dec 16, 2016
Messages
1,689
Location
AZ
Sort of right. It’s fussy. The top piece you have to center the inboard edge under one of the jig fingers. The bottom piece you center the inboard edge between the jig fingers.

That’s close. Then make a test cut and find that your pieces are out of vertical alignment by 1/32”. Move the bottom piece 1/32” over, make a test cut, and find that it’s off by 1/64”. Repeat until aligned.

It does seem like there should be an easier way to set this up without so much fussing.

I can relate and I’ve never tried router cut dovetails.

After I got my adjustable finger joint jig constructed and more importantly found I could cut the joints with a dedicated saw blade stack, I never wanted to remove it from the saw table.

Your dovetails look good and I love your use of workmates.
I look at your drawer part labels and notes and can relate to that as well
 

WildBill

ALLIANCE MEMBER
Joined
Aug 20, 2021
Messages
2,024
Location
PNW
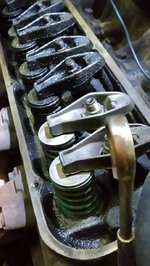
Spent two days pulling stuff apart to replace old crumbling umbrella style valve stem seals with new positive seal type on my 67 cougar, did it with heads on by sticking an old plug wire in the cylinders to hold up the valves. What a nasty mess, pretty sure this poor 289 never had an oil change in the 30k it was driven. Plus what kind of amazing green paint did ford put on the springs. Looks fine after 57 years on a flexing spring, inside an engine. Happy to say the poor thing is no longer putting out a continues cloud of light blue/white smoke at idle. Was pretty bad before. Also drove the cougar around the block a couple times, last time it was licensed was 1989 and I've drove it in and out of the shop a couple times. Was exciting testing the all new brakes for the first time, every direction around my house is either up or down a hill, so I was a little nervous.

First cylinder done, took two hours. Everything has a baked on layer of crunchy oil.
valveold2.jpg

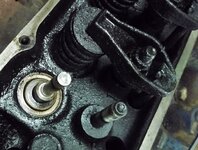
Old umbrella seals that just moved up and down with valve, and got rock hard and brittle. New positive seal one to right. It locks down onto the valve guide and seals around the moving valve stem.
valveoldseals.jpg

Close up of the beautiful baked on chitty. And the valve guide that the new seal presses on.
valveold.jpg

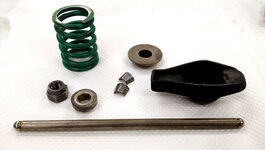
Mostly cleaned up parts. Took awhile x 16. Amazing green paint.
valveparts.jpg
 

ZRX61

Well-known member
Joined
Aug 15, 2006
Messages
28,716
Location
Solar Blight Valley, SoCal
I need to try some lost PLA casting for some aluminum parts.

Today I finished up the construction on the Kayak. I glued on some more fiberglass layers on the bow and stern for abrasion resistance and cleaned up the underside of the coping lip.

When this epoxy dries, I'll start sanding everything down in prep for finishing. My plan at this point is to use some Automotive 2k clear. I've epoxied a test piece to test out the clear I already have. I need to check and see how much clear I have from a previous project. I think I have at least half a quart. Should be enough for 4-5 coats of clear on the kayak.
We call that "A pint" ;)
 

bugnut

ALLIANCE MEMBER
Joined
Jul 14, 2012
Messages
3,967
Location
Central Ohio
Installed the carb on the 8n, not sure what changed, but running like a champ today. Tuned up the Stihl Kombi including a burn of the spark arrester and shes ready to go. Dragged the safety harnesses, seat cushions and pull up ropes out of the attic. Working on deer stands Tuesday morn while enjoying the cooler weather.
 

rd65

Well-known member
Joined
Sep 29, 2017
Messages
2,802
Location
Granite Falls, WA
Installed the carb on the 8n, not sure what changed, but running like a champ today. Tuned up the Stihl Kombi including a burn of the spark arrester and shes ready to go. Dragged the safety harnesses, seat cushions and pull up ropes out of the attic. Working on deer stands Tuesday morn while enjoying the cooler weather.
The Stihl most likely has their 4-mix engine in it, correct? Check the valve clearance, Stihl sells the feeler gauge w/ a new valve cover gasket - although I rarely replace the gasket. The valves will get loose. Also check the piston crown for carbon build up. I use Yamaha Combustion Chamber cleaner on the units at work.
 

Bessy

Well-known member
Joined
Dec 18, 2012
Messages
995
Location
Ontario, Canada
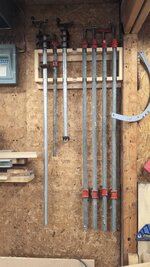
Managed to hang my little clamp rack I tossed together to hold my pipe clamps on my lunch break. Still need to get the other large F-clamps, trigger clamps and all of the smaller clamps somewhere, but these are at least off the floor and put from under my bench! It's on a French cleat, but since I haven't actually done any cleats otherwise in the garage, it's not yet standardized. I have another cabinet hung on cleats made out of 2x4 scraps that holds my grinders and portaband. One day I'll rebuild both, and standardize the cleat system to something, but for right now, onto other projects. 1000014220.jpg
 

ZRX61

Well-known member
Joined
Aug 15, 2006
Messages
28,716
Location
Solar Blight Valley, SoCal
What did *I* do in *MY* garage today?

I'll tell you what *I* did....

I had an attack of the ******** dumbasses is what I did.

Here's how it started:
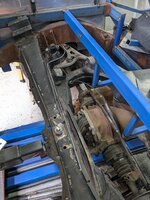
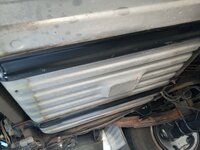
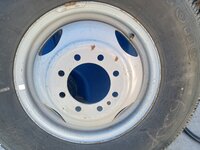
Reading on line about the difficulties some people have with dropping the spare under the rear of their OBS Fords owing to rust & seized bolts etc. So I decided to drop the spare, clean up the area, clean up the wheel & bracket etc, even put dressing on the tire & sprayed some galvanize paint on a 1/2in rust spot on the bottom of the tank.

IMG_20240820_142052977.jpg

That was yesterday (when I sliced my thumb open)
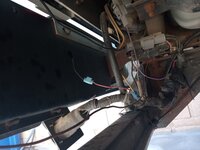
Today I took the opportunity to clean up the birds nest of wiring & scotch locks (which I HATE with a burning passion) between the rear of the gas tank & the bumper etc. Zip ties, Adel clamps & proper harness wrap from Germany as used by Mercedes etc. This is after (I'm not done yet):

IMG_20240820_145010396.jpg

Then I decided the put the rear tire & bracket back on & the fun started.
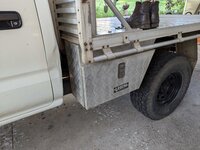
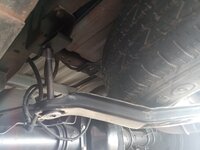
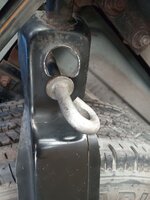
Bolted the spare to the bracket with the BIG plastic nut thingie. Put it on a shipping blanket dragged it under the back of the dually.
Now bear in mind I'm dealing with a 20yo non-union fracture of the right scaphoid, complete with failed bone graft & a loose screw... AND intermittent grip in the left hand owing to Kaiser making a complete *** of the shoulder surgery (also 20 years ago)

So it's a bit of a struggle to get it in place, raised up (by hand at first, & then with a floor jack under it) & get the two bolts in, one at each end of the bracket. It took over 30 minutes to get it all lined up & the bolts started.

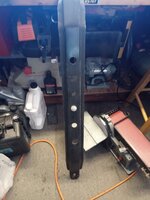
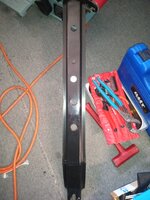
That's when the dumbassery struck I noticed had the goddamn bracket backwards. The end that went to the right/rear was at the front/left... ARRRGGHHH!! So I had to drop it down again turn it around 180 deg & raise it up again.

Got it all sorted now. FFS


Luckily I did this with it balanced on the jack so it only took a few minutes

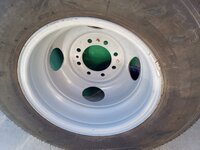
The correct way:
IMG_20240820_153828368.jpgIMG_20240820_153847501.jpgIMG_20240820_153853305.jpgnites.
 

kaymccampbell

Well-known member
Joined
Feb 27, 2015
Messages
29,588
Location
Upstate New York
What did *I* do in *MY* garage today?

I'll tell you what *I* did....

I had an attack of the ******** dumbasses is what I did.

Here's how it started:
Reading on line about the difficulties some people have with dropping the spare under the rear of their OBS Fords owing to rust & seized bolts etc. So I decided to drop the spare, clean up the area, clean up the wheel & bracket etc, even put dressing on the tire & sprayed some galvanize paint on a 1/2in rust spot on the bottom of the tank.

IMG_20240820_142052977.jpg

That was yesterday (when I sliced my thumb open)
Today I took the opportunity to clean up the birds nest of wiring & scotch locks (which I HATE with a burning passion) between the rear of the gas tank & the bumper etc. Zip ties, Adel clamps & proper harness wrap from Germany as used by Mercedes etc. This is after (I'm not done yet):

IMG_20240820_145010396.jpg

Then I decided the put the rear tire & bracket back on & the fun started.
Bolted the spare to the bracket with the BIG plastic nut thingie. Put it on a shipping blanket dragged it under the back of the dually.
Now bear in mind I'm dealing with a 20yo non-union fracture of the right scaphoid, complete with failed bone graft & a loose screw... AND intermittent grip in the left hand owing to Kaiser making a complete *** of the shoulder surgery (also 20 years ago)

So it's a bit of a struggle to get it in place, raised up (by hand at first, & then with a floor jack under it) & get the two bolts in, one at each end of the bracket. It took over 30 minutes to get it all lined up & the bolts started.

That's when the dumbassery struck I noticed had the goddamn bracket backwards. The end that went to the right/rear was at the front/left... ARRRGGHHH!! So I had to drop it down again turn it around 180 deg & raise it up again.

Got it all sorted now. FFS


Luckily I did this with it balanced on the jack so it only took a few minutes

The correct way:
IMG_20240820_153828368.jpgIMG_20240820_153847501.jpgIMG_20240820_153853305.jpgnites.
Have you considered taking your carcass to a better shop for a few revisions?
 

ZRX61

Well-known member
Joined
Aug 15, 2006
Messages
28,716
Location
Solar Blight Valley, SoCal
Have you considered taking your carcass to a better shop for a few revisions?
I haven't had Kaiser since '09, been getting stuff fixed for the past 5 years. Unfortunately the only surgery option for the failed bone graft is removing the bone entirely & fusing the wrist. Not going to let them do that as it's bad enough with the minimal RoM I have now (about 45deg)
 

Old Man Roger

Well-known member
Joined
Apr 6, 2017
Messages
17,716
Location
Palm Coast Florida
I haven't had Kaiser since '09, been getting stuff fixed for the past 5 years. Unfortunately the only surgery option for the failed bone graft is removing the bone entirely & fusing the wrist. Not going to let them do that as it's bad enough with the minimal RoM I have now (about 45deg)
There’s a new drug being tested for re growing teeth. I wonder if it wouldn’t work with bones that don’t heal.
 

kaymccampbell

Well-known member
Joined
Feb 27, 2015
Messages
29,588
Location
Upstate New York
I haven't had Kaiser since '09, been getting stuff fixed for the past 5 years. Unfortunately the only surgery option for the failed bone graft is removing the bone entirely & fusing the wrist. Not going to let them do that as it's bad enough with the minimal RoM I have now (about 45deg)
So, like they can't use a cadaver bone in there?
 
To avoid these ads, REGISTER NOW!
Top Bottom