To avoid these ads, REGISTER NOW!

What did you do "IN" your garage today?

nadogail

Well-known member
Joined
Jan 23, 2009
Messages
32,019
Location
Coronado, CA
Gave to a neighbor, a small generator set consisting of a 5 Horse HONDA engine and a 100 Amp 10SI Alternator and a pair of 12 volt batteries; they are all mounted on a homemade cart made from scrap bed frame and other peoples junk.
My neighbor was very pleased and thrilled that we could load it all onto his pickup without lifting.
The assembling of the unit was a lot of fun and an educational opportunity.
I feel that my work was a lot of fun and that I have made my neighbor happy; he will be buying an inverter to make AC electricity.
 
To avoid these ads, REGISTER NOW!

Motorman55

Well-known member
Joined
Apr 10, 2016
Messages
2,641
Location
South Jersey
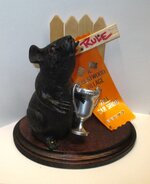
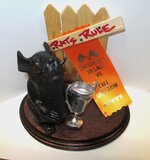
Another day another Car Show Trophy completed. This one is for the Rat Rod or Rat Bike Catagory. Its called 'Rats Rule'

Grabbing some wide wood popsicle sticks, I fashioned a background picket fence and a separate pine board sign with the name of the Trophy catagory on it. Glued the fence into a slit cut I made into the top back of the plaque and wiped some Howard's Feed-n-Wax on it. Next I stained and clear polyurethane the pine oval base plate. After it dried, I took one of the Car Show ribbons, trimmed it to size and slipped it up between the sign and the picket fence. Drilled some small holes thru the sign board and fence and attached the sign with small nails and super glue securing the ribbon at the same time.

Grabbed one of the rubber Holloween rats and leaving his body unpainted, I painted his eyes red and trimmed off a couple of his whiskers and shortened his overly long tail. Drilled a couple holes thru his feet and tail and into the wood base to mount with nails. Also painted a small plastic Party Favor trophy and super glue it to the rats body. Lastly I added some black felt to the bottom of the plaque.

And that ends the tail, pun intended, of the 'Rats Rule' Trophy. On to the next one......1723955336931.jpeg1723955273882.jpeg
Nice day out today so I thought I'd go for a ride on the Harley. Then I made the mistake of passing by the work bench. Damn, I really need to knock out a few more trophies for the Car Show next month.

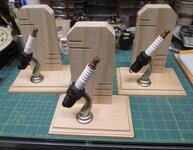
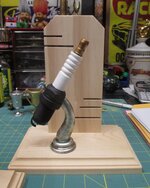
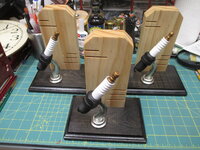
Ok, well here's three more. Basically I used some of the old left over plastic Spark Plug trophies from last year. After removing the plugs from their plastic bases. I set about painting them to resemble real spark plugs.

Next I cut three boards for the vertical parts and added some horizontal slots in them to represent a motor cylinder and head similar to a motorcycle trophy I made last week. After that I drilled the plaques and countersunk the holes and attached the verticals and spark plugs.

As of this post, I've taken them apart, stained the plaques and used the Howard's Feed-n-Wax on the verticles. Tomorrow, I'll give the base plaques a coat of clear polyurethane and reassemble them. After everything is dry I'l add some black felt to the bottoms. I'll post pics of them tomorrow. 1724211813016.jpeg1724211755182.jpeg
 
Last edited:

niget2002

Well-known member
Joined
Oct 2, 2012
Messages
11,182
Location
Josephine, TX
Took advantage of some mid-70s temperatures outside this morning before work.

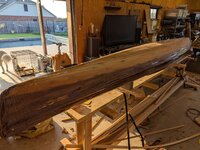
Opened up the shop doors and started sanding the hull. Got half the hull sanded in the 40 minutes of time I had available. Had to wear a headlamp to counter the shadows from the sun coming through the side door.

1000003044.jpg
 

CoogarXR

Well-known member
Joined
Jan 11, 2016
Messages
6,863
Location
Ohio
Scrap day! Cleaned out all the scrap at the new house's garage, and the scrap at the old house's garage, all the cans, radiators, pipes, wire, you name it. Stuffed the van to the ceiling and hauled it in.

The big winner was some junk silver-plated serving set that was left in the kitchen cabinets at the new house. All tarnished and gross. I figured it was worthless, but I took it in anyway. They hit it with the grinder and showed me that it was silver-plated brass. I got $32 for it!

As much as I like a fat check for scrap, I equally like having all that hoard out of the way. Getting paid to clean my own place is always a good day.
 

Levaughn

Well-known member
Joined
Feb 17, 2015
Messages
1,403
Location
NY
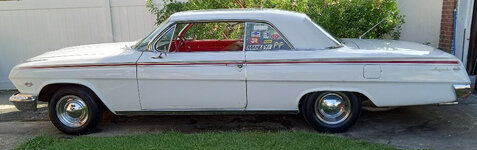
I went to add some gear oil to the rear end of my 62 Impala. I saw I only had about eight ounces left. It didn't need it all, but i wanted some for the gearbox in case it was low. I looked in the corner of the garage and saw a jug which I thought was paint stripper. It was gear oil I got from an Estate Sale some years back. It was 3/4 full. The gas gauge also wasn't working. I dumped the tank when I had an issue last year. I thought it was the ground, but turns out I forgot to plug the wire back to the tank.
 

Attachments

  • thumbnail-2.jpeg
    thumbnail-2.jpeg
    165.5 KB · Views: 23
  • 62.jpg
    62.jpg
    112.6 KB · Views: 7

rcktpwrd

Well-known member
Joined
Mar 5, 2008
Messages
1,094
Location
Raleigh, NC
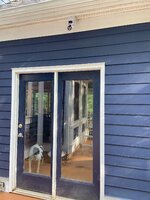
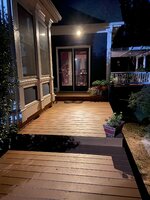
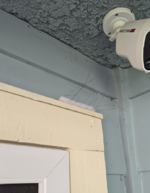
Worked on low voltage lighting for the deck. I had picked up a flood light and a motion sensor a while back. Already had a plastic box to mount them to.
IMG_7299.jpg

Installed above the door
IMG_7300.jpg

Dog making sure I'm being productive!
IMG_7301.jpg

Unfortunately, the motion sensor doesn't work, light is always on. Not sure if it's just a bad sensor or if I didn't wire it correctly. Have a brown, blue and red wire in the sensor. Have a red and blue wire in the light and then the low voltage power wire. Connected one side of low voltage wire to brown wire, connected the other low volt wire to the two blue wires and then connected the two red wires.
 

welder4956

Well-known member
Joined
Apr 8, 2010
Messages
3,072
Location
Birmingham, AL USA
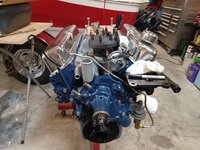
Spent half the day running around getting oil changed in the F150, car wash, looking for engine break-in oil and filter. Scored a filter, but had to order the break-in oil, should be delivered to the house tomorrow. I installed the distributor, AC compressor bracket and fuel pump on the Mustang engine, then tried to install a prebent stainless fuel line from the pump to carb. It was not bent even close to where it needed to be and actually ended up in the opposite direction from the carb. I wish I had a "before" pic, but straightened it out as best I could, then routed it where it needed to be around the AC bracket and distributor. Came out decent, but not perfect.

20240821_162703.jpg
 

rcktpwrd

Well-known member
Joined
Mar 5, 2008
Messages
1,094
Location
Raleigh, NC
Unfortunately, the motion sensor doesn't work, light is always on. Not sure if it's just a bad sensor or if I didn't wire it correctly. Have a brown, blue and red wire in the sensor. Have a red and blue wire in the light and then the low voltage power wire. Connected one side of low voltage wire to brown wire, connected the other low volt wire to the two blue wires and then connected the two red wires.
After some reading, I think my transformer might be putting out 12v AC not DC... I'll have to test it with my meter.
 

Motorman55

Well-known member
Joined
Apr 10, 2016
Messages
2,641
Location
South Jersey
Nice day out today so I thought I'd go for a ride on the Harley. Then I made the mistake of passing by the work bench. Damn, I really need to knock out a few more trophies for the Car Show next month.

Ok, well here's three more. Basically I used some of the old left over plastic Spark Plug trophies from last year. After removing the plugs from their plastic bases. I set about painting them to resemble real spark plugs.

Next I cut three boards for the vertical parts and added some horizontal slots in them to represent a motor cylinder and head similar to a motorcycle trophy I made last week. After that I drilled the plaques and countersunk the holes and attached the verticals and spark plugs.

As of this post, I've taken them apart, stained the plaques and used the Howard's Feed-n-Wax on the verticles. Tomorrow, I'll give the base plaques a coat of clear polyurethane and reassemble them. After everything is dry I'l add some black felt to the bottoms. I'll post pics of them tomorrow. 1724211813016.jpeg1724211755182.jpeg
And here are the finished three Spark Plug Trophies. I went with the same Classic Black stain for the bottom plates on these followed by a coat of the clear polyurethane. . Just need to add the catagory info.

Actually managed to finish these quicker then I thought I would. Which means.....it looks like I might be able to get a couple more different catagory trophies made before the show too. Let's see. 1724290823568.jpeg1724290776591.jpeg
 

DGersic

Well-known member
Joined
Mar 12, 2017
Messages
6,354
Location
DeKalb, IL
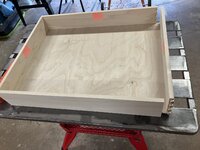
Got home too late last night to cut the bottom dados, and the plans for today were to go help dad with some yard work. So I got up early, cut the dados, and started to glue up drawer #1.

IMG_5715.jpeg

Yeah, I cut the front/back exactly 1” too short.

photo sep 29 2022, 9 14 58 pm.jpeg

So after a bunch of yard work, I bought more wood and hauled it in to the garage.
 
To avoid these ads, REGISTER NOW!

bugnut

ALLIANCE MEMBER
Joined
Jul 14, 2012
Messages
3,967
Location
Central Ohio
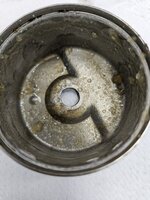
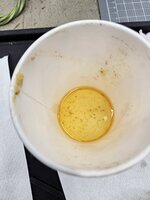
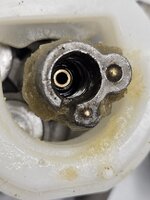
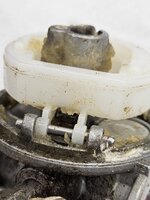
Push weed wacker would not start. I had replaced the carb last year. So onto the workbench and remove carb. It was filled with yellow pebbles and waxy stuff. Cleaned reassembled and fired up.
 

Attachments

  • 20240821_111255.jpg
    20240821_111255.jpg
    830.4 KB · Views: 13
  • 20240821_111301.jpg
    20240821_111301.jpg
    509.4 KB · Views: 13
  • 20240821_112743.jpg
    20240821_112743.jpg
    774.5 KB · Views: 13
  • 20240821_113223.jpg
    20240821_113223.jpg
    874.8 KB · Views: 14

rd65

Well-known member
Joined
Sep 29, 2017
Messages
2,802
Location
Granite Falls, WA
Spent half the day running around getting oil changed in the F150, car wash, looking for engine break-in oil and filter. Scored a filter, but had to order the break-in oil, should be delivered to the house tomorrow. I installed the distributor, AC compressor bracket and fuel pump on the Mustang engine, then tried to install a prebent stainless fuel line from the pump to carb. It was not bent even close to where it needed to be and actually ended up in the opposite direction from the carb. I wish I had a "before" pic, but straightened it out as best I could, then routed it where it needed to be around the AC bracket and distributor. Came out decent, but not perfect.

20240821_162703.jpg
What are you running for a cam and oil? Flat tappet or roller? I hope to get my 400 in the F350 sometime this fall.
 

welder4956

Well-known member
Joined
Apr 8, 2010
Messages
3,072
Location
Birmingham, AL USA
What are you running for a cam and oil? Flat tappet or roller? I hope to get my 400 in the F350 sometime this fall.
I'm swapping to a 1995 302 roller engine. Most parts from 1976 fit, some require changes - harmonic balancer, flex plate, dipstick location, (waiting to see what else).

Oil for 1995 is 5w20 or 5w30. Warranty requires a conventional break-in oil for the first 600 miles, but hard to find around here. Most everything is full synthetic or blend.
 

Snapped-off

Well-known member
Joined
Feb 22, 2012
Messages
4,808
Location
Indiana
Forgot pics.

Got a 8hp '92 Evinrude that "wouldn't run". It's really clean.

I put some fresh mix in the fuel tank and gave it some pulls. Nothing. Looked at the tiller and saw the tether wasn't installed on the killswitch. After installing one, it fired up in about 4 pulls.

It was running excellent, but wasn't ******* out much water. I pulled the lower off, and the impeller only had 1 lobe left. Got a new impeller on order and after a gear oil change it'll be ready to hit the lake. (Just a small 12' jon boat)
 

niget2002

Well-known member
Joined
Oct 2, 2012
Messages
11,182
Location
Josephine, TX
More sanding on the kayak.

Someone on a Facebook group reminded me that epoxy won't stick to shiny epoxy. I grabbed a brillo pad and scuffed up any shiny spots in crevices on the side I already sanded.

Then I went and started sanding the other side of the hull.

When I'm done with the hull, then I get to flip the kayak over and sand the deck.

Then I get to apply a fill coat on both sides and sand everything again. Repeat as necessary until all the low spots are done.

Then sand everything up to 120 and prep for paint. Then hang the boat and spray clear on the entire kayak. Then wet sand, buff, and polish.

Probably another 3 weeks of work?

Oh. And I still have to cut and install the bulkheads from 3" closed cell foam.
 

jdrais

Member
Joined
Feb 2, 2020
Messages
14
Location
Eveleth MN
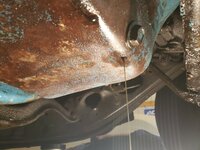
Took the 1955 Pontiac Star Chief to a car show and it started leaking oil.
Got it back home after the show and found a pin hole in the oil pan. So I spent the day trying to find the correct oil pan for a 55. I found some possibilities. I also tried to figure out the correct paint color because the source materials say it's a dark green but mine is blue. At least it hasn't gotten cold yet in Minnesota. This will probably end up being a winter project.

20240817_165025.jpg
 

kaymccampbell

Well-known member
Joined
Feb 27, 2015
Messages
29,588
Location
Upstate New York
Took the 1955 Pontiac Star Chief to a car show and it started leaking oil.
Got it back home after the show and found a pin hole in the oil pan. So I spent the day trying to find the correct oil pan for a 55. I found some possibilities. I also tried to figure out the correct paint color because the source materials say it's a dark green but mine is blue. At least it hasn't gotten cold yet in Minnesota. This will probably end up being a winter project.

20240817_165025.jpg
You could take it down and weld it. I've salvaged more than several unobtainium or stupid expensive oil pans that way.
 

jdrais

Member
Joined
Feb 2, 2020
Messages
14
Location
Eveleth MN
You could form a bottom and weld it in. Or just make patches for the inside, to cover the eroded bits. That way it won't show on the outside.
I like the idea of the inside patch. I'll have to wait and see once I get the pan dropped. I'm a crappy welder, but I have a friend I can probably talk into doing the welding for me.
 

Snip's

Well-known member
Joined
Apr 29, 2017
Messages
1,860
Location
Ohio
Made this.
1724349089622.png
What is it you ask?
A bird tickler.
1724349156514.png
Hopefully, it will keep the little ******* from roosting on the corner of the door. It's been crapping all over the entry.
Now of course... You know the birds will look at that and think... "So nice, the human provided us with a handy nest construction source"...
 

KwikFab

Well-known member
Joined
Jul 27, 2024
Messages
1,211
Location
Central Valley, CA
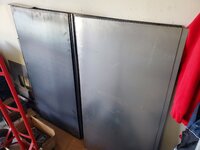
Yesterday I purchased and brought in over 350lbs of steel, **** ***** loading and unloading it with bad feet and a bad back.

Bought it cause I have 12 orders of an assembly I need to start this Saturday.

20240822_171152.jpg

The kicker?

Garage is in shambles as I had to pull out one of my small table fixtures, move the big one over (+150lbs) and make room for another welding table I just bought.

Well, per FedEx it was supposed to deliver today. One box hasn't left the nearby hub and the other is still on its way from AZ so....

20240823_104955.jpg

Garage will have to remain a mess and I'll wait until tomorrow or Monday to put the new table up and reorganize (once it arrives).
 
To avoid these ads, REGISTER NOW!
Top Bottom