To avoid these ads, REGISTER NOW!

Above 1200 Sq/FT The Cow Pasture Garage - Australia

Wokspaces above 1200 squarefeet.

kitdoctor

Well-known member
Joined
Oct 30, 2010
Messages
529
Location
Sunshine Coast, Australia
Post #0001 – Introduction

Hi everyone,

I’ve spent a lot of time dreaming of owning a reasonably sized shed (as we call them here) because for almost 25 years I’ve made do with a DLUG or two-car garage. All that will soon change. For the last three and a half years I’ve been project managing the development of a 2 hectare (5 acres) block of land as an owner builder. My wife and I purchased the block in May 2021. It’s located in Queensland up on a plateau in an area known as the Sunshine Coast Hinterland. To get there next year we’re relocating 3500 kilometres (2100 miles).

We’re now at the point where the slab for a 25.6 m x 13 m (84 ft x 43 ft) shed with a partial wrap-around lean-to and a 9 m x 7 m (29.5 ft x 23 ft) garage are only weeks away from being poured. A planned house is coming later. The priority now is to relocate.

It’s not been easy and being a former engineer I’m fortunate enough to have the knowledge, experience and skills to do this. I’d congratulate anyone else who doesn’t come from that background or building/construction who’s done it!

It’s not over yet…Just last week my unhelpful building certifier issued my second building permit but changed some critical floor and surface levels without consulting me. Odd, well no, you’ve gotta realise that many professionals you’ll need to work with will be wrong with their advice and don’t view themselves as being there to help you deliver a successful project. What more can I say…

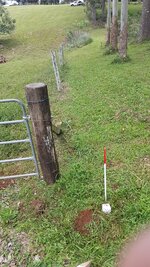
Here’s the block. I love a challenge. Steep slopes, a gully blocking access, no electricity, no reticulated water, no sewerage, native vegetation, wireless internet and difficult access. That sounds bad…but it’s got magic views, it’s conveniently located, it’s private and quiet.

So, these are some of the photographs from the for-sale advertisement.

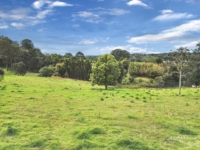
This first one is well onto the adjacent block to the west looking east over our block. The slopes are deceiving. Those damn real estate agents…The tree in the middle unfortunately had to go. It was considered a weed. The tree on the right is approximately on our western boundary.

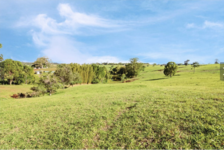
The second one is well onto the adjacent block to the west looking south over our block. On the right hand side you can those two trees I was referring to in the earlier photograph.

The third one is on our lot looking south-east over our block. The dam is mainly on the adjacent block to the east but the stream that feeds it crosses our block. Now the slope is clearer. We had a record wet start to the year, so the views are a little different today and the last six months have been spent reshaping the site to make it more usable (more to come later).

The fourth one is on our lot looking to the north-east to the stream that cuts through the north-east corner of our block. That’s the native vegetation to the LHS and across from the stream. The few trees on the bank of the gully in the foreground are not native.

In my third post I thought I’d share some more about us and my YouTube channel. Then, in the next few posts I’ll start with the brief summary of the journey over the last three and half years and show you what the block looks like now after pushing dirt around for six months and placing 550 tonnes (1.2 Million pounds) of rock boulders for retaining walls.
 

Attachments

  • For sale advert photo No. 2.png
    For sale advert photo No. 2.png
    1.7 MB · Views: 215
  • For sale advert photo No. 1.png
    For sale advert photo No. 1.png
    1.4 MB · Views: 183
  • For sale advert photo No. 5.png
    For sale advert photo No. 5.png
    1.6 MB · Views: 174
  • For sale advert photo No. 4.png
    For sale advert photo No. 4.png
    1.7 MB · Views: 200
Last edited:
To avoid these ads, REGISTER NOW!
OP
K

kitdoctor

Well-known member
Joined
Oct 30, 2010
Messages
529
Location
Sunshine Coast, Australia
Post #0002 – Thread Index

#0001 - Introduction - Post ID #1 (page 1)
#0002 - Thread Index - Post ID #2 (page 1)
#0003 - More about us - Post ID #5 (page 1)
#0004 - Where did three years go? - Post ID #8 (page 1)
#0005 - Construction works commences - Part I - Post ID #15 (page 1)
#0006 - Construction work continues - Part II - Post ID #27 (page 1)
#0007 - What's the big picture plan here? - Post ID #37 (page 1 still!)
#0008 - You put in the effort but you still miss out - Post ID #39 (page 1)
#0009 - Construction work continues - Part III - Post ID #42 (page 2)
#0010a - Construction work continues - Part IV - Post ID #44 (page 2)
#0010b - Construction work continues - Part IV - Post ID #45 (page 2)
#0011 - Construction work continues - Part V - Post ID #52 (page 2)
#0012a - House design - Post ID #58 (page 2)
#0012b - Garage design - Post ID #59 (page 2)
#0012c - Shed design - Post ID #61 (page 2)
#0013 - Construction work continues - Building survey - Part VI - Post ID #62 (page 2)
#0014a - Construction work continues - Shed slab pour - Part VII - Post ID #65 (page 2)
#0014b - Construction work continues - Shed slab more preparation - Part VIII - Post ID #69 (page 2)
#0014c - Construction work continues - Shed slab pour - Part IX - Post ID #70 (page 2)
#0015 - Construction work continues - Material deliveries and mishaps - Part X - Post ID #71 (page 2)
#0016 - Construction work continues - Steelwork erection commences - Part XI- Post ID #76 (page 2)
#0017 - Construction work continues - Steelwork erection continues - Part XII - Post ID #77 (page 2)
#0018 - Construction work continues - Steelwork erection continues and driveway breaking up - Part XIII - Post ID #82 (page 3)
#0019 - Wasn't expecting this - Driveway destroyed - Part XIV - Post ID #83 (page 3)
#0020 - Neighbour's shenanigans - Part XV - Post ID #84 (page 3)
#0021 - Driveway repairs - Part XVI - Post ID #96 (page 3)
#0022 - Construction work continues - Sheeting installation - Part XVII - Post ID #98 (page 3)
#0023 - More heavy rain - More driveway damage - Part XVIII - Post ID #102 (page 3)
#0024 - Construction work continues - Last tasks 2024 - Part XVIV - Post ID #110 (page 3)
#0025 - That's a wrap for 2024 - Part ** - Post ID #116 (page 3)
#0026 - War on weeds - Know thy enemy - Part XXI - Post ID #120 (page 3)
#0027 - Construction work continues - Garage slab pour - Part XXII - Post ID #124 (page 4)
#0028 - War on weeds underway - First strikes - Part XXIII - Post ID #127 (page 4)
#0029 - Construction work continues - On-site wastewater system installation - Part XXIV - Post ID #128 (page 4)
#0030 - Construction work continues - Shed completion edges closer - Part XXV - Post ID #133 (page 4)
#0031 - Garage Site Tidy Up - Part XXVI - Post ID #146 (page 4)
#0032 - Cyclone Alfred preparations - Part XXVII - Post ID #147 (page 4)
#0033 - Mud splash dilemma - Part XXVIII - Post ID #162 (page 5)
#0034 - Cyclone Alfred aftermath - Part XXIX - Post ID #166 (page 5)
#0035 - Alfred tropical low aftermath - Part *** - Post ID #170 (page 5)
#0036 - Alfred tropical low aftermath continued - Part XXXI - Post ID #172 & ID #175 (page 5)
#0037 - Construction work continues - Shed gutters and downpipes - Part XXXII - Post ID #181 (page 5)
#0038 - Construction work continues - Shed lean-to roof structure, more framing and other progress - Part XXXIII - Post ID #197 (page 5)
#0039 - Construction work continues - Shed lean-to roof structure continued and more progress - Part XXXIV - Post ID #201 (page 6)
#0040 - Construction work continues - Garage steelwork erection commences - Part Part XXXV - Post ID #214 (page 6)
#0041 - War on weeds - More strikes - Part XXXVI - Post ID #220 (page 6)
#0042a - Shed site tidy up - Part XXXVII - Post ID#226 (page 6)
#0042b - Shed site tidy up continued - Part XXXVII - Post ID #228 (page 6)
#0042c - Shed site tidy continued - Part XXXVII - Post ID #230 (page 6)
#0042d - Shed site tidy up continued - Part XXXVII - Post ID #231 (page 6)
#0043 - Construction work continues - Garage keeps progressing - Part XXXVIII - Post ID #233 (page 6)
#0044 - Construction work construction continues - Shed's vehicle access doors - Part XXXVIV - Post ID #238 (page 6)
#0045a - Construction work continues - Shed lean-to's posts and more downpipes - Part XL - Post ID #247 (page 7)
#0045b - Construction work continues - Shed lean-to's post and more downpipes continued - Part XL - Post ID #248 (page 7)
#0046 - Construction work continues - Shed plumbing works rough in - Part XLI - Post ID #258 (page 7)
#0047 - Construction work continues - Garage electrical cabling rough in - Part XLII - Post ID #275 (page 7)
#0048a - Construction work continues - Shed electrical and communication cabling rough in - Part XLIII - Post ID #278 (page 7)
#0048b - Construction work continues - Shed electrical and communication cabling rough in continued - Part XLIII - Post ID #283 (page 8)
#0048c - Construction work continues - Shed air conditioners - Part XLIII - Post ID #295 (page 8)
#0049 - Australia discovers US General - Well, a small step - Part XLIV - Post ID #303 (page 8)
#0050 - Lightweight steel framing and timber framing - An introduction - Part XLV - Post ID #319 (page 8)
#0051a - Driveway, more destruction! - Part XLVI - Post ID #329 (page 9)
#0051b - Driveway, more destruction continued! - Part XLVI - Post ID #330 (page 9)
#0052a - War of the weeds - Part XLVII - Post ID #335 (page 9)
#0052b - War of the weeds continued - Part XLVII - Post ID #336 (page 9)
#0053 - Construction work continues - Mezzanine storage room staircase - Part XLVIII - Post ID #337 (page 9)
#0054 - Construction work continues - Western boundary fence - Part XLIX - Post ID #340 (page 9)
#0055a - Construction work continues - Lightweight steel framing - More extras to integrate with steel framing - Part L - Post ID #349 (page 9)
#0055b - Construction work continues - Lightweight steel framing - More extras to integrate with steel framing continued - Part L - Post ID #361 (page 10)
#0055c - Construction work continues - Lightweight steel framing - More extras to integrate with steel framing continued - Part L - Post ID #370 (page 10)
#0056a - Construction work continues - Insulation batt installation - Part LI - Post ID #378 (page 10)
#0056b - Construction work continues - Insulation batt installation continued - Part LI - Post ID #397 (page 10)
#0056c - Construction work continues - Insulation batt installation continued - Part LI - Post ID #425 (page 11)
#0057 - Construction work continues - Plasterboard and cornice installation - Part LII - Post ID #456 (page 12)
#0058 - Backpack sprayers - Solo 475 vs Silvan ProGrade - Part LIII - Post ID #462 (page 12)
#0059a - Construction work continues - Plywood lining of garage storage room - Part LIV - Post ID #463 (page 12)
#0059b - Construction work continues - Plywood lining of garage storage room continued - Part LIV - Post ID #473 (page 12)
#0060 - Construction work continues - Vehicle access door controls - Part LV - Post ID #481 (page 13)
#0061a - Construction work continues - Plywood lining at shed - Part LVI - Post ID #493 (page 13)
#0061b - Construction work continues - Plywood lining at shed continues - Part LVI - Post ID #496 (page 13)
#0062 - Construction work continues - Weatherboard cladding installation at shed - Part LVII - Post ID #503 (page 13)
#0063a - Construction work continues - Problems with vehicle access doors - Part LVIII - Post ID #508 (page 13)
#0063b - Construction work continues - Problems with vehicle access doors continued - Part LVIII - Post ID #509 (page 13)
#0064 - Construction work continues - More progress at accommodation module and shed - Part LIX - Post ID #518 (page 13)
#0065a - Driveway repairs - Part LX - Post ID #529 (page 14)
#0065b - Driveway repairs continued - Part LX - Post ID #530 (page 14)
#0066a - Stormwater drainage management- Part LXI - Post ID #551 (page 14)
#0066b - Stormwater drainage management continued - Part LXI - Post ID #552 (page 14)
#0067 - Compost tumblers - Part LXII - Post ID #571 (page 15)
#0068a - Construction work continues - Downpipes connected into stormwater - Part LXIII - Post ID #573 (page 15)
#0068b - Construction work continues - Downpipes connected into stormwater continued - Part LXIII - Post ID #574 (page 15)
#0069a - Construction work continues - Weatherboard cladding installation completed - Part LXIV - Post ID #579 (page 15)
#0069b - Construction work continues - Weatherboard cladding installation completed continued - Part LXIV - Post ID #580 (page 15)
#0070a - Shed site tidy up No. 2 - Part LXV - Post ID #596 (page 15)
#0070b - Shed site tidy up No. 2 continued - Part LXV - Post ID #597 (page 15)
#0070c - Shed site tidy up No. 2 continued - Part LXV - Post ID #598 (page 15)
#0071a - War of the weeds - Tidying and solarisation - Part LXVI - Post ID #605 (page 16)
#0071b - War of the weeds - Tidying and solarisation continued - Part LXVI - Post ID #606 (page 16)
#0071c - War of the weeds - Tidying and solarisation continued - Part LXVI - Post ID #611 (page 16)
#0071d - War of the weeds - Tidying and solarisation continued - Part LXVI - Post ID #612 (page 16)
#0071e - War of the weeds - Tidying and solarisation continued - Part LXVI - Post ID #622 (page 16)
#0071f - War of the weeds - Tidying and solarisation continued - Part LXVI - Post ID #661 (page 17)
#0071g - War of the weeds - Tidying and solarisation continued - Part LXVI - Post ID #681 (page 18)
 
Last edited:

strength_and_power

Well-known member
Joined
Apr 26, 2015
Messages
1,405
2100 mile move, 1.2 million pounds of rocks, nothing small about this project. Welcome aboard, looking forward to seeing your progress and the finished product.
 
OP
K

kitdoctor

Well-known member
Joined
Oct 30, 2010
Messages
529
Location
Sunshine Coast, Australia
Post #0003 – More about us

Hi again,

I'm a newbie when it comes to sheds, a tragic ’70s-‘80s Ford lover, general car enthusiast, and would like to do more DIY, particularly on my cars. I’ve got a small collection of cars comprising some ******** muscle cars, some cruisers and at the moment one luxo barge. All are stock standard, mostly totally original, including patina and battle scares. A couple have come from the USA, the rest are Australian.

I’ve been around this forum lurking for a long time looking at the various builds on here and learning about tools and garage gear. At the moment, I’ve got a Bendpak four-post hoist that I’ll relocate to the new shed. In terms of tools, I’ve bought the odd one here and there but haven’t taken the plunge on a big toolkit.

A little bit about us. I'm 59 and live in Queensland Australia at the moment. My wife and I are house sitting this year to be nearby to the build. My wife works FIFO or fly-in-fly-out, returning for work and to keep our interstate home ticking along. I finished work in 2018 and my wife will finish up in October. If I could give some advice to a younger version of me, I’d say give up full-time work as soon as you can.

Although I’d been a car nut for ages we’d never had the room for a dedicated shed. We actually live on about 300 sq m (3230 sq ft) and the lot is shared with another dwelling, so there’s a shared driveway. In 2009 we bought our first muscle car, then a second and this required a hoist to be installed in our garage. As spare car parts were accumulated and took over two bedrooms a scale modelling hobby was abandoned.

The photo below is our 1973 Ford Falcon XA GT in Lime Glaze sitting in the shared driveway of our current home.

XA GT 73 2009.JPG

I was able to do minor maintenance in the garage but the cramped conditions and particularly the extreme humidity made this impossible for six months of the year. I persisted for a few years…

In 2013 I was diagnosed with cancer and had surgery in 2014. In 2016 it returned and I had two rounds of surgery plus 30 sessions of radiotherapy in early 2017. Luckily, I was able to take a sideways move at work as I recovered during 2017/2018. I had always been planning to take early retirement at age 55 and essentially what I did was take all my accrued leave. I left work in May 2018 when I was 53.

I think I’m a bit OCD. I enjoy working on anything but it takes me forever as I must plan and execute things in great detail. Small details are important to me. If I have one regret, it’s not pursuing my passion of working on cars more and sooner. Of course, I also regret selling the cars I’ve owned in the past and had the opportunity to buy but never did.

I do have a YouTube channel which I’ve just started. I had to learn quite a few new skills to establish the channel. Of course I’ve been really busy over the last six months (more on that to come), so at the moment there’s only the one video. It’s a quick walk around of a special car that I waited 17 years to acquire. If you care to check the channel out, you can do that <HERE>.

I wanted to participate more in this forum because firstly, I have a lot of work ahead setting up my new shed. I know I need some help to do this and a better result will flow from sharing the journey. Secondly, this journey will likely help others and then it becomes a process of giving back to the community. So, I thought I’d document my own journey building and fitting out my shed!

My goal for this shed "build", is to make a very clean, efficient place to work that appeals to me to work on my cars and other DIY home improvement projects, store my tools, etc, all without spending a large fortune. I've always wanted a "man-cave" garage and believe a shed can be much more than just a place to store excess junk you never use. I plan to slowly add petrol and oil and Ford items to deck the “man-cave”out.

So, my next post will tell you a little about the journey (aka struggle) to get to where we’re now at.
 
Last edited:

hewey

Well-known member
Joined
Sep 5, 2014
Messages
1,679
Location
Blue Mountains, Australia
Welcome mate. That's a beautiful piece of land you've got. My brother in law is over Kenilworth way, so we've visited your region a few times. And what a stunning GT too - gotta love that Lime Glaze colour! I'd love to see what else you've got in your line up too.

Also your youtube link wasn't working? But looking forward to following your house and shed build (y)
 
OP
K

kitdoctor

Well-known member
Joined
Oct 30, 2010
Messages
529
Location
Sunshine Coast, Australia
Welcome mate. That's a beautiful piece of land you've got. My brother in law is over Kenilworth way, so we've visited your region a few times. And what a stunning GT too - gotta love that Lime Glaze colour! I'd love to see what else you've got in your line up too.

Also your youtube link wasn't working? But looking forward to following your house and shed build (y)

Thanks for the response.

I'm not sure what's up with the YouTube channel link. It works for me. Let's see what others say. I've only got the one video. This shed build has occupied too much of my time!
 
Last edited:
OP
K

kitdoctor

Well-known member
Joined
Oct 30, 2010
Messages
529
Location
Sunshine Coast, Australia
Post #0004 – Where did three years go?

Hi again,

Like I mentioned in an earlier post, we bought our block in May 2021. We’d always thought we’d build our last house and how we’ve financed it by selling down other property required us to acquire some land first, then build. In 2021 the real estate market was going crazy, you had to act quickly and stack things in your favour. We had a buyer’s agent help with searching and then acquiring the block.

We hit the ground running, the block was surveyed in June 2021, we quickly got some preliminary town planning advice to understand the local council’s (land) overlay and development codes and then commissioned an architect to develop a concept site plan and concept building drawings.

The survey identified numerous occurrences of mis-fencing. The original survey was done in the early 1900s.

Next came a geotechnical report because of the steep grades and a report on how wastewater would be dealt with. We then had a civil engineering firm take a preliminary look at the services needed, drainage, building platforms including retaining walls, the driveway and stream crossing design. All up, this work spanned about 15 months and identified some design non-compliances that weren’t possible to overcome. This drove the need to submit a planning permit application to the local council which in turn required the preparation of a town planning report. Our application was submitted in July 2022. So, after three months with council we received our planning permit in October 2022.

In December 2022 the utility provider did a two-pole span extension to provide reticulated electricity to our block.

The second photo is looking north up the street (yes it’s a street!) showing one of the new electricity poles on the left. That’s native vegetation to the left too. As a private citizen you can’t build within the height of native vegetation (without approval). Of course, government is exempt from such red tape.

We also arranged for our electrician to install our private service pole.

I’d fully expected that the planning permit would be conditioned to require an operational works to also be obtained, once all the civil works were designed in detail and prior to construction commencing. That’s a pretty common requirement but fortunately one was not listed as being required in the planning permit. I thought it would a good idea to confirm that in writing which was done. Fast forward to point where I applied for my building permit and the building certifier did not accept that. This was the first of many battles with them.

Anyway, between about September 2022 to October 2023 was spent undertaking the detailed design and documentation for the civil works. In November 2023 I engaged a hydraulic design company that was recommended to me to do the design of the sanitary drainage, hot/cold water plumbing, on-site water supply etc. In March 2024, when they were still not finished, they invoiced me for full payment, so I complained. That then led to us parting company. I lodged my own plumbing and drainage permit application.

Once the civil design was done, I settled on a preferred civil contractor and we then signed a contract with them in December 2023. I also squeezed in completing an owner-builder course and obtained a permit. Once you’re coordinating contractors performing works valued at $11,000 or more, you have to become an owner builder. I’d been dealing with a local shed contractor since 2018 and finally got some firm pricing in October 2023 after asking for 13-months. A contract was then signed with the shed contractor in February 2024.

After being rejected by I think six building certifiers (e.g. they were too busy, don’t take on owner builders etc.) I found a certifier through which I’d be able to obtain my building permit. This work went off the rails almost immediately and I mentioned earlier they are still a source of problems. I did manage to obtain a first permit which enabled us to commence the bulk earthworks, retaining walls, stormwater drainage etc.

The next couple of posts will take up the story from March 2024. Then after those I’ll outline the shed (and garage) design.
 

Attachments

  • ADK Electrical service pole install Oct 2022.JPEG
    ADK Electrical service pole install Oct 2022.JPEG
    128.1 KB · Views: 173
  • Energex extension install Photo No. 2 Dec 2022.JPEG
    Energex extension install Photo No. 2 Dec 2022.JPEG
    164.4 KB · Views: 142
  • Corner peg NE corner.jpg
    Corner peg NE corner.jpg
    923.9 KB · Views: 168
Last edited:

Coolabah

Well-known member
Joined
Jun 6, 2010
Messages
1,370
Location
2nd Floor, 3rd on the Right,Narooma, Australia
Thanks for the response.

I'm not sure what's up with the YouTube channel link. It works for me. Let's see what other say. I've only got the one video. This shed build has occupied too much of my time!
Yeh, link not working for me either, just takes me to another GJ page, telling me: "

Oops! We ran into some problems.​

The requested page could not be found."
.
If it helps in your trouble shooting, link itself translates to : ...,snip>ww.garagejournal.com/forum/HERE

Great project, looking forward to following along !!
 
OP
K

kitdoctor

Well-known member
Joined
Oct 30, 2010
Messages
529
Location
Sunshine Coast, Australia
Yeh, link not working for me either, just takes me to another GJ page, telling me: "

Oops! We ran into some problems.​

The requested page could not be found."
.
If it helps in your trouble shooting, link itself translates to : ...,snip>ww.garagejournal.com/forum/HERE

Great project, looking forward to following along !!

Hi Coolabah. I'm stumped. Both links work for me. When you clinked on the link and got the error, you were clicking on the first link of the two links? The reason I ask is the first link is the YouTube channel and the second link is to this Garage Journal thread. So, if you clicked on the first link for the YouTube Channel it's somehow going to the The Garage Journal web site. Confusing!!!!!

I'll log in from another computer and see if that makes a difference to my investigation. Anyway, here's link to the YouTube channel:

https://www.youtube.com/@TheCowPastureGarage
 

Coolabah

Well-known member
Joined
Jun 6, 2010
Messages
1,370
Location
2nd Floor, 3rd on the Right,Narooma, Australia
Hi Coolabah. I'm stumped. Both links work for me. When you clinked on the link and got the error, you were clicking on the first link of the two links? The reason I ask is the first link is the YouTube channel and the second link is to this Garage Journal thread. So, if you clicked on the first link for the YouTube Channel it's somehow going to the The Garage Journal web site. Confusing!!!!!

I'll log in from another computer and see if that makes a difference to my investigation. Anyway, here's link to the YouTube channel:

https://www.youtube.com/@TheCowPastureGarage
Yes, just to confirm I clicked on the word "here" in capitals :
"If you care to check the channel out, you can do that <HERE>."
 

Geoff289

Well-known member
Joined
Nov 10, 2013
Messages
1,229
Location
Melbourne, Australia
I had the same issue with the video that Hewey and Coolabah reported but now working fine.

As a died in the wool Ford man, I just love that Torino. Looking forward to reading more about it as well as your garage build.
 
OP
K

kitdoctor

Well-known member
Joined
Oct 30, 2010
Messages
529
Location
Sunshine Coast, Australia
I had the same issue with the video that Hewey and Coolabah reported but now working fine.

As a died in the wool Ford man, I just love that Torino. Looking forward to reading more about it as well as your garage build.
Geoff289. The shed build is now three months behind and will slip to about four months as I'm waiting on the manufacture of four polyethylene water tanks that need to unloaded on the shed pad and moved to a temporary holding spot. This is in turn is holding up pouring the slabs. I think I'll look into some alternative option for moving the tanks into position.

Anyway, all of this has delayed a second video I was planning that is a detailed walk-around and look under the Torino. It's history is known from day 1. It was found in the garage of its original owner in Detroit in 2005. It runs a 429 SCJ engine (Super Cobra Jet) with four-bolt mains, the pistons are forged aluminum instead of cast, a 780 CFM Holley carb sits atop a cast iron intake manifold, there’s an oil cooler hanging off the front of the radiator support panel, and a nasty solid-lifter cam requiring manual adjustment! All of this came when the rear end was specified with a 3.91 or 4.30 ratio. Ford lied about performance and it makes somewhere between 420-450 bhp stock standard.
 
OP
K

kitdoctor

Well-known member
Joined
Oct 30, 2010
Messages
529
Location
Sunshine Coast, Australia
Post #0005 – Construction work commences – Part I

Hi again,

Works started in March 2024 but it just kept on raining, it rained, it rained some more, it kept raining… How much rain fell? 529 mm in January (20.8 inches), 180 mm in February (7.1 inches), 492 mm in March (19.3 inches), 211 mm in April (8.3 inches), 116 mm in May (4.6 inches), 14 mm in June (0.55 inches), 120 mm in July (4.7 inches) and so far in August 297 mm (11.7 inches). So, that’s 1959 mm (77.1 inches) this year. Average annual rainfall here is about 2000 mm (78.7 inches). Anyway, despite this, I’ve decided that a boat Is not needed!

The goods news though is my choice of civil contractor has proved to be the right decision. They’re a local business and have been great to deal with. Nothing has been a problem. They have even suggested some very practical changes to the design of driveway and sequence of work etc. The bad news was that with the extensive rain their retaining wall contractor was delayed on other projects and has commenced much later on our project. This has meant we’re behind schedule.

This first photos shows the entrance point to the block. The driveway runs down the eastern boundary to the stream, then swings west uphill.

Post #0005 - Photo No. 1.jpg

The ground was so wet the contractor laid some temporary road base down to the gully crossing. The stream was now flowing, so a temporary pipe was laid because it was simply impossible to place concrete culverts.

Post #0005 - Photo No. 2.jpg

The third photo shows the southern extent of the construction site. The garage pad is on the right in the foreground. The contractor is stripping the topsoil and starting to form the upper level of the house pad. The tree in the middle of the photograph was eventually knocked down and mulched, although I did save the log and have given that to my neighbour.

Post #0005 - Photo No. 3.jpg

By late April/early May the three building pads were beginning to take shape. The fourth photo shows the upper house pad shown closer up.

Post #0005 - Photo No. 4.jpg

To be continued...
 
Last edited:
To avoid these ads, REGISTER NOW!

hewey

Well-known member
Joined
Sep 5, 2014
Messages
1,679
Location
Blue Mountains, Australia
Youtube link working for me now. (y) Torino looks like a great tough cruiser.

Those site works look great. Also the 'flow' of your driveway up to the house looks great. I love a nice block like your that has a sense of arrival when you drive up to the house.

Your posts are great. Good balance of detail and pics. Keep em coming.
 

rixtrix1

Well-known member
Joined
Aug 25, 2013
Messages
3,010
Location
Chandler, AZ (from west NE)
Just found your thread and will be following it and your YouTube channel ( "HERE" link up above worked fine first time! ) Posts are fine/ everyone here loves lots of pics.
Beautiful area you have gotten! Sorry to hear about all the permitting snafu's; I went through much of the same with my shop build. Congrats on getting ahead of your cancer, so you can enjoy your "early" retirement. I had to wait until I was 71 to retire. Will definitely be looking for updates!
 
Last edited:

Lyndon

Well-known member
Joined
Aug 11, 2014
Messages
2,535
Location
Sydney, Australia
KD

You're doing well. Keep it up. Your story is remarkably similar to mine, but I'm in NSW. You can read my bits using the link below, but while it's 100 pages long now most of it is boring stuff or conversations with great people no longer here (1/2 Cup, Dan, Simon and some others). But it's a great group on here and we'll all enjoy your story. The wife and I are waiting to start building our last house too, about 2 1/2 hours south of here. While we are downsizing the house (from 5-6 bedrooms to 3) we are upsizing the garage (of the 322 sq m of the house, 90sq m is my garage and workshop....).

And I have always been a Ford man too, but added a liking for Jaguars as well in the late 80's........

Keep up the good work.

Lyndon
 

rixtrix1

Well-known member
Joined
Aug 25, 2013
Messages
3,010
Location
Chandler, AZ (from west NE)
So, checking up on wiki for some info on your area, it would appear you have located in a fantastic area with the climate of northern Florida in the USA, minus the hurricane danger I hope! Way too much rain for me, but the temps appear to be quite mild year round. I moved from the -30+F winters in Nebraska to the 115+F summers of Arizona almost 40 years ago. The rest of the year is really mild.
 
OP
K

kitdoctor

Well-known member
Joined
Oct 30, 2010
Messages
529
Location
Sunshine Coast, Australia
Post #0006 – Construction work continues – Part II

Hi again,

The underground stormwater system was then installed. Above each building platform and some other areas is a swale drain to capture the surface water runoff from upslope and divert it around these areas. You can see a swale drain upslope of the area between the garage and the house sites in the next photo. The swale drains convey the surface runoff into pits which drop the water into pipes that pass under various sections of the driveway, otherwise you’d have surface water flowing uncontrolled across the driveways.

Post #0006 - Photo No. 1.jpg

Each building platform has a drainage system to capture surface water from the immediate area and to receive the discharge from building downpipes. The junctions in the buried pipes are marked with white PVC pipes, so the plumber connecting in the downpipes can find the junctions. In the next photo are two of the pits near the garage pad. Here you can also see the preliminary cut being done for a retaining wall. No shoring of material required!

Post #0006 - Photo No. 2.jpg

The next photo shows two headwalls on two of the drainage pipes that pass under the driveways and discharge downslope.

Post #0006 - Photo No. 3.jpg

Here’s a typical headwall structure. This one’s at the shed platform. This photo is out of sequence because the retaining wall came much later.

Post #0006 - Photo No. 4.jpg

It was then time get ready to install the underground electrical and communications services. The original contractor I’d selected had to pull out due to health reasons. Fortunately, my civil contractor recommended another contractor. They were great too.

Post #0006 - Photo No. 5.jpg

That's Geogrid fabric under the road base which is needed on reactive clays. Hopefully it should contain cracks that form in the reactive clay and not allow them to propagate through the asphalt.

Post #0006 - Photo No. 6.jpg

Post #0006 - Photo No. 7.jpg

In the next instalment construction works continues.
 
Last edited:
OP
K

kitdoctor

Well-known member
Joined
Oct 30, 2010
Messages
529
Location
Sunshine Coast, Australia
KD

You're doing well. Keep it up. Your story is remarkably similar to mine, but I'm in NSW. You can read my bits using the link below, but while it's 100 pages long now most of it is boring stuff or conversations with great people no longer here (1/2 Cup, Dan, Simon and some others). But it's a great group on here and we'll all enjoy your story. The wife and I are waiting to start building our last house too, about 2 1/2 hours south of here. While we are downsizing the house (from 5-6 bedrooms to 3) we are upsizing the garage (of the 322 sq m of the house, 90sq m is my garage and workshop....).

And I have always been a Ford man too, but added a liking for Jaguars as well in the late 80's........

Keep up the good work.

Lyndon
As you would appreciate, there's been a few battles fought and won to get this far...I'll have a read of your thread too.
 
Last edited:
OP
K

kitdoctor

Well-known member
Joined
Oct 30, 2010
Messages
529
Location
Sunshine Coast, Australia
So, checking up on wiki for some info on your area, it would appear you have located in a fantastic area with the climate of northern Florida in the USA, minus the hurricane danger I hope! Way too much rain for me, but the temps appear to be quite mild year round. I moved from the -30+F winters in Nebraska to the 115+F summers of Arizona almost 40 years ago. The rest of the year is really mild.
Up here on the plateau we're about 430 m (1200 ft) above sea level, so it's slightly cooler and less humid than down on the coast.

No cyclones (hurricances) here thank goodness. Annual rainfall is about 2 m (79 inches).
 

Notgrownup

Well-known member
Joined
May 5, 2014
Messages
5,908
Location
Snow Hill NC
Welcome aboard . I am a bit envious but very happy for you. Looks like a great project. I am at a point in life where I am close to retirement and want to sell my property and get more of a a big barn or shed with a small living quarter in it for simplistic living. My wife has retired 7 years ago and I am 59. We want a big garage with a woodworking shop for me and a small paint studio for her and a place to park our Harley Trike , car and mower then maybe a 1200 square feet living space. This current house is too much for us . I am looking forward to seeing your progress and enjoy. Life is short.
 
OP
K

kitdoctor

Well-known member
Joined
Oct 30, 2010
Messages
529
Location
Sunshine Coast, Australia
Welcome aboard . I am a bit envious but very happy for you. Looks like a great project. I am at a point in life where I am close to retirement and want to sell my property and get more of a a big barn or shed with a small living quarter in it for simplistic living. My wife has retired 7 years ago and I am 59. We want a big garage with a woodworking shop for me and a small paint studio for her and a place to park our Harley Trike , car and mower then maybe a 1200 square feet living space. This current house is too much for us . I am looking forward to seeing your progress and enjoy. Life is short.
Thanks for taking the time to respond. What you've said about simplifying your life makes a lot of sense. There's a growing trend to only build what you need because you're right, we don't need giant homes. I think you'll find the shed design of interest as it contains a 100 square metre, dual story, accommodation quarters tucked in the south-east corner to take advantage of the view over the dam.
 
OP
K

kitdoctor

Well-known member
Joined
Oct 30, 2010
Messages
529
Location
Sunshine Coast, Australia
Post #0007 – What’s the big picture plan here?

Hi again,

A number of forum members have made comments about the site, driveway etc., so realising I haven’t shown an overall site plan I thought, well why not now? So, here it is.

The short sides of the block are essentially at the south and north and the long sides at the west and east. West is upslope and east is downslope.

There’s a gully in the north-east corner that flows when it rains, so this required a culvert crossing to be built. Two banks of 900 mm x 750 mm culverts sized for 1600 L/s are part of the design, cha ching!

The driveways are 3 m (9.8 ft) wide asphalt with 0.5 m (1.6 ft) wide shoulders. The asphalt is 30 mm (1.2 inches) thick, the road base is 200 mm (7.9 inches) thick and there’s a layer of Geogrid under the road base.

There’s no reticulated sewerage, so an on-site sewage treatment facility is required. Effluent disposal is via an above ground irrigation system located in the south-west corner of the block.

We could have had reticulated water extended to the block but decided we’d capture roof water and store that in tanks. As part of Stage I I decided to bring in the two concrete tanks for a future house and partially embed these within an embankment for aesthetic reasons. At the shed, three above ground tanks are located at the north end. Sequencing their placement with the shed build will require they be delivered and unloaded onto the slab. They’ll then be moved and stored on the adjacent ground.

Given the slopes and potential for development to occur upslope of us, the design of the drainage system was given a lot of attention. Upslope swale drains divert surface water around the building platforms and there are three pipe crossings under the driveways.

Electricity and communication services were run underground. My contractor didn’t pull communication cables at this point in time because normally the communications’ service provider does that. For the moment we have access to wireless internet and will install Starlink.

I included a smaller garage in the design for a number of reasons but one was that it would be the ideal place to install a PV system, as it is centrally located between the future house and the shed. Also, the PV panels would be closer to the ground and easier to access for cleaning.

Snippet 003 ULTIMATE DEVELOPMENT CONCEPT PLAN - STAGES I & II - GJ.png

In the next post I’ll return to the build, well maybe the one after the next or the one after that...
 
Last edited:
OP
K

kitdoctor

Well-known member
Joined
Oct 30, 2010
Messages
529
Location
Sunshine Coast, Australia
Post #0008– You put in the effort but you still miss out

Hi again,

I’ve always had a soft spot for Ford Australia’s ’70s (P5 and P6 models) and ’80s (FC-FE models) luxo barges, the Ford LTD.

This first photo is Ford Australia’s P5 LTD, often criticised because it looked very similar to the 1972-1976 ZF-ZG Fairlanes and even XA-XB Falcons of that era. Despite these criticisms I do still like the P5. Ford even did a luxury two-door coupe, the Landau.

P5 Image.jpg

This next photo is Ford Australia’s P6 LTD which was visually very different. The P6 was introduced in 1976 and a run-out Town Car model in early 1979 signalled their end. I do have one tucked away, more on that in a future post.

P6 Image Kevin Crough.jpg

So, for a while now I’ve been scouring the classic car for sale web sites and Facebook Marketplace etc. looking for the last few models of the LTD. As the FC-FE LTDs aren’t as highly collectable as even their similar era four-door smaller sedans like the Falcon and Fairmont, let alone earlier high-performance Ford cars, they’re less expensive and don’t seem to pass through the common go to classic car dealers. This being the case, they appear in lesser followed dealers’ inventories conducting auctions, like Burns and Co, Lloyd’s, smaller dealers, gumtree (akin to craigslist), generic used cars web sites and of course on Facebook Marketplace.

As the last of the ‘80s 351C equipped LTDs were too expensive and outside my budget, a six-cylinder EFI FE was my target, like the one below but minus the roof racks. By the way, who does that and thinks it’s okay?

1987_Ford_LTD_(FE)_sedan_(2015-07-14)_01.jpeg

Ford Australia didn’t build cars in the ‘70s and ‘80s to last 40+ years, so finding a good example is like looking for a needle in a haystack. The other critical variable is being in the right place at the right time. That’s why I hate Facebook Marketplace, it’s disrupted the whole classic car market and made it so much harder to be the first to find and purchase a nice example.

Over the course of months I’d enquired about many, only to be disappointed, So, I couldn’t believe my eyes when this beautiful Alantic Blue 1987 FE LTD popped up on Facebook on the evening of 13 September 2024.

1987 FE LTD Photo No. 2.jpg

1987 FE LTD Photo No. 6.jpg

1987 FE LTD Photo No. 8.jpg

Now of course, the for sale advertisement was being featured on various Facebook pages and Marketplace but being a Friday night I thought I was in with a chance firing off a PM within three minutes of the car being listed. I received a response and the seller agreed he’d contact me Saturday morning. That night I was excited and had trouble getting off to sleep. You see, that colour is the colour of the LTD featured in Ford’s original sales brochure.

Come Saturday morning I was up early. The hours passed and no call. The listing had disappeared, so I knew the opportunity was gone. I made contact with the seller and sure enough the car had been viewed, paid for and collected by a buyer on Friday evening. I moped around for a few hours feeling sorry for myself. It was my 60th birthday.

Well there you have it. That's been my weekend and so, I guess it’s back to searching…
 
Last edited:

Geoff289

Well-known member
Joined
Nov 10, 2013
Messages
1,229
Location
Melbourne, Australia
Bad luck missing out on that blue one, it does look nice. However, Fairys should have 8 cylinders in my view (I kept the XD Fairmont wagon I had with 351 for ten years, way longer than I usually kept a car, to avoid the dark ages of V8 free Fords).

Go for an NC onwards with the Canadian Windsors in them.
 
To avoid these ads, REGISTER NOW!
Top Bottom