To avoid these ads, REGISTER NOW!

What did you do "IN" your garage today?

To avoid these ads, REGISTER NOW!

ZRX61

Well-known member
Joined
Aug 15, 2006
Messages
28,716
Location
Solar Blight Valley, SoCal
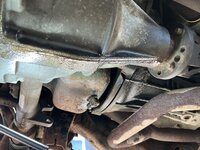
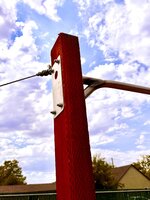
Got the last piece off the F350, scrubbed up etc. Still have to remove the 4 brackets on the left side, but not until I have painted & labeled the 4 from the right side...
& at least two of the right ones need modifying/trimming to size. They weren't cut to size at the factory & have sharp pointy pieces sticking down under the truck.
Judging by the quality of FG on the back of this last piece, it wasn't laid up by whoever did the other five pieces. Will also be taking care of that half-assery.
 

Attachments

  • IMG_20240906_184758958.jpg
    IMG_20240906_184758958.jpg
    452.2 KB · Views: 88
Last edited:

cannuck

Well-known member
Joined
Nov 30, 2021
Messages
4,648
Location
Rural SK
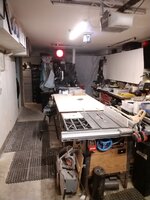
Got the new mill onto the shop floor today. Had loaded it onto an old trailer frame we used to haul gensets with but front axle crapped out, so just hitch, frame and back axle left. Perfect for the job since very low and could put mill right at the back. Managed to back it into shop (big truck but very narrow back lane) and thought I would try the two shop cranes to lift it. One bridge good for half ton other closer to 2 tons, but trolleys only intended to do 1k lbs. each and this thing weighs in at 2,300 lbs stripped down. Turned rigid spreader over and welded up to larger eyes so I could put the crane hooks directly in (need ever inch of height I can get, hook clearance only 9 feet) and they easily picked the load, so didn't have to rent forklift (plan C).

Excuse the ****** mess, had to move a lot of stuff around to fit mill in - and wanted this all sorted out before I start ripping into the engine on the 1440V. Will do monthly coffee tomorrow and try to press gang so help to move the Cheng Ki into place (might be able to make engine lift work, as cranes cover the work bay but not the side bays.
 

Attachments

  • 20240906_172917[1].jpg
    20240906_172917[1].jpg
    1.4 MB · Views: 78

56vette461

Well-known member
Joined
Jan 13, 2013
Messages
494
Location
Northern California
With a dozen unfinished projects hanging around the shop, one would think it would not be so hard to get things done. My wife fell and broke her femur just below the hip joint about 4 weeks ago. Between surgery, recovery and PT, there has been no time for any projects.
I've been wanting to build a cover for my outside work bench before this next winter rather than covering it with tarps. So, 3 weeks ago, I saw the metal structure for a patio hammock set curbside for the garbage pickup. One man's junk is another man's project. Fast forward to the last two days and the metal structure is becoming a 3' x 5' cover/shed with aluminum studs, braces and a corrugated roof sheeting. Lighting and air quick connect is on standby. This project will be done by the weekend if all goes well. I'll post pictures soon.
 

KwikFab

Well-known member
Joined
Jul 27, 2024
Messages
1,209
Location
Central Valley, CA
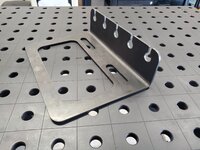
That fixture table? Ordered another one yesterday.

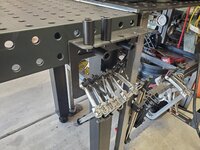
That means the table that holds my clamps and tools is being replaced.

Cut and bent this out real quick and after this weekend, I'll draw up more ways to work as storage.

20240906_161258.jpg

20240906_161621.jpg

20240906_162810.jpg

20240906_162819.jpg

The stops holding it up are temporary. I'll use some hardware to mount it after I make all my tool holders.

20240906_162607.jpg

Second fixture arrives next week.
 

larry4406

Well-known member
Joined
Jan 27, 2006
Messages
19,444
Location
Northern Virginia
Got the last piece off the F350, scrubbed up etc. Still have to remove the 4 brackets on the left side, but not until I have painted & labeled the 4 from the right side...
& at least two of the right ones need modifying/trimming to size. They weren't cut to size at the factory & have sharp pointy pieces sticking down under the truck.
Judging by the quality of FG on the back of this last piece, it wasn't laid up by whoever did the other five pieces. Will also be taking care of that half-assery.
What pieces exactly have you made a career of that you are fixing for a Ford F350?

Fiberglass running boards?
 

niget2002

Well-known member
Joined
Oct 2, 2012
Messages
11,164
Location
Josephine, TX
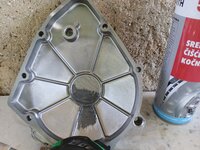
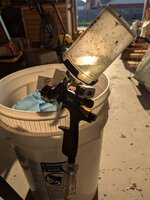
Testing some HOK clear on my epoxy coated test piece. It should dry fully by the time we get back from my son's soccer game this afternoon. If the clear sticks like it should, then I'll hang and spray the kayak.

Then this project will be mostly done. I need to cut and install bulkheads, but I'm not going offshore, so that can wait. I'm going to get some air bladders to put in the nose for now in case we capsize and I have a water pump we can use to get water out if needed.

1000003086.jpg

1000003087.jpg
 

Prospecter

Well-known member
Joined
May 16, 2015
Messages
2,437
Location
Maine
With a dozen unfinished projects hanging around the shop, one would think it would not be so hard to get things done. My wife fell and broke her femur just below the hip joint about 4 weeks ago. Between surgery, recovery and PT, there has been no time for any projects.
I've been wanting to build a cover for my outside work bench before this next winter rather than covering it with tarps. So, 3 weeks ago, I saw the metal structure for a patio hammock set curbside for the garbage pickup. One man's junk is another man's project. Fast forward to the last two days and the metal structure is becoming a 3' x 5' cover/shed with aluminum studs, braces and a corrugated roof sheeting. Lighting and air quick connect is on standby. This project will be done by the weekend if all goes well. I'll post pictures soon.
A broken femur is no joke. Titanium rods? Good save on the hammock stand conversion.
 

Outlander

Well-known member
Joined
Jul 30, 2010
Messages
5,154
Location
Quebec, Canada
Well, having sold my ATV a few weeks back I took to cleaning up the garage. Leaf blower and shop vac did wonders on dust, webs and leftovers from chipmunk's dinner.

Now onto horizontal surface cleanup, woodworking tool suface clean and wax an start a couple of woodworking jobs beginning with refinishing a lamp I made for Mrs Outlander a few years ago.

Clean the dust, make some dust. Rinse, repeat.
 

GirchyGirchy

Well-known member
Joined
Nov 14, 2011
Messages
9,913
Location
Central Indiana
After cleaning the Focus inside and out, used the Chevy truck to tote the Ford truck's wheels/tires, tools, and floor jack over to it. Got those on, then put the used/spare parts for the Chevy into its bed for the buyer (it's sold). Replacement Focus headlight showed up, so put it on, replaced the rest of the bulbs, and it's done now too...hopefully will be sold this weekend. Then put away tools and cleaned up mess so I can park my car back in.

The Focus doesn't look too bad...still some mildew on the hood and the condition of the rest of the paint isn't great, but it's much better than before. I'm happy with how it turned out.

_DSC9124.jpg

_DSC9128.jpg
 

cannuck

Well-known member
Joined
Nov 30, 2021
Messages
4,648
Location
Rural SK
Got the new mill onto the shop floor today. Had loaded it onto an old trailer frame we used to haul gensets with but front axle crapped out, so just hitch, frame and back axle left. Perfect for the job since very low and could put mill right at the back. Managed to back it into shop (big truck but very narrow back lane) and thought I would try the two shop cranes to lift it. One bridge good for half ton other closer to 2 tons, but trolleys only intended to do 1k lbs. each and this thing weighs in at 2,300 lbs stripped down. Turned rigid spreader over and welded up to larger eyes so I could put the crane hooks directly in (need ever inch of height I can get, hook clearance only 9 feet) and they easily picked the load, so didn't have to rent forklift (plan C).

Excuse the ****** mess, had to move a lot of stuff around to fit mill in - and wanted this all sorted out before I start ripping into the engine on the 1440V. Will do monthly coffee tomorrow and try to press gang so help to move the Cheng Ki into place (might be able to make engine lift work, as cranes cover the work bay but not the side bays.
Quoted this post for reference. Got 2...uh "volunteers" from coffee this morning. I am forbidden to lift or strain (recent surgery) so I ran the cranes and shouted orders while my hired help manhandled the 2300 lb. Nice touch was that one helper (journeyman machinist and millwright, combat engineer and a few other things - who also sold machine tools) said my Cheng Ki was worth 3x go 4x what I paid. On top of that the quality of the vice alone to replace was about what I paid for the mill. It is in THAT good shape. Once we got it turned around (hung it by chain from spreader bar) and at limit of travel for cranes, we used the 2 ton engine hoist (PA item) to barely pick it off ground straddling from behind but crawling over the seam between slabs was not something they could do - so invited my long-suffering neighbour (former pro lineman) to give it a bit more oomph. Table travel is so great it took up a bit more room than I budgeted, but one thing I can live with. All that is left to do is find a 5HP 3 phase motor and build a rotary phase converter to replace the 10HP one I gave away some time ago.
 

kaymccampbell

Well-known member
Joined
Feb 27, 2015
Messages
29,584
Location
Upstate New York
Quoted this post for reference. Got 2...uh "volunteers" from coffee this morning. I am forbidden to lift or strain (recent surgery) so I ran the cranes and shouted orders while my hired help manhandled the 2300 lb. Nice touch was that one helper (journeyman machinist and millwright, combat engineer and a few other things - who also sold machine tools) said my Cheng Ki was worth 3x go 4x what I paid. On top of that the quality of the vice alone to replace was about what I paid for the mill. It is in THAT good shape. Once we got it turned around (hung it by chain from spreader bar) and at limit of travel for cranes, we used the 2 ton engine hoist (PA item) to barely pick it off ground straddling from behind but crawling over the seam between slabs was not something they could do - so invited my long-suffering neighbour (former pro lineman) to give it a bit more oomph. Table travel is so great it took up a bit more room than I budgeted, but one thing I can live with. All that is left to do is find a 5HP 3 phase motor and build a rotary phase converter to replace the 10HP one I gave away some time ago.
A cheap Chinese 10hp VFD is under $300. It should more than serve your purpose, and take up a lot less room.
 
To avoid these ads, REGISTER NOW!

ZRX61

Well-known member
Joined
Aug 15, 2006
Messages
28,716
Location
Solar Blight Valley, SoCal
What pieces exactly have you made a career of that you are fixing for a Ford F350?

Fiberglass running boards?
Yup. Over the years they've suffered damage. The biggest area was something the previous owner did in 1996 & then ignored up until he sold it to me on March 10th.
There were two or 3 other impact areas & the rest is just stress cracks.

Probably could all be done in a day or two, but the heat makes working more than 10 minutes an ordeal.

As for today: Was running errands all over town, including visits to several stores looking for a new toaster (got the black Stainless Cuisinart)
Then stopped for lunch at a local haunt.

F350 work for the day was limited to putting connectors on the wire I cut the other day & then adding shrink tubing, even matched the color of the wire :)

That's it, as it's 106deg with what feels like damn near 100% humidity. It's like Florida here today. (It's actually 9% according to the weather guessers)
 
Last edited:

Fixr

Well-known member
Joined
Dec 23, 2012
Messages
9,708
Location
SW VA
Will do a quick thread when its done (y) , Ive some plans for a high lift jack that should make it more user friendly.
Basic details are:-
Length 6m / width 1.1m / depth 1.73m
Recessed lighting.
Sump pump and chamber, 10" of gravel for drainage (due to water table)
Angle top for grates and beam jack.
Re the hate, well, lets just say its not my first rodeo on that front so fun will be had :bounce:


Yep, falling in it and petrol related fires top my list of concerns, that said Ive enough experience with 2/4 post lifts to know nothing is without risk. The pit has a 4" vent pipe set low in the wall but honestly, I see the main role for that in making it a more pleasant place to be, well ventilated, well lit, spacious and dry is the aim.
A clean, well lighted place?
 

Bessy

Well-known member
Joined
Dec 18, 2012
Messages
995
Location
Ontario, Canada
Woke up at the **** crack of 6:00 this morning, and couldn't get back to sleep, so I decided to wander out to the shop and get to work.

First project was to shape (roughly) the handle of my new BFM. I spent about an hour whittling away at the handle then decided to install it because it felt decent enough in hand.
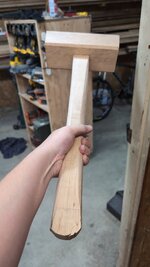
1000014676.jpgI completely butchered the end of the handle on the bandsaw, but I'll clean it up with hand tools eventually. For now I'm just going to use it here and there.

From there, I went out to COPPS to pick up some MDF, to prototype my drawers for the miter station. They unfortunately only had a single piece of the size I was looking for, so I opted to go even cheaper and buy particle board (gross, I know) because I'm just looking for proof of concept here. I batched out one bottom, and three sets of drawer sides spaced such that I could stack them to get the maximum clearances of my three planned drawer sizes (4, 8 and 12"). The idea is that I can dowel the additional sides on top of one another, test for clearance, and optimal layout, then I can disassemble them all, and make two more bottoms to use for three separate drawers in my existing workbench until such time as they eventually disintegrate. I played around a bit with various drawer items then got side tracked.

Last but not least, my lovely wife decided to come out to the shop to paint on of her projects. She reminded me that we have a wedding coming up in two weeks and we still need a gift. Off to the wood pile I go, and find a nice-ish piece of cherry, and proceeded to cut it down for a rather stout serving tray. I'll go out tomorrow to get a big *** router bit, because I want to add a 60 degree chamfer on the bottom, and I don't care to make a jig for the table saw for a single project.

I finished off by cutting the ends of the board (reasonably) square with my quick and dirty crosscut sled. I may do a little bit of sanding tonight but I don't care to go ham on it just yet, until I've cut the bottom first.

This will be a good first "real" project on the laser as well, as we plan to burn in their names and an "Established 2024" into the corner of the board. From there, I'll wax and oil it, and add some handles/rubber feet, and box it up for wrapping!

Nice to do some work "in" the shop as opposed to "on" it for a change, even though I do enjoy the planning/designing/visualizing of my hopefully one day nearly organized shop.

Now, time to make some dinner.

B.
 

stuntman

Member
Joined
Oct 4, 2009
Messages
22
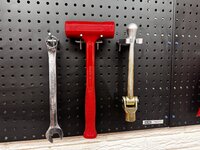
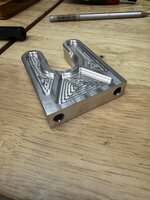
I recently added pegboard to my shop and wanted a spot to hang high use tools for the mill. I didn’t find a solution I liked for the vise handle, so I made one.
 

Attachments

  • IMG_1846.jpeg
    IMG_1846.jpeg
    677.9 KB · Views: 55
  • IMG_1847.jpeg
    IMG_1847.jpeg
    510.5 KB · Views: 30
  • IMG_1848.jpeg
    IMG_1848.jpeg
    569.6 KB · Views: 28
  • IMG_1849.jpeg
    IMG_1849.jpeg
    774.9 KB · Views: 29
  • IMG_1850.jpeg
    IMG_1850.jpeg
    767.3 KB · Views: 32
Last edited:

bulletpruf

Well-known member
Joined
Nov 28, 2013
Messages
11,105
Location
San Antonio
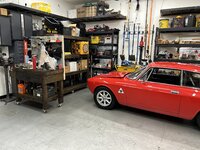
Reconfigured the garage to accommodate the Alfa, which will live here until it's sold in a few months. I really only have room for one car (wife's DD - my projects live in storage units and at the shop), but I put my workbench and shelf unit on casters and ordered a parts washer with casters, so it's quick and easy to move stuff around.

IMG_2093.jpg


IMG_2092.jpg
 

cannuck

Well-known member
Joined
Nov 30, 2021
Messages
4,648
Location
Rural SK
A cheap Chinese 10hp VFD is under $300. It should more than serve your purpose, and take up a lot less room.
You didn't run into the thread where I asked about doing this, and got a thoroughly detailed answer:

There are 3 different 3 phase motors driven from main feed and transformer, and as you will see on every VFD advert you can only use one per motor (see link above for why). You CAN buy a solid state phase converter, but they come in around $5k each!!! I can build a rotary converter for a few hundred and the non-electronic electrical system of the mill will be perfectly happy. Also, leaving the wiring all in place means I can just move it into my 3ph shop if and when I get building up and wired.
 

housewolf

Well-known member
Joined
Feb 3, 2021
Messages
1,144
Location
East Texas
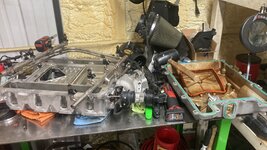
Replaced plugs, wires, fuel injectors, supercharger intercooler & pulley, and added flex fuel sensor for my CTS V. It still had the original pulley so the whole blower needed to be removed so a pulley adapter could be pressed on. Any future pulley swaps will be very simple. Hopefully dyno tuning next weekend to find out I’ve picked up ~ 100 hp
IMG_9951.jpeg
32AAFEA1-A777-4BDB-A429-45971EBED2E3.jpeg

A95F4129-836B-49B2-804F-49F6F6A5073B.jpeg
IMG_9986.jpeg

IMG_0002.jpeg
 
Last edited:

kaymccampbell

Well-known member
Joined
Feb 27, 2015
Messages
29,584
Location
Upstate New York
You didn't run into the thread where I asked about doing this, and got a thoroughly detailed answer:

There are 3 different 3 phase motors driven from main feed and transformer, and as you will see on every VFD advert you can only use one per motor (see link above for why). You CAN buy a solid state phase converter, but they come in around $5k each!!! I can build a rotary converter for a few hundred and the non-electronic electrical system of the mill will be perfectly happy. Also, leaving the wiring all in place means I can just move it into my 3ph shop if and when I get building up and wired.
Oh well. March on.
 
To avoid these ads, REGISTER NOW!
Top Bottom