To avoid these ads, REGISTER NOW!

Silicone caulk

Jsf721

Well-known member
Joined
Dec 23, 2012
Messages
4,129
Location
LI, NY
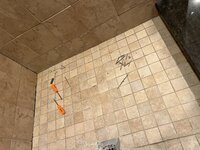
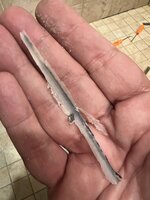
I need a good caulk remover. I’m working on regrouting my shower. The clear silicone caulk failed and it got moldy behind it. Removing it is a bear. Inch by inch. Any effective caulk removers ? Bits in a groove between the floor and the wall.

Been dreemeling out grout.

ThanksIMG_8697.jpegIMG_8696.jpegIMG_8695.jpegIMG_8694.jpegIMG_8693.jpeg
 

Attachments

  • IMG_8692.jpeg
    IMG_8692.jpeg
    951 KB · Views: 10
  • IMG_8691.jpeg
    IMG_8691.jpeg
    982.8 KB · Views: 12
Last edited:
To avoid these ads, REGISTER NOW!

JohnC1957

Well-known member
Joined
Mar 19, 2022
Messages
84
Carefully razor blade it out first. I used either white vinegar or 91 strength suoermarket alcholol I can’t remember. spray it with a 20% bleach solution and let it dry
 

rlitman

Well-known member
Joined
Oct 18, 2010
Messages
24,663
Location
Long Island
If you have an oscillating tool then they make a caulk removing tool. I have one and it works great.

James
I have caulk removing blades for my OMT. They rip through caulk like it isn't there. Think of a putty knife that blazes through caulk as if it were butter. The down side (and it's a big one), is that the metal will wear on the surface, leaving a metallic stain on porcelain or stone (and scuff up plastic), that can be as difficult to remove as the caulk itself.

There are silicone removers. I got mine at a local lumber hardware store. You need to get it all off as nothing will stick to cured silicone, not even more silicone.
+1 No matter how good a job you do with the razor, you're not removing the base layer, and unless 100% of the silicone is gone before you caulk again, you're going to have a caulk adhesion failure.
 
OP
J

Jsf721

Well-known member
Joined
Dec 23, 2012
Messages
4,129
Location
LI, NY
I have caulk removing blades for my OMT. They rip through caulk like it isn't there. Think of a putty knife that blazes through caulk as if it were butter. The down side (and it's a big one), is that the metal will wear on the surface, leaving a metallic stain on porcelain or stone (and scuff up plastic), that can be as difficult to remove as the caulk itself.


+1 No matter how good a job you do with the razor, you're not removing the base layer, and unless 100% of the silicone is gone before you caulk again, you're going to have a caulk adhesion failure.
I am painstakingly removing it with a combination of razor blades, picks, scrapers and screwdrivers. I will get it clean if I have to shower in my kids bathroom for another week -lol.

I was going to start a new thread but I’ll ask here -

Can I just grout this area ? Or does it require silicone ? I’d rather not do this again :).
 

PCustoms

Well-known member
Joined
Jul 23, 2011
Messages
23,457
Location
VT
Changes in plane (wall to floor) typically get sealant and not grout.

Who did the original type job?
 
To avoid these ads, REGISTER NOW!

rlitman

Well-known member
Joined
Oct 18, 2010
Messages
24,663
Location
Long Island
I am painstakingly removing it with a combination of razor blades, picks, scrapers and screwdrivers. I will get it clean if I have to shower in my kids bathroom for another week -lol.

I was going to start a new thread but I’ll ask here -

Can I just grout this area ? Or does it require silicone ? I’d rather not do this again :).
Once you get the silicone down to a nearly invisible layer, you can apply a silicone remover paste, let it soak in and scrub if off with a brush (toothbrush or better yet, a slightly more aggressive nylon brush) for a residue-free surface. Lots of options on the market:
Kleen Strip Caulk Remover
Dap Caulk-Be-Gone
Goo Gone Caulk Remover
Permatex RTV Silicone Dissolver
etc.
edit: Applying the paste to a thick layer of silicone CAN cause it to lose it's bond and just fall off in chunks, if you're lucky. But it takes a good deal of soaking time and just-right conditions. By pre-scraping down to a minimum layer, you guarantee the remnants will slough off easily.

PCustoms has it. Changes of plane flex too much for grouts, and even epoxy grouts don't stretch significantly (plus epoxy and polyester grouts are DIFFICULT to work with). Silicone isn't the longest lasting adhesive. It tends to lose it's bond (starting at the "toes") within about 10 years. Life-Caulk (polysulfide) has better adhesion and similar stretch, and lasts a lot longer, if you shop in marine stores and want the longest lasting option. It does have a pretty good selection for color matching, but only comes in gloss finishes.

I've had good luck with sanded caulk that matches my grout in color and texture. When dry, you really can't distinguish where the grout meets the caulk, but when wet, my caulk color seems to lighten more than the grout. I get my polymer modified (sealing not required) grout and matching caulk at Old Country Ceramic Tile in Westbury.
 
Last edited:
OP
J

Jsf721

Well-known member
Joined
Dec 23, 2012
Messages
4,129
Location
LI, NY
Changes in plane (wall to floor) typically get sealant and not grout.

Who did the original type job?
My contactor did this bathroom about 15 years ago, and finished it in grout.

It cracked and I took what did not fall out, out myself and ran a thin bead of clear GE silicone guessing 7-8 years ago. Now I am at it again, but first time removing caulk. It looked really good up until about 3 months ago and last weekend, I started the removal process. Its a slow go and I think by the weekend I will be done. Its slow painstaking work. I cut the larger bead top and bottom with a razor. Pull out what I can with a tweezer, then and pick and screw driver. I have thin film on the tiles and Ill try a remover at the end or a fine sand paper
 
OP
J

Jsf721

Well-known member
Joined
Dec 23, 2012
Messages
4,129
Location
LI, NY
Ok -guys thanks for the tips. The best tool I got to help was a registration blade holder, a straight edge holder and a wide blade.

I’m about 2 hours invested but it’s looking much better. Before I went to sleep I mixed Clorox 75% to 25% warm water into a 32oz bottle and doused the whole thing. Slept with the exhaust fan on and woke up to this !

Tonight I’m going over the whole thing again to remove any caulk film I can find. This project is being made even harder because I was in a car accident and I’m kind of banged up and cannot get flat on my belly to work like I was previously. I hope I heal up fast and totally.

IMG_8737.jpegIMG_8736.jpeg
 
Last edited:

rlitman

Well-known member
Joined
Oct 18, 2010
Messages
24,663
Location
Long Island
...This project is being made even harder because I was in a car accident and I’m kind of banged up and cannot get flat on my belly to work like I was previously. I hope I heal up fast and totally...
Got access to a scrap couch cushion?
 
OP
J

Jsf721

Well-known member
Joined
Dec 23, 2012
Messages
4,129
Location
LI, NY
So just to sum this part I call the prep work what I learned from all the advice above, get the right tools - I was killing myself using the wrong stuff just because I did not know what the right tools were. Thanks very much guys. What worked best are posted in post #12. Used about 10 blades in each over the course of the evening. I could not believe how many sparks those blades created with all the scraping. I also could not believe how much grout I pulled out along with the caulk. I have almost zero grout in the space where the lowest wall tile meets the floor. It came out scraping with the blades getting the caulk out.

SO my thought on the next step - I have never done this before so feel free to correct my process or materials-Thanks

So the next step will be to re grout the gap where the wall meets the floor. I plan on buying the sanded grout with the additive that makes it stain resistant. Any suggestions on the best way to get it into the gap? I am thinking tape above and below gap with blue tape and put in zip lock freezer bag, cut corner and pipe in, run finger in wet nitrile glove to press into gap. Pull tape, use wet finger to smooth ridge caused by tape, let sit until mostly set and wipe with wet sponge. when perimeter is done and dry (hardened) then use a float to do the floor area with grout. let set up 80% and wipe with wet sponge till clean.

Once that is done, do i need to re caulk the gap between the floor and walls?

Thanks
 

PT Doc

Well-known member
Joined
Nov 12, 2010
Messages
3,197
So just to sum this part I call the prep work what I learned from all the advice above, get the right tools - I was killing myself using the wrong stuff just because I did not know what the right tools were. Thanks very much guys. What worked best are posted in post #12. Used about 10 blades in each over the course of the evening. I could not believe how many sparks those blades created with all the scraping. I also could not believe how much grout I pulled out along with the caulk. I have almost zero grout in the space where the lowest wall tile meets the floor. It came out scraping with the blades getting the caulk out.

SO my thought on the next step - I have never done this before so feel free to correct my process or materials-Thanks

So the next step will be to re grout the gap where the wall meets the floor. I plan on buying the sanded grout with the additive that makes it stain resistant. Any suggestions on the best way to get it into the gap? I am thinking tape above and below gap with blue tape and put in zip lock freezer bag, cut corner and pipe in, run finger in wet nitrile glove to press into gap. Pull tape, use wet finger to smooth ridge caused by tape, let sit until mostly set and wipe with wet sponge. when perimeter is done and dry (hardened) then use a float to do the floor area with grout. let set up 80% and wipe with wet sponge till clean.

Once that is done, do i need to re caulk the gap between the floor and walls?

Thanks
That sounds like a good plan and should result in a good clean line.
 

duneslider

Well-known member
Joined
Jan 20, 2013
Messages
2,268
Location
Riverton, Utah
I don't even know where to start here...

Did you put silicone caulk over the grout in the WHOLE shower? Please say no...

You need to remove at least 2/3rds of the grout in the joint before trying to regrout or it will just want to keep falling out. The grout in that whole shower looks not great (maybe its just the pictures).

For grouting just do it the way it is intended, mix the grout, use a grout float and push it in, let it set and clean up. Follow the instructions, watch some youtube videos, etc. Trying to do it with a "grout bag" is way more work than its worth.

For caulking, you can get colorized sanded siliconized latex caulk.

Mold and mildew only grow if its staying wet, or water is getting trapped. Tile and grout isn't waterproof and putting silicone over everything will just make it worse. You need to figure out how to get the shower to dry between uses.
 
To avoid these ads, REGISTER NOW!
Top Bottom