To avoid these ads, REGISTER NOW!

What did you do "IN" your garage today?

ZRX61

Well-known member
Joined
Aug 15, 2006
Messages
28,716
Location
Solar Blight Valley, SoCal
Wasn't happy with the two smallest pieces of body kit for the F350. Wet sanded @ #320.

Guide-coated the two middle pieces for #320 wet tomorrow

Can't do anything with the two 10ft pieces as my outside "workbench" which consists of three trashcans is shortened to one trashcan until the other two are emptied tomorrow.

Dug through my autobody sanding blocks* & added a couple more to this project.


* I have a ****-ton, from about 1in up to 3ft.
 
To avoid these ads, REGISTER NOW!

kaymccampbell

Well-known member
Joined
Feb 27, 2015
Messages
29,592
Location
Upstate New York
As far as in the “main” garage, still cleaning up this 460 block. Lots of wd-40 and wiping. Cylinders are cleaning up okayish.
The 460 runs fine on OK-ish. I've revived a pair of sunk 460s by pulling the heads, blowing and pumping out what water I could get out of it, leaving the light rust alone, spraying everything with penetrating oil, replacing the gaskets, lighting them off and changing the oil at frequent intervals for the first couple days. They're way beyond tough.
 

DAVE94LIGHTNING

Well-known member
Joined
May 24, 2024
Messages
198
I wish had known. I sold some parts over the weekend. I wasn't even planning on selling the wheel. But the guy asked about it and made an offer. I would have sent it your way no charge. Share some pics if you get the new 86.
I looked at the car but passed on it. The 86GT is something I’ll have to own again at some point in my life so the search continues 👌
 

bugnut

ALLIANCE MEMBER
Joined
Jul 14, 2012
Messages
3,974
Location
Central Ohio
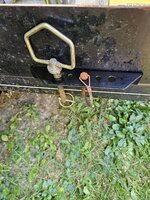
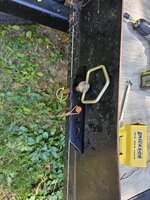
Made a pin holder for the small tilt trailer. When the pin is removed to let the trailer tilt there's no easy place to store it. I also wanted to have a spare in case of loss. Fabbed a bracket/holder from a pc of leftover angle iron, painted and installed. Extra holes for part storage! All done.
 

Attachments

  • 20240916_125650.jpg
    20240916_125650.jpg
    1.1 MB · Views: 41
  • 20240916_125656.jpg
    20240916_125656.jpg
    1.5 MB · Views: 24
  • 20240916_125710.jpg
    20240916_125710.jpg
    725.1 KB · Views: 21
  • 20240916_130447.jpg
    20240916_130447.jpg
    1 MB · Views: 21
  • 20240916_130451.jpg
    20240916_130451.jpg
    958.2 KB · Views: 22

PassnThru

Well-known member
Joined
Jan 5, 2010
Messages
6,512
Location
Bowling Green KY
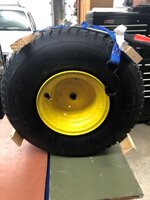
Then got in a wrestling match with a mower tire. I got the old one off and the new one on easy enough. But when I tried to seat the bead it was having none of that. Tried a ratchet strap and the bucket method, but no go. I looked around the shop for some starting fluid, but only had nonflammable brake cleaner, electrical cleaner, mapp gas and bug spray. Tried all of those, but still no go. I'll get some starting fluid and carb cleaner tomorrow and hit it again.

Tire - 6; Me - 0.
20240916_160021.jpg
Get some short pieces of wood around the tire so the strap doesn't dig into the middle only. Mower rear tire 2.jpg
 

CoogarXR

Well-known member
Joined
Jan 11, 2016
Messages
6,865
Location
Ohio
Installed my just-fixed amp (this one- https://www.garagejournal.com/forum...-do-in-your-garage-today.126997/post-10849398) in my van. It fit nicely under the seat. Running the wires to it was a *****, as the van is a 30-year-old winter driven van, so all the trim screws were rusted solid around the door jambs. And the seat bolts were too rusty to move, so I couldn't cheat and sneak a ground under there. I had to drill and grind a new ground. Oh well, the amp is in, and it's nice and loud compared to just the old CD player by itself.

Funny thing is, I had an old passive EQ that I had bought new back in the day that I was going to install too. But it was dead. Wouldn't power up at all. Strange, it worked when I took it out about 20 years ago, and it's been in a nice dry cabinet all these years. I'll have to pop it open and see what the deal is.

But at least the amp (and sub) are out of the garage, and into a vehicle where they can be enjoyed. Part of my big garage purge is not only cleaning, selling and tossing, but deciding to actually USE **** that's been sitting if I insist on keeping it.
 

DGersic

Well-known member
Joined
Mar 12, 2017
Messages
6,359
Location
DeKalb, IL
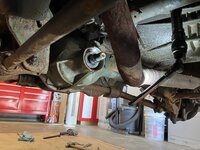
Replaced the front diff pinion seal.

IMG_5918.jpegIMG_5917.jpeg

Then figured that since I already had it jacked up and the wheels off, I might as well change the oil and grease the suspension, so I did that too. Cleaned up.

Backing out after, had no brakes. Blew the rear brake line. Sprayed brake fluid all over the driveway. Eased it down the driveway and parked in the street. It’s a manual trans, so not hard to control without brakes.

Ordered a 25’ coil Of NiCop.
 

Outlawmws

Well-known member
Joined
Aug 9, 2011
Messages
39,302
Location
The Badlands
I finally got going on my long desired nickel plating: I spent 36 or so hours "cooking" the nickle acetate, then changed the setup and tried a test piece.

I needed nickel and am starting with 3/32 nickel arc welding rods with the flux removed.

The Acetate "Base" is Heinz 5% vinegar with a pinch or two of salt added for better conductivity.

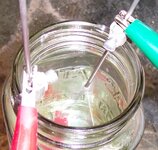
I wanted this to be portable so the "power supply" is my power source for recharging USB devices - an old 12V UPS battery, A car lighter socket, and a USB adapter;

To that I plug in a regulated Power supply I got off Amazon - https://www.amazon.com/PEMENOL-Adjustab ... 52KR?th=1 - You know you can find nearly anything USB powered? I even found a USB powered aquarium air pump and stone - to be added later for larger plating jobs to agitate the acetate...

I made a spacer from a piece of a Glad lunch meat cover, punched with 3/32 holes using a Whitney Jr. #5 punch This worked perfectly fine, but I'll make a few more in different sizes with a bit of an angle left on so they are more rigid.

The top of jar bits on the rods are to help keep the rods from just falling over. I can make a copper half loop to really lock then down, but this can't be done for the acetate brewing as the rods are positive and neg, anode and cathodes, simply loading the vinegar with nickle.

I used test leads to make the connections; I added 14 ga. "lugs" with a small loop bent on to the PS so I can use simple clip on test leads:
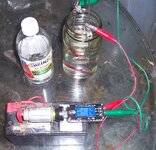
Plating-setup-Acetate-generation-1.jpg

A note on the Test leads- These are too heavy and tend to drag things around. I have some super light ones that won't pull on things and I'm concerned that I not short the stuff inside the plating jar, so at these voltages and amps some really thin light ones create less drag, I will also add a fuse to the circuit, so If I do short it then the fuse dies, not my PS!


Voltage set to as close to 3V I could:

Plating-setup-Acetate-generation-2-Voltage-Amps.jpg

And immediate fizzing:

Plating-setup-Acetate-generation-3-fizz.jpg

Plating-setup-Acetate-generation-4-fizz.jpg

The amperage slowly climbed as the nickel content of the Acetate climbed, to about .0078. This "cooked" for about 36 hours:

About noon today I connected my smaller solar panel as it was handy. I could have setup a charger, but in the spirit of "Off grid - Portable" I opted for solar -I didn't need to - it had only dropped about a quarter of a volt for the entire 30 hour "burn" to that point.

ting-setup-Acetate-generation-5-about-ready-to-tes.jpg

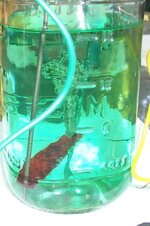
After the 36 hours give or take, I decided the nickel acetate was done (Nice and green) and removed the negative and clipped the two bars together:

Plating-setup-Acetate-generation-6-Setup-tpo-plate.jpg

The Test Subject, a house key - I cleaned it, fine wire wheeled it, cleaned some more, Final clean in Vinegar, and "polished" with Paper towel not touching it directly with my fingers.
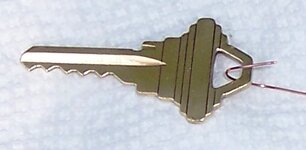
Plating-setup-Acetate-generation-7-test-subject.jpg

Then hung it in the jar of Acetate so its not touching the nickel bars:

Plating-setup-Plating-test-8.jpg


Immediate fizz:

Plating-setup-Plating-tesr-8a.jpg


It was still at the acetate cooking voltage and the amps jumped to >0.2A - so I turned it down :

Plating-setup-Plating-test-9-voltagr.jpg

Plating-setup-Plating-test-10-lower-voltagr.jpg


This dropped as the plating progressed:

Plating-setup-Plating-test-11-lower-voltagr.jpg

I checked and turned it every ten min for a full hour and pulled it, cleaned it and polished it:

Finished key on the left, a factory plated key on the right. I'm happy with the results for a first piece:

Plating-setup-Plating-test-12-test-Compare.jpg
 
To avoid these ads, REGISTER NOW!

BlakeTheCarGuy

ALLIANCE MEMBER
Joined
Oct 10, 2018
Messages
9,384
Location
Roanoke Virginia
Put an ammeter on the fuel pump positive wire. I used to use a jumper wire in place of the relay and clamp the meter on it. IIRC, amperage on a healthy pump usually ran around 4 amps.
We found the issue. Something really stupid that we both overlooked and that’s someone screwed around in the fuse box and moved all the fuses up one slot. Fixed the order they were in with correct fuses and it fired right up. But the good thing is I learned from it and the guy who helped me made bank on it lol. Also customer just randomly called right before we finished and requested a new alternator for it so installed that too. Now it’s out of sight and out of mind. But we both know now to look at the fuses more carefully next time.
 

Fix Until Broke

Well-known member
Joined
Feb 21, 2016
Messages
795
Location
SE Wisconsin
Blake - glad you figured that one out, it would have stumped most people for sure. I had a similar experience - customer stated the car was a 2003 but was actually a 2004 (my fault for not confirming) Spent a full day tracking down an electrical issue and just couldn't make sense of the schematics. Most things were right, but a few in circuits I was troubleshooting were slightly different. Tried it again with a 2004 schematic and had it figured out in ~15 minutes :).

Always confirm the simple stuff first :)
 

rharman

Well-known member
Joined
Apr 22, 2012
Messages
8,886
Location
SoCal
Grabbed my 3" holesaw and drill. Cleaned up around the sprinklers again. Ordered a 3-1/4" saw for it - would like a bit more clearance around the sprinkler heads. Cleaned up the saw, arbor, and drill and all put away.

Dumped the garage waste basket into the big trash can - trash day tomorrow...
 

Bob Heine

ALLIANCE MEMBER
Joined
Oct 24, 2009
Messages
10,707
Location
Boca Raton, Florida
Grabbed my 3" holesaw and drill. Cleaned up around the sprinklers again. Ordered a 3-1/4" saw for it - would like a bit more clearance around the sprinkler heads. Cleaned up the saw, arbor, and drill and all put away.
Roger, I like that idea. St. Augustine runners can cross a sprinkler head in a week when it's growing season. I have concrete donuts around my small Toro heads and there are a number of Rainbird pulse heads so I'd need a 6" holesaw. It would probably be best if it were carbide tipped so not the cheapest solution but we all know the 'buy once, cry once' motto.
 

BlakeTheCarGuy

ALLIANCE MEMBER
Joined
Oct 10, 2018
Messages
9,384
Location
Roanoke Virginia
At the moment working on a 2003 Tacoma timing belt. Man it’s a chore. It’s rusty as heck and bolts rounding off and everything. Everyone says old stuff is easier to work on but I don’t always believe that lol. Also there is a bunch of hoses in the way of the bolts on the side. And then the puller for the crank pulley is too big and we have tried wedging pry bars in there and everything. Hopefully it will budge. It’s lunch time now though maybe after it we can get it to work better. If it wasn’t so rusty it would probably be a lot better and easier.
 

rharman

Well-known member
Joined
Apr 22, 2012
Messages
8,886
Location
SoCal
Grabbed my 3" holesaw and drill. Cleaned up around the sprinklers again. Ordered a 3-1/4" saw for it - would like a bit more clearance around the sprinkler heads. Cleaned up the saw, arbor, and drill and all put away.

Dumped the garage waste basket into the big trash can - trash day tomorrow...

Roger, I like that idea. St. Augustine runners can cross a sprinkler head in a week when it's growing season. I have concrete donuts around my small Toro heads and there are a number of Rainbird pulse heads so I'd need a 6" holesaw. It would probably be best if it were carbide tipped so not the cheapest solution but we all know the 'buy once, cry once' motto.

Our back lawn is St. Augustine so I understand. The front fescue covers pretty quickly as well.

I'll suggest making a guide out of 1x12 so you can hold that down with your foot. That 6" holesaw is really going to jump trying to get started without a pilot bit. My 3" saw jumps some so I can imagine the 6" will be a bear.

Also ensures you don't saw through the sprinkler top. Not that I'd have any experience with that.... :cool:
 

GarageHobbyist

Well-known member
Joined
Feb 18, 2024
Messages
364
Location
Illinois
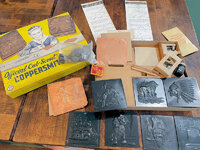
It's also a neat flashback for me. As a Cub Scout in the 1950s one of our projects was hammering a sheet of copper into an ash tray. It was important for 10-year-olds to carry an ash tray wherever we went so our butts wouldn't set the woods on fire.
Cub Scout Coppersmith Kit.jpg
That's hilarious.
Is this your kit? I'll have to keep an eye out for one. I was in scouts, but we never had a kit like this.
 

Fixr

Well-known member
Joined
Dec 23, 2012
Messages
9,708
Location
SW VA
At the moment working on a 2003 Tacoma timing belt. Man it’s a chore. It’s rusty as heck and bolts rounding off and everything. Everyone says old stuff is easier to work on but I don’t always believe that lol. Also there is a bunch of hoses in the way of the bolts on the side. And then the puller for the crank pulley is too big and we have tried wedging pry bars in there and everything. Hopefully it will budge. It’s lunch time now though maybe after it we can get it to work better. If it wasn’t so rusty it would probably be a lot better and easier.
I'm doing timing belt & water pump on our 06 Highlander hybrid. My IR231 1/2 inch impact that I got some time in the 80s won't budge the crankshaft pulley bolt even using a 1/2 inch air hose and unregulated air pressure from a 2 stage compressor. Neighbor brought over his newer options and I'll see if something works after I finish lunch.
 

BlakeTheCarGuy

ALLIANCE MEMBER
Joined
Oct 10, 2018
Messages
9,384
Location
Roanoke Virginia
I'm doing timing belt & water pump on our 06 Highlander hybrid. My IR231 1/2 inch impact that I got some time in the 80s won't budge the crankshaft pulley bolt even using a 1/2 inch air hose and unregulated air pressure from a 2 stage compressor. Neighbor brought over his newer options and I'll see if something works after I finish lunch.
We have a holding tool here. We held it and managed to get a huge 1/2 ratchet and the strongest guy in the shop to break it loose. Impact wouldn’t fit lol.
 
To avoid these ads, REGISTER NOW!
Top Bottom