To avoid these ads, REGISTER NOW!

Imperfections in garage curb wall

unclebones

Member
Joined
Dec 16, 2021
Messages
17
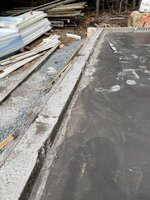
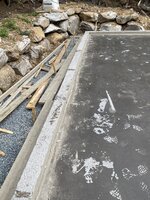
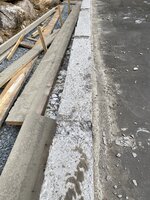
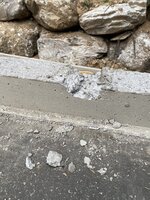
Hey there, just had my garage slab poured yesterday, the slab turned out good but the 3.5x6”curb wall was a different story, there was quite a few imperfections and never got finished properly, the forms bowed out for one but i can deal with that, the issue i have is 1 form got pulled off to early and took some of the concrete with it, but that was only one section, and 2 the supports to hold the curb on weren’t pulled quick enough and finished so there’s like a 3/4 inch gap in the concrete, so what i was wondering is there a product i can use to fix these issues, a grout or hand mix a bag of concrete to fix, i’ll try and attach photos, thanks
 

Attachments

  • IMG_4960.jpeg
    IMG_4960.jpeg
    1.3 MB · Views: 180
  • IMG_4958.jpeg
    IMG_4958.jpeg
    1.1 MB · Views: 169
  • IMG_4963.jpeg
    IMG_4963.jpeg
    1.4 MB · Views: 165
  • IMG_4957.jpeg
    IMG_4957.jpeg
    1.2 MB · Views: 160
  • IMG_4962.jpeg
    IMG_4962.jpeg
    1.3 MB · Views: 160
  • IMG_4961.jpeg
    IMG_4961.jpeg
    1.3 MB · Views: 174
To avoid these ads, REGISTER NOW!

jack stand

Well-known member
Joined
Feb 29, 2012
Messages
3,360
Location
Lakes Region Maine
Honestly, your 2x6 wall will cover a lot of those "blemishes".
Once you finish the wall you could trowel in some parging mix.
If you're closing in the walls a 6" 1x6 baseboard will hide it all. I would mud in anything like that little chunk that's all the way through before you put down your green plate.
 

ConCretin

Well-known member
Joined
Jan 20, 2011
Messages
3,379
Location
Central Maine
Imperfections?!! Bug holes or the odd rock pockets are imperfections! That's an absolute mess! It can be cleaned up and will probably serve it's purpose but that's **** work and it's not just the damage, it was a hack forming and topping job too.

I'm curious just how long it was after placement that they stripped those forms.
 
OP
U

unclebones

Member
Joined
Dec 16, 2021
Messages
17
yea the back wall ended up bowing out 2-3 inches, may be hard to tell by the picture, i ended up striping the top supports for the curb , hoping they would use some cream to fill in the holes, but it was pretty well too hard by than
 

Attachments

  • IMG_4943.jpeg
    IMG_4943.jpeg
    1.4 MB · Views: 150

LXCam

ALLIANCE MEMBER
Joined
Apr 23, 2013
Messages
19,204
Location
AZ
yea the back wall ended up bowing out 2-3 inches, may be hard to tell by the picture, i ended up striping the top supports for the curb , hoping they would use some cream to fill in the holes, but it was pretty well too hard by than
That bow is a **** show. The rest can be sacked and patched. Good luck.
 
OP
U

unclebones

Member
Joined
Dec 16, 2021
Messages
17
That bow is a **** show. The rest can be sacked and patched. Good luck.
as of now i’m thinking on throwing some stright boards up and hand mixing some bags and get the back wall a little straighter, than maybe chock line and saw cut a notch out of the back so i can still overhang my plywood a half inch, or just make up some flashing so water doesn’t come in under the sill
 
OP
U

unclebones

Member
Joined
Dec 16, 2021
Messages
17
Good point. I actually had second thoughts after posting. I usually try to be helpful rather than critical.
it’s all good i knew it was kind of bad, that must be why most guys around here want to do the curb pour on its own the next day, i thought it looked doable as a mono pour, so it’s half my fault doing it that way, what would be the best way to fix some of the chips out of it to smooth it out, some non shrink grout or something
 

PCustoms

Well-known member
Joined
Jul 23, 2011
Messages
23,517
Location
VT
It looked like some property I've been to in Maine, so Nova Scotia makes sense.

You pour this yourself?

I'd trowel some repair mortar in the curb. I think you're spot on with re-forming the bow, but I would use some bonding agent and structural mortar packed tight to fill it.
 

ConCretin

Well-known member
Joined
Jan 20, 2011
Messages
3,379
Location
Central Maine
it’s all good i knew it was kind of bad, that must be why most guys around here want to do the curb pour on its own the next day, i thought it looked doable as a mono pour, so it’s half my fault doing it that way, what would be the best way to fix some of the chips out of it to smooth it out, some non shrink grout or something
I'd avoid non shrink grout. It's difficult to work with. I'd do a little bushing on the high spots, run a grinder over it and fill the voids. Our go to product these days is Silpro TDQ. It's a fast setting repair mortar that can fill deep areas and feather out to nothing. It's a decent color match too.

Just out of curiosity, did they strip the same day as they poured or was it the next day?
 
To avoid these ads, REGISTER NOW!
OP
U

unclebones

Member
Joined
Dec 16, 2021
Messages
17
It looked like some property I've been to in Maine, so Nova Scotia makes sense.

You pour this yourself?

I'd trowel some repair mortar in the curb. I think you're spot on with re-forming the bow, but I would use some bonding agent and structural mortar packed tight to fill it.
yes lots of spruce trees and maples here, and lots of rock too lol, no someone else came and poured it
 
OP
U

unclebones

Member
Joined
Dec 16, 2021
Messages
17
I'd avoid non shrink grout. It's difficult to work with. I'd do a little bushing on the high spots, run a grinder over it and fill the voids. Our go to product these days is Silpro TDQ. It's a fast setting repair mortar that can fill deep areas and feather out to nothing. It's a decent color match too.

Just out of curiosity, did they strip the same day as they poured or was it the next day?
 
OP
U

unclebones

Member
Joined
Dec 16, 2021
Messages
17
ok that brand product might be a little hard to find around here, but there might be something similar under a different name, and i striped the curb supports while they were finishing, thought they might get some of those areas, and pulled one leanth of the inside curb board and that’s when the inside of the wall pulled off a bit and looks rough, i striped everything else yesterday, the day after it was poured, the inside of the curb wall and outside forms, but i would like to try and do something about it today so it has its best chance of color matching, hopfully
 

Fav Onefour

Well-known member
Joined
Jul 14, 2022
Messages
725
Location
MN cold and hot
Bummer.
Do it right do it once. There is a reason.
You should be doing framing instead of repair.

Spend the time now and get the curbing fixed. The stuff is still green. Maybe it's an option to knock off the curb and have the guys do it right.
Believe me, the idea of patching is one you will deal with for the rest of your build and afterword. Crooked and rough isn't a good base. Is it even level?

I don't like coming off sounding like a bi**h session, but I know myself. I'd curse that curbing throughout the build and afterword when the form groove causes issues.
 

Viper98912

Well-known member
Joined
Oct 20, 2012
Messages
1,132
Location
GA
Bowed curb? No problem, just buy your wood at home depot, it'll come pre-bowed for you.


just kidding folks, I like HD.
 
OP
U

unclebones

Member
Joined
Dec 16, 2021
Messages
17
Bummer.
Do it right do it once. There is a reason.
You should be doing framing instead of repair.

Spend the time now and get the curbing fixed. The stuff is still green. Maybe it's an option to knock off the curb and have the guys do it right.
Believe me, the idea of patching is one you will deal with for the rest of your build and afterword. Crooked and rough isn't a good base. Is it even level?

I don't like coming off sounding like a bi**h session, but I know myself. I'd curse that curbing throughout the build and afterword when the form groove causes issues.
yea the only good part about is it’s fairly close to level, adding the sill gasket should hide the little roughness in it, ill probobly just patch the deep holes in the curb with whatever are local hardware store has witch i think is sakrete top and bond , than drill and bolt my sill plate on stright and block the little bit of overhang on the inside with some scrap wood, than just stick frame the wall instead of trying to stand the wall
 

LXCam

ALLIANCE MEMBER
Joined
Apr 23, 2013
Messages
19,204
Location
AZ
I’d suggest some Z flashing on the back side to waterproof your sill plus it’ll help hide it visually. Once you determine the edge or centerline of you wall you’ll be able determine how much offset you’ll need.
 

PCustoms

Well-known member
Joined
Jul 23, 2011
Messages
23,517
Location
VT
yea the only good part about is it’s fairly close to level, adding the sill gasket should hide the little roughness in it, ill probobly just patch the deep holes in the curb with whatever are local hardware store has witch i think is sakrete top and bond , than drill and bolt my sill plate on stright and block the little bit of overhang on the inside with some scrap wood, than just stick frame the wall instead of trying to stand the wall
I think I know what you mean, but never used that terminology like that before....

You could run a double plate.

First plate gets bolted down straight/square. Wall gets framed, then stood up. Probably need 2 sets of anchors though
 
OP
U

unclebones

Member
Joined
Dec 16, 2021
Messages
17
I’d suggest some Z flashing on the back side to waterproof your sill plus it’ll help hide it visually. Once you determine the edge or centerline of you wall you’ll be able determine how much offset you’ll need.
yes that was my plan anyway so i think it will work out good as i was going to run insulation up the side and z flash it
 
OP
U

unclebones

Member
Joined
Dec 16, 2021
Messages
17
to "hide" the bow in the curb wall, you could frame the walls with 2x6 and let them hang over the curb walls , keeping them straight . it will be noticeable to a trained eye but could relieve a lot of framing issues .
yea that’s what a buddy who frames said, as long as i’m getting a good 3.5 inches it’s fine, as it’s only a gable end, he said if i want to please the inspector i could put the odd piece of blocking the same size as overhang right to the floor to finish that bit of bearing
 
OP
U

unclebones

Member
Joined
Dec 16, 2021
Messages
17
I think I know what you mean, but never used that terminology like that before....

You could run a double plate.

First plate gets bolted down straight/square. Wall gets framed, then stood up. Probably need 2 sets of anchors though
yes i was going to “stick frame” as we call it here, bolt sill plate down and toe nail all the studs in place, than get staging or ladder and nail in top and double top plate, no need on getting a bunch of guys to stand a 32’ 12’ high wall
 

CraigStu

Well-known member
Joined
May 22, 2014
Messages
4,057
Location
Blacksburg, Va
I'd rather stand up four 8ft or two 16ft walls than toenail the whole thing. Build them w/ a single top plate and then span the joints w/ the second top plate. Also span your joints w/ the osb(?) sheathing.
 
To avoid these ads, REGISTER NOW!
Top Bottom