DAVE94LIGHTNING
Well-known member
- Joined
- May 24, 2024
- Messages
- 198
Finished Fabbing the material racks. I’ll mount them on the wall this weekend and get my steel tubing off the floor.
Last edited:


Luckily Im on the east coast and far north of it.Just stay safe from that storm!


Funny. I spent the last few days checking off 'fix it' lists from our last trip camping too.Still cleaning up putting away and completing my "fix it list" I started while camping.
Went through the canopy pole set and marked then as to what goes where likel I've promised myself for years to do. reassembly will not e much faster. I added vinyl tape to the leg sections so I can assemble easier when alone, and not have the legs fall off. vinyl will be able to be reused within reason. I got all the poles to fit in the aluminum case I keep the poles in, - Something i was off by one short section on the camp reload - I had added 3 short sections to make it wider and carried those up loose...
Lemon oiled the bare wood "top deck" of the big 5 gallon wash station as the wood is drying out. Its old rough sawn fence wood with piece aided to the edges to help keep things from falling/rolling off so easy, and some blocking on the bottom so it sits as level as the can is.
Reorganized the parts/tool boxes in the van again so the cooler and the reserve tank fit in a way that allows me to access either, easily. I'm thinking about making a low deck back there for storage of loose smalls, maybe with a drawer or two?
Made leveling ramps from scrap redwood: 1-1/2 - 3" H in 2 stages, x 18L overall and 8 W. This way I can work with not level spaces more easily. important if I'm sleeping in the van.
Sleeping bag was aired out and put away and some of the cleaned laundry put away like the Flannel sheet I primarily used and some other things
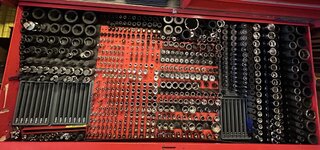
Do what I did with my 06, sell and move on. I know, I'm not much help. It was a great truck, but it was starting to fail in too many ways for me to want to keep it.Replaced the two back spark plugs & coils in my 05 F150 5.4L 3v, still has the light throttle stumble/miss. Back in January 2022 I replaced 6 of the 8 spark plugs & the coils. I did not replace the back plug on each side because they are tucked under the firewall & they are a PITA to get at & my back was hurting from laying across the front of the truck & the engine to be able to change the other 6. A couple weeks ago I drove to Florida to visit my 2 older brothers & the truck developed a light throttle stumble/miss at about 40-55 mph. I had 2 more new spark plugs & coils so yesterday & the day before I replaced the back one on either side. No change it still has the stumble/miss. I used the proper updated Motorcraft spark plugs & new Bosch coils. My thinking is that I have either a coil or a spark plug breaking down under light load, so I ordered a new spark plug & a new coil & I am going to start removing one at a time the six I replaced 2 years ago & replace them with the new ones & road test it each time I change one out to see if I can find which one is causing a problem unless there is something obvious when I remove it. Sound like a plan? Any suggestions?
Use a scan tool, Ford has a great power balance/misfire function.Replaced the two back spark plugs & coils in my 05 F150 5.4L 3v, still has the light throttle stumble/miss. Back in January 2022 I replaced 6 of the 8 spark plugs & the coils. I did not replace the back plug on each side because they are tucked under the firewall & they are a PITA to get at & my back was hurting from laying across the front of the truck & the engine to be able to change the other 6. A couple weeks ago I drove to Florida to visit my 2 older brothers & the truck developed a light throttle stumble/miss at about 40-55 mph. I had 2 more new spark plugs & coils so yesterday & the day before I replaced the back one on either side. No change it still has the stumble/miss. I used the proper updated Motorcraft spark plugs & new Bosch coils. My thinking is that I have either a coil or a spark plug breaking down under light load, so I ordered a new spark plug & a new coil & I am going to start removing one at a time the six I replaced 2 years ago & replace them with the new ones & road test it each time I change one out to see if I can find which one is causing a problem unless there is something obvious when I remove it. Sound like a plan? Any suggestions?
That probably set him back a pretty penny. Mine is made from stuff from the scrap pile. I mostly only use it when I need to have a bit more counterbalance.Kay, I thought of you today. I was driving behind a guy that had a dingo on his trailer. He had what looked like an aluminum diamond plate step on the back.
Ya, I was thinking about what you were saying about the step the other day. I probably wouldn’t have even noticed the dingo if it weren’t for your posts here, now I want one..lolThat probably set him back a pretty penny. Mine is made from stuff from the scrap pile. I mostly only use it when I need to have a bit more counterbalance.
They're stupid expensive nowadays. $32K for the smallest one, which is still musclier than mine. Though not so much after this weekend.Ya, I was thinking about what you were saying about the step the other day. I probably wouldn’t have even noticed the dingo if it weren’t for your posts here, now I want one..lol
Kay, did you take the hydronic arm off of the right side of that Dingo? It looks like it only has one arm?They're stupid expensive nowadays. $32K for the smallest one, which is still musclier than mine. Though not so much after this weekend.
Do you have acreage? Or need to handle heavy loads? Or have a big landscaping need? Otherwise it'd be a waste. A fun one, though.
Mine is a TX413. It only has a single arm, versus all the other TXxxx series, that have dual arms. If you look, the dual arms of the other models are about the same total size as the one on mine. Mine has bigger root pivot bearings.Kay, did you take the hydronic arm off of the right side of that Dingo? It looks like it only has one arm?
I have zero use for one, but that doesn’t change a thing.lolThey're stupid expensive nowadays. $32K for the smallest one, which is still musclier than mine. Though not so much after this weekend.
Do you have acreage? Or need to handle heavy loads? Or have a big landscaping need? Otherwise it'd be a waste. A fun one, though.
Was it painted before? Don't paint it again - use an exterior stain. Then all you have to do is occasionally pressure wash it and apply more stain. No more sanding.
Probably. But she was escorted to another spot on the property, and so far has not been back.Looked like he might be a pregnant she.

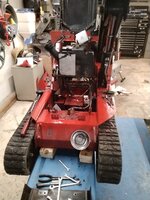
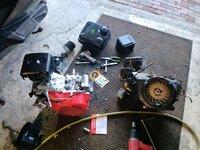
Love those Predator replacements. Sometimes it's nice to just start over with a fresh engine.Disassembled, cleaned, painted and puzzled out the Dingo.
Started prepping the new motor. Pulled off what I didn't want. Installed what I can. Waiting for Charlie to help me lift it into the engine bay.
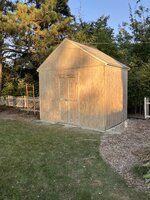
You realize that many of us see these posts on a very public screen? You are setting a standard that could cause a bit of family row over just how far something on the Honeydo list can go.Finished sanding the shed. Ended up taking it down to bare wood. Wasn’t going to do that, but here we are.



How often does your house get audited for code violations?Well I learn something I can't do. I cannot install a pet door in the garage to house door. It's a code violation. They do however make fire rated pet doors at 10X the price. No thanks, my knees work just fine. Unfortunately my purchased specialty sheet metal cutting tool is going back.
Sorry ‘bout that.
I wasn’t planning to take it this far.
I started with just a putty knife, was going to scrape off the loose bits, then prime and paint. I have a couple of gallons of primer left over from painting the house last year, so using them up is free, gets them out of my way, and I’m already painting the garage so doing the shed now at the same time seemed like a good idea.
Once the really loose bits were off, I was going to do like I did the garage (prepped, but not painted yet) with the Bauer Surface Conditioning Tool.
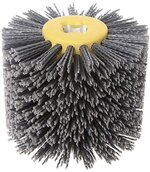
I didn’t intend to go to wood, I was just going to scuff the surface for better adhesion. I had one of these brush heads from the house painting last year, and had already scuffed the garage with it. So it was a bit worn down, but it’s just an 8x12 shed, so I figured it’d be enough. The T-111 siding is pretty rough, and has those grooves in it, so the brush seemed perfect.
I started that. It didn’t work out as well as I’d hoped. It was taking off more paint than I expected. Also, the bristles were breaking and coming off, leading to a less effective brush. So I got another one, and ran that down too. It is good for the grooves, but the flat surfaces were getting rougher as some of the paint was coming off, and some was still stuck.
Two sides were done, two to go, and both brush heads were pretty ragged looking. So I switched to this 40 grit head. And, hey, look, bare wood.
I did wear out this head, and two more. And made a hell of a mess, with dust everywhere.
I had not intended to go this far. It’s project scope creep. I should probably have either started with the 40 grit and saved the time wasted in scraping and the brush heads, or torn the siding off and replaced it. But, here we are.
I have a couple delaminated places in siding on the back of the shed that need to be fixed. I might be replacing those pieces, I need to get a better look at them and decide what I’m doing.
I’m hoping to get the garage and shed painted next week. The. Those two will be off of my mental “to do” list, and I can get back to the other projects. This “being retired” thing is a lot of work.
Well I learn something I can't do. I cannot install a pet door in the garage to house door. It's a code violation. They do however make fire rated pet doors at 10X the price. No thanks, my knees work just fine. Unfortunately my purchased specialty sheet metal cutting tool is going back.
How often does your house get audited for code violations?
If you ever sell the house, replace the door before putting it on the market.