To avoid these ads, REGISTER NOW!

What did you do "IN" your garage today?

BlakeTheCarGuy

ALLIANCE MEMBER
Joined
Oct 10, 2018
Messages
9,384
Location
Roanoke Virginia
Not much at work today. They ran out of work about 2pm. But when there was work I done front brakes and machine rotors on a RAV4 and then a 40K on a different RAV4 too. 40K is oil change, tire rotation, front differential drain and full and both air filters. Other than that it was it and I helped out some of the flat rate guys with their work too. My coworker brought me in boxes and boxes of DVDs and man was I excited lol. I spent the remainder of the day looking at all my new DVDs.

About 10am dad texted me saying that cylinder 3 spark plug in my truck blew out again. I suspect it’s because he dogs the heck out of that truck. I don’t like it but I refrain from saying anything because it would be really mean if I did lol. I’m tired of him driving it but don’t have another working vehicle for him right now. I guess I’m going to have to figure out the thread size (head is 13/16) then get a timesert and install it. It done it once last week too and I got the plug to tighten down and I thought it was good. I have never done plugs in it before but I thought maybe it had worked its way loose. Luckily I bought a set of plugs for it back in 2018 when I bought the truck but it didn’t need them then. Guess they will be in handy now. Also whoever done the plugs last time (I suspect Jiffy Lube because previous owners loved going there for their work) loaded it with so much anti seize that I had to clean the plug off and the cylinder hole and try to avoid getting anything down in the engine. Yes I’m all for using anti seize on plugs but a little bit goes a long way. Yes be smart and use it on there like you should but don’t use so much where it’s so thick and you can’t even see the threads on the plug. After I got most of the anti seize out of the hole I ran my finger around it and didn’t feel any threads so I suspect they are shot. I’m a bit angry that he chose to drive it 30 miles to work and 30 miles back on 3 cylinders but like I said I just have to keep my cool even though it’s hard lol. Both times it’s blown the plug out it’s done a huge back fire too. So hopefully all it needs is the timesert and 4 new spark plugs. I asked him why didn’t he call a tow truck or wait for me to get off work at 5 to come look at it. He is like well I’m for sure not paying for a tow truck and I am not going to wait on you either because I had to get a Red Bull. I love him but man we sure do see things differently lol. I was like well I’d rather pay for a tow truck than risk you blowing the inside of the cat or something like that to which he replied that any issue pertaining to that is one of those things that people hear and repeat and isn’t true. I’m like well respectfully working in the industry I know your wrong but I’m going to leave it at that.
 
Last edited:
To avoid these ads, REGISTER NOW!

niget2002

Well-known member
Joined
Oct 2, 2012
Messages
11,237
Location
Josephine, TX
I wish I could get some good German beer here. Best our beer store has is some Weihenstephaner hefeweizen with a 2023 date code on it. If I want a good hefeweizen or dunkelweizen I have to brew it. I do drink my fair share of Wernesgrüner pils from Aldi.
My wife just discovered that the store near us has German beers. It's a Brookshire brother's "fresh". It has a beer and wine bar in the store you can grab a drink at while you shop. It almost makes the higher prices at the store bearable.

She said it looked like they had 3 German brands. This one, Spaten and Palsner(?). I'll have to go look next time I'm there.

As far as what I've done in the shop today...

I ran out early morning to see if the little sprinkler setup I put on the son's lemon tree is working. I managed to get out there the same time it was running. I manually ran it yesterday because the soil was dried out. I'll check it each morning to see how dry the soil is and possibly adjust the amount of time the sprinkler runs for.
 
Last edited:

CoogarXR

Well-known member
Joined
Jan 11, 2016
Messages
6,868
Location
Ohio
Cut a giant shower enclosure carton down into a still-giant smaller container for an item I sold. Cut foam sheets to pad it, got foam balls all over me, the floor, the box, and the entire earth. Packed the item into the custom box, swept up my mess, and collapsed in front of a fan, lol.

I'm old, fat, and ****'s exhausting sometimes.
 

Snip's

Well-known member
Joined
Apr 29, 2017
Messages
1,866
Location
Ohio
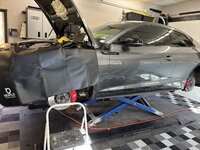
Took my Quickjacks off the wall and set them up in the garage...
Read on GJ that QJ recommends they get used within about a 3 month period, to keep the rod seals lubricated... I did not know this...
Threw a piece of plywood on top and ran the QJ up and down several times while sitting on it... Also oiled all the pivots...
Tomorrow I'll be changing out the 15 YO serpentine belt on the MINI Cooper for a fresh one...
IMG_4289.jpg
 

kaymccampbell

Well-known member
Joined
Feb 27, 2015
Messages
29,616
Location
Upstate New York
Cut a giant shower enclosure carton down into a still-giant smaller container for an item I sold. Cut foam sheets to pad it, got foam balls all over me, the floor, the box, and the entire earth. Packed the item into the custom box, swept up my mess, and collapsed in front of a fan, lol.

I'm old, fat, and ****'s exhausting sometimes.
Join the club.
 

zcar751

Well-known member
Joined
Apr 15, 2013
Messages
837
Location
Knoxville, TN
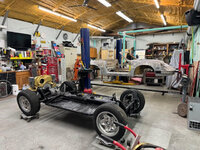
Got the first test fit completed with the body on pan over the weekend then made some adjustments to the front suspension. Yesterday the body came off and back onto the rotisserie so I can make the necessary adjustments to the engine compartment. At the same time, I need to make some major adjustments to the rear suspension to bring it way down. Today I just pulled the motor off so not really a photo opportunity. I have a feeling that I will do this at least two if not three more times as I work to get it how I want it.

1puma body on.jpgMuffler interferance.jpgbody back off.jpg
 

PassnThru

Well-known member
Joined
Jan 5, 2010
Messages
6,512
Location
Bowling Green KY
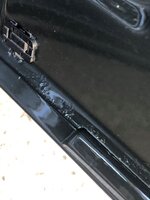
Just outside the garage - cleaned the interior of the wife's Explorer. I also cleaned all the door jambs - it's something I do to every car every 2 years or so. Good thing I did - I discovered a problem I didn't know about. Here is a picture of the passenger side front door - the bottom of the door where the outer skin wraps over the inner door. That's the drain there on the left.
Ex Door.jpg
Looks like that all the way across the bottom of the door. If you think it's rust then you are right. I did some research and apparently it's a somewhat common problem - and it always starts with that door. Every other door is very smooth there. It's only about 2.5 years old and not even at 20K yet and gets parked in the garage. So I'll be talking to them soon.
BTW - it's a 22 and I've seen a 20 with the same issue on the net. If you have a 20+ Explorer check the bottom inside of your passenger door.
 

Hal

Well-known member
Joined
Mar 8, 2008
Messages
673
Location
Vermont
Wife said her car had a "noise". Drove her to work in my truck, put the car up and pulled a wheel, looks like I didn't tighten one of the caliper pin bolts, and it fell out. The caliper was rubbing on the inside of the wheel. New bolt and good to go.
 

nmk_61802

Well-known member
Joined
Mar 6, 2008
Messages
965
Location
Central IL
Just outside the garage - cleaned the interior of the wife's Explorer. I also cleaned all the door jambs - it's something I do to every car every 2 years or so. Good thing I did - I discovered a problem I didn't know about. Here is a picture of the passenger side front door - the bottom of the door where the outer skin wraps over the inner door. That's the drain there on the left.
Ex Door.jpg
Looks like that all the way across the bottom of the door. If you think it's rust then you are right. I did some research and apparently it's a somewhat common problem - and it always starts with that door. Every other door is very smooth there. It's only about 2.5 years old and not even at 20K yet and gets parked in the garage. So I'll be talking to them soon.
BTW - it's a 22 and I've seen a 20 with the same issue on the net. If you have a 20+ Explorer check the bottom inside of your passenger door.
Hopefully they do something for you. Last vehicle I took for body rust/ bubbles under warranty I was told it was perforation only. When I asked if they expected it to get better I was told nothing could be done until it perforated the metal and it need to do so within warranty to be covered. Basically trying to see if the metal would outlast the warranty coverage. Last vehicle of that make I ever purchased (Dodge)
 

vwpieces

Well-known member
Joined
Apr 28, 2020
Messages
5,925
Location
Hills, PA
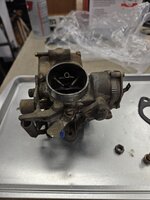
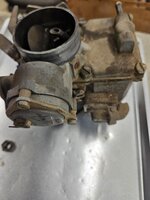
Opened boxes from amazon one shiny new vw carb and a package of rebuild parts for the existing carb.
Just took one of those off a buddys Bug. Gave him an older Mexican Bocar 34 PICT-3 that had the VW symbol machined off. Runs Great Now! His spark plugs were Black and his New recent production Bosch points were tweaked, not seating flat.
Glad I have a hoard of Old parts around. Evil SHTuff made these days.
I wanted to use my 20 Ton press to make some adjustments to that carb. But he still had the box and said he'll sell it at the next VW swapmeet for 10 bux or something.
Make sure you test out that carb before the Amazon return window closes.
 

bugnut

ALLIANCE MEMBER
Joined
Jul 14, 2012
Messages
3,998
Location
Central Ohio
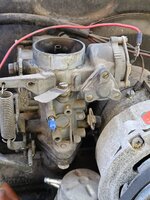
Well that didn't work. Put the new carb with an iv of fresh gas on the 1600cc and tried to start. Just not getting something right. Fires on ether, but not firing when using gas, gas is only a month old. So I'll continue with poking and prodding, to see whats going on. The carb seemed to be working but as @vwpieces suggested, I'll rebuild the old and then test it. The new one may go back to amzn.
 

Attachments

  • 20241022_101107.jpg
    20241022_101107.jpg
    932.7 KB · Views: 27
  • 20241022_110113.jpg
    20241022_110113.jpg
    623.1 KB · Views: 18
  • 20241022_110123.jpg
    20241022_110123.jpg
    572.5 KB · Views: 23
To avoid these ads, REGISTER NOW!

GarageHobbyist

Well-known member
Joined
Feb 18, 2024
Messages
366
Location
Illinois
Well, I ended up with a crack/hole in a copper piece I was working on so into the scrap it goes...

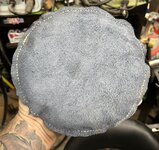
Then I started working on stitching up a leather sand bag. I'm still pretty slow at saddle stitching, so I do it while I am watching/listening to lectures for my degree.

Going back to school with a full time job and family in my mid 30's was a wild decision :ROFLMAO:
 

DGersic

Well-known member
Joined
Mar 12, 2017
Messages
6,378
Location
DeKalb, IL
and it rained right after.

Well, that would be my luck.

During, actually.

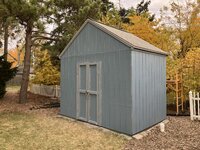
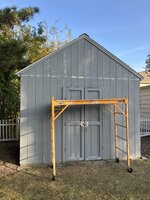
We hadn’t had any rain in a month. 20% chance, so I went for it. Got the south and west walls done about 11am. Rain chance now 50% and radar showed a small line of rain coming. Paint can says that rain after 90 minutes is ok. Stopped for an early lunch.

Rained from about 12:30 to 12:45. Light rain, news guy says 0.03”. Straight down, no blowing wind. Walls stayed mostly dry.

Waited until 2pm, sun was out again, partly cloudy. Painted the north and west walls.

Still need to paint the trim along the roofline and around the doors. That will be white. Painting the garage white, hopefully tomorrow, so will do the trim at the same time. But there’s rain in the forecast for tomorrow. Today would be perfect, but I have to go help dad out today.
 

Magnum440d100

Well-known member
Joined
Dec 2, 2018
Messages
3,581
Location
Indiana
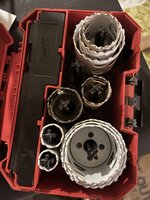
Went digging for a hole saw set I knew I had. IMG_4997.jpeg

Found it. As you can tell, it gets used a LOT lol IMG_4998.jpeg


Needed it to saw through the top plate of my newly installed wall IMG_4996.jpeg

The wires were coming through that huge hole. Yes. It was already big. With the old wall, the wires came out the ceiling next to the wall, and then into a box in an unfinished wall. Just open studs, it being the back side of a closet. I’m moving the closet and finishing the wall on both sides. So it’s gotta look good.

The ceiling will eventually be redone in drywall or similar, as a PO liquid nailed some ceiling tile to the existing ceiling, and it looked horrible. Even after removal.

One project at a time!
 

Snip's

Well-known member
Joined
Apr 29, 2017
Messages
1,866
Location
Ohio
Put the MINI up on the lift...
Worked on replacing the serpentine belt...
Pushed grease in the zerks on the rear adjustable control arms...
Inspected for rust... Was happy none was evident on my 2009 MINI...
Of course I don't drive it on the salty roads in the winter, so I guess that helps...
IMG_4293.jpg

IMG_4294.jpg
 

Fixr

Well-known member
Joined
Dec 23, 2012
Messages
9,709
Location
SW VA
Got the first test fit completed with the body on pan over the weekend then made some adjustments to the front suspension. Yesterday the body came off and back onto the rotisserie so I can make the necessary adjustments to the engine compartment. At the same time, I need to make some major adjustments to the rear suspension to bring it way down. Today I just pulled the motor off so not really a photo opportunity. I have a feeling that I will do this at least two if not three more times as I work to get it how I want it.

1puma body on.jpgMuffler interferance.jpgbody back off.jpg
Swingarm rear? That should increase the entertainment factor.
 

vwpieces

Well-known member
Joined
Apr 28, 2020
Messages
5,925
Location
Hills, PA
Well that didn't work. Put the new carb with an iv of fresh gas on the 1600cc and tried to start. Just not getting something right. Fires on ether, but not firing when using gas, gas is only a month old. So I'll continue with poking and prodding, to see whats going on. The carb seemed to be working but as @vwpieces suggested, I'll rebuild the old and then test it. The new one may go back to amzn.
Joel, make sure the fuel cutoff solenoid is working/has power. On the 34's there is a tiny jet under a brass plug, remove plug cap and use a small screwdriver to remove the tiny jet. This is most likely clogged. This is generally overlooked jet. See pic.
20241022_110123.jpg
The hex/slotted air jet on the bottom right corner of the circle also clog.
The butterfly on the bottom Must be completely shut and the adjustment screw on the long lever must not be touching the choke cam with choke off. Butterfly closed, use the large brass air bypass screw to adjust idle. get it low and then use the smaller screw by the bypass to set the idle fuel. Once idle is set with air screw, choke off, rev the engine and allow to settle to idle. Adjust the smaller screw to get engine to settle to idle after reving up. If it returns to idle slow, turn small screw in. If it returns to lower rpm than idle and then gets a bit higher, turn smaller screw out. You want it to return to idle without being high or low to the set idle.
PM me if you wish.
 
Last edited:

notherone

Active member
Joined
Oct 20, 2024
Messages
28
Well it was hard, but made some progress:

1. Threw out old arcade game coin door
2. Got 2 stools ready to move out
3. Threw out a box of old pinball parts
4. Got some things straightened up
5. Got a box chucked out that had old car stickers in it (kept the stickers)
 

ZRX61

Well-known member
Joined
Aug 15, 2006
Messages
28,716
Location
Solar Blight Valley, SoCal
Decided to work on the right 10ft running board from the F350 as it requires less repair work than the left one.
Wet sanded most of it with #320, spotted 3 or 4 cracked areas that needed grinding/filling, did the grinding part.
Then flipped it over to do some fiberglass work on the back of it. Dragged the left one outside & did some FG work on the back of that one too.
Put them back in the garage.

Laundered a bunch of various microfiber towels.
 

LeonardY

Well-known member
Joined
Apr 16, 2011
Messages
5,100
Location
Southern California
Aimlessly tried to clean. I've been trying to find a bunch of metric hardware I bought. When I put it away. I thought this is the perfect spot and it is. I outsmarted myself.

I just started cleaning without any plan. Hoping that I would run across them. Nope.

I made more of a mess than I started with. I actually put away and tossed a bunch of stuff. I finally came across a plan. It involved a beer.
 

GarageHobbyist

Well-known member
Joined
Feb 18, 2024
Messages
366
Location
Illinois
I started another leaf out of some thicker copper, hopefully I don’t put a hole in this one. Still a looooong way to go. I’m making punches as I go as well since I don’t have any.
IMG_8226.jpeg

Also got the sand bag finished and filled. Hopefully this will make chasing copper a bit easier until I pony up the cash for some pitch.
I didn’t do a great job cutting the leather, but the stitching is solid and was good practice.
IMG_8225.jpeg

I decided to learn leatherwork a few weeks ago solely because I can’t find a blacksmithing apron that combines everything I want. Figured I could do it myself after some smaller projects.

One of these days I need to start a project/garage thread for myself. I sure seem to have enough of them.
 

larry4406

Well-known member
Joined
Jan 27, 2006
Messages
19,564
Location
Northern Virginia
Got the first test fit completed with the body on pan over the weekend then made some adjustments to the front suspension. Yesterday the body came off and back onto the rotisserie so I can make the necessary adjustments to the engine compartment. At the same time, I need to make some major adjustments to the rear suspension to bring it way down. Today I just pulled the motor off so not really a photo opportunity. I have a feeling that I will do this at least two if not three more times as I work to get it how I want it.

1puma body on.jpgMuffler interferance.jpgbody back off.jpg
Neat project!

Aftermarket body on a VW bug chassis?
 

bugnut

ALLIANCE MEMBER
Joined
Jul 14, 2012
Messages
3,998
Location
Central Ohio
@vwpieces thanks for the information and instructions. I'll be rebuilding the old carb as most new are junk.

Backstory bought the car as a nonrunner from Arizona, metal is fabulous with no rust anywhere. I found a single wire that was cut/broken that when connected allowed it to turn over. Shot it with ether and she tried to fire. In the meantime the birth certificate said it's not a numbers matching. Bought the carb to try and get it going. Visit from body guy said he's a year out. So the verdict is eventually a 1776 going in, was hoping to get it going so I can move it about. Probably not spending much more time on it and waiting to install the 1776. Was oh so very hopeful. Would make things easier.
 
To avoid these ads, REGISTER NOW!
Top Bottom