To avoid these ads, REGISTER NOW!

What did you do "IN" your garage today?

To avoid these ads, REGISTER NOW!

KwikFab

Well-known member
Joined
Jul 27, 2024
Messages
1,222
Location
Central Valley, CA
Little bit of cutting today in anticipation for the weekend.

Just glad I'm back up and running so I can continue fulfilling these remaining orders.

20241024_115822.jpg

20241024_121039.jpg

20241025_121811.jpg

20241025_125215.jpg

Only 12 more sets and they'll be done before I can take on additional orders.

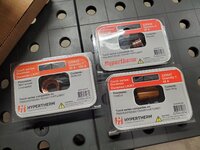
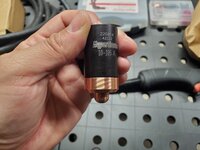
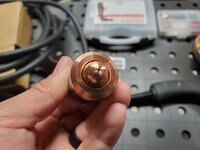
Also excited about trying finecut for the first time. Been cutting for over 2 years but never tried my hand at any finecut consumables on any plasma cutter I've owned.

20241025_101533.jpg

20241025_103110.jpg

That kerf width is gonna be really small it looks like!

20241025_103114.jpg
 

harley jim

Well-known member
Joined
Dec 6, 2013
Messages
11,423
Location
Cleveland Tn..........out in the sticks
We had an issue with our table yesterday! It was working perfectly, we opened the shop doors about 11:00 as it had got quite warm in the shop. About 1:00 the table went crazy, it would stich cut leaving 1" strips uncut! Struggled with it for a couple of hours, the sun went past the open door and the processor cooled off and just as fast as it went crazy it was fine.
We'll not have that problem again, we relocated the table this morning!
 

jskicet

Well-known member
Joined
Apr 26, 2020
Messages
216
Location
Western NC Mtns
Little bit of cutting today in anticipation for the weekend.

Just glad I'm back up and running so I can continue fulfilling these remaining orders.

20241024_115822.jpg

20241024_121039.jpg

20241025_121811.jpg

20241025_125215.jpg

Only 12 more sets and they'll be done before I can take on additional orders.

Also excited about trying finecut for the first time. Been cutting for over 2 years but never tried my hand at any finecut consumables on any plasma cutter I've owned.

20241025_101533.jpg

20241025_103110.jpg

That kerf width is gonna be really small it looks like!

20241025_103114.jpg
Wow! (y)
 

rbgearz

Well-known member
Joined
Nov 20, 2011
Messages
2,899
Location
Illinois
Replaced all the rubber bumpers on wife's pinball machine and one of the ramps that I had ordered a while back. Daughter stopped in with the grand kids on the way to a Halloween dance. They were dressed as the Blues Bros. Listened to a cd I had burned of Beth Hart and Joe Bonamassa.
 

ZRX61

Well-known member
Joined
Aug 15, 2006
Messages
28,716
Location
Solar Blight Valley, SoCal
@vwpieces thanks for the information and instructions. I'll be rebuilding the old carb as most new are junk.

Backstory bought the car as a nonrunner from Arizona, metal is fabulous with no rust anywhere. I found a single wire that was cut/broken that when connected allowed it to turn over. Shot it with ether and she tried to fire. In the meantime the birth certificate said it's not a numbers matching. Bought the carb to try and get it going. Visit from body guy said he's a year out. So the verdict is eventually a 1776 going in, was hoping to get it going so I can move it about. Probably not spending much more time on it and waiting to install the 1776. Was oh so very hopeful. Would make things easier.
Take the evening autobody class at your local community college...
 

Chatchie

New member
Joined
Oct 25, 2024
Messages
2
What's going on guys. New here but I had a "first" the other day. I've never had a cracked wheel until moving to RI a few years ago. This is now my 4th cracked wheel. A steel wheel at that.

I realized after the fact that in my excitement forgot to take pictures of the actual welding process. Regardless, I successfully welded an airtight repair to a steel wheel.
 

kaymccampbell

Well-known member
Joined
Feb 27, 2015
Messages
29,616
Location
Upstate New York
What's going on guys. New here but I had a "first" the other day. I've never had a cracked wheel until moving to RI a few years ago. This is now my 4th cracked wheel. A steel wheel at that.

I realized after the fact that in my excitement forgot to take pictures of the actual welding process. Regardless, I successfully welded an airtight repair to a steel wheel.
Don't forget to check for out of round, and get the tire-wheel assembly balanced.
 

Chatchie

New member
Joined
Oct 25, 2024
Messages
2
Don't forget to check for out of round, and get the tire-wheel assembly balanced.
Yeah I don't own a tire machine yet so I took it to the mechanic around the corner to peel the tire off and remount/balance. I've been beating back the bends with a hammer for these past 2 years so I'm sure it's not true anymore. Balanced out though. Vibration free.
 

Magnum440d100

Well-known member
Joined
Dec 2, 2018
Messages
3,581
Location
Indiana
In/out in/out

**** working alone because of all the movement between working.

Anyway…

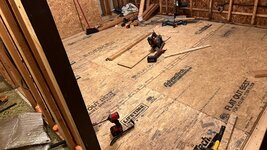
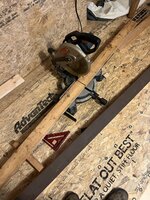
With the front bedroom having “some” subfloor, I decided to bring in the chopsaw and set it up, if only on the floor IMG_5008.jpeg

Made cutting way easier and quicker than a circular saw. Started cutting more 1x4’s for the subfloor. Got some laid out here. Still needed more IMG_5010.jpeg

Got a couple more sheets glued and screwed IMG_5013.jpeg

Then came time for the fun parts. The cutting in at the door ways IMG_5014.jpeg

Got those cut in and installed IMG_5015.jpeg

And now the front bedroom has subfloor again. At least to under there the closets will be going.


So here’s where I leave off for the night. IMG_5016.jpeg


I’m out of screws, 2x4’s, 1x4’s, Advantech, and patience.

Maybe I’ll buy more tomorrow, depends. Today was almost a disaster though. I had everything set up outside so I could get home and start working on the house. But it started to absolutely pour rain. So I rushed home to bring everything inside. Got everything inside, and the bossman called to take the day off. So I worked on the house. Over 12 hours. Dang.
 
To avoid these ads, REGISTER NOW!

GarageDan

Well-known member
Joined
Dec 27, 2012
Messages
221
Haven't done a lot today - taking it easy after a medical procedure. BUT, I can't just sit and watch football teams I don't care about. I did finally fix the front screen door so it closely and locks tightly as it should. That's something that's needed doing for a while. Technically it wasn't "IN" the shop, but I did go in and out getting tools. :)
 

GarageDan

Well-known member
Joined
Dec 27, 2012
Messages
221
Little bit of cutting today in anticipation for the weekend.

Just glad I'm back up and running so I can continue fulfilling these remaining orders.

20241024_115822.jpg

20241024_121039.jpg

20241025_121811.jpg

20241025_125215.jpg

Only 12 more sets and they'll be done before I can take on additional orders.

Also excited about trying finecut for the first time. Been cutting for over 2 years but never tried my hand at any finecut consumables on any plasma cutter I've owned.

20241025_101533.jpg

20241025_103110.jpg

That kerf width is gonna be really small it looks like!

20241025_103114.jpg
This looks so cool. May I ask what it is you're manufacturing?
 

CoogarXR

Well-known member
Joined
Jan 11, 2016
Messages
6,868
Location
Ohio
At the new place, cut down some old, brittle, rigged-up overhead service wire to the garage. Ran a new wire through the interior to an old outdoor motion light to see if it works (it was formerly twisted/taped "spliced" into the old service wire). It lights, but just stays lit. The motion sensor is dead. But at least I have light on the driveway for now, and the new wire is run for an easy replacement of the fixture next week.

Oh, and I put a box fitting on the fixture's box. The open hole invited mud wasps, and the whole box was a giant mud nest (dormant, thank goodness).

While I was in the garage ceiling, I also found the abandoned wire to my breezeway ceiling fan laying up there! I always wondered why the previous owner installed a fan, ran a cable, but it wasn't live. There were no wall switches for it. Well, I found the cable, tested it, and hooked it up. Now I've got my breezeway fan/light done too, lol. It looks like he had the wire just stripped and shoved into an outlet (he must have just used the pull-chains on the fan/light to turn it on). When I pulled the wire out of the garage ceiling, the bends in the wire lay perfectly to a nearby outlet. I had just cut in some 3-way switches on each end of the breezeway and wired them up, and was getting ready to pull a new wire to that fan, so it saved me that step. I just routed the old wire to my junction and my 3-way circuit is complete. I am pretty happy to not have to pull a wire through the breezeway ceiling!
 

KwikFab

Well-known member
Joined
Jul 27, 2024
Messages
1,222
Location
Central Valley, CA
This looks so cool. May I ask what it is you're manufacturing?

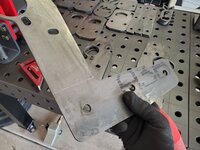
So, those specific parts are bed reinforcements.

I cut out several sets per run, and then move forward with completing a few sets at a time.

I start by knocking off whatever dross remains on the metal followed by scribing marks with precise measurements for bending.

20241026_111835.jpg

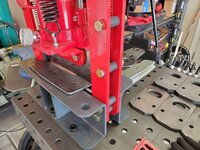
Then, onto the bender.

20241026_112049.jpg

Here's the result.

20241026_112112.jpg

There are two different sets of parts that receive a bend. This one being much shallower means I use the manual method with the lever.

20241026_113731.jpg

20241026_114041.jpg

20241026_114105.jpg

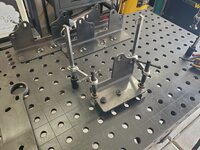
Here's three sets completely bent and ready for the last step, welding.

20241026_114759.jpg

Two magnets, two clamps, and 14 nuts per set and they're all welded on.

20241026_121105.jpg

The end result.

20241026_131501.jpg

All that's left to do is to simply let them cool down, wipe them down with a rag and acetone, and package them up for shipping.

I'll knock out the other 3 tomorrow as I'm retired so I don't like to work more than 3 hours per session (or more than 6 hours per week).

I've got a bad back (disabled veteran).

Since there's a limit to pictures being uploaded per post, I'll use the next post to show the install.
 

KwikFab

Well-known member
Joined
Jul 27, 2024
Messages
1,222
Location
Central Valley, CA
So, those specific parts are bed reinforcements.

I cut out several sets per run, and then move forward with completing a few sets at a time.

I start by knocking off whatever dross remains on the metal followed by scribing marks with precise measurements for bending.

20241026_111835.jpg

Then, onto the bender.

20241026_112049.jpg

Here's the result.

20241026_112112.jpg

There are two different sets of parts that receive a bend. This one being much shallower means I use the manual method with the lever.

20241026_113731.jpg

20241026_114041.jpg

20241026_114105.jpg

Here's three sets completely bent and ready for the last step, welding.

20241026_114759.jpg

Two magnets, two clamps, and 14 nuts per set and they're all welded on.

20241026_121105.jpg

The end result.

20241026_131501.jpg

All that's left to do is to simply let them cool down, wipe them down with a rag and acetone, and package them up for shipping.

I'll knock out the other 3 tomorrow as I'm retired so I don't like to work more than 3 hours per session (or more than 6 hours per week).

I've got a bad back (disabled veteran).

Since there's a limit to pictures being uploaded per post, I'll use the next post to show the install.

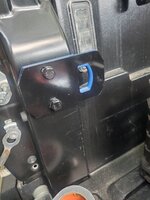
And just a few pics of customer installs.

Most of the parts are all hidden and underneath the bed.

20240814_182923.jpg

20240814_183137.jpg

With the only exterior part being a customer-chosen exterior bracket.

20240814_182927.jpg

And other installs.

IMG_1549.jpg

IMG_1550.jpg

IMG_8350.jpg

IMG_8353.jpg

And it ***** but I don't have the picture anymore where a customer custom painted his F bomb in a cool olive drab with a face on it like a real bomb.

Here are others.

IMG_1565.jpg

IMG_8601.jpg
 

GarageDan

Well-known member
Joined
Dec 27, 2012
Messages
221
And just a few pics of customer installs.

Most of the parts are all hidden and underneath the bed.

20240814_182923.jpg

20240814_183137.jpg

With the only exterior part being a customer-chosen exterior bracket.

20240814_182927.jpg

And other installs.

IMG_1549.jpg

IMG_1550.jpg

IMG_8350.jpg

IMG_8353.jpg

And it ***** but I don't have the picture anymore where a customer custom painted his F bomb in a cool olive drab with a face on it like a real bomb.

Here are others.

IMG_1565.jpg

IMG_8601.jpg
Beautiful work! I'll keep you in mind as I'm restoring my 1980 C10
 

KwikFab

Well-known member
Joined
Jul 27, 2024
Messages
1,222
Location
Central Valley, CA
Beautiful work! I'll keep you in mind as I'm restoring my 1980 C10

Absolutely!

Most times I'm cheaper than Send Cut Send, not always though.

I don't have laser CNC, or industrial press brakes as you can see from the pics.

My gig is simply, I'm just a regular dude working out of his garage that enjoys metal work. Not everyone has the ability to work CAD to make their own design for cutting out for SCS. And sometimes people want to deal with one person to describe what it is they need which is where I come in.

I do a lot of one-off stuff for people.

The above items are just one of my most popular items I sell mean for a ton of Toyota truck owners.
 
To avoid these ads, REGISTER NOW!
Top Bottom