
You are using an out of date browser. It may not display this or other websites correctly.
You should upgrade or use an alternative browser.
You should upgrade or use an alternative browser.
ZMotorsports Shop Projects 2.0
- Thread starter zmotorsports
- Start date
Finallygotit
ALLIANCE MEMBER
Good call on chasing those threads Mike! But I would expect nothing less.

OP
zmotorsports
ALLIANCE MEMBER
Mike,
Why the cradle replaced, was it rotted out? And did all the bubblegum look like this?

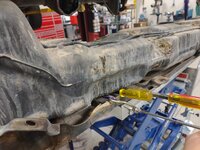
Cam, yes, the cradle was severely rotted. Not even holding in some places. The owner asked me if I would mind replacing it as well as the fuel pump while I was doing the gears. I agreed seeing as how it was already on the lift and that would be the time to do it. For a few hours labor I think it was a wise choice on his part as now he doesn't have to mess with it on the ground.
I can't remember the brand he purchased, but he did tell me he had to do some welding on it and paint it as it came with minimal welds and bare steel.
Good call on chasing those threads Mike! But I would expect nothing less.
Thank you Dan. These are the small details that make huge differences in the long run, yet so many shops and mechanics fail to perform. These are the things that I like to think set me apart from others that don't take place at other shops. The devil is in the details.

Bigblue&Goldie
Well-known member
I had no idea that table lifted that high! I also like the L-track mounted on the side. Definitely a nice tool!
OP
zmotorsports
ALLIANCE MEMBER
I had no idea that table lifted that high! I also like the L-track mounted on the side. Definitely a nice tool!
Thanks Ryan, yeah, it's a nice tool and addition to the shop for sure. The table height itself will go to approx. 68" then about another 10 inches with the attachment pedestals.
I did have to lower the Jeep down one notch on the locks just to get it up firmly against the fuel tank cradle as it missed it by a couple of inches with the lift at the top lock.
I spent my trailer budget funds on this lift table so at this point I think it was a good decision. I still don't have a trailer, but I hope to save up enough that maybe I can build one later in the next year.
aka Larry
Well-known member
Last night I swapped out the fuel tank skid/cradle and replaced the fuel pump on the Jeep JKU. I discovered another very handy use for the AGA Tools powertrain lift table as it makes this job much less hated, especially when the fuel tank is full.
Mike two things in life that are true 99.99% of the time are smoke detector batteries always die in the middle of the night, and any time a fuel tank needs to removed, it's always full.
It happened to me most recently when I helped my neighbor replace the fuel pump in his '99 Tahoe. I don't have a lift table, but I do have a tall transmission jack, which helped a ton with the process.
We've had to remove the tank a couple of times in my race car, but the engineers at Honda decided back in the day that building a tank drain plug would be a good idea. That makes it soooo much easier!
OP
zmotorsports
ALLIANCE MEMBER
Mike two things in life that are true 99.99% of the time are smoke detector batteries always die in the middle of the night, and any time a fuel tank needs to removed, it's always full.
I think you are dead on both accounts Vincent.
ntsqd
Well-known member
I keep an old P4070 Carter fuel pump around with some long lengths of fuel hose on it just for that reason. Can pump out a fuel tank into the collection of Wavian fuel cans, and then pump it back into the tank when the work is finished.
MISF taught me that one, he was randomly processing junkers passing thru his work on the way to the JY that usually had a lot of fuel in them, sometimes more fuel than the vehicle was worth. His set-up had a filter in it, but mine does not. With that set-up I don't think he had to buy commuter fuel for nearly a year.
MISF taught me that one, he was randomly processing junkers passing thru his work on the way to the JY that usually had a lot of fuel in them, sometimes more fuel than the vehicle was worth. His set-up had a filter in it, but mine does not. With that set-up I don't think he had to buy commuter fuel for nearly a year.
Just Fishing
Well-known member
Mike,
Why the cradle replaced, was it rotted out? And did all the bubblegum look like this?
I Identify as the hack that "Welded" that bubblegum.
Nothing to see here

Brother I didn’t mean to offend you. I thought it came that way from the manufacturer. So I was a bit baffled by the lack of penetration and burnishing.I Identify as the hack that "Welded" that bubblegum.
Nothing to see here
**** I did it again…sorry bout that JF 🫢

We all have out strengths and learning curves. Me, I fish but I **** at it soooo

Just Fishing
Well-known member
Brother I didn’t mean to offend you. I thought it came that way from the manufacturer. So I was a bit baffled by the lack of penetration and burnishing.
**** I did it again…sorry bout that JF 🫢
We all have out strengths and learning curves. Me, I fish but I **** at it soooo
No offence taken; I was just trying to be funny at my own expense.
ntsqd
Well-known member
They call it "Fishing" and not "Catching" for good reason......
Scuderia-F1
Well-known member
Nice work Mike!Last night I swapped out the fuel tank skid/cradle and replaced the fuel pump on the Jeep JKU. I discovered another very handy use for the AGA Tools powertrain lift table as it makes this job much less hated, especially when the fuel tank if full.
Lift table in position and up against the fuel tank cradle. The fasteners were all broke loose and treated with penetrant for a couple of days now. Kroil on half and Knock-Er-Loose on the other half of the fasteners. I really want to say that the Kroil kicked ***, however, I unfortunately have to report that I saw no distinct difference between the two penetrants. My 3/8" impact with extension wouldn't even touch them, so I grabbed my good ole' trusty IR Titanium 1/2" with a 18mm wobbly and removed all of the fasteners. A couple came right out without hesitation, but the majority of them still were slow to come out. At this point I think all I can say is that in this scenario, some form of penetrant was better than no penetrant at all. One thing I did notice however, was that the Kroil seemed to wick its way up the threads just a couple more threads than the Knock-Er-Loose penetrant.
Fuel tank lowered and rolled out from under the Jeep.
At this point I realized I missed my opportunity. My son had just stopped by the shop after work to visit and he had just left when I lowered the fuel tank. I instantly realized my folly. I should have asked him to wait a few minutes so he could help me lift the fuel tank out of the old cradle and reinsert it into the new one. The tank was heavy and awkward and every time I lifted one end the other just slid around and neither end was coming out of the cradle.
After screwing with it for about 15-minutes I came up with a better solution. I parked it perpendicular to the Jeep right under the rear bumper. I raised the table up to within about 2' of the rear bumper and slid a couple of prybars under the poly tank and dropped a tie-down between the tank and cradle then fished it out with a magnet.
Then with it slung from either end of the tank, I lowered the table and cradle away from the tank. Even then it stuck occasionally and had to be assisted to drop away. Mainly due to a few dents in the cradle and the fact that it was packed with mud and debris which locked the two together.
With the tank out of the cradle, I cleaned off the underside of the poly tank. I didn't want to reassemble it into the new cradle with the possibility of a pebble or rock between the tank and the cradle which would wear a hole in it. I brushed the bottom of the tank off, then grabbed a wet towel and cleaned the bottom thoroughly before raising the new cradle up to capture the tank.
With the tank now married back with the cradle, it was time to tackle the fuel pump. I removed the lock ring and removed the old fuel pump.
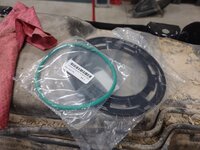
Compared the new pump to the old.
Client supplied both a new O-ring and lock ring which was nice as these generally need replacing.
Once the mounting surface of the tank was cleaned, the new O-ring was treated with some Sil-Glyde prior to installation.
New O-ring in place.
More pictures to follow....






I've only got to use Kroil a few times (it's not available here, but I managed to get hold of an almost empty can, after learning about this absolutely magical product from you). I have to say that I have NEVER come across anything near as good. I pester the Kroil people on a regular basis. So I hope that they will cave in and get a European distributor.
Any reason why you opted for the Napa silglyde over your usual AGS?
OP
zmotorsports
ALLIANCE MEMBER
Nice work Mike!
I've only got to use Kroil a few times (it's not available here, but I managed to get hold of an almost empty can, after learning about this absolutely magical product from you). I have to say that I have NEVER come across anything near as good. I pester the Kroil people on a regular basis. So I hope that they will cave in and get a European distributor.
Any reason why you opted for the Napa silglyde over your usual AGS?
Thanks Anders.
The NAPA Sil-Glyde is made by AGS, it's the same stuff just with NAPA's name on it. If you look back at most of my previous posts that is what I've used for years as I had a couple tubes of it. A couple in my home shop, then a couple in my work toolbox when I brought it home so I have been well stocked for the past decade or so.
I recently purchased a new tube from a different vendor because my local NAPA was out of stock, and it labeled as AGS but haven't "cracked it open" yet. I only recently tossed one of my empty tubes of NAPA/AGS Sil-Glyde in the garbage can and I have to be honest, that was a hard thing to do. That tube was well marred and soiled, and we had a history. I had been squeezing the "last" of it for what seems like a year but finally couldn't get any more out of it, so I had to throw it away. I think I have one more tube of the NAPA labeled stuff before I go into the new tube from AGS. As for the Kroil vs. Knock'er Loose, I have used Kroil my entire Industrial Maintenance Career as that is what the shop was using when I began back in 1988. I had never heard of it before but was quite impressed with it upon my first use. On the farm we used whatever my dad bought on sale and it varied quite a bit and seldom the same stuff twice in a row so I was amazed at how well Kroil worked when I first started using it. We fought a lot with corrosion issues and Kroil just always seems to work.
That being said, I had heard many times of the Knock'er Loose penetrant over the past couple of decades, and it had almost the same cult-like following that Kroil does so when I saw a can of it at my local NAPA a couple of weeks ago, I couldn't resist the urge to give it a try and do a comparison. I hadn't really had an opportunity to do a good side by side comparison until now. I had used it on a few components on the Super Duty I worked on few weeks back and now this Jeep, but nothing gave me a definitive answer, I still don't think I have a definitive winner, but I do like the fact that the Kroil wicked up the threads a bit better than the Knock'er Loose.
bigdave_185
Well-known member
Well that has been a few days worth of relaxing and catching up on this thread!
As always. Love the detail and the progress photos of your vacations, jeepin adventures, and of course the different shop projects that come in.
Are you doing a gear change on the rear axle @zmotorsports ?
As always. Love the detail and the progress photos of your vacations, jeepin adventures, and of course the different shop projects that come in.
Are you doing a gear change on the rear axle @zmotorsports ?
OP
zmotorsports
ALLIANCE MEMBER
Well that has been a few days worth of relaxing and catching up on this thread!
As always. Love the detail and the progress photos of your vacations, jeepin adventures, and of course the different shop projects that come in.
Are you doing a gear change on the rear axle @zmotorsports ?
Thanks for catching up Dave.
Yes, a complete gear ratio change as well as added limited slips front/rear. If you look back a page or two you can see where I dropped the front axle out from under the Jeep to weld a truss on it and replaced the OEM carrier and gearing with an Eaton Truetrac limited slip and 5.13 gearing.
Same gears and LSD will be going into the rear axle.
OP
zmotorsports
ALLIANCE MEMBER
Finally back on the Jeep JKU again. I've been waiting for my 10 pound slide hammer that I had to order to be able to remove this axle shaft. Tuesday evening with the nice weather here along the Wasatch Front, I opted to trim some trees in the back yard as some of the neighbor's limbs have really grown over the fence and were hanging quite low over the past summer. I talked to him last weekend and made sure he was ok with me trimming them so a couple of nights ago I went at them to trim them a bit. My son loaned me his electric pole saw and it was a real time saver. Made it to where I didn't even need to get the ladder out, which made the wife happy.
When I arrived home from work yesterday the UPS driver still hadn't been by with my package but finally later in the evening my slide hammer arrived. After unboxing it, the size difference between the old Snap-on 3 pounder and generic one I have used over the years was incredible.
I have NEVER fought an axle shaft in all my years like I have this one. Usually I flip the rotor around, start a couple lug nuts and use the weight of the rotor to knock the axle out. It worked on the driver's side, but with a lot more force than normal. Nothing I had would touch the passenger's side however. My son even came out one evening to give me a hand and after about 20-minutes of his time we still couldn't budge it and I didn't want to start prying at the hub end and damage a reluctor ring, so I ordered this 10 pound slide hammer.

The shaft is massive.
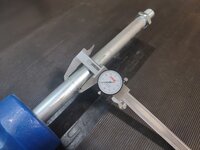
Compared to my 3 lb. Snap-on slide hammer.

With only 4 smacks, the axle gave in. Granted, they were pretty good smacks, but nothing I tried over the weekend would even move it.

With the axle out of the housing, I removed the rusted brake backing plate and then removed the outer races from the housing.
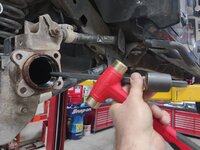

With the housing tube empty of old parts, time to turn to the carrier for removal. OTC case spreader installed and case spread slightly.

Carrier out.
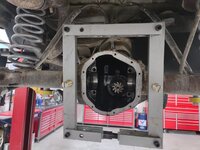
Then the yoke was removed as well as the pinion.
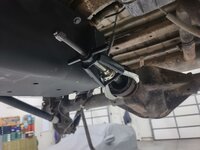
All of the parts out and on the bench.

In only about an hour I had the axle stripped down, parts on the bench and ready to start cleaning and prepping for assembly.
Thanks for looking.
When I arrived home from work yesterday the UPS driver still hadn't been by with my package but finally later in the evening my slide hammer arrived. After unboxing it, the size difference between the old Snap-on 3 pounder and generic one I have used over the years was incredible.
I have NEVER fought an axle shaft in all my years like I have this one. Usually I flip the rotor around, start a couple lug nuts and use the weight of the rotor to knock the axle out. It worked on the driver's side, but with a lot more force than normal. Nothing I had would touch the passenger's side however. My son even came out one evening to give me a hand and after about 20-minutes of his time we still couldn't budge it and I didn't want to start prying at the hub end and damage a reluctor ring, so I ordered this 10 pound slide hammer.
The shaft is massive.
Compared to my 3 lb. Snap-on slide hammer.
With only 4 smacks, the axle gave in. Granted, they were pretty good smacks, but nothing I tried over the weekend would even move it.
With the axle out of the housing, I removed the rusted brake backing plate and then removed the outer races from the housing.
With the housing tube empty of old parts, time to turn to the carrier for removal. OTC case spreader installed and case spread slightly.
Carrier out.
Then the yoke was removed as well as the pinion.
All of the parts out and on the bench.
In only about an hour I had the axle stripped down, parts on the bench and ready to start cleaning and prepping for assembly.
Thanks for looking.
rattle_snake
Well-known member
Hmmm. I just spent way too long on getting ONE axle out, off to shop for slide hammers....
Bigblue&Goldie
Well-known member
What's the tool you used for popping those races out?
Scuderia-F1
Well-known member
That is a neat bearing race punch/tool you got yourself there Mike.Finally back on the Jeep JKU again. I've been waiting for my 10 pound slide hammer that I had to order to be able to remove this axle shaft. Tuesday evening with the nice weather here along the Wasatch Front, I opted to trim some trees in the back yard as some of the neighbor's limbs have really grown over the fence and were hanging quite low over the past summer. I talked to him last weekend and made sure he was ok with me trimming them so a couple of nights ago I went at them to trim them a bit. My son loaned me his electric pole saw and it was a real time saver. Made it to where I didn't even need to get the ladder out, which made the wife happy.
When I arrived home from work yesterday the UPS driver still hadn't been by with my package but finally later in the evening my slide hammer arrived. After unboxing it, the size difference between the old Snap-on 3 pounder and generic one I have used over the years was incredible.
I have NEVER fought an axle shaft in all my years like I have this one. Usually I flip the rotor around, start a couple lug nuts and use the weight of the rotor to knock the axle out. It worked on the driver's side, but with a lot more force than normal. Nothing I had would touch the passenger's side however. My son even came out one evening to give me a hand and after about 20-minutes of his time we still couldn't budge it and I didn't want to start prying at the hub end and damage a reluctor ring, so I ordered this 10 pound slide hammer.
The shaft is massive.
Compared to my 3 lb. Snap-on slide hammer.
With only 4 smacks, the axle gave in. Granted, they were pretty good smacks, but nothing I tried over the weekend would even move it.
With the axle out of the housing, I removed the rusted brake backing plate and then removed the outer races from the housing.
With the housing tube empty of old parts, time to turn to the carrier for removal. OTC case spreader installed and case spread slightly.
Carrier out.
Then the yoke was removed as well as the pinion.
All of the parts out and on the bench.
In only about an hour I had the axle stripped down, parts on the bench and ready to start cleaning and prepping for assembly.
Thanks for looking.
A sheer joy to enjoy your content (work) as always.
Bob Heine
ALLIANCE MEMBER
Thom, most of what I used to do was called "Feeding" so maybe a lot like "Phishing." Even then I never got a Grouper''s password.They call it "Fishing" and not "Catching" for good reason......
OP
zmotorsports
ALLIANCE MEMBER
What's the tool you used for popping those races out?
Ryan, I'm sorry, it's been a while since I bought it and I can't remember the part number, but it's made my Matco. I think they market it as a seal remover tool. It has a hook on the end, then a round block welded to the shank to strike on with a hammer. I think they offered another style that has a small handle that comes out perpendicular to the shank and then you strike on the bent part of the tool, but I opted for this style that has the striking block welded to the shank as I figured it would do a better job of transferring the blows the closer it was hit to the shank.
I can look when I get to the shop and get the part number for you. I actually think Mayhew also makes one similar to the Matco one but I could be wrong.
OP
zmotorsports
ALLIANCE MEMBER
That is a neat bearing race punch/tool you got yourself there Mike.
A sheer joy to enjoy your content (work) as always.
Thanks Anders. Happy to have you continue to follow along.
ntsqd
Well-known member
I've seen one of the other version of that tool that you describe, Mike. Hadn't seen the one that you used.
Ever used a really hot circular MIG bead to shrink a race like that? If you could tilt the housing it will fall out after that. That was how I was taught to remove hard seats from cylinder heads (about 125A- 150A with a TIG), and it works just as easy on bearing races.
Ever used a really hot circular MIG bead to shrink a race like that? If you could tilt the housing it will fall out after that. That was how I was taught to remove hard seats from cylinder heads (about 125A- 150A with a TIG), and it works just as easy on bearing races.
OP
zmotorsports
ALLIANCE MEMBER
I didn't have much time in the shop last night as the wife and I had some errands to run, but I was able to get some prep work done on the axles before closing up shop.
I'm not sure if anyone else has experienced this, but on these Jeep JK axles, I have had 2 different Jeeps now that the studs have spun on me in the retainer plates. One during disassembly and one after I did all of the work to prep the axle shafts, including new seals, bearings and lock rings, then the stud spun on me during assembly. The retainer plates have studs pressed into them and use Stover style of lock nuts, so there is resistance on the studs during both disassembly and assembly. The studs have small splines that grip into the stamped steel retainer, but the retainer is only about .125" thick and if there had been any kind of rust jacking going on, I can now see how the grip of the splines in the shank of the studs can release enough tension to allow the studs to spin when the nuts are either being installed or removed. I never have had any issues with any of the Ford 9" axles which use the exact same style of retainer plate in all the years of working on them, but after having a couple on the Jeep JK's spin, I now take a little extra precaution to prevent either myself or the next mechanic having to deal with a spinning stud that won't allow the nut to come off.
So, for the past several years now I have been going an extra step after bead blasting the retainer plates. I now add a couple of small stitch welds to each stud before painting. This should prevent the studs from spinning on me during the next disassembly, or whomever the next mechanic is who disassembles it. Overkill? Yeah, probably, but overkill is under-rated.
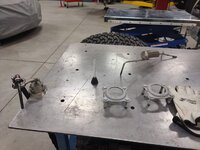
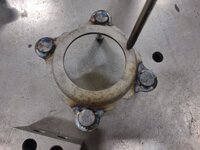

They should now be ready to be installed along with new seals and bearings before going back into the axle housing.
Thanks for looking.
I'm not sure if anyone else has experienced this, but on these Jeep JK axles, I have had 2 different Jeeps now that the studs have spun on me in the retainer plates. One during disassembly and one after I did all of the work to prep the axle shafts, including new seals, bearings and lock rings, then the stud spun on me during assembly. The retainer plates have studs pressed into them and use Stover style of lock nuts, so there is resistance on the studs during both disassembly and assembly. The studs have small splines that grip into the stamped steel retainer, but the retainer is only about .125" thick and if there had been any kind of rust jacking going on, I can now see how the grip of the splines in the shank of the studs can release enough tension to allow the studs to spin when the nuts are either being installed or removed. I never have had any issues with any of the Ford 9" axles which use the exact same style of retainer plate in all the years of working on them, but after having a couple on the Jeep JK's spin, I now take a little extra precaution to prevent either myself or the next mechanic having to deal with a spinning stud that won't allow the nut to come off.
So, for the past several years now I have been going an extra step after bead blasting the retainer plates. I now add a couple of small stitch welds to each stud before painting. This should prevent the studs from spinning on me during the next disassembly, or whomever the next mechanic is who disassembles it. Overkill? Yeah, probably, but overkill is under-rated.
They should now be ready to be installed along with new seals and bearings before going back into the axle housing.
Thanks for looking.
OP
zmotorsports
ALLIANCE MEMBER
I've seen one of the other version of that tool that you describe, Mike. Hadn't seen the one that you used.
Ever used a really hot circular MIG bead to shrink a race like that? If you could tilt the housing it will fall out after that. That was how I was taught to remove hard seats from cylinder heads (about 125A- 150A with a TIG), and it works just as easy on bearing races.
Thom, I'll get a part number tonight and a better picture of the Matco tool and post it up.
I have used the method you described, quite a lot actually, especially throughout my career in the Industrial Maintenance world in particular. You are right, a hot weld or two and the race with drop right out as it shrinks upon cooling. My dad taught me that trick on the farm when I was younger, as he was using the old Lincoln tombstone welder that we had in the barn and some 7018 rod. It was one of the very few tidbits of knowledge that I brought with me when I started my career as an Industrial Maintenance Mechanic back in the late 80's. It works like a charm especially when options are limited as far as a puller. In the case of the bearing races on these axles, they are not as tight a fit as it appears and they come out with relative ease. They just need to be coaxed out squarely and evenly with a few light taps on either side and walk them out so no need to get as intrusive as breaking out the welder. The smell of gear oil is bad enough, let alone the smell of burning gear oil stinking up my shop.
ntsqd
Well-known member
Hot, burning gear oil is a definite downside!
Fellow on another forum with a very stuck race had never heard of that technique, and he was farm born and bred. Several other, experienced posters hadn't heard of it either. Made me wonder if it wasn't as well known as I thought it was.
Fellow on another forum with a very stuck race had never heard of that technique, and he was farm born and bred. Several other, experienced posters hadn't heard of it either. Made me wonder if it wasn't as well known as I thought it was.
OP
zmotorsports
ALLIANCE MEMBER
Hot, burning gear oil is a definite downside!
Fellow on another forum with a very stuck race had never heard of that technique, and he was farm born and bred. Several other, experienced posters hadn't heard of it either. Made me wonder if it wasn't as well known as I thought it was.
I'm not gonna lie Thom, when I started my career back in the late 80's I walked into a shop full of mechanics that had a ****-ton of experience and knowledge, so I was very intimidated. Here was this young punk kid literally right off the farm and he was walking into the center of all this knowledge, what could I possibly bring to the table? And if your beginning was anything like mine, you may remember what it was like when you began your journey, it seems like the new guy, especially a punk kid, got all of the **** and menial jobs that came along, plus all of the harassment and hazing that came with the environment.
I think I'd only been there a couple of months or so when one of the guys had a bearing pull apart during removal in a gearbox and left the outer race still in the bore. There was nothing to use a puller on and I suggested welding the race to remove it. He looked at me like I had two heads. I thought there is NO way in this group of guys that this procedure was not common knowledge. I was nervous as hell to show it but when it worked, I think for the first time in those first couple/few months, I had actually earned just a little bit of respect. Very little, but I took it.
Bob Heine
ALLIANCE MEMBER
Mike, I bought all kinds of penetrants over the years and most seemed to work OK. On October 26, 2012 I got an offer I couldn't refuse: Two cans of Kroil for $12.00 direct from Kano Laboratories in Nashville, TN. I feel really bad for how little I've used but when I need it, it always works. I haven't bought another brand since. I'm tooI have used Kroil my entire Industrial Maintenance Career as that is what the shop was using when I began back in 1988.

It's direct center in the cabinet so I can grab it with either cabinet door open. You may notice there are a number of products in that cabinet that are 100% your fault and I thank you for that.
The second can of Kroil resides in a cabinet in the shed/workshop. It's in the middleish position in the row for no good reason.

Yup! Kroil has a permanent spot right at hand on the end of my work bench.
@Bob Heine I too suffer from buying chemical I see on Mike’s thread.
Shelia Shine was my latest wallet drain. And I love it!
@Bob Heine I too suffer from buying chemical I see on Mike’s thread.
Shelia Shine was my latest wallet drain. And I love it!
Attachments

aka Larry
Well-known member
The smell of gear oil is bad enough, let alone the smell of burning gear oil stinking up my shop.
There is nothing that smells worse, at least that my nose has experienced. I always say it smells worst that Russian Wolf P*ssy!.

I heard that somewhere before.Overkill? Yeah, probably, but overkill is under-rated.

OP
zmotorsports
ALLIANCE MEMBER
Mike, I bought all kinds of penetrants over the years and most seemed to work OK. On October 26, 2012 I got an offer I couldn't refuse: Two cans of Kroil for $12.00 direct from Kano Laboratories in Nashville, TN. I feel really bad for how little I've used but when I need it, it always works. I haven't bought another brand since. I'm toocheapfrugal to throw out the full cans of the other stuff. One Kroil can resides in the garage.
It's direct center in the cabinet so I can grab it with either cabinet door open. You may notice there are a number of products in that cabinet that are 100% your fault and I thank you for that.
The second can of Kroil resides in a cabinet in the shed/workshop. It's in the middleish position in the row for no good reason.
Sorry about that Bob.
Funny you mentioned how many you've tried. I was the same way over the course of my years of wrenching. Although I was introduced to Kroil when I began my professional career in the late 80's and was impressed immediately, I still purchased a few others to try during my earlier years as well. I found NOTHING worked nearly as well as Kroil, so I stopped wasting money on anything else. When my son and I dismantled the old shop in late 2016 in preparation to move to wherever our new home would be, we threw multiple almost full cans of various penetrants away. I thought never again, that is so wasteful and takes up unnecessary space. Well, that didn't last as long as it should have.
Me being who I am and wanting to be well versed in so many things, I want to make certain that the techniques and products that I use in my shop are still some of the best available, so I have purchased a few over the past 5 or 6 years again. I need to just purge my shelf again and stick to what works and quit trying other things, especially at this point in my life. On both of my tool carts I have a can of Kroil in the can caddy, so it is readily available and within easy reach no matter which cart I am using. I also have a can directly overhead on my chemical shelf front and center so it is also readily available. Plus, a couple of backups in the cupboard for when one runs out in any of the forementioned locations.
The other penetrants are somewhat buried a row or two back on my shelf and nothing else has ever made it to my tool cart so I don't know why I keep messing with anything else. 
Yeah, thinking about it, I really need to purge my chemical shelf. Maybe I'll make that a task for sometime in between jobs over the next month so I go into 2025 with a freshly purged chemical shelf and then vow to keep it that way. At least for as long as I can.
Bob Heine
ALLIANCE MEMBER
Mike, a selection of BFSHs (Big ******** Slide Hammers) is as important as a selection of impact wrenches. When the 1/4", 3/8" and 1/2" Milwaukee M12 battery tools fail to do the job, out comes the air line and my Harbor Freight 1/2" Earthquake. That beast treats everything my stuff is bolted together with like it's on finger tight. Only drawback is weight.With only 4 smacks, the axle gave in. Granted, they were pretty good smacks, but nothing I tried over the weekend would even move it.

There is nothing that smells worse, at least that my nose has experienced. I always say it smells worst that Russian Wolf P*ssy!.
Ok Larry, just how in the hell do you ….
No, no, noooooo. Never mind I DON’T want to know
OP
zmotorsports
ALLIANCE MEMBER
Hot, burning gear oil is a definite downside!
There is nothing that smells worse, at least that my nose has experienced. I always say it smells worst that Russian Wolf P*ssy!.
Ya know guys, I don't have the best "smeller" in the world, nothing like my wife's anyways.
But smells are a funny thing and really have some type of mental connection with me for some reason. My son and I had this EXACT conversation last Saturday night when they stopped by, and I asked him to assist me in trying to get that axle shaft removed. When we opened the shop door and he walked into the shop and said "oh, I don't miss that smell". The pungent smell of gear oil met us at the door, and it wasn't even the nasty burnt smelling gear oil, it was just normal somewhat used gear oil. Years ago, in our last shop, I thought I'd take the quicker approach to removing a Ford 9" axle bearing and lock ring and use the torch. I figured with me being able to wield a torch pretty well that it would make a much quicker job of removing an old bearing and lock ring. Between the burning gear oil and rubber from the seal, that smell took a month to get out of the shop.
That was huge mistake and one I swore never to repeat. I think it was one my son had hoped I would never repeat as well. But also, during our conversation my son mentioned he missed the smell of our old shop. He remembers the smell of the Klotz 2-stroke oil and race fuel and it brought back fond memories. I was so glad to hear him say he missed something of the days of working in the shop together because I sometimes feel his experiences in the shop were not pleasant because I was such a slave driver. I want him to look back on his youth and time spent together in the shop and have fond memories, not bad memories.
Although I doubt we will ever have race fuel in this shop, in only 7 short years it has begun to take on its own unique smell, but nothing like the old shop and probably never will. It is more like a combination of metal being cut and machining oil, with just a hint of gear and motor oil mixed in.

I remember when I was an early teenager and my dad would bring me down to my uncle's shop where he'd let me dig through his used lawnmower and snowblower parts looking for a carburetor or cable that I needed for a mower I was trying to repair to sell, the smell of his shop was soothing and almost intoxicating to me and I still remember that smell to this day. The feeling I had just being in that automotive shop because of the smell brings back fond memories. Memories that I hope one day my son and now grandson will have when I am long gone.
OP
zmotorsports
ALLIANCE MEMBER
Mike, a selection of BFSHs (Big ******** Slide Hammers) is as important as a selection of impact wrenches. When the 1/4", 3/8" and 1/2" Milwaukee M12 battery tools fail to do the job, out comes the air line and my Harbor Freight 1/2" Earthquake. That beast treats everything my stuff is bolted together with like it's on finger tight. Only drawback is weight.
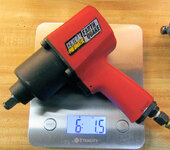
Same here Bob. Although I don't have the extensive cordless selection that you do and don't use cordless tools much, when my 1/4" or 3/8" impacts can't get the job done, out comes my trusty IR 2235 TiMax 1/2" impact which has yet to fail me. I don't know about yours, but mine seems to have gotten heavier over the years.
My son mentioned that now that I have a 10 pound slide hammer one of two things will more than likely happen, either I will never fight one like that and it will probably never come out of the toolbox again, OR, the next one will be so stuck nothing will touch it. I sure hope it isn't the latter.
mbryson
Well-known member
There is nothing that smells worse, at least that my nose has experienced. I always say it smells worst that Russian Wolf P*ssy!.
Hopefully that's not actual intimate knowledge? Sounds awkward however you analyze it
chipdog4
Well-known member
Matco's Part number was SP7 or SP205 (no longer made)What's the tool you used for popping those races out?
Here's one is from Mayhew
https://mayhew.com/products/specialty/specialty_seal_puller
PugetDude
ALLIANCE MEMBER
Siberian Snow Leopard is way worse...There is nothing that smells worse, at least that my nose has experienced. I always say it smells worst that Russian Wolf P*ssy!.