To avoid these ads, REGISTER NOW!

VISE REPAIR 101 all vise repairs, lubricants, sources for parts and the tricks to fix

To avoid these ads, REGISTER NOW!

Firstram

Well-known member
Joined
May 16, 2017
Messages
1,393
I think I'm going to weld up some fill around the hole on both sides. Not all the way through the shaft but around the outer part. Yes the weld will be super hard, but I can maybe use the suggested reamer or just die grind it. If that all turns out like **** then at least it'll be no worse than it is now, and I can always die grind all the weld off as if it never happened lol.
It would be a shame to ruin that meatball! Accurate die grinding a welded hole will bring the ****! If you absolutely have to weld it, block off the center. Clamp a brass, bronze or graphite slug ( 0.020” larger than the handle) centered in the hole and weld around it. Only weld one pass at a time so you don’t melt the lower temperature metal.

So much safer to open it up for a bushing!

https://www.amazon.com/Bridge-Const...-Drilling/dp/B0BNXFBNR1/?tag=atomicindus08-20
 

WatchHobby

Member
Joined
Dec 3, 2024
Messages
17
Clamp the head decently and support the screw sticking out and it will dill just fine. the only "precision" needed is the bore diameter.
Yep, I can clamp the work well, and I ordered a set of bridge reamers per the suggestion above, to cut the weld up back to a nice sized hole.
 

WatchHobby

Member
Joined
Dec 3, 2024
Messages
17
It would be a shame to ruin that meatball! Accurate die grinding a welded hole will bring the ****! If you absolutely have to weld it, block off the center. Clamp a brass, bronze or graphite slug ( 0.020” larger than the handle) centered in the hole and weld around it. Only weld one pass at a time so you don’t melt the lower temperature metal.

So much safer to open it up for a bushing!

https://www.amazon.com/Bridge-Const...-Drilling/dp/B0BNXFBNR1/?tag=atomicindus08-20
Yep those are big giant heavy awesome meatballs that I hope not to ruin. I like this plan too.
 

WatchHobby

Member
Joined
Dec 3, 2024
Messages
17
Yep those are big giant heavy awesome meatballs that I hope not to ruin. I like this plan too.
Are you saying put the plug in there in order to shape the weld around it, then ream out the plug? Rather than drill out a larger hole and pressing a bearing all the way into it?
 

Firstram

Well-known member
Joined
May 16, 2017
Messages
1,393
Are you saying put the plug in there in order to shape the weld around it, then ream out the plug? Rather than drill out a larger hole and pressing a bearing all the way into it?
You can weld it with the plug in place and knock the plug out leaving a finished hole. Well, finished enough for this method. The weld won’t stick to the brass!

the best way is to ream it oversized and bush back down to the handle size without any welding!

Both of these have been repaired with a bushing that’s glued in place with green bearing retainer. I don’t have a closer picture but you can zoom in to see the bushings.

IMG_8293.jpeg
IMG_8205.jpeg
 

WatchHobby

Member
Joined
Dec 3, 2024
Messages
17
You can weld it with the plug in place and knock the plug out leaving a finished hole. Well, finished enough for this method. The weld won’t stick to the brass!

the best way is to ream it oversized and bush back down to the handle size without any welding!

Both of these have been repaired with a bushing that’s glued in place with green bearing retainer. I don’t have a closer picture but you can zoom in to see the bushings.

IMG_8293.jpeg
IMG_8205.jpeg
Ok I thought maybe you meant that. But I thought weld would stick to bronze and brass since you can weld bronze bearing surfaces to steel.
 

KMScott

Well-known member
Joined
Feb 14, 2012
Messages
4,643
Location
Daufuskie Island, South Carolina
There is a good chance the meatball is cast material. Many Reeds casted the meatball around the spindle instead of friction welding. Check before welding. Best bet if it is cast material is to buy a round cast iron bar from McMaster Carr and weld or braze the plug in then drill. Cast iron drills real easy. Good luck.
 

Attachments

  • IMG_2324.jpeg
    IMG_2324.jpeg
    128.6 KB · Views: 30

WatchHobby

Member
Joined
Dec 3, 2024
Messages
17
There is a good chance the meatball is cast material. Many Reeds casted the meatball around the spindle instead of friction welding. Check before welding. Best bet if it is cast material is to buy a round cast iron bar from McMaster Carr and weld or braze the plug in then drill. Cast iron drills real easy. Good luck.
Good info. I did get a bras plug 5/8 which I might braze in. Still trying to decide what's best.
 

PeteA

Active member
Joined
Sep 5, 2012
Messages
29
I need vise jaw screws for a Wilton 2'' baby bullet vise. Does anyone know the screw size for this vise or a possible source to purchase them ? Any help would be greatly appreciated.
 

454ragtop

Well-known member
Joined
Mar 24, 2008
Messages
5,011
Location
Carver, MA
With the lower lip being broken off on the static jaw insert, I might be tempted to tap the hole in the jaw and use a couple flat countersink machine screws to hold the insert down and tight. Have to see how hard the top of the jaw inserts are, whether it is possible to counter sink the pin hole. Other option would be to find another jaw insert, but part interchangeability on Parker vises can be problematic.
 

fishwatcher

Well-known member
Joined
Jan 26, 2023
Messages
759
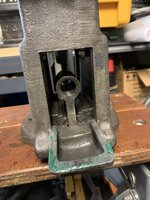
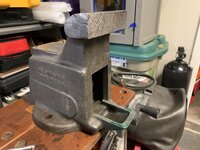
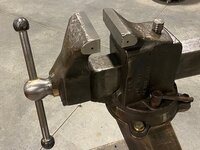
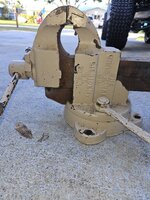
This Craftsman vise is clean, lubed and everything on it looks good and functional. I’ve had the screw out, collar removed, checked the collar bearing and all parts cleaned of old greas and regreased.

However, when I turn the screw handle and squeeze the jaws together just a little tight (against themselves or something in the jaws) it goes from a very easy and acceptable action to open and close, to becoming very tight (to both open and close). I can still open and close it, but the effort to do so becomes much harder.

If I open it all or nearly the way (8.35”) , and then close it.. the action loosens back up to what I think is normal again.

I don’t see any burrs anywhere, the screw is super straight, and the action is normal - opening and closing.. unless I squeeze the jaws together right (not overly tight mind you).

What can I do to fix or troubleshoot this further? I’m using Park Tools Polylube 1000 grease and it’s never been an issue before on other vises.

Thanks for your tips!
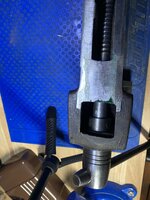
IMG_3059.jpegIMG_3060.jpegIMG_3061.jpegIMG_3062.jpeg
 

ALLFAST

Well-known member
Joined
Feb 20, 2017
Messages
1,233
Location
Northern California
This Craftsman vise is clean, lubed and everything on it looks good and functional. I’ve had the screw out, collar removed, checked the collar bearing and all parts cleaned of old greas and regreased.

However, when I turn the screw handle and squeeze the jaws together just a little tight (against themselves or something in the jaws) it goes from a very easy and acceptable action to open and close, to becoming very tight (to both open and close). I can still open and close it, but the effort to do so becomes much harder.

If I open it all or nearly the way (8.35”) , and then close it.. the action loosens back up to what I think is normal again.

I don’t see any burrs anywhere, the screw is super straight, and the action is normal - opening and closing.. unless I squeeze the jaws together right (not overly tight mind you).

What can I do to fix or troubleshoot this further? I’m using Park Tools Polylube 1000 grease and it’s never been an issue before on other vises.

Thanks for your tips!
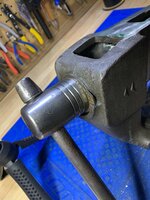
IMG_3059.jpegIMG_3060.jpegIMG_3061.jpegIMG_3062.jpeg
Is your setscrew backing out of the collar threads upon receiving clamping forces? Is the collar by chance facing the wrong direction? Try reversing the collar position and see if it improves the issue.

I recently had this dilemma ( collar facing backwards) on my newly acquired 1941 Rock Island 542-BX. There was an unacceptable gap ( at the back of the meatball/dynamic jaw interface surface) upon snugging the jaws together; once I flipped the collar around, everything was perfect.
 
To avoid these ads, REGISTER NOW!

fishwatcher

Well-known member
Joined
Jan 26, 2023
Messages
759
Hmm.. maybe. Is the nut holding pin supposed to **** right up against the nut? Mine is bent backward and there is a gap between it and the nut.

IMG_3072.jpeg
 

Outlawmws

Well-known member
Joined
Aug 9, 2011
Messages
39,328
Location
The Badlands
Have you had the nut out? is there debris in there forcing it cocked when you get to the final tighten?

And does it "lock up" if you are clamped on something larger?
 
Last edited:

fishwatcher

Well-known member
Joined
Jan 26, 2023
Messages
759
Is your setscrew backing out of the collar threads upon receiving clamping forces? Is the collar by chance facing the wrong direction? Try reversing the collar position and see if it improves the issue.

I recently had this dilemma ( collar facing backwards) on my newly acquired 1941 Rock Island 542-BX. There was an unacceptable gap ( at the back of the meatball/dynamic jaw interface surface) upon snugging the jaws together; once I flipped the collar around, everything was perfect.
The set screw is perfect. It doesn’t loosen or back out.

Reversing the collar should be easy to try (probably tomorrow).

Thanks.
 

fishwatcher

Well-known member
Joined
Jan 26, 2023
Messages
759
Have you had the nut out? is there debris in there forcing it cocked when you get to the final tighten?

And does it "lock up" if you are clamped on something larger?
I have not had the nut out. When I first when to investigate the nut (thanks to these answers 👆🏼) it did move a bit. Should it not move?

Is the nut holding pin supposed to be flush and straight against the nut?

How would I remove the pin (seems like an awkward angle to try and hammer it out from the top)?

And if I can’t straighten the pin, what would
make a suitable replacement? Or where could I buy a replacement pin?

Thanks all!
 

RTM

Well-known member
Joined
May 13, 2019
Messages
13,257
Location
SF Bay Area
Is the nut holding pin supposed to **** right up against the nut? Mine is bent backward and there is a gap between it and the nut.
Pull the pin, rotate it 180⁰, and put it back to make the gap go away?

Or just whack it with a punch?

It sounds like the nut or the screw is moving, not sure which, but I agree with everybody else.
 

fishwatcher

Well-known member
Joined
Jan 26, 2023
Messages
759
Pull the pin, rotate it 180⁰, and put it back to make the gap go away?

Or just whack it with a punch?

It sounds like the nut or the screw is moving, not sure which, but I agree with everybody else.
I confirmed I was able to move the nut back and forth a couple of millimeters. Should the nut be totally fixed in position?

In my effort to straighten the pin with a punch (steel stake), the pin loosened up and came out.

How should the pin be reset against the nut? I assume now I straighten out the pin and reinsert it? Also I assume I insert it from the bottom and tap it in. If it’s loose in there.. make a couple of barbs on it so it stays in?

I’ve never dealt with a pin on a vise before, so appreciate the education I’m getting here.

When I get it back together.. I’ll watch the nut as I rotate it in and close it tight to see what if anything that does to the nut.

I did reverse the collar.. but forgot to test that before I started in on the pin. 🤦🏻‍♂️

Thanks again.

IMG_3077.jpeg
 
Last edited:

Outlawmws

Well-known member
Joined
Aug 9, 2011
Messages
39,328
Location
The Badlands
Pin should be snug on the nut, but not so tight it causes the nut to bind. id the nut "floats" fore and aft, that makes for more backlash -something to consider.

The pin is simply a keeper to keep the nut from traveling and your suggestions on reinstalling are fine, and it can be inserted from either top or bottom, likely easier from the top/inside so you are not dealing with it getting stuck traveling the full length. -probably not an issue when new, at the factory, but for a dinged up used pin...

While the nut is out run it full length on the main screw to see if there is any thread binding.

A little movement up and down of the nut in the dovetail, - 90 deg from the axis of the main screw, won't hurt anything.

I suspect binding on the nut is your "lockup". Hence my earlier suggestion to test on a larger object - does it still bind?
 

fishwatcher

Well-known member
Joined
Jan 26, 2023
Messages
759
Pin should be snug on the nut, but not so tight it causes the nut to bind. id the nut "floats" fore and aft, that makes for more backlash -something to consider.

The pin is simply a keeper to keep the nut from traveling and your suggestions on reinstalling are fine, and it can be inserted from either top or bottom, likely easier from the top/inside so you are not dealing with it getting stuck traveling the full length. -probably not an issue when new, at the factory, but for a dinged up used pin...

While the nut is out run it full length on the main screw to see if there is any thread binding.

A little movement up and down of the nut in the dovetail, - 90 deg from the axis of the main screw, won't hurt anything.

I suspect binding on the nut is your "lockup". Hence my earlier suggestion to test on a larger object - does it still bind?
There was a small burr I saw at the end of the screw and I smoothed it out with a small file. I’m not sure if this was the cause of the bind up.

The nut, while outside of the vise, spins freely up and down the screw.

I got the pin out, straightened it, reinserted and now the nut is totally fixed, doesn’t float. Oops. Too tight? How do I loosen it back up?

It took me a helluva long time to get the dynamic back into the static (something was blocking it when I had the nut in with the pin) and to get the screw to line back up with the nut in. I finally did it by removing the pin again, pushing the dynamic through the static, installing the nut through the back and screwing the nut back into place. I hope this is clear.

I reinserted the straightened pin with a small bend, and now it’s back together (phew), but the open and close anction is always tight now.

Not just when I squeeze something. How to I get the nut to have some float back? Bend the pin some more?

Thanks again in advance for tips on how I can get this vise to operate smoothly.
 

fishwatcher

Well-known member
Joined
Jan 26, 2023
Messages
759
I remembered to try and flip the collar. I thought maybe that’s the trick!! After flipping it, now I can’t get the dynamic back in through the static enough to engage the screw and nut.

I can try the other way, remove the pin, screw the nut in from the back.. but that doesn’t seem right.

I hope all of this turns into something others can learn from, because right now it’s just got me totally befuddled.
 

Firstram

Well-known member
Joined
May 16, 2017
Messages
1,393
There was a small burr I saw at the end of the screw and I smoothed it out with a small file. I’m not sure if this was the cause of the bind up.

The nut, while outside of the vise, spins freely up and down the screw.

I got the pin out, straightened it, reinserted and now the nut is totally fixed, doesn’t float. Oops. Too tight? How do I loosen it back up?

It took me a helluva long time to get the dynamic back into the static (something was blocking it when I had the nut in with the pin) and to get the screw to line back up with the nut in. I finally did it by removing the pin again, pushing the dynamic through the static, installing the nut through the back and screwing the nut back into place. I hope this is clear.

I reinserted the straightened pin with a small bend, and now it’s back together (phew), but the open and close anction is always tight now.

Not just when I squeeze something. How to I get the nut to have some float back? Bend the pin some more?

Thanks again in advance for tips on how I can get this vise to operate smoothly.
Is the nut backwards?
 

Firstram

Well-known member
Joined
May 16, 2017
Messages
1,393
I have 5” prentiss that was bored out 0.135” too low, the hole didn’t even line up with the casting boss. I rebored and bushed it into alignment. You may need to leave the nut loose in the dovetails!
 
Last edited:

fishwatcher

Well-known member
Joined
Jan 26, 2023
Messages
759
I have 5” prentiss that was bored out 0.135” too low, the hole did even line up with the casting boss. I rebored and bushed it into alignment. You may need to leave the nut loose in the dovetails!
Good suggestion for a fix if I need to go that route.

There was some space between the indention and the pin before I pulled the bent pin. Also, I don’t see how there could be vertical movement, per @Outlawmws . The nut fits into the dovetail without any up and down play.
 
Last edited:

RTM

Well-known member
Joined
May 13, 2019
Messages
13,257
Location
SF Bay Area
It took me a helluva long time to get the dynamic back into the static (something was blocking it when I had the nut in with the pin) and to get the screw to line back up with the nut in.
This might be a clue. I was looking at the other posts, and was wondering if everything is straight and true, and maybe leaving the nut completely loose, and watch it while you tighten the jaw from the extreme open to closed, see if the screw is wobbling, pulled out of level, anything other than straight and true. A slight angular misalignment will be fine when you're wide open but as you get closer and closer to zero opening could become a problem. If the main screw is bent or if there is a wobble between the handle and the meatball would be things to look at
 

fishwatcher

Well-known member
Joined
Jan 26, 2023
Messages
759
This might be a clue. I was looking at the other posts, and was wondering if everything is straight and true, and maybe leaving the nut completely loose, and watch it while you tighten the jaw from the extreme open to closed, see if the screw is wobbling, pulled out of level, anything other than straight and true. A slight angular misalignment will be fine when you're wide open but as you get closer and closer to zero opening could become a problem. If the main screw is bent or if there is a wobble between the handle and the meatball would be things to look at
When I push the dynamic through the static, it runs into something. With or without the nut. Without the nut, I can wiggle it and get it through.

Definitely more time needed to analyze what’s going on.

The potential for it to be really smooth is there. I’ve felt it.

Thx.
 

Patrickm82

Well-known member
Joined
Feb 27, 2021
Messages
826
Location
Massachusetts
Take some measurements in various spots along the slide and see if there are any variations. I have a prentiss 21 that would hang up in spots and turns out it was thicker in a few spots. Not noticeable by eye but just enough to drive me nuts putting it back together. A few mins with a file and palm sander and it slides like butter.
 

RTM

Well-known member
Joined
May 13, 2019
Messages
13,257
Location
SF Bay Area
When I push the dynamic through the static, it runs into something. With or without the nut. Without the nut, I can wiggle it and get it through.
Do you have hammer dings in the slide, making it wider at the top? File them square.

Oops, edit, here was mine post filing, the shiny spots were high spots that bound


IMG_20191121_210144-X3.jpg
 
Last edited:

fishwatcher

Well-known member
Joined
Jan 26, 2023
Messages
759
Do you have hammer dings in the slide, making it wider at the top? File them square.

Oops, edit, here was mine post filing, the shiny spots were high spots that bound


IMG_20191121_210144-X3.jpg
when “it’s right”.. and it’s really hard to get right now.. it slides in and out easily. When it’s not working, it bangs into something hard and just won’t go in past an inch or two. I can move the screw around and see when it is aligned and should be going into the nut .. but doesn’t reach the nut to engage.

I haven’t had time to do measurements or look at it more.. but will take all of your input into consideration when I mess with it this weekend.
 
To avoid these ads, REGISTER NOW!
Top Bottom