To avoid these ads, REGISTER NOW!

What did you do "IN" your garage today?

Prospecter

Well-known member
Joined
May 16, 2015
Messages
2,518
Location
Maine
Unwrapped Charlie's floormats. Installed the aluminum binding strips in the boat floor. Primed the inside of the hull. Caulked some gaps in the floor. Pumped foam into the bilge space. Measured, cut and sanded the rear bench.
Messing about with boats on dreary winter days is a wonderful way to spend time in the shop. I thought you had a fishing boat, but there seem to be some sailboat features, like a spar and a centerboard trunk in your pictures?
 
To avoid these ads, REGISTER NOW!

zmotorsports

ALLIANCE MEMBER
Joined
Oct 20, 2009
Messages
21,574
Location
Northern Utah
Cleaning inlet valves on my daughters 2009 mini cooper s, its direct injection nonsense which means the inlet valves get carbed up. Its been idling rough when cold with odd noises on start up, fuel pressure is good so not hpfp.

before
PHO00024.JPG

after
PHO00029.JPG

However, did remove the valve cover to reveal the top timing chain guide had disintegrated and fell into the timing cassette, this jammed the cassette open and stopped the tensioner doing its job which means slack chain. The more I look the more I find, almost want to button it up and at least hear the ******* run right before I go any further. Dont blame anyone for not wanting to work on these pos 🙄

@Demon69 , did you mechanically remove the carbon with walnut blasting or chemical? By the appearance I'm not thinking chemically.

Thanks.
 

Demon69

Well-known member
Joined
May 29, 2024
Messages
148
Location
Surrey UK
@Demon69 , did you mechanically remove the carbon with walnut blasting or chemical? By the appearance I'm not thinking chemically.

Thanks.
This is the first time for me and I used what I had to hand. Started out with carb cleaner and a long pick to break up the worst of it, I then soda blasted it with a small handheld that I made an extenstion tube for and a vac to keep the mess down. The blasting doesn't really get right into area where the seat meets the valve so I finished that and any stubborn bits with the pick. A final blow out with an airline and it's done. Had to use a bore scope for the pick work as the intake ports face the firewall.

Cheers D
 

SMOKEYBEAR

Well-known member
Joined
Jan 3, 2016
Messages
485
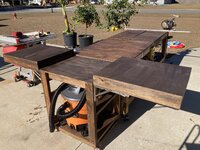
I've been hustling during my time off now that my holiday family obligations are complete. . Wrapped up the kick stand to support the extension table on my band saw. l looked at options on line, decided to make my own. I had most of it on hand. Not sure of the load rating, but its all Alcoa Aluminum and grade 8 fasteners so probably higher than stuff I found on Amazon. Quick reminder with a sharpie on the wrench size for the finite adjustment. A few minor changes to the aluminum angle so it's removable as 1 piece. I finally took time to locate nice hardware to secure the X/Y vice to the drill press table. Made for easy drilling and tapping of the solid stock on the bottom side.
 

Attachments

  • KS4.jpg
    KS4.jpg
    283.9 KB · Views: 37
  • KS3.jpg
    KS3.jpg
    314.2 KB · Views: 37
  • KS2.jpg
    KS2.jpg
    399.1 KB · Views: 40
  • KS1.jpg
    KS1.jpg
    499.4 KB · Views: 40
Last edited:

KwikFab

Well-known member
Joined
Jul 27, 2024
Messages
1,296
Location
Central Valley, CA
What was supposed to be 2+weeks to plan, draw, order LED lights, stand-offs, and whatever else turned to a 2 day thing.

Found out last month I'm going to be an uncle, and for a small baby shower they would like something small (personalized, home-made). Thing is, my mom, brother, and my brother's fiance are coming by to visit in 2 days :ROFLMAO:

So I cut this out so they can hang up in the nursery -


20241229_114000.jpg

20241229_114054.jpg
 

kaymccampbell

Well-known member
Joined
Feb 27, 2015
Messages
29,763
Location
Upstate New York
Messing about with boats on dreary winter days is a wonderful way to spend time in the shop. I thought you had a fishing boat, but there seem to be some sailboat features, like a spar and a centerboard trunk in your pictures?
It's a Grumman motor-sail-row, with the full kit. I've never seen one before this one.
 

SMOKEYBEAR

Well-known member
Joined
Jan 3, 2016
Messages
485
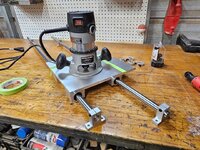
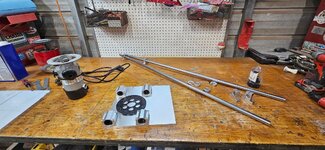
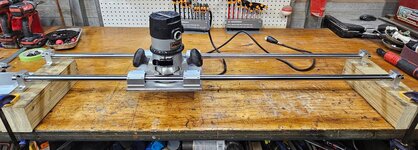
Separate project, new post. Parts for the router sled are starting to arrive. In the final R&D stages. I have enough to get a good start tomorrow after I hit the gym. I laid some stuff out to just get a look at it all. The first picture is the closest to what I think will become the final version. I might add some length to it for a "sweep" and or "viewing window". I have some hardware to purchase tomorrow too. I'm using 3/8" aluminum plate as a replacement of where others have used acrylic sheet or a combo of plywood and aluminum angle. , the aluminum is probably over kill especially at 3/8" thick.
 

Attachments

  • RS6.jpg
    RS6.jpg
    153.8 KB · Views: 38
  • RS5.jpg
    RS5.jpg
    398.4 KB · Views: 33
  • RS4.jpg
    RS4.jpg
    216.8 KB · Views: 35
  • RS3.jpg
    RS3.jpg
    149.1 KB · Views: 32
  • RS2.jpg
    RS2.jpg
    185.2 KB · Views: 33
  • RS1.jpg
    RS1.jpg
    344.8 KB · Views: 29

Outlawmws

Well-known member
Joined
Aug 9, 2011
Messages
39,455
Location
The Badlands
It's a Grumman motor-sail-row, with the full kit. I've never seen one before this one.

That is very cool Kay! when I was in HS I was given a 12 ft wood framed sailboat, glassed canvas over the frame, front and rear decks and a cockpit. - no centerboard, it had a cross bar and dagger boards. The sail was a sort of lateen that you pulled up the mast, which was guy wired in place centered in front and slightly to the rear on the sides.

It also had a transom plate you could put a motor on, and oarlocks for rowing.

The catch was the bottom wood skeleton front to rear was beginning to rot out. I put in pine 1X1's to reinforce, added a cut to fit ply plate, front and rear of the cockpit to hold them in, and went sailing!

I loved how well that boat sailed! it was fast and maneuverable, and once, coming back in with a strong wind to our back (after a couple hours of tacking to get upwind), we came ripping back so fast the dagger-boards slipped on the wing nut clamps and we had to hold them down, and the bottom started slapping the waves like it was being driven across them by a motor! I had to douse the sail to stop it as it was afraid to try turning it! Strong wind!

Awesome boat, very adaptable, but it met its end after a trip to a lake in the Sierras where we borrowed my buddy's step father's 15 HP kicker and proceeded to beat the bottom put of it. We did get camp gear to and from one side of the lake to the other, but you just knew the framing was gone.

I'd love to find plans or rescue one if not so far gone, but I've never seen another.
 

harley jim

Well-known member
Joined
Dec 6, 2013
Messages
11,434
Location
Cleveland Tn..........out in the sticks
I helped a friend that got kinda screwed over!
20241115_123737.jpg
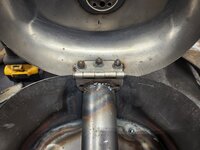
He hired a guy to make this gas tank into a storage compartment, it's mounted on an electric trike. The guy didn't understand compound angles so when he cut it the top became smaller than the bottom and fell inside, this is where he quit and ran!
20241230_161321.jpg
I cut some wedges out and pinched the bottom.
20241230_174318.jpg
Added 1½" plate.
20241230_175714.jpg
Made the hinge offset to the front.
20241230_175333.jpg
Did some grinding, hammer and dolly work.
20241230_180715.jpg
Now there is about a ⅜" lip around the top, we will put a piece of chrome door edge guard around the lip after he paints it.
Messenger_creation_892C32D4-855D-44DB-8F3E-C31D2DC5DA1B.jpeg
Roy is 83 and still going strong, he will pull this trike behind his 1935 Ford pickup, when he goes to a car show he will have a pit bike to cruise the show with.
 
Last edited:

rharman

Well-known member
Joined
Apr 22, 2012
Messages
9,024
Location
SoCal
Took my wheel/tire to the dealer for a patch/plug. Had to wait about 1-1/2 hours, even with an appointment, as they were swamped. When he brought it back, I kind of did a double-take. No wheel weights? I asked and he went back to check with the tech - yep, it balanced out without adding any weight! Walked out with a $0.00 invoice. I feel better with their patch/plug from the inside than just a DIY plug.
 

rharman

Well-known member
Joined
Apr 22, 2012
Messages
9,024
Location
SoCal
I have two of these in the pipeline but just (almost) finished this one today. Still needs paint to seal the wood.

12"x3/4" plywood base for the scissor jack for our cars. A little more stability and spread the load if you're on a crappy surface.
3/8-16 T-Nuts, 1" bolts, and an inexpensive Sunex 9/16" combi wrench.
Center hole is from my router trammel. Edge has a slight roundover.

1735622631325.jpeg1735622647655.jpeg
1735622665933.jpeg1735622677983.jpeg
 

bugnut

ALLIANCE MEMBER
Joined
Jul 14, 2012
Messages
4,082
Location
Central Ohio
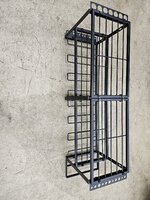
Gifted my SIL a holder for drills etc. Realized after purchasing it was a DIY kit. So I assembled. Will add a backboard, power strip and @BobHeine timer, and will help him install it in his garage.
 

Attachments

  • 20241230_152724.jpg
    20241230_152724.jpg
    1.7 MB · Views: 31
  • 20241230_152713.jpg
    20241230_152713.jpg
    1.8 MB · Views: 26
  • 20241230_152704.jpg
    20241230_152704.jpg
    1.7 MB · Views: 25
  • 20241230_142252.jpg
    20241230_142252.jpg
    923 KB · Views: 29

zmotorsports

ALLIANCE MEMBER
Joined
Oct 20, 2009
Messages
21,574
Location
Northern Utah
This is the first time for me and I used what I had to hand. Started out with carb cleaner and a long pick to break up the worst of it, I then soda blasted it with a small handheld that I made an extenstion tube for and a vac to keep the mess down. The blasting doesn't really get right into area where the seat meets the valve so I finished that and any stubborn bits with the pick. A final blow out with an airline and it's done. Had to use a bore scope for the pick work as the intake ports face the firewall.

Cheers D

Thanks. I have not been impressed with some of the blasting attempts for the reason you just mentioned, you really can't get around the seat face, margin or combustion face of the valves for a thorough cleaning of the carbon. I feel the only real method to mechanically remove the carbon is with heads off and perform a thorough cleaning, but that is not a cost-effective method.

On these GDI engines, I feel capturing as much oil vapor through the use of a catch can is the best method to prolong the carbon buildup, but without having the fuel flowing over the valves, carbon buildup is simply a biproduct that needs to be dealt with and it is just kicking the can down the road until the inevitable needs to take place.

Thanks for your reply and it should at least prolong the buildup quite a while longer.
 

CoogarXR

Well-known member
Joined
Jan 11, 2016
Messages
6,888
Location
Ohio
Finally finished the VW yesterday. I still have a low-speed popping sound in the suspension somewhere, I can't find it. I give up. I can't get it to make the sound manually, like bouncing it. Everything is tight bolt-wise and clearance-wise. I looked up torque specs and torqued every damn bolt I could see to spec. Some were a little off. According to VW forums, MKV VWs suffer from clunky/poppy front ends, and it may be something we'll just have to deal with until it annoys us enough to have a pro look at it.

Doing this suspension job was probably one of the most pain-in-the-*** jobs I have ever done. But I was glad I did it, since I noticed some catastrophic things that may have went unnoticed had I just paid to have the work done. Like I mentioned in another post, the driver side CV axle had 3 of 6 bolts actually tight, 2 were finger-tight, and one bolt was missing. Yesterday while double-checking everything on the passenger side, I found the same damn thing on that axle too! Except this side had 4 of 6 bolts were finger-tight! One bolt was backed all the way out, only being retained by the CV boot not letting the head past. What the hell man? Why are all the axle bolts on this car loose? I can see the passenger side axle was replaced at some point, so maybe they just didn't torque them right. But the driver side was the OEM axle, I wonder why it was loose? Maybe somebody had the ****** out at some point. Who knows. Crazy ****. I know I'd have hated to lose both axles going down the road though, so I'm glad I was able to see that...

Oh well, even with the mystery popping, the ride is so much nicer with new struts, springs, balljoints and a new CV axle (and a tightened axle on the other side). The ride is smoother, the highway shimmy is 98% gone, the steering is tighter, and all the other "normal" groans, pops and clunks are gone. So while it isn't a perfect end to a way-too-long project, it's "acceptable", which seems to be an all-too-common result to my work, lol.

Kudos to you guys who do this for a living. Especially in salty/rusty regions. That job sucked with a capital "F".
 
To avoid these ads, REGISTER NOW!

Jgaz

Well-known member
Joined
Dec 16, 2016
Messages
1,746
Location
AZ
I have two of these in the pipeline but just (almost) finished this one today. Still needs paint to seal the wood.

12"x3/4" plywood base for the scissor jack for our cars. A little more stability and spread the load if you're on a crappy surface.
3/8-16 T-Nuts, 1" bolts, and an inexpensive Sunex 9/16" combi wrench.
Center hole is from my router trammel. Edge has a slight roundover.

1735622631325.jpeg1735622647655.jpeg
1735622665933.jpeg1735622677983.jpeg
Disc fits inside the spare tire/wheel center?
Nice job
 

DGersic

Well-known member
Joined
Mar 12, 2017
Messages
6,449
Location
DeKalb, IL
Why are all the axle bolts on this car loose?

That has me wondering if this is an engineering failure. Wrong bolt materials, wrong torque spec failed to achieve sufficient clamping force, something like that. Not familiar with the car, but if you can find other owners to check their axle bolts, it could be interesting.
 

TheClaw

Well-known member
Joined
Dec 25, 2012
Messages
550
Location
Chicagoland
Put a couple of coats of ScuffX on the bottom liner for my motorcycle lift.

I was using the lift as a bench to soak some larger parts in EvapoRust. A section of the piece I was soaking cracked the plastic bin I was giving it a bath in. 3 gallons of EvapoRust flooded the lift, spilled all over the floor and generally made a mess. Thank God it's water soluable.

The existing liner was toast. So off the Depot for some hardboard, cut it, drilled it, primed and started to paint it.

ScuffX from Ben Moore is solid stuff. I resists gasoline, motor oil and brake fluid. I know, I geeked out one day and tested it.

20241231_093018.jpg
 

PhantomEB

Well-known member
Joined
Feb 6, 2006
Messages
6,967
Location
Medicine Hat, AB, Canuckistan
Gonna be more skidplate time today. Hard pack the frame section then tackle the angle iron edge of where I plan to add on the Transmission pan and cable linkages section. It’s gonna be fun as it will angle up from the flat belly section To act like a ramp To slide up and over with. May support it down the road once I see just how this suspension really works.

so now question since I want this skid plate to be right out there in your face in those oh **** moments….red or orange? think I can get both for 5 fingers….

Need to wait on countersink bolts anyways to mount this skidplate anyways.
 

JEFFREYWisconsin

Well-known member
Joined
Oct 9, 2021
Messages
380
The garbage truck had some stuff blow out near my property. I had to patrol my ditches and bag up some paper trash. I was going to hang out in the garage, but then decided to bake a key lime pie for the stay at home NYE celebration.

Renaissance man according to my wife.

Who am I to argue? 🤣
 

Attachments

  • IMG_9596.jpeg
    IMG_9596.jpeg
    647.2 KB · Views: 81
Last edited:

slik560

Well-known member
Joined
Oct 5, 2009
Messages
787
Location
Kansas, USA
Spent some time finally organizing all of the loose 1/2" drive sockets with an organizer that sits in the top of my Homak tool cart. I don't have all that many, but just having them roll around loose was inconvenient at best. Also continued cycling a new Power Queen 12v LiFePO4 battery that I have cabled to the new 2000w inverter. Experimenting with layering back-up power solutions. Generator, battery etc.
 

Wrench97

Well-known member
Joined
Jun 23, 2018
Messages
12,312
Location
Southeastern Pa
Thanks for the suggestion. The vents and filters look ok, BUT your comment triggered an idea.

There is a "vent" on the plumbing to the condensate neutralizer, basically an open length of pipe. Installer's thought was to provide an overflow if the neutralizer ever clogged, but since it is about net 2 feet of pipe from the condensate trap to the vent, it may look like a better source of air on startup than the actual vent. I am going to try capping that line and see if I still get the error.

I have also noticed moisture in the muffler in the summer - this is a combi unit, so hot water use only in the summer - and am wondering if that is a symptom of the same issue.

I'll give a week or so and let you know if capping that line helps. Thanks again for the idea.
If it's needs the condensate vent open to pull the sensor switch closed you have blockage somewhere like in ****** for the sensor line on the heater side or water not draining and blocking the sensor ******.
Pictures of the sensor and hose connections might help.
 

Wrench97

Well-known member
Joined
Jun 23, 2018
Messages
12,312
Location
Southeastern Pa
Finally finished the VW yesterday. I still have a low-speed popping sound in the suspension somewhere, I can't find it. I give up. I can't get it to make the sound manually, like bouncing it. Everything is tight bolt-wise and clearance-wise. I looked up torque specs and torqued every damn bolt I could see to spec. Some were a little off. According to VW forums, MKV VWs suffer from clunky/poppy front ends, and it may be something we'll just have to deal with until it annoys us enough to have a pro look at it.

Doing this suspension job was probably one of the most pain-in-the-*** jobs I have ever done. But I was glad I did it, since I noticed some catastrophic things that may have went unnoticed had I just paid to have the work done. Like I mentioned in another post, the driver side CV axle had 3 of 6 bolts actually tight, 2 were finger-tight, and one bolt was missing. Yesterday while double-checking everything on the passenger side, I found the same damn thing on that axle too! Except this side had 4 of 6 bolts were finger-tight! One bolt was backed all the way out, only being retained by the CV boot not letting the head past. What the hell man? Why are all the axle bolts on this car loose? I can see the passenger side axle was replaced at some point, so maybe they just didn't torque them right. But the driver side was the OEM axle, I wonder why it was loose? Maybe somebody had the ****** out at some point. Who knows. Crazy ****. I know I'd have hated to lose both axles going down the road though, so I'm glad I was able to see that...

Oh well, even with the mystery popping, the ride is so much nicer with new struts, springs, balljoints and a new CV axle (and a tightened axle on the other side). The ride is smoother, the highway shimmy is 98% gone, the steering is tighter, and all the other "normal" groans, pops and clunks are gone. So while it isn't a perfect end to a way-too-long project, it's "acceptable", which seems to be an all-too-common result to my work, lol.

Kudos to you guys who do this for a living. Especially in salty/rusty regions. That job sucked with a capital "F".
Unhook the sway bar links and see if the noise goes away
 

SMOKEYBEAR

Well-known member
Joined
Jan 3, 2016
Messages
485
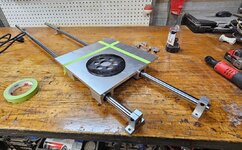
I'm out of parts for the router sled project. I came to a stopping point and cleaned up a bit. Waiting on the delivery of the other set of rails (the long set).
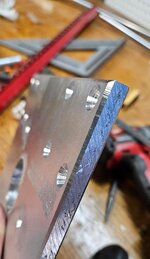
Used the straight edge I made for my Porter Cable saw and tried the metal demon blade on it. Best/ accurate session of aluminum cutting I've had and tried the router out on it too. It came out better than I figured it would. Made a crude jig for the bearings bolt pattern on the aluminum plate, and it actually worked! I have two holes that need to probably go up 1 or 2 sizes to free it up from binding. It runs smooth though... so I'm no complaining.

Bunch or pictures.. no specific order
 

Attachments

  • RS16.jpg
    RS16.jpg
    122.1 KB · Views: 66
  • RS15.jpg
    RS15.jpg
    187.1 KB · Views: 28
  • RS14.jpg
    RS14.jpg
    181.3 KB · Views: 25
  • RS13.jpg
    RS13.jpg
    145.7 KB · Views: 25
  • RS9.jpg
    RS9.jpg
    162.7 KB · Views: 24
  • RS8.jpg
    RS8.jpg
    218.1 KB · Views: 22
  • RS7.jpg
    RS7.jpg
    231.6 KB · Views: 19

Old Man Roger

Well-known member
Joined
Apr 6, 2017
Messages
18,200
Location
Palm Coast Florida
What was supposed to be 2+weeks to plan, draw, order LED lights, stand-offs, and whatever else turned to a 2 day thing.

Found out last month I'm going to be an uncle, and for a small baby shower they would like something small (personalized, home-made). Thing is, my mom, brother, and my brother's fiance are coming by to visit in 2 days :ROFLMAO:

So I cut this out so they can hang up in the nursery -


20241229_114000.jpg

20241229_114054.jpg
Do they live in Jupiter Florida or did they name the baby Jupiter? Nice work, by the way.
 

rharman

Well-known member
Joined
Apr 22, 2012
Messages
9,024
Location
SoCal
Disc fits inside the spare tire/wheel center?
Nice job
It could, but my truck has a foam insert that goes there to hold the factory wrench and things.

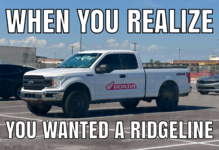
It's a Ridgeline so I have the whole trunk in the bed for stuff. My toolbox, earthquake backpack (SoCal, you know), moving pad, ratchet straps, and a 1/2" breaker bar and socket for the lug nuts. Plenty of room for that flat disc.

p.s.: No Ridgeline smackdowns, please. It works for me. :cool:

1735691521171.png
 

SMOKEYBEAR

Well-known member
Joined
Jan 3, 2016
Messages
485
@02Xterra Are you left handed? I've never seem a fishing rod holder with the reels to the ceiling when mounted vertical. I need some rod storage, in a odd way that may work better than the reels close to the ground. Definitely takes less space than horizontal on the walls. My new shop doesn't allow me to store them over head like I have in my previous shops.
 

02Xterra

Well-known member
Joined
Oct 1, 2015
Messages
525
Location
Lynchburg, Va
@02Xterra Are you left handed? I've never seem a fishing rod holder with the reels to the ceiling when mounted vertical. I need some rod storage, in a odd way that may work better than the reels close to the ground. Definitely takes less space than horizontal on the walls. My new shop doesn't allow me to store them over head like I have in my previous shops.
Nope, right handed. I had planned to just line them up and have them sit in spot faces at the bottom, with a notched board going across at the top.. But figured with the sawdust flying around, perhaps having them upside would keep the dust off the reels more effectively.
For rod storage I put two aluminum tubes on spacers off the work room ceiling, and most of them go there.
Seems like a very effective way to do it! The ceilings in my rental space are over 14' high, so ceiling use is out for me
 
To avoid these ads, REGISTER NOW!
Top Bottom