OP
olsenmotorsports
Well-known member
Not a conversation to walk into the middle of!
Realized that as soon as I hit “reply”


Not a conversation to walk into the middle of!
Thank you for the feedback!For me, the content is good. I like it. I like seeing the tools and workspace as much or more as the vehicle being worked on.


The ratcheting break pad spreader is on the list of tools I never knew existed but totally appreciate. I always thought a rusty 3/4” chisel was meant to do the same task.
As you guys know I am a clean freak. I have this 5x4 stainless table that I put casters on. It is perfect for cleaning cars. Just roll it under and start spraying stuff. Helps a lot to contain the mess.


Tim, I have a similar setup. I don't have a specific table however, but I do have a 4' by 4' stainless steel drip pan with a 2" lip that I fabricated about 25 years ago. I place it on the floor, a table, or now I can use my AGA Lift table, and spray undercarriage areas down as needed before and/or after a repair. The filthy mess drips down into the pan to avoid having to clean up the mess on the floor. Then, I usually have a couple of absorbent pads that I use around during various jobs, so I soak up the wet, dirty mixture with the already slightly soiled absorbent pads to clean the drip tray, then it's nice and clean and ready for the next use.
I also was able to get caught up on some videos yesterday while having my morning coffee. I watched one of yours where you were sealing the engine case. I had to chuckle to myself when I saw you break out the silk string to place around the perimeter of the case half. I had a coworker about 30 years ago who "dabbled" in aircraft engines, mainly on air boats, but he had some experience. He knew I was building a lot of VW engines at the time and informed me about the process and even brought me a copy of the service recommendation from Continental pertaining to the silk and anaerobic sealant. Upon reading through the process, I immediately bought some silk string using the part # included in the service bulletin and have used it on all my VW engines from that time on.
Yesterday after seeing your video, I had to run out to the shop and snap a couple of pictures of my old box of silk string from Continental. This is quite old but still works.
These were my "go-to" items for sealing up VW cases for many years. I did a lot of VW engines during the 90's and early 2000's for sandrails and cars and these products were used on every one.
Amazing I love it!
It is a super controversial topic (the thread that is) but we find it works really well for us. Nothing worse than having a leak on the case right?
Man those old bugs leaked oil so bad, I bet with the thread you never had a weep!
I have never built a VW engine, with the exception of an old 356 4 cam engine. That made my head spin setting up all those spider gears. Was the first and last one for me lol. Just a time ****!
Happy new year bud
Tim, I agree, sealing debates involving various chemicals and processes is one of the hottest debate topics there are, next to the old Ford vs. Chevy debate of course.
I would be lying if I said not a single one of mine ever leaked. But in the sand racing and sand sport arena back in the early 90's through 2012 when I was most heavily involved, I did have great success using this method compared to other builders that I talked with who were sticking with the same old technique laid out by VW and then wondering why theirs leaked profusely.
VW's in general leaked if you looked at them wrong, and having them in a highly detailed, painted, chromed and polished sandrail chassis was NOT what I wanted my workmanship to be associated with, so I took any advice and practices from other industries I could find and tried to remedy the leak situation to the best of my ability, and the Continental technical document and process helped the most, or should I say gave me the best chance at not having a leaking VW as possible.
During my VW building days, I was mainly focused on the 2180, 2276 and 2332 displacement engines, using **** cranks, Pauter rods, Mahle cylinders and pistons, then topping off with either IDA's or IDF's and usually a Turbonetics (T3/T4) turbo setup. I would then build either a swing axle or later came the 091 bus style transaxles followed by the Mendeola's as horsepower was increasing and Mendeola's prices were coming down somewhat to be within reach for the average duner. I really enjoyed building those cars either in piece format as my clients upgraded their cars, or better yet, from frame up when a client wanted a completely new car built. I used the Rhino cases on quite a few as I was flipping the ring & pinions to run in a mid-engine configuration but also welded gussets onto the back of quite a few to more or less bridge the gap between the VW transaxle cases and the cost of the Rhino cases.
A few cars also received a small dose of NOS, but I tried to steer my clients towards turbo alone and not introducing another hard to control power adder into the equation. Most were not racing for anything other than bragging rights of the fastest to the top of the mountain so I tried to explain the cost of such bragging rights where no money was involved to aid in offsetting the costs. It was fun times and occasionally I do miss that industry, but many people these days simply don't understand the gamble with building that kind of powerplant when they aren't willing to control so many of the variables that I was insisting they do. Things like paying close attention to fuel being mixed and not allowing to sit for months at a time, consistent cleaning of air filter elements, cooling system maintenance, etc. Many clients did a good job of maintaining their hi-performance cars to the highest degree, but that started changing around 2010 and later. With the introduction of side by sides into the sport, many people were expecting to treat their highly tuned and built cars like lawnmowers. Putting them away after a trip and not doing anything do them until the next trip several months later then expecting everything to run the same as it was previously. I quit working on snowmobiles in 2009 and sand toys around 2012. That's when my son and I got completely out of the powersports arena as I grew tired of dealing with the new blood coming into the sand sport in particular.
you know it is funny that you mention that. Getting the most power out of something is NOT our business model. I found that it just doesnt make the money. It gives bragging rights, but things become unreliable. We focus on making stock better, but reliable. Nothing worse than having someone stuck on the side of the road waiting on a hook.
Now we just stick to cam profiles and bigger jugs, basic stuff that really cannot bite you in the behind!
We are playing with motec a lot though. It is amazing how many drivability things can be fixed with proper sensors and some electronic throttles!
Sounds like we are in agreement on several topics. Many of my clients were ONLY thinking of being the fastest but once we had some conversations, I was able to convince them that being the fastest all the time is nearly impossible and it comes at a HUGE cost, not only immediate costs for parts and materials, but the ongoing maintenance. When I started asking them how much time they were willing to devote to the car between trips, THAT is when I could see the realization hit them that this is going to costly in time as well.
This is where I tried to differ myself from other shops in the area. I didn't want to just build something for a person and send them on their way. I wanted to form a "partnership" with the client in devising a plan for what they really wanted and then on how we could achieve that by working together.
I lost a lot of business to those who simply couldn't understand what I was trying to do, but more importantly, I gained a very loyal clientele that appreciated my honesty as well as what I was bringing to the table. When I closed my business down in 2017, after being in business for 20-years, I had a lot of my clients ask if I would continue to do work for them. At the time I had absolutely no intention of working on stuff for other people as I was getting burned out and had enough of dealing with entitled people that simply didn't get it. The whole shift that I saw in the powersports industry really ruined me as far as wanting to wrench for other people.
With the wife and I finding our forever home and me being able to build my forever or dream shop, working on stuff for other people was not something on my list of things to do going forward. I just wanted to work on my own stuff, period.
Well, after a few years of getting the new shop built, setup and organized the way I wanted it I was able to build a few of my own projects that had been on my "wish list" for a while. The LS swap into my Jeep being one and helping my son build his new Jeep another. However, after getting some of my personal projects crossed off the list, I realized I missed working on such a wide range of things for other people.
Wouldn't you know it that is when the good Lord was listening, because I received a few phone calls from past clients who had been burned or soured by those working on their stuff. They sought me out to see if I would once again do work for them at the time I was thinking I had some time on my hands, so it was a win/win opportunity.
I like the kind of work I do now on the side and eventually I still have a few cars that I want to build for myself, while including my son and grandson, but for the time being if I can provide a service to a small group of clients that are appreciative, and make a few bucks on the side, that is a winning combination as far as I am concerned.
Reliability and dependability are paramount in what I am trying to accomplish with each project. Seems like those seeking only speed are failing to realize one important factor that took me a while to learn, there's always someone faster.
I would like to get there at some point to where you are. But for right now i have to run a business.
Dreams!


Thank you very much for the kind words and the feedback!Great updates - love the detail.


Excellent work as always Tim. Thank you for sharing.
I like that you mentioned you like the stepped feeler gauges and use them as a "go/no-go" tool. I have mentioned the same thing before and prefer the stepped feeler gauge blades for certain tasks, running overheads (valve adjustments) is one I absolutely like them for.
I also see that you use the CMD Press Lube #3. That has been my go-to press lube for 35+ years and I don't think the formula nor the packaging has changed in all that time. Maybe one of the few chemicals I can say that about.
I have a question. You mentioned that once the car comes back from paint it will immediately have the clear bra installed. Do you not wait until the paint finished off-gassing and curing? When I went to a PPG paint seminar years ago they advised at least 3 montsh, but highly recommended 6 months before installing a clear bra on a fresh paint job. Just curious as I know most urethane paints require an amount of time for the solvents to fully flash and the paint to cure so it needs to breath.
Thanks.
Great updates as usual. Interesting to see the P engine assembly. I've done several different OEM engine builds, but never a P engine.


The STOMSKI stuff is good. But I really wish it was tool steel instead of aluminum. Good tooling ideas, just not made for a production environmentLots of Stomski goodness in there...
I have found this invaluable as well in the Porsche ownership experience...love it!


“Aah it’s false knock, let’s just turn those off n let’r eat”This one had a hard life. Someone converted it to a 3.4 but didn’t know what they were doing on the tuning front. Detonation killed this thing.
The pistons were just destroyed. Some people SMH. Didn’t run right, we are the third store to look at it.


“Aah it’s false knock, let’s just turn those off n let’r eat”
 actually no knock sensors on these old terds. All you need to be able to do is READ a 5 gas analyzer and a wide band. Pretty simple,
Ha you can finance anything!Reading this thread, my bank account just let out a cry
A quick side track Tim. I was heavily involved in the modern hemi scene from day one. We were doing everything n anything possible upfront with no real tuning ability, just methods for tricking the ecu.

A quick side track Tim. I was invoked heavily in the modern hemi scene from day one. We were doing everything n anything possible upfront with no real tuning ability, just methods for tricking the ecu.
One thing that many thought is we suffer from false knock. The very first weekend that Diablo released their tuner they gave us the ability to disable the knock sensors and this was literally before a track event.
No ******** racing on Sunday sold a whole bunch of engines come Monday.
And no, I was not one of them
 But I did install them all to the same height for consistency just as you are. In sandrails especially, EVERYTHING is right out in the open for the world to see.
 Updates on teh 993 Cab. It is back from paint! I need to get going on this engine for it!
All my critical engine internal seals and bearings showed up from Porsche (more on that later). We only use OEM parts from PMNA. Yes I am well aware that you can get them for 1/4 of the price from different sources, but in our testing there is a difference. So that is where we buy from.
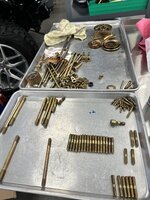
First off had to get my studs in the engine block. Just a little dab of Blue Threadlocker, less is more here.
All the case studs are in. These you have to be careful of setting the height on as they are not sealed holes, so if you just hit the stud setter with the gun you will run out of threads on the nut side and they will be visibility different. For these blocks I made a jig for this. It is basically a stud setter and then a gauge block sleeve that floats under it. Clutch the screw gun to 4 and send them. Makes short work of it. Not a big deal if you are one and done, but we do 4-5 a month so that tooling really pays off.
Same with the head studs. Install them with a gauge block sleeve so you get the perfect height every time. These just spin in by hand if your prep is good, same deal just a dab of blue on the threads.
The 993 I was building the above engine is back from paint! So excited.
Oh man I can't even imagine! Give a bunch of gearheads the MOAR POWER easy button what do you expect!
First time i ever heard knock i had so much green behind my ears you would of thought it was moss. Im on a test drive, come back man this thing sounds like its got marbles clanging around in a jar when you get on the gas and its loaded at low RPMs??? The look on my foremans face was hilarious... That's knock son
I would tell my clients that I was ok with pushing the envelope and building power, but you MUST respect the laws of physics as they simply cannot be broken, bent yes. I also have made a career of pushing some vehicles to the extreme, whether it be sandrails, snowmobiles, race cars or now Jeeps, but I would also explain that if you are going to push vehicles to their limits, you need to know where those limits are.. I really love the color... is that a factory color?? and curious of what the name is... ARP is the go to fasteners here as well. Although I’m very much curious to have a go at P1 (P1 Manufacuring), commonly used by the nitro teams (they also make TF / FC engine blocks). Their hardware looks pretty good I have to say.Tim, I am glad to see you using ARP fasteners, I wouldn't expect anything less from you. Been using them myself for over 3 decades now and have found nothing else that even comes close to quality and constancy. Great choice.
I am also not surprised to see you using threadlocker sparingly. I DESPISE seeing things fully "slathered" in various chemicals. More is not better when it comes to anaerobic chemicals, or even aerobic chemicals for that matter.
I didn't build enough VW engines at a time to justify building a tool or jig for installing case and cylinder studs, or hell, I didn't even think about honestly.
I often had people ask me why I got out of building street rods and into sand quads and sandrails so heavily. I would joke with them and say "anyone can build a car and hide their flaws with interior and piling filler over ****** bodywork, but in a sandrail and sand quad, there's no hiding substandard workmanship or quality, It is right out there for the whole world to see".
I do miss those days of building sleds and sand toys, but I am also kind of looking forward to retirement when I can have the time to build a few more hot rods while I'm still above ground.
^^Tim, I'm not personally a fan of green. HOWEVER, that car is going to look amazing. Especially with the contrast of the matte black hoses and cables laid over it as that color as the canvas in the engine bay.
I've also done enough color changes on vehicles to know and appreciate the amount of time that goes into making them look like they came from the factory that way. That is not for the faint of heart, or wallet for that matter.
I had experience with the death knock as a young kid, watching my oldest brother experience it as he played with cams, compression and figuring out how timing and carburetion played a role. IT was on his dime, but I learned from it and have spent a lifetime making sure to avoid it as well as directing my clients away from it.
Even when off-roading now in our Jeep, when climbing my way through an obstacle or working through a technical section, I feel I am very aware of the strains and stresses on certain components of the vehicle as it progresses through the obstacle, applying power and removing power as the Jeep responds to tell me how it's doing. Sounds strange and maybe I'm not explaining it well, but I'm sure those of you who are around vehicles enough, can tell what's going on with the vehicle at certain times or situations and know what I'm talking about.