To avoid these ads, REGISTER NOW!

Between 265 & 485 SQ/FT The Time Machine: Rebuilding a PNW 1.5 car garage from 1946

Workspaces sized between 265 and 485 squarefeet.

Tim_with_a_T

Well-known member
Joined
Dec 30, 2013
Messages
217
Location
Vancouver, WA
Hello,

Long time occasional lurker on here. I'm a hot rodder living in the PNW, living in Vancouver, WA to be more specific. In 2017 I purchased my first home, a small 2br/1ba built in 1942 by the city of Vancouver for incoming shipyard workers during WW2 and auctioned off after the war. From what I've been able to gather, the detached garage was added in 1946, and a 3rd bedroom was added onto the rear of the home in the 90s. My goal is to place both home and garage back in time, with a few modern upgrades hopefully not too noticeable.

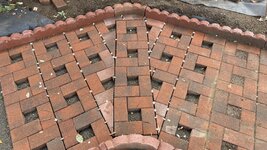
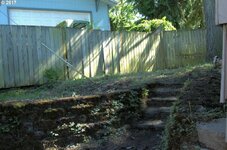
I wasn't able to focus on projects at all because shortly after I moved in, I learned the lot had some serious drainage issues. So.... I spent a few years of my life on the end of a shovel removing ~ 936 cubic yards of dirt, but in exchange, I traded it for ~ 2,000 sq ft of pavers put down over beds of crushed gravel and sand, as well as a repaired-as-best-we-could retaining wall between my neighbor and I ("we" being my dad, brother and I - neighbor "supervised" and chipped in $50), a demo'd retaining wall 4' off the back of the house dug out and rebuilt now 10' off the back of the house, some french drains and a dry well or two, etc. I was very busy in that time and ABSOLUTELY SHREDDED. I miss the digging days.

Winter of 2021 the garage roof started leaking, so a massive Harbor Freight tarp got me by till summer when my dad, friend Jeremy and I re-roofed the garage. There was at one time a very poorly constructed attic in the garage, with various creatures both known and unknown to the scientific community living up there. The roof leak did not help the smell of all that, so I took advantage of the dumpster we ordered for the roof and gutted the attic. The consequence of doing this was everything inside the garage was pushed out to the driveway so the demo could be done, then some pressure washing happened, then everything got shoved back in with zero plan to re-organize or set anything back up. After this, the house roof was replaced and it's just been one project after the other. It's been a blur.

All this to say, the time has come to make the garage a functional workshop. Progress will be slow as I primarily work alone and jump from one nightmare to the next as priorities shift, and by that I mean whatever flame is burning brightest and has potential to do the most damage, but follow along to see the chaos unfold. Pictures to follow in the next posts.
 
To avoid these ads, REGISTER NOW!
OP
T

Tim_with_a_T

Well-known member
Joined
Dec 30, 2013
Messages
217
Location
Vancouver, WA
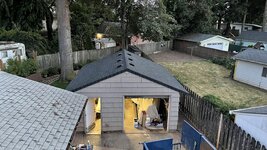
Here’s some context for where I’m going with it. The garage is 18’x20’, and I’m going to try to maximize every cubic inch of that place.

I want to say this image came from Popular Mechanics, but I’m not sure. I just love the simplicity and functionality.

IMG_1046.jpeg


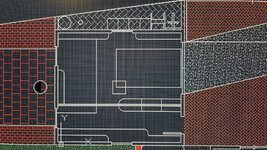
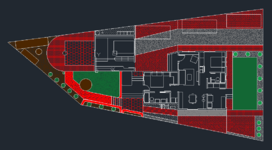
I drew this up in CAD - there’s a lot going on here and a lot will likely change, but generally speaking this is what I’m going for.

IMG_1106.jpeg
 
OP
T

Tim_with_a_T

Well-known member
Joined
Dec 30, 2013
Messages
217
Location
Vancouver, WA
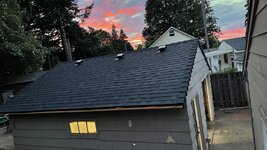
Re-roof project. For some reason it’s not loading all the pictures, so you only get to see the completed roof, not the FOUR LAYER tear-off or the lower roof deck rot replacement. We covered the entire deck with ice and water shield, so hopefully it doesn’t leak again anytime soon.

IMG_7108.jpegIMG_7109.jpegIMG_7110.jpeg
 
OP
T

Tim_with_a_T

Well-known member
Joined
Dec 30, 2013
Messages
217
Location
Vancouver, WA
Looks like a cool project, what kind of stuff do you plan on working on in there?
IMG_6600.jpeg

There’s a 32 roadster and a T bucket in there. In the CAD snip above, larger rectangle sideways at the rear of the garage is the 32 and the smaller rectangle at the front is the T.

I have a build thread on the H.A.M.B. for the T. The 32 kinda sorta fell together with cast-offs from the T, so I didn't start a thread on that one.
 
Last edited:
OP
T

Tim_with_a_T

Well-known member
Joined
Dec 30, 2013
Messages
217
Location
Vancouver, WA
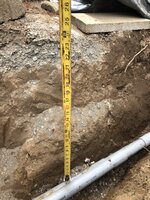
The garage luckily already had a sub panel installed when I moved in. It took me awhile to figure out they didn’t bother to ground the sub panel to the main panel, so I had the joy of running that through an already crowded conduit under the house and out the back, as well as pounding in a couple grounding rods. Now there’s a legit 100a sub panel installed, and in the same trench I ran 1” pex sleeved in its own conduit out to a hose bib, with plans to expand on that later. Below shows several past sins of power ran to the garage, some random pipe nobody has a record of, some poorly done previous grounding rod, and the ghetto-*** plumbing that used to be the garage laundry room. Oh the joys I've had....

IMG_2767.jpegIMG_2770.jpegIMG_2786.jpegIMG_2785.jpegIMG_2784.jpegIMG_2787.jpegIMG_2797.jpegIMG_2829.jpeg
 

WildBill

ALLIANCE MEMBER
Joined
Aug 20, 2021
Messages
2,068
Location
PNW
IMG_6600.jpeg

There’s a 32 roadster and a T bucket in there. In the CAD snip above, larger rectangle sideways at the rear of the garage is the 32 and the smaller rectangle at the front is the T.

I have a build thread on the H.A.M.B. for the T. The 32 kinda sorta fell together with cast-offs from the T, so I didn't start a thread on that one.
Nice! I was wondering if a vehicle project would fit, apparently you have two that will.
 
OP
T

Tim_with_a_T

Well-known member
Joined
Dec 30, 2013
Messages
217
Location
Vancouver, WA
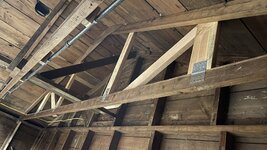
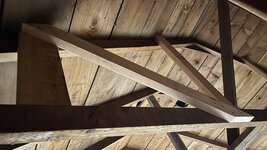
One of the things I want to make use of is attic storage. Unfortunately, the truss design leaves a lot to be desired, so I came up with what I think will improve the situation up there. It will be a bit before I can tackle this, but we're starting to get to current work status, so it makes sense to mention this here.

IMG_6589.jpegIMG_1345.jpeg
 
OP
T

Tim_with_a_T

Well-known member
Joined
Dec 30, 2013
Messages
217
Location
Vancouver, WA
One of the things I figured out right away was that my compressor (240v 60gal Husky) was in the way no matter where I put it. I decided to make the effort to place it outside, eventually in a dog house on the side of the garage. I'd also like to muffle the air intake, so I'll be sure to post on that when I get there.

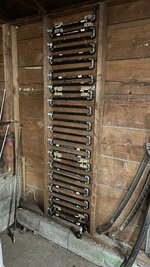
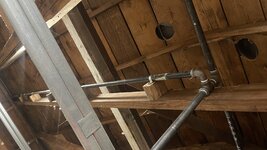
When I had the compressor inside the garage, I routed 1/2" black pipe around the perimeter of the garage walls about 4' off the ground, with connection points every 8' or so. I liked this feature a lot, but I didn't like how it was mounted to the walls as it would make finishing the walls difficult. Eventually, I came up with a plan to route the air lines overhead in the rafters to the various planned workstations (see CAD snip for reference).
1. At work bench near the “x” above.
2. Above the peninsula work station.
3. Through wall just above personnel door for a hose reel mounted underneath the peninsula work station - from there, a pop-out to the outside wall will allow me to drag an air hose more easily out into the driveway.
4. Final drop just above the rectangle representing the T - this will be a fold out welding table mounted to the wall. Planning to do all my welding/grinding near the door to keep the mess inside at a minimum.

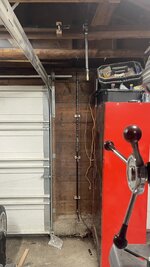
The compressor is on the other side of this wall, connecting first to > 50' of pipe before the ladder rung pokes through the top plate, up, over and across the rafter.

IMG_1407.jpegIMG_1331.jpeg

Across rafter:
IMG_1334.jpegIMG_1335.jpeg


Tee's off to go to the peninsula - not the best picture but the only one I could get to load:
IMG_1357.jpeg


Drop above work bench:
Couldn’t get the picture to load

Drop at peninsula:
IMG_1338.jpeg


Continuing on over to welding station:
IMG_1342.jpeg


Welding station drop:
Couldn’t get picture to load.


Peninsula run continues to front wall, where a hose reel will live under the peninsula work station:
IMG_1341.jpeg
 
OP
T

Tim_with_a_T

Well-known member
Joined
Dec 30, 2013
Messages
217
Location
Vancouver, WA
Because the compressor will be living outside in a potentially damp environment, I wired it on a 240v 30a GFCI breaker. This past weekend, I was finally in a position to hook everything up and give it a go, and I found that the compressor trips the breaker right away. I'd guess the thing gets about a second of run-time before the breaker trips. This compressor is a 3-wire configuration - two hots and a ground. I have the neutral pigtail on the GFCI breaker connected to the neutral bus bar in the sub panel.

This brings me to my first question - why does this happen, and what are some things I can check? My dad helped me troubleshoot a little bit over the phone - his speculation is either that the compressor may like an equipment ground (pound in a grounding rod out there and see what happens), or that perhaps the start capacitor on the motor is sending an imbalanced load on one or both lines causing the breaker to trip. Does anyone have any experience with this?
 
Joined
Sep 16, 2016
Messages
8
Location
Vineland, NJ
The ground rods won't do anything, if it does you have a major problem in the main line of the house or garage itself. The best thing to do is use a regular 2p 30a breaker (non gfi) hook it up and see if it runs longer. If it stays on then you have a voltage leak somewhere from the breaker to the compressor motor. Exe: wet wire, pinched wire casing, motor windings are bad.

If it still trips you have an overload. That will mean thorwire or motor is bad. Do a continuity test on the wire, with ALL wires disconnected on all ends. If continuity exists its bad. If continuity test on wire passes the problem is in the motor and I have no actual idea how to fix it. My training is call an appliance guy or just replace the motor.

If it was wired incorrectly, like a dead short, the breaker would trip instantly. It could still be a short, just a small one.

And the last possibility is the gfi breaker is bad from the factory, definitely not impossible.

This all assumes the garage panel is wired correctly if it's not all bets are off gfis are very touchy.

Hope this helps
 
OP
T

Tim_with_a_T

Well-known member
Joined
Dec 30, 2013
Messages
217
Location
Vancouver, WA
The ground rods won't do anything, if it does you have a major problem in the main line of the house or garage itself. The best thing to do is use a regular 2p 30a breaker (non gfi) hook it up and see if it runs longer. If it stays on then you have a voltage leak somewhere from the breaker to the compressor motor. Exe: wet wire, pinched wire casing, motor windings are bad.

If it still trips you have an overload. That will mean thorwire or motor is bad. Do a continuity test on the wire, with ALL wires disconnected on all ends. If continuity exists its bad. If continuity test on wire passes the problem is in the motor and I have no actual idea how to fix it. My training is call an appliance guy or just replace the motor.

If it was wired incorrectly, like a dead short, the breaker would trip instantly. It could still be a short, just a small one.

And the last possibility is the gfi breaker is bad from the factory, definitely not impossible.

This all assumes the garage panel is wired correctly if it's not all bets are off gfis are very touchy.

Hope this helps
Thanks, you've given me some things to go check. I should mention a few other things (got distracted).

First, I switched out the 30a GFCI breaker for a regular 2p 30a, and the compressor runs fine. Second, I have the wire coming out of the panel to a service disconnect box outside, then a pigtail to the compressor. Third, I wired a second 30a GFCI breaker for my MIG welder, and I tried that today at lunch. That works great. So it's either the GFCI breaker I tried for the compressor is bad or I have some wiring gremlins to track down on that compressor circuit. I'll report back.
 

johnre

Well-known member
Joined
Dec 1, 2016
Messages
1,094
Location
Portland, OR
That 1/2" black steel pipe system looks impressive - that was a lot of trouble to go through to put that all together and have it leakproof; that I know because I did just an 11-piece natural gas system to reach from the gas meter to my outdoor barbecue, and it had to go underneath a deck that had a lot of obstacles. After that experience I did my air system in 1/2" copper as a result of the difficulty.

I agree with the inside overhead distribution, and the drop locations - you can never have enough. Do put a pressure gauge on one drop and ball-valve shutoffs on all of them; that's the way to avoid the leaks that are inherent in the quick connects.

How do you plan to switch the compressor on/off?
 
OP
T

Tim_with_a_T

Well-known member
Joined
Dec 30, 2013
Messages
217
Location
Vancouver, WA
That 1/2" black steel pipe system looks impressive - that was a lot of trouble to go through to put that all together and have it leakproof; that I know because I did just an 11-piece natural gas system to reach from the gas meter to my outdoor barbecue, and it had to go underneath a deck that had a lot of obstacles. After that experience I did my air system in 1/2" copper as a result of the difficulty.

I agree with the inside overhead distribution, and the drop locations - you can never have enough. Do put a pressure gauge on one drop and ball-valve shutoffs on all of them; that's the way to avoid the leaks that are inherent in the quick connects.

How do you plan to switch the compressor on/off?

My plan was to just control it with the breaker in the panel. Good idea on the ball valves for every drop. I'll see how it goes and update if necessary.

Nice work on the garage project!!! Nice write up too! ( I am Chief 64 over on the H.A.M.B.) I started with a one car garage back in 1980 and had to get creative with the space to be able to work on my GTO.

Chief 64 - nice to see you!!!
 

johnre

Well-known member
Joined
Dec 1, 2016
Messages
1,094
Location
Portland, OR
My plan was to just control it [the compressor] with the breaker in the panel.
You might want to reconsider; panel breakers aren't meant for this kind of service.

Similar discussion going on in this thread; as a result of the thread I changed out the standard SPDT 20 A switch (rated only 1 HP) to a motor start switch rated for 5 HP motor size, which was appropriate for my compressor.

And since your compressor is out of sight, a warning light that it is switched on is a good idea - then you'll always have a reminder to turn it off when you leave the shop. That's also discussed throughout this thread.
 
OP
T

Tim_with_a_T

Well-known member
Joined
Dec 30, 2013
Messages
217
Location
Vancouver, WA
You might want to reconsider; panel breakers aren't meant for this kind of service.

Similar discussion going on in this thread; as a result of the thread I changed out the standard SPDT 20 A switch (rated only 1 HP) to a motor start switch rated for 5 HP motor size, which was appropriate for my compressor.

And since your compressor is out of sight, a warning light that it is switched on is a good idea - then you'll always have a reminder to turn it off when you leave the shop. That's also discussed throughout this thread.

Very Nicely Done! You've given me some things to think about. Thank you for sharing the link.
 
OP
T

Tim_with_a_T

Well-known member
Joined
Dec 30, 2013
Messages
217
Location
Vancouver, WA
The ground rods won't do anything, if it does you have a major problem in the main line of the house or garage itself. The best thing to do is use a regular 2p 30a breaker (non gfi) hook it up and see if it runs longer. If it stays on then you have a voltage leak somewhere from the breaker to the compressor motor. Exe: wet wire, pinched wire casing, motor windings are bad.

If it still trips you have an overload. That will mean thorwire or motor is bad. Do a continuity test on the wire, with ALL wires disconnected on all ends. If continuity exists its bad. If continuity test on wire passes the problem is in the motor and I have no actual idea how to fix it. My training is call an appliance guy or just replace the motor.

If it was wired incorrectly, like a dead short, the breaker would trip instantly. It could still be a short, just a small one.

And the last possibility is the gfi breaker is bad from the factory, definitely not impossible.

This all assumes the garage panel is wired correctly if it's not all bets are off gfis are very touchy.

Hope this helps

Just an update. When I installed the disconnect box and whip for the compressor, it was pouring rain. Your message gave me the thought that I likely had a moisture issue. When it was dry the other day, I caulked around the disconnect box, and routed the whip in such a way that water can't get in. That seems to have done the trick as I reconnected the GFCI breaker this morning to give it another go. Works great, and it's currently raining, so I know the wiring is staying dry. Thanks again for the info.
 
To avoid these ads, REGISTER NOW!
OP
T

Tim_with_a_T

Well-known member
Joined
Dec 30, 2013
Messages
217
Location
Vancouver, WA
hey Tim, good to see some HAMB crossover. I need to get back to my backdated shop thread on here.

is there any chance you could add on to your garage? looks like there's a little room behind it?

What's the link to your shop thread? I don't think I've seen it.


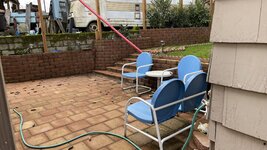
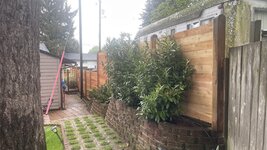
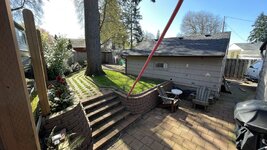
Generally speaking, this is what I'm working with (and a small flex to show I wasn't full of it when I said I dug out ~936 cubic yards of dirt armed with a pick, a shovel, and a wheelbarrow, then put down ~2,000 sq ft of pavers):

1734111930809.png


Story Time:

I'll keep this short story format as best as possible. I initially planned to put a shed butted up to the back of the garage - the city will let me go less than 120 sq ft and less than 12ft in height with no permit, so long as building setbacks are compliant (5' off side and 5' off rear property lines).

The city has shot down every other plan I've had (ADU above garage in existing footprint, carport in front of garage, etc). I think they will eventually lax their setback criteria, but for now, the garage is ON the property line on its SW corner, so in their world, the garage needs to move 5' to the East, and that is not possible without taking down a gigantic fir tree (brown circle above), as well as making the garage non functional as a garage (wouldn't be able to drive back there).

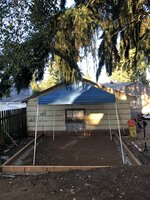
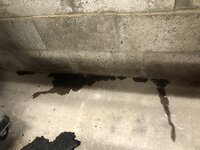
So with those things in mind, early on in my digging days, I set about on a quest to build said shed behind said garage. This was to be my first french drain project, and my second paver project. The garage is carved into roughly a 3' tall hill, so that was part of the drainage issues I've had (water coming in on the back wall of garage). I got the trench all dug out, lined with black plastic, sloped my drain pipe, filled with drain rock, covered the thing all up and got started on my paver border/foundation footprint. Around 75% of the way through the project, I figure, hmmm, should probably check to see if that drain works.... So, I get a couple 5 gallon buckets of water, dump it in on the uphill side, quickly run around the corner to the downhill side.... Nothing. Not even a trickle. I've blacked out a lot of this from my brain, but I do remember going into the garage and seeing a nice little artistic water feature seeping in through the back wall. Those days were fueled by energy drinks, gallon jugs of water, and heavy metal music, so once the blinding rage left my body in powder form from gritted teeth, I dug it all back out, deeper this time, which fixed the issue.


IMG_1615.jpegIMG_1618.jpegIMG_1641.jpegIMG_1651.jpegIMG_1737.jpeg

After getting the pavers down, it was around this time I also had that massive fir tree trimmed, and these two things really changed the whole vibe of the yard. Previously, I thought the back yard was completely un-usable for anything other than junk storage, but now there was a calm, peaceful vibe going on. It was at this point I decided to use the space as patio space, and ran with that idea. Pictures of that, as well as into the next post:

IMG_1769.jpegIMG_1817.jpegIMG_1824.jpegIMG_1870.jpeg
 

BigJoeArt

Member
Joined
Aug 22, 2015
Messages
9
Location
Almost IA, KS, or NE, but still in MO
haha you can find the start of my build thread HERE

as for the above mentioned water intrusion issue, the garage that we removed to build my house, had the slab LEVEL with the ground to the uphill side.

needless to say, you could watch water flow under the wall on the downhill side of the slab when it rained.

I spent a good few days digging a trench and a burm on the uphill side to redirect water.

It worked, but we still had to brace the bottom sill plate on the up and downhill side of the shed, cause it was rotten.
 
OP
T

Tim_with_a_T

Well-known member
Joined
Dec 30, 2013
Messages
217
Location
Vancouver, WA
Small update. I’ve been running the electrical for the garage, trying to plan for both present and future needs. I’m probably about 75% of the way done with this - still got light circuit, water heater, and hot tub circuits to run. Yellow are 120v, orange are the 240v. I don’t have good pictures of the actual progress- been too busy to take a picture I guess.

IMG_1374.jpeg

IMG_1448.jpeg

When running the wire, it became apparent that any wall mods needed to happen now, so because the framing is 24” on center, I sistered a 2x4 for each stud to give it a little more stability. I also started planning some window upgrades, and framing to that plan as well.

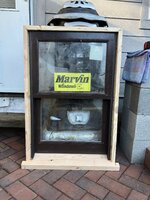
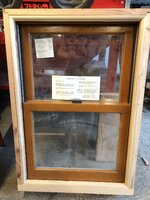
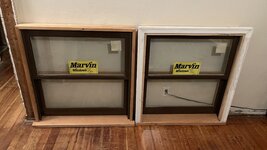
Several years ago I got ahold of about 10 Marvin Tilt Pac window kits - these are intended to upgrade your Craftsman-era or earlier double hung windows to a more modern dual pane without replacing the window casing or getting into the siding. They come with two window tracks, top and bottom window sashes, and some hardware. They are custom built to your specs. Someone donated these to the Rebuilding Center in Portland, a favorite stop of mine just across the river. This was at the time I was hoping to put an ADU above the garage, and I figured this would be a low cost solution. After that plan didn’t work out, I re-donated several of them, gave a few to the neighbor for her barn, and set my sights on figuring out how to get a few of these into the garage.

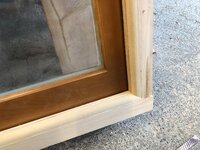
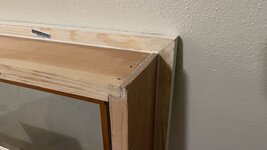
Because these were a custom order, I had no idea what the rough opening was supposed to be, so some reverse engineering was in order. As an aside, the house was built with 5 1/4” jamb thickness, so my intent is to match that with the garage. For these reasons, I decided to build the windows like a pre-hung door, then install accordingly. Here’s a couple pictures of the process - I used 2x6’s cut down to 1” x 5 1/4” for the frame and a 2x8 cut at a 15* angle for the sill (that’s the angle the window tracks were cut at, so I matched that angle). The first window had a few whoopsie cuts, but overall turned out good. After that, I started to get the hang of it.

IMG_3311.jpeg

IMG_3308.jpeg
IMG_3310.jpeg

IMG_3309.jpegIMG_3318.jpegIMG_3320.jpeg

IMG_3321.jpegIMG_3322.jpeg
 
OP
T

Tim_with_a_T

Well-known member
Joined
Dec 30, 2013
Messages
217
Location
Vancouver, WA
Continued..

IMG_3346.jpeg

Old window:

IMG_1419.jpeg

New window rough opening completed and window mocked up for fit:

IMG_1420.jpeg

IMG_1421.jpeg

IMG_1424.jpeg

Pulled the window back out and back apart to prime all the bare wood, as well as trimmed it out with brick moulding.

IMG_1439.jpeg

IMG_1440.jpeg

IMG_1442.jpeg

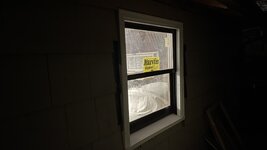
And finally managed to get the window in. I have some siding to touch up and caulking to do, but I’m happy with the result. Three more to go!!!

IMG_1446.jpeg

IMG_1447.jpeg
 
OP
T

Tim_with_a_T

Well-known member
Joined
Dec 30, 2013
Messages
217
Location
Vancouver, WA
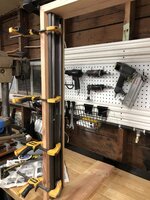
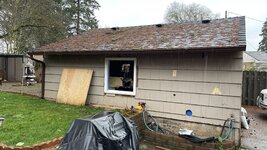
Merry Christmas and Happy New Year. My gf and I vacationed in Hawaii and managed to get pneumonia on the flight over, but we made the best of it. When I got back home, I was pretty low energy and bummed out to spend my remaining week off recovering instead of getting $#!+ done, but such is life sometimes. I managed to get out in the garage for a couple hours a day and bust out another window, as well as finish the wiring for the receptacles that will be for a future lathe. Pictures of outside show gap of where old window used to live- I’ll be covering this up with some shutters, once I figure out how I’m going to make them. Last pictures show shutter concept (never mind-couldn’t get it to load) and general idea for lathe and cabinets. I’ve been staring at the garage scheming what’s next, and I think I have a plan. Hope you all had a happy, healthy holiday season.

IMG_1611.jpegIMG_1612.jpegIMG_1614.jpegIMG_1615.jpegIMG_1616.jpegIMG_1617.jpeg
IMG_1445.jpeg
 

gatewaysysop

Well-known member
Joined
Nov 11, 2008
Messages
3,316
Location
Arizona
As has already been said, that's a stunning backyard you've put together. Hats off to you!

I really like the character of the place, glad you're preserving it while modernizing what you need to. Thanks for sharing and taking us along the journey. Nice drill press by the way, I saw it poking out in a few shots of the shop interior. :cool:
 
OP
T

Tim_with_a_T

Well-known member
Joined
Dec 30, 2013
Messages
217
Location
Vancouver, WA
As has already been said, that's a stunning backyard you've put together. Hats off to you!

I really like the character of the place, glad you're preserving it while modernizing what you need to. Thanks for sharing and taking us along the journey. Nice drill press by the way, I saw it poking out in a few shots of the shop interior. :cool:

Thank you! It’s been a big learning process. And thanks once again- hopefully the drill press will receive a formal introduction when I get the peninsula workstation going.
 
OP
T

Tim_with_a_T

Well-known member
Joined
Dec 30, 2013
Messages
217
Location
Vancouver, WA
Update time- been working on the garage as much as I can, but also been busy with life. My girlfriend moved in last week, and it became immediately apparent on my part that the living room/kitchen/bedroom/bathroom swap meet booths full of car parts lifestyle needs to change. The garage attic is needed now more than ever lol. I have managed to check something off the list, so here we are.

Something that weighs on my mind living in the PNW is the lack of seismic resistant foundations in the older homes, mine included (cinder block with not much of a footing and no rebar). This is by no means a how to seismically retrofit your foundation tutorial, but I feel better after reading several articles and researching past earthquakes. The house and garage have seen several small earthquakes already, with no real signs of damage, so I’m thinking I’ll just improve what’s there as best I can while I’m in there and move on.

The first thing I did was to hurricane strap the rafters to the walls - I realize most prefer to install these on the outside of the walls, and I realize the orientation of the strap install is unconventional on my part due to the framing constraints of the building, but my thinking is that in heavy wind, or even in an earthquake, having weight up in the attic could cause some significant racking, so this is something to help mitigate that.

IMG_1625.jpeg

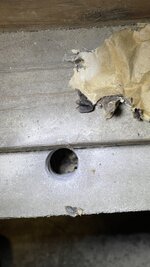
The next thing I did was bolt the walls to the foundation with some 1/2”x6” Tapcon bolts every 4’ and within 1’ of a corner or opening (door). There were a couple places when drilling the holes I noticed I punched through to a void, so my thinking was maybe the cinder blocks weren’t completely filled with grout when the foundation was laid. Scheming a way to solve this, I decided to take a few core samples by drilling a 1” hole into the block cavities from overhead to see what I’m working with. Out of 3 holes, 2 were completely solid about a foot down, which is as far as my drill would reach. One hole about 6” down seemed to be stuffed with some sort of paper bag…. My speculation is they disposed of the mortar bags inside the wall…. That is pretty much on par with what I’ve seen in the rest of the house. Unfortunately and fortunately, there’s no real easy way to find the voids and fill them, as the paper is going to block the mortar anyway. Sooooooo… my plan is to fill up the core samples with mortar and move on under the assumption the wall is mostly solid, the mortar joints are in good shape, and the walls are bolted down solid.

IMG_1632.jpeg

IMG_1633.jpeg


After that was done, I began concentrating on the attic, beefing up the rafters and planning for what’s next.

IMG_1665.jpeg


IMG_1678.jpeg

IMG_1679.jpeg

This has proven to be slow going, so my next post will hopefully be when I’ve finished this part.
 
To avoid these ads, REGISTER NOW!
Top Bottom