To avoid these ads, REGISTER NOW!

What did you do "IN" your garage today?

GrayFlattop

Well-known member
Joined
Jan 18, 2018
Messages
1,051
Location
Chicago
Yeah I have been doing it on and off for years. I go through phases where I frustrated with just too much stuff I don't use.
Oh, there’s plenty of stuff I’ll keep (like an obscene number of ratchets), but I’ll never need three worm drive saws, three Milwaukee right angle drills, etc. Once upon a time I had thoughts of running a contracting company again or owning rental properties, but that no longer interests me - I can’t imagine having the time and energy.
 
To avoid these ads, REGISTER NOW!

RonnieC

Well-known member
Joined
Aug 7, 2013
Messages
814
Location
Orlando, FL
How do you like the Bosch mitersaw?
Overall good. It was a little off square out of the box but adjusting all three axes is fairly straightforward and it has held square since. The dust collection as designed by Bosch was not good so I bought an aftermarket dust chute from Shop Nation. Seems to be a big improvement.
Note I do not move it around- it stays permanently in the shop.
 

M.Brane

ALLIANCE MEMBER
Joined
Feb 11, 2024
Messages
1,793
Location
1 hr N/W of LA LA Land
Not actually in the garage (it won't fit), but in front of it. Flushed the cooling system in the 8K lb 6.0 diesel powered toolbox. Don't think it actually had any coolant in it, but flushed it out anyway just to be be sure. Refilled with CAT ELC. While I was waiting for liquid to drain removed the 2-way antenna, cleaned out the boxes, and took the yellow glaze off the headlights.

IMG_2276.jpeg
 

dwasifar

Well-known member
Joined
May 28, 2017
Messages
2,101
Not in the garage, but near it. I fixed a slight defect in a wall and repainted it.

Many years ago, I cut a 4" hole in said wall to run speaker wires into the adjacent ceiling. I had been neat about it, and I had the bright idea not to feather it out with mud, but rather just caulked the patch back in and smoothed it out neatly. It looked fine for some years, but then the caulk started shrinking, and the patch lines became visible. Not obvious, but every time I went up the stairs where the patch is, I knew it was there and my eye would go to it.

I put up with it for years and years, but now it feels like the caulk is done shrinking, so I spackled it lightly and repainted the wall.
 

Hal

Well-known member
Joined
Mar 8, 2008
Messages
677
Location
Vermont
Helped my friend change a broken coil over shock on the front of a 2010 Tacoma. Basically have to tear the front end apart to get it out.

He was going to do it in his driveway, but I persuaded him that inside the heated garage on the lift would be a lot easier.
 

GX460DIYguy

Well-known member
Joined
Aug 26, 2023
Messages
430
Location
Texas
Helped my friend change a broken coil over shock on the front of a 2010 Tacoma. Basically have to tear the front end apart to get it out.

He was going to do it in his driveway, but I persuaded him that inside the heated garage on the lift would be a lot easier.
Easiest way is to put pressure on the lower control arm while it’s on the lift and just take the nut off the lower ball joint, take the bolt out of the lower shock mount, and slowly lower the control arm to release the pressure on the coilover and then remove the nuts on the top. Much harder to do in a driveway though.
 

cannuck

Well-known member
Joined
Nov 30, 2021
Messages
4,662
Location
Rural SK
Saturday I had to choose from a half dozen projects that have been slowed to a crawl by year end accounting and some business research workloads. #1 grandson spent his day milling game player pieces from 1/2" MDF on his little CNC router (that runs off of my shop computer) so I had him close by for times when I needed a third and fourth hand, so thought it was time to get the 5HP rotary phase converter project running at somewhere between breadboard and final configuration stage to see where I am before correcting 3ph voltages. I can't run to the corner store and buy cheap run caps, so I started out with WAG from some rules of thumb to get the two pass through phases on even ground (244 and 245V). I designed a manual push button start/stop system using some industrial Square D components from my junk box. This required me to buy one more module to run parallel pull in circuits on main feed relay and motor start relay. After shelling out $73 for that little part of those switches I soon realized my scrap **** was worth half a grand - just to switch the 110V control side! My idler is an ancient plain bearing thing, but seems pretty decent. My WAG for start cap (you kick the 3rd leg "generating" winding momentarily) is a 400 uF oil filled device that works quite well. Instead of a fancy timer, I use the momentary NO to NC modules of push button and find I have to hold it for about a half second. WAY simpler/cheaper/more reliable than a Chinese timer in the circuit. Also went with hot tapped 120 from 240 feed to use on control circuit with no isolating transformer. Will hard wire my new-to-me Bridgeport clone into the box leaving a 30A (overkill) and maybe later a parallel 20A 3 ph receptacles on same circuit. For the time being will use a 15A fuse block to feed a 26A 3ph out relay with a momentary pull in that will prevent accidental feed through (same on mains in). Will switch the out on only when I see a generated leg indicator light let me know everything is clean enough to feed to loaded circuits.

Got new 3" indexable boring head so moved my old dovetail mill inside to work on the luthier project (face plate for converting one style Fender single pickup guitar to much later 2 pickups). What made is so difficult is owner who lives part time around here, and part time in AB supplied my with a hand traced template on old face plate, but 3 different sets of dimensions for pickup locations and cavity sizes. Making gross holes in scrap and dialing in boring head (flycutter) to correct diameter +/- 0.1mm then positioning part on table (REALLY hard to get alignment right as at different angles) one hole at each end of each cavity with boring head and will mill the slots from that hole.
 

TheClaw

Well-known member
Joined
Dec 25, 2012
Messages
542
Location
Chicagoland
Helped my friend change a broken coil over shock on the front of a 2010 Tacoma. Basically have to tear the front end apart to get it out.

He was going to do it in his driveway, but I persuaded him that inside the heated garage on the lift would be a lot easier.

He had to be "persuaded" to go inside and use the lift?
 

DGersic

Well-known member
Joined
Mar 12, 2017
Messages
6,386
Location
DeKalb, IL
Pondering and puttering.

Im coming to the end of the hall cabinets project. I have one last hurdle to clear. Looking for ideas to cut a slot (3/32” x 1/4” deep) in the end of this shelf to install T molding.

IMG_6570.jpeg

The traditional answer is a slot cutting bit in a router, but the cabinet sides are in the way. I can’t get within about 3” to 4” of the ends, depending on which router I use.

I poked around with various saws, none of which are going to work. I considered cutting the slot with a chisel, but I don’t have one that small, and I wasn’t relishing the idea of cutting a 24” slot with one if I did.

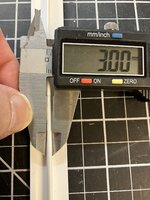
Looking at my oscillating tool, the blades are too narrow, and it’s hard to freehand a long straight cut with a blade that’s only 1” wide. I took a couple of old worn blades, and cut one off. They cut easily with shears.
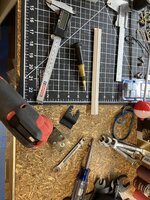
IMG_6568.jpeg

Then a couple of holes and some screws:
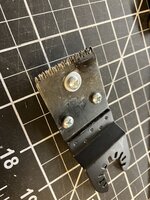
IMG_6571.jpeg

The washer is for depth. Crude but effective:

IMG_6569.jpeg

Still hard to guide it straight, but the width and depth work. These blades are worn, with some bent and missing teeth, so I’ll pick up some new ones to repeat this with. I think these were cheap Masterforce from Menards. The nicer Milwaukee and even Bauer blades are thinner, and I actually need the thicker blade for this to work.

To guide the cut, I‘m thinking a sheet metal strip, bent over 90* at a little under 3/8” to centre the cut on the board.

I can’t remove the shelf, though that would make the slot cut a lot easier. It is nailed and glued in to the cabinet.
 

RonnieC

Well-known member
Joined
Aug 7, 2013
Messages
814
Location
Orlando, FL
Pondering and puttering.

Im coming to the end of the hall cabinets project. I have one last hurdle to clear. Looking for ideas to cut a slot (3/32” x 1/4” deep) in the end of this shelf to install T molding.

IMG_6570.jpeg

The traditional answer is a slot cutting bit in a router, but the cabinet sides are in the way. I can’t get within about 3” to 4” of the ends, depending on which router I use.

I poked around with various saws, none of which are going to work. I considered cutting the slot with a chisel, but I don’t have one that small, and I wasn’t relishing the idea of cutting a 24” slot with one if I did.

Looking at my oscillating tool, the blades are too narrow, and it’s hard to freehand a long straight cut with a blade that’s only 1” wide. I took a couple of old worn blades, and cut one off. They cut easily with shears.

IMG_6568.jpeg

Then a couple of holes and some screws:

IMG_6571.jpeg

The washer is for depth. Crude but effective:

IMG_6569.jpeg

Still hard to guide it straight, but the width and depth work. These blades are worn, with some bent and missing teeth, so I’ll pick up some new ones to repeat this with. I think these were cheap Masterforce from Menards. The nicer Milwaukee and even Bauer blades are thinner, and I actually need the thicker blade for this to work.

To guide the cut, I‘m thinking a sheet metal strip, bent over 90* at a little under 3/8” to centre the cut on the board.

I can’t remove the shelf, though that would make the slot cut a lot easier. It is nailed and glued in to the cabinet.
Could you make a bunch of overlapping cuts with a biscuit cutter? And either use your oscillator where the biscuit cutter can’t get to or perhaps remove the tenon section of the T-slot molding where it is a hassle to cut the slot..
 

69charged

Well-known member
Joined
Sep 20, 2007
Messages
469
Location
carberry, manitoba
Had to pull my diesel gladiator into the garage and try figure out why it wouldn’t start. I thought it was a starter locked up but turns out I can turn the motor almost a full revolution and it comes to a stop going in both directions. So either a piston hitting a valve or fuel dumped in the cylinder somehow and it locking it up. 66,000kms on it. We’ll see if the dealer warranties it!!
 

PhantomEB

Well-known member
Joined
Feb 6, 2006
Messages
6,821
Location
Medicine Hat, AB, Canuckistan
7B772FF5-5C59-4004-AA70-50CA93AEFDC2.jpeg
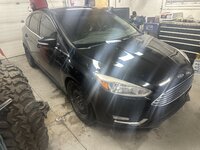
washed the car last night when I got home from another road trip. Gotta pick up a jug of 5w20 today and do an oil change on her. Need to order an air deflector and splash pan for under the engine but that’s not critical for a few weeks. Need to figure out that thermostatic sensor on the back of the motor that turns the fans on, ….one day
 

DGersic

Well-known member
Joined
Mar 12, 2017
Messages
6,386
Location
DeKalb, IL
Could you make a bunch of overlapping cuts with a biscuit cutter? And either use your oscillator where the biscuit cutter can’t get to or perhaps remove the tenon section of the T-slot molding where it is a hassle to cut the slot..

Maybe? I don't have one, so I’d have to find out how thick biscuits are. From memory of looking at them, I seem to recall them being around 1/8”. The depth of cut isn’t critical, but the width is. Also looks like it has the same problem as a router with a slot cutter, can’t get within several inches of the ends of the cut.
 
To avoid these ads, REGISTER NOW!

M.Brane

ALLIANCE MEMBER
Joined
Feb 11, 2024
Messages
1,793
Location
1 hr N/W of LA LA Land
If you don’t clear-coat them after they’ll be yellow again in a year or less. Sanding/polishing takes the UV protection coating off so it needs to be restored with some 2K clear.
I may do that at some point. Just wanted better light for now. Drove all the way home from work in the dark with hi beams, and nobody flashed me LOL.
 

Jgaz

Well-known member
Joined
Dec 16, 2016
Messages
1,713
Location
AZ
I want to put some feet on my table top router table to raise it about 2 1/2”.
This piece of rough sawn maple was “in stock” and very close to the desired thickness.

I really couldn’t afford any snipe on the piece when I planned it so I used my planner sled and glued a couple runners to the edge
IMG_5108.jpeg
Snipe is worse on my planner with shorter (8 1/2”) pieces like this
 

kaymccampbell

Well-known member
Joined
Feb 27, 2015
Messages
29,626
Location
Upstate New York
Maybe? I don't have one, so I’d have to find out how thick biscuits are. From memory of looking at them, I seem to recall them being around 1/8”. The depth of cut isn’t critical, but the width is. Also looks like it has the same problem as a router with a slot cutter, can’t get within several inches of the ends of the cut.
My biscuit joiner is 3mm, so an eighth. With a wood block and a clamp or screws, you can make a biscuit joiner close up real tight.
 

jblnut

ALLIANCE MEMBER
Joined
Jan 17, 2015
Messages
7,142
Location
In the Middle of MN
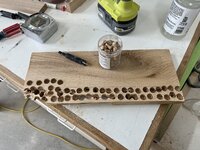
Used my new plug cutter set to make some nice little red oak plugs for a shelf I’m building for Mama Bear.
IMG_3157.jpeg

This was the first time I used these new cutters and they have that fancy little pin to push the plugs out. Or they’re supposed to push them out. The first one wouldn’t come out so I grabbed a screwdriver and went to pop it out. Not quite sure where I went wrong exactly but my thumb ended up a little lighter. Oddly enough it hurt less than the last Lego I stepped on. The rest of the plugs got removed with a needle nose pliers and I didn’t lose any more blood.
IMG_3155.jpeg
 
Last edited:

SMOKEYBEAR

Well-known member
Joined
Jan 3, 2016
Messages
466
Used this video to true up the blade on my RAS project. Took longer that I thought..but I was being particular and zero hurry. Will need to shim the table a smidge to get it 100% true. The table runs just a smidge up hill at full cross cut length.


And put 10 gallons of non ethanol fuel plus Mercury additives in the boat. Boat prep is next on the list.
 

cannuck

Well-known member
Joined
Nov 30, 2021
Messages
4,662
Location
Rural SK
This was the first time I used these new cutters and they have that fancy little pin to push the plugs out. Or they’re supposed to push them out. The first one wouldn’t come out so I grabbed a screwdriver and went to pop it out. Not quite sure where I went wrong exactly but my thumb ended up a little lighter. Oddly enough it hurt less than the last Lego I stepped on. The rest of the plugs got removed with a needle nose pliers and I didn’t lose any more blood.
IMG_3155.jpeg
I thought you were just being a modern, inclusive kind of guy with that bright red nail polish
 

jblnut

ALLIANCE MEMBER
Joined
Jan 17, 2015
Messages
7,142
Location
In the Middle of MN
I thought you were just being a modern, inclusive kind of guy with that bright red nail polish
Oh boy that’s me to a T. I’m a very accepting, tolerant sort of person. Never judgy or anything else that may hurt some softies feelings. 🫣

It’s a rather nice combo shade of black, purple and dried red now. Still doesn’t hurt. Unless I smack it on a piece of wood loading the boiler. Than it bleeds again. A lot :lol_hitti
 

Indexmill

Well-known member
Joined
Apr 12, 2013
Messages
1,414
Location
Central NC
Replaced the backup camera in our 2014 RDX. A seal must have failed and the picture was very cloudy. New one has a clear sharp picture. Part was kind of expensive and the space was tight but it wasn't really a bad job, and very satisfying.
That camera from Acura is about $300, yes?
 

rharman

Well-known member
Joined
Apr 22, 2012
Messages
8,914
Location
SoCal
Maybe? I don't have one, so I’d have to find out how thick biscuits are. From memory of looking at them, I seem to recall them being around 1/8”. The depth of cut isn’t critical, but the width is. Also looks like it has the same problem as a router with a slot cutter, can’t get within several inches of the ends of the cut.
I was thinking just a straight bit in the router and a plywood or 1x<whatever> jig to guide it.
 

rharman

Well-known member
Joined
Apr 22, 2012
Messages
8,914
Location
SoCal
Modified the hood on the Civic to accept the Gurney flap mod, painted the new/used mirror cap, and put a new chain on my chainsaw since mine decided to throw and dinged the bottom/tooth side of the chain.

Doesn't the flap mod usually go on the deck lid?
Just catching up and glad this was asked/answered.

When you said "hood" I thought "Huh? Gurney flap aka wickerbill goes on the back."

Thanks for clarifying.
 

DGersic

Well-known member
Joined
Mar 12, 2017
Messages
6,386
Location
DeKalb, IL
I was thinking just a straight bit in the router and a plywood or 1x<whatever> jig to guide it.

Thought about that, but I end up too far away from where I need the cut to end. The smallest router I have is the plastic router base for a Dremel. That hits the cabinet frame at 1 1/2”. Next is the HF fixed base, at 2 3/4”. Then there’s my plunge router, at 3”.

I haven’t checked the sizes on some of those little trim routers they’re selling now. Maybe one of those would cut closer to the cabinet frame.

A trip to Menards yielded a couple of packs of cheap blades. After tomorrow’s various medical appointments and things, I’ll Frankenstein something together.

I got a piece of 1/2” angle iron. I think I can use that as my cutting guide.
 
To avoid these ads, REGISTER NOW!
Top Bottom