I was thinking the jig would extend beyond the edge so the base wouldn't hit the vertical wall of the cabinet. Of course, this wouldn't work if the cabinet is butted up to a room wall. The other problem might be with the bit extended so far it may be prone to breaking but I don't think that's too serious a potential issue.


You are using an out of date browser. It may not display this or other websites correctly.
You should upgrade or use an alternative browser.
You should upgrade or use an alternative browser.
What did you do "IN" your garage today?
- Thread starter mayhemman
- Start date
This beat up Vidmar cabinet was my toolbox by the 2 post for about 8years. Mainly because I wanted deeper drawers that can stand up deep sockets etc.
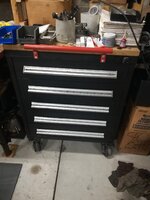
Recently biught a USG Ser3 56in and retired the Vidmar from toolbox duty. So I did the right thing and painted it to look like a toolbox.

Waiting for the Rustoleum to dry... forgot to save some hardener for the grey... might be a Few Weeks till the drawers are put back in.

Most of the handle end caps were missing so I printed a new set.
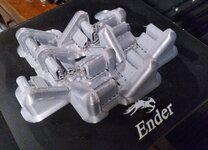

Not the highest quality print but it took 5 hours instead of 12hrs. They fit...
Recently biught a USG Ser3 56in and retired the Vidmar from toolbox duty. So I did the right thing and painted it to look like a toolbox.
Waiting for the Rustoleum to dry... forgot to save some hardener for the grey... might be a Few Weeks till the drawers are put back in.
Most of the handle end caps were missing so I printed a new set.
Not the highest quality print but it took 5 hours instead of 12hrs. They fit...
bugnut
ALLIANCE MEMBER
kaymccampbell
Well-known member
I've got a big Bosch plunge router with a fence. And a DeWalt drywall cutter with a fence. And a Ryobi battery trim router with a fence. All would do that well, if you could find the right size bit. If your router doesn't have a fence, you can make one easily enough.Thought about that, but I end up too far away from where I need the cut to end. The smallest router I have is the plastic router base for a Dremel. That hits the cabinet frame at 1 1/2”. Next is the HF fixed base, at 2 3/4”. Then there’s my plunge router, at 3”.
I haven’t checked the sizes on some of those little trim routers they’re selling now. Maybe one of those would cut closer to the cabinet frame.
A trip to Menards yielded a couple of packs of cheap blades. After tomorrow’s various medical appointments and things, I’ll Frankenstein something together.
I got a piece of 1/2” angle iron. I think I can use that as my cutting guide.
He thought it would be just unbolt the ends and bolt in the new ones.He had to be "persuaded" to go inside and use the lift?
bugnut
ALLIANCE MEMBER
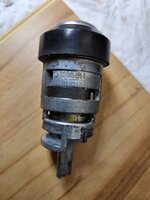
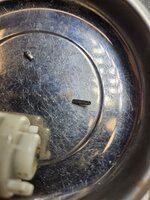
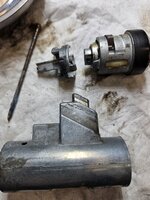
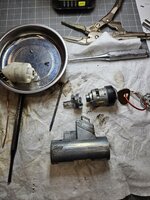
Steering column for the moneypit baja. Turn signals, not cancelling, wiper washers are actuated by poor 50 yr old design using air pressure and the locking column would not lock. Couple YT vids and we're tearing it apart. Complete disassembly. Started working on the locking steering. Disassembled and found a small roll pin laying loose in the assembly. Studied for a while, then found a video showing how parts were removed as an assembly. Mine came out in parts. Much fiddling and testing. It took 2 tries and then reassembled with the roll pin installed. Upon getting it together and removing the key the lock protruded into space, as it would lock into the column. Set other parts aside. Then cleaned up the mess.
Attachments


kaehlin
Well-known member
$330. From what I read, the camera may be swap-able with a much less expensive unit from a CR-V, but you lose the bottom part of the picture and the ability to see wide and top-down views. I decided to go with the factory part, since we plan to keep this car long-term.That camera from Acura is about $300, yes?
kaymccampbell
Well-known member
Even when it is, I bring the car in and put it up. It gives me a chance to check out the underside, in case anything else has gone awry.He thought it would be just unbolt the ends and bolt in the new ones.
kaymccampbell
Well-known member
If you tow, that top down view of the hitch is godlike.$330. From what I read, the camera may be swap-able with a much less expensive unit from a CR-V, but you lose the bottom part of the picture and the ability to see wide and top-down views. I decided to go with the factory part, since we plan to keep this car long-term.
racecougar
Well-known member
Assembled the 347 Windsor short block for Dad's '73 Mustang. Drilled the late model steam holes into the deck on both sides, installed the cam, crank, rods, and pistons, measuring all clearances along the way. Waiting on the woodruff key for the crank so I can install the timing set, lifters, heads, and so on.

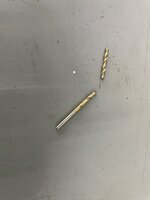
By the way, breaking a bit off in a coolant passage while drilling holes in the pristine deck surface of the block is not stressful or anything.
Spent yesterday afternoon riding around with the kid.

By the way, breaking a bit off in a coolant passage while drilling holes in the pristine deck surface of the block is not stressful or anything.
Spent yesterday afternoon riding around with the kid.
Take a close look at the lens... The "cloudyness" might be UV attacking the clear plastic lens (like what happens to headlights)...Replaced the backup camera in our 2014 RDX. A seal must have failed and the picture was very cloudy. New one has a clear sharp picture. Part was kind of expensive and the space was tight but it wasn't really a bad job, and very satisfying.
You might be able to polish the haze off the lens with some fine rubbing compound, restoring the surface back to original...
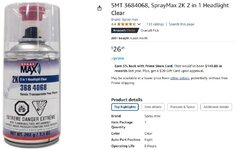
Add a 2K UV clear spray to replace the OEM coating you removed with the rubbing compound...
If it works, you'll have a good $300 spare...
This is the coating I use for my headlights... Much better coating than the UV wet wipes that are sold...
Last edited:
DGersic
Well-known member
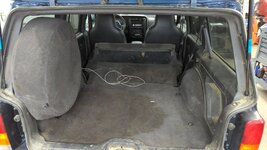
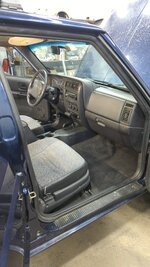
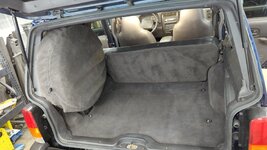
The XJ got it's first interior detail. The carpet wasn't too bad but the seats had a ton of stains / dirt in them so I hit everything with the extractor.
Forgot to take before pics but I at least got this one

What extractor did you use for this?
DGersic
Well-known member
I was thinking the jig would extend beyond the edge so the base wouldn't hit the vertical wall of the cabinet. Of course, this wouldn't work if the cabinet is butted up to a room wall. The other problem might be with the bit extended so far it may be prone to breaking but I don't think that's too serious a potential issue.
Yeah, there’s a wall in the way too.
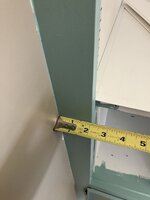
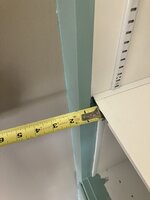
I see what you’re thinking, use the router horizontal. Build out a jig to surround the shelf, stuck out so that the router base can clear the cabinet face.
I can probably build that, but needing 1 1/2” of cut depth from the router base seems like too much. I’ll have to measure some bits, see if there’s any way to cut that.
DGersic
Well-known member
@DGersic Might you own a dremel or a rotozip? A spiral wood cutting bit and a 3d printed guide would make it duck soup. Angle iron or metal would also help guide the tool. Could tilt it to do the inside corners. Wear ear protection!
Dremel yes. No rotozip. No 3d printer, though I can bodge things together from wood and steel.
DGersic
Well-known member
I've got a big Bosch plunge router with a fence. And a DeWalt drywall cutter with a fence. And a Ryobi battery trim router with a fence. All would do that well, if you could find the right size bit. If your router doesn't have a fence, you can make one easily enough.
All three routers have a fence. The Dremel router base seems least stable, it’s just a cheap plastic clamp on thing. But it is light and easiest to manage on a horizontal cut.
How would you set up the cut, though? I’m stuck on getting as close as possible to the face frame without hitting it. Or the wall that it’s attached to.

LeonardY
Well-known member
There is an attachment for the Dremel for the rotozip bits.Dremel yes. No rotozip. No 3d printer, though I can bodge things together from wood and steel.

It allows you to set the depth.
You could could make a channel as a guide. Attach it to the face of the cabinet. It's a small base so you should be able to get really close to the edge. Then you could use whatever means to get you to the end. It doesn't have to be perfect since the T channel in the center will hold it in. Or cut off the T side at the ends.

I would take several passes to cut to depth.
Last edited:
bulletpruf
Well-known member
New battery trays and cables for Project Brownie - 2/0 with crimp on lugs and military terminals.
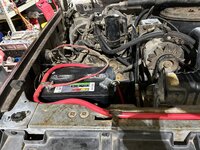
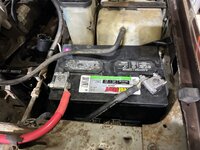
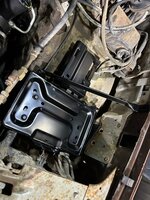
Installed new power steering pump, high and low pressure hoses; old one leaked badly.

Installed new power steering pump, high and low pressure hoses; old one leaked badly.
Hooked
Well-known member
Glad you asked as I was going to ask if no one else did.How do you like the Bosch mitersaw?
RonnieC -- thanks for the feedback. I've been considering a new miter saw and the Bosch is my top contender. I 'inherited' a Makita from my former SIL but the fence is not quite square so I have to use shims when making cuts.
I have a few IDIs, 2 projects and a work truck, cool seeing other ones out there getting some love!
Today I'm diagnosing (or attempting to haha) one of the lifts and absolutely need to change oil in the compressor.
When I got this shop in 2017, my first major expense was get the air installed asap. But since then, these battery tools have been taking over slowly.
I sent in my air gun to get rebuilt, but the guy vanished, so I'm down to one. I'm too old to invest in another one and I currently don't have a snap on balance heehee.
Today I'm diagnosing (or attempting to haha) one of the lifts and absolutely need to change oil in the compressor.
When I got this shop in 2017, my first major expense was get the air installed asap. But since then, these battery tools have been taking over slowly.
I sent in my air gun to get rebuilt, but the guy vanished, so I'm down to one. I'm too old to invest in another one and I currently don't have a snap on balance heehee.
bulletpruf
Well-known member
I have a few IDIs, 2 projects and a work truck, cool seeing other ones out there getting some love!
Today I'm diagnosing (or attempting to haha) one of the lifts and absolutely need to change oil in the compressor.
When I got this shop in 2017, my first major expense was get the air installed asap. But since then, these battery tools have been taking over slowly.
I sent in my air gun to get rebuilt, but the guy vanished, so I'm down to one. I'm too old to invest in another one and I currently don't have a snap on balance heehee.
More details on the IDI truck - it's a 1991 F350 crew cab long bed dually - https://www.garagejournal.com/forum...b-diesel-dually-build-project-brownie.530308/
I don't know how long it's been since I've used any of my air tools. I have an 80 gallon Quincy in the garage, but it only gets used periodically to air up a tire, do some minor sandblasting, or use the air blow gun.
My work truck is a 93 crew cab long bed also. It's a monster towing, rwd, 5 speed and 4.10s. It's na but I have never felt I needed more as I really only use it for the car trailer. Mine is single rear wheel and I go back and forth about swapping to dually.
I read some of your thread, definitely need to sit down and read that whole journey!
I read some of your thread, definitely need to sit down and read that whole journey!
bulletpruf
Well-known member
My work truck is a 93 crew cab long bed also. It's a monster towing, rwd, 5 speed and 4.10s. It's na but I have never felt I needed more as I really only use it for the car trailer. Mine is single rear wheel and I go back and forth about swapping to dually.
I read some of your thread, definitely need to sit down and read that whole journey!
A dually swap isn't that difficult. What I'd like to do is buy a 7.3 idi powered crew cab long bed SRW 4x4 and swap to a dually. That's a lot easier than adding a Dana 60 to a RWD dually, and one of the only ways you can get a 4x4 idi crew cab dually, unless you can find a Centurion conversion.
kaymccampbell
Well-known member
HF sells the Earthquake brand of rattle gun. It doesn't ****. And it's priced about as much as the truck guy charges for a rebuild.I have a few IDIs, 2 projects and a work truck, cool seeing other ones out there getting some love!
Today I'm diagnosing (or attempting to haha) one of the lifts and absolutely need to change oil in the compressor.
When I got this shop in 2017, my first major expense was get the air installed asap. But since then, these battery tools have been taking over slowly.
I sent in my air gun to get rebuilt, but the guy vanished, so I'm down to one. I'm too old to invest in another one and I currently don't have a snap on balance heehee.
coldh2o
Well-known member
All three routers have a fence. The Dremel router base seems least stable, it’s just a cheap plastic clamp on thing. But it is light and easiest to manage on a horizontal cut.
How would you set up the cut, though? I’m stuck on getting as close as possible to the face frame without hitting it. Or the wall that it’s attached to.
I like a challenge as much as the next guy, but... I'd just cut the spline off the T molding and glue that sucker on the face of the shelf.
My amazon chinese pot-metal door handle came in the mail today, so I replaced the OEM pot-metal door handle on the Astro.
It's always a little nerve-wracking to break the bolts loose on an Ohio-salt-driven Astro. Sometimes the weld breaks and the stud spins and it's a ***** to get out. Well, all went well with the removal, hooray! However, upon installing the new one, one of the welds broke and the stud was spinning! Never had a new one do that. I just snugged it up with visegrips on the head as best as I could get it. The door handle will probably break in a few years anyway, and that'll be future-me's problem.
Also, I keep seeing what appears to be the bottom of my windshield bouncing in and out when I hit potholes. I push on the windshield and it feels firm, so it must be in my head. Well, today I definitely saw it move. So when I parked, I pushed on the lower corner, like by the dash speaker, and I could move it in and out quite a bit! So yeah, that needs fixed next.
I was worried that maybe the bottom of the cowl had rusted out and the windshield had nothing to seal to. But while I had it in the shop working on the door handle, I removed all the trim on the bottom of the windshield and the metal is like new under there. So it must just be a bad seal-job from somebody at some point. Thank goodness.
It's always a little nerve-wracking to break the bolts loose on an Ohio-salt-driven Astro. Sometimes the weld breaks and the stud spins and it's a ***** to get out. Well, all went well with the removal, hooray! However, upon installing the new one, one of the welds broke and the stud was spinning! Never had a new one do that. I just snugged it up with visegrips on the head as best as I could get it. The door handle will probably break in a few years anyway, and that'll be future-me's problem.
Also, I keep seeing what appears to be the bottom of my windshield bouncing in and out when I hit potholes. I push on the windshield and it feels firm, so it must be in my head. Well, today I definitely saw it move. So when I parked, I pushed on the lower corner, like by the dash speaker, and I could move it in and out quite a bit! So yeah, that needs fixed next.
I was worried that maybe the bottom of the cowl had rusted out and the windshield had nothing to seal to. But while I had it in the shop working on the door handle, I removed all the trim on the bottom of the windshield and the metal is like new under there. So it must just be a bad seal-job from somebody at some point. Thank goodness.
Yeah, contact cement might be the solution here. Or, melamine edge banding?I like a challenge as much as the next guy, but... I'd just cut the spline off the T molding and glue that sucker on the face of the shelf.
@DGersic - I was thinking Dremel as @LeonardY posted or a trim router. The base is pretty small. Those RotoZip bits look like a possible good idea.
RonnieC
Well-known member
No problem. You are probably looking at the same saws I was- the Bosch, the Makita Ls1219L, the Festool Kapex. Hitachi/Metabo also had a slider that used rods but they seem to have changed that out for a folding arm similar to the Bosch and Ridgid. I wanted a model that could be installed close to the back wall. Weight was not a concern as I’m not a contractor lugging it around.Glad you asked as I was going to ask if no one else did.
RonnieC -- thanks for the feedback. I've been considering a new miter saw and the Bosch is my top contender. I 'inherited' a Makita from my former SIL but the fence is not quite square so I have to use shims when making cuts.
I ended up buying mostly based on price. Bosch is currently $549 on Amazon. Makita is $800, and Festool is Festool priced. I didn’t like the feel of the previous Metabo, haven’t tried the newer version which is currently $399 on sale.
Once I make the decision I try not to look back and rethink it. I just forge ahead and try to make it work.
Thanks for your feedback. Close to the wall is important to me as well. Weight is secondary at bestNo problem. You are probably looking at the same saws I was- the Bosch, the Makita Ls1219L, the Festool Kapex. Hitachi/Metabo also had a slider that used rods but they seem to have changed that out for a folding arm similar to the Bosch and Ridgid. I wanted a model that could be installed close to the back wall. Weight was not a concern as I’m not a contractor lugging it around.
I ended up buying mostly based on price. Bosch is currently $549 on Amazon. Makita is $800, and Festool is Festool priced. I didn’t like the feel of the previous Metabo, haven’t tried the newer version which is currently $399 on sale.
Once I make the decision I try not to look back and rethink it. I just forge ahead and try to make it work.
DGersic
Well-known member
There is an attachment for the Dremel for the rotozip bits.
It allows you to set the depth.
You could could make a channel as a guide. Attach it to the face of the cabinet. It's a small base so you should be able to get really close to the edge. Then you could use whatever means to get you to the end. It doesn't have to be perfect since the T channel in the center will hold it in. Or cut off the T side at the ends.
I would take several passes to cut to depth.
I do have the rotozip base. The rotozip bits are too big though. I need a 3/32” (.09375”) channel cut.

DGersic
Well-known member
I like a challenge as much as the next guy, but... I'd just cut the spline off the T molding and glue that sucker on the face of the shelf.
I’ll probably back it with glue to make sure it holds.
DGersic
Well-known member
Yeah, contact cement might be the solution here. Or, melamine edge banding?
That was the original plan, which is why I didn’t cut the shelf out to replace it. But I didn’t like the way the melamine edge looked with the FRP shelf surface.
DGersic
Well-known member
Today’s efforts at turning my oscillating tool in to a slot cutter.
I found some wide blades at Menards. 2 5/8” at the teeth. Seemed like wider would make getting a straight cut a little easier.
First version, cut one screwed it to the other, and added a depth stop.
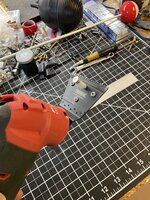
Worked, but the depth stop waggles and induces vibration in to the blade.
Guided with steel:
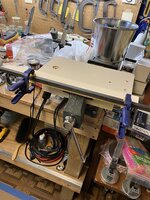
Cut is the right width and depth:
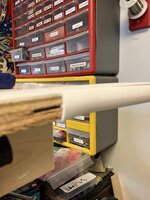
Second version, different depth stop:

Seems to work better. Less vibration.
I found some wide blades at Menards. 2 5/8” at the teeth. Seemed like wider would make getting a straight cut a little easier.
First version, cut one screwed it to the other, and added a depth stop.
Worked, but the depth stop waggles and induces vibration in to the blade.
Guided with steel:
Cut is the right width and depth:
Second version, different depth stop:
Seems to work better. Less vibration.
Mr. Roboto
Well-known member
Nerded out... yearly LAN party with friends

JEFFREYWisconsin
Well-known member
- Joined
- Oct 9, 2021
- Messages
- 380
Cops ever get called on this insanity?Nerded out... yearly LAN party with friends
jblnut
ALLIANCE MEMBER
No blood shed today !! Pops and I finished up the shelf Mama Bear commissioned a while back. Notice the plugs sticking out of the side. They were the ones I was making when my thumb sprung a leak. They’ll get sanded off once the glue dries.

All kinds of different looking but it matches almost perfectly with the picture she sent me from some place called Pinterest.

Notched the shelves to fit into the rear spine and errythang. Gotta stain, varnish and deliver it.
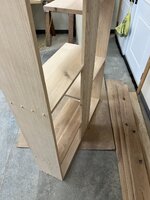
All kinds of different looking but it matches almost perfectly with the picture she sent me from some place called Pinterest.
Notched the shelves to fit into the rear spine and errythang. Gotta stain, varnish and deliver it.
jblnut
ALLIANCE MEMBER
Where’s the Code Red and Pepsi Blue ? They were staples at our LAN parties “back in the day”.Nerded out... yearly LAN party with friends
BlakeTheCarGuy
ALLIANCE MEMBER
It was a pretty chill day at work not too much going on. One guy the shop snitch walked by and seen me using anti seize on a wheel hub and he said you should never do that so he got my boss and brought him over to show him and then my boss told him to mind his own business and so he called the big boss the big boss came down and basically said the same thing so they all got in a shouting match and the tech went home. I’m like I use anti seize on everything I don’t care what anyone else says or does I do me and they do them. Normally he wins the battle because he is teachers pet but I think everyone has had enough of his pettiness. Other than that done a lube tech screw up he left the drain plug out of the bottom of the oil filter housing so it got towed back in and I replaced it and cleaned it up really good and refilled with oil and gave it back to the customer. I didn’t realize anyone used those drain plugs I never do lol. Other than that just basic stuff nothing much else to do. I found the anti seize fit to be hilarious honestly especially since he lost that battle.
JEFFREYWisconsin
Well-known member
- Joined
- Oct 9, 2021
- Messages
- 380
Holy F, I am doing this. Game Changer for meMade a retractable parking aid today....
Lets me maximize the space in my garage...
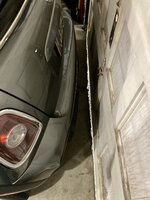
Made a retractable parking aid today....
Lets me maximize the space in my garage...
That's a great hack!