To avoid these ads, REGISTER NOW!

What did you do "IN" your garage today?

To avoid these ads, REGISTER NOW!

LeonardY

Well-known member
Joined
Apr 16, 2011
Messages
5,107
Location
Southern California
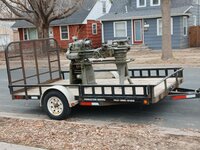
That's a nifty bending set up. What have you got going on with the hinge at the back of your vise?
Thanks. For some reason have a lot of the right size bolts for the 123 block. Machined one pin to fit in the non threaded holes.

The vise is a patterns maker vise. It's adjustable to all sorts of positions.
 

Attachments

  • 1743444729617.png
    1743444729617.png
    2 MB · Views: 44
  • 1743444759697.png
    1743444759697.png
    1.8 MB · Views: 32
  • 1743444793026.png
    1743444793026.png
    1.6 MB · Views: 32

CoogarXR

Well-known member
Joined
Jan 11, 2016
Messages
6,871
Location
Ohio
Sorting ****. Came across some little LED panels that I had been saving to swap into my Cougar's dome light for years, so I finally just installed them real quick. I already had all my soldering junk out, so it was a quick job. I also drilled a small toggle switch into the side of the dome light housing so I can turn the dome light off. We go to the drive-in movies a lot, and it ***** getting blinded when one of us has to get out. So now I have a nice bright LED dome light (compared to the super-dim factory one), and a manual-override switch.

Also finished my little triple-gang arduino enclosure for my homemade well/cistern level monitor:

20250331_111544.jpg

The pattern on the (repurposed) plexiglass isn't that noticeable in person, the camera really picks it up for some reason. All that's left is to install the sensors in the well/cistern and run the cables to this enclosure once I mount it in the basement.
 

Snip's

Well-known member
Joined
Apr 29, 2017
Messages
1,866
Location
Ohio
Yesterday I disassembled one of my vintage Shaw Walker Tanker desks out in the garage...
Today I hauled most of the parts upstairs to begin assembly in my new to me office space...
I still need to get the steel and rubber top up the stairwell... Not looking forward to that struggle...
This desk is truly built like a tank... A bunch of nuts and bolts holding it together...
I need to do a little repair work on the anti-squeak green felt strips before the top gos on...

IMG_4727 2.JPG
Once my wife picks a color, I'll be painting the walls...
Still need to sort and pitch "STUFF" to make room for my office plans...
 
Last edited:

mikegt4

Well-known member
Joined
Sep 12, 2005
Messages
3,277
Location
sw ohio
The switches & vents are plastic, everything else is wrapped in leather, or aluminum.

They also put a "soft touch coating" on those plastic surfaces which turns to goo. That's frustrating.

It is actual leather, not the synthetic leather other car manufactures use. It smells amazing...and its 20 years old.
My 308 at 47 years old still smells amazing every time that I open the door, definitely the real deal leather.
 

DGersic

Well-known member
Joined
Mar 12, 2017
Messages
6,382
Location
DeKalb, IL
First attempt at bending some scraps of sheet metal.

IMG_6713.jpegIMG_6716.jpeg
The glove box door is missing its trim piece. This is a difficult piece to find, and I don’t need it to be original. I’ll eventually get a piece of stainless, so I can polish and engine turn it. For now, working out how I want to get the radius bend on the ends, after turning it. This worked, but I think it could be better. So more time puttering with it is needed.
 

bugnut

ALLIANCE MEMBER
Joined
Jul 14, 2012
Messages
3,998
Location
Central Ohio
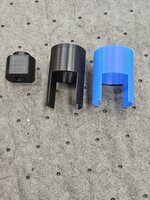
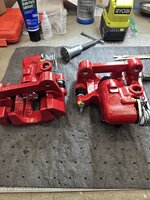
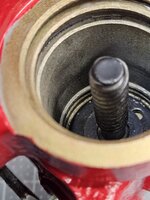
Cogitated on how to assemble the moneypit baja VW Empi rear disc brakes. After a little chat with @lbhsbz, I made the tools and was able to refine it all to work. Spent a bit of time with the 3d printed an came up with some suitable bits. After 4-10 tries she finally slammed home. The spring must be compressed, the metal keeper (top hat looking thing, must be centered and then a snap ring has do be slammed home all down in the hole. Second brake took about half a dozen tries. But they're together, reassembled ready to install.
 

Attachments

  • 20250331_152756.jpg
    20250331_152756.jpg
    1 MB · Views: 24
  • 20250331_152700.jpg
    20250331_152700.jpg
    1.4 MB · Views: 19
  • 20250331_152645.jpg
    20250331_152645.jpg
    695.8 KB · Views: 22
  • 20250331_150026.jpg
    20250331_150026.jpg
    664.7 KB · Views: 22
  • 20250331_150013.jpg
    20250331_150013.jpg
    1.1 MB · Views: 22
  • 20250330_180524.jpg
    20250330_180524.jpg
    827.5 KB · Views: 24
  • 20250301_142200.jpg
    20250301_142200.jpg
    631.3 KB · Views: 41

jives

Well-known member
Joined
Jan 4, 2013
Messages
2,811
Location
Central NY
The rear panel looks good. Does it have a similar front panel in good condition? I've seen those have value because they are so easily ruined and near unobtainium.
Nope. Cracked (both before and during removal). Same with front panel, front storage box, spare tire cover, propane tank cover. Remarkably brittle.
 

niget2002

Well-known member
Joined
Oct 2, 2012
Messages
11,250
Location
Josephine, TX
Jumped in the truck to go to my son's soccer game. The driver's side front tire had leaked down some again. It was at 61psi when all the other were at 65psi.

I'll have to figure out when I can get the truck to the tire shop to see if they can patch the leak or if I need new tires.
 
To avoid these ads, REGISTER NOW!

mikegt4

Well-known member
Joined
Sep 12, 2005
Messages
3,277
Location
sw ohio
I was looking at the 308's at the Cavallino. They look like a fun, achievable way to enter the classic world. We are considering one for the next toy! Maybe an early carb'd euro model.

I would suggest joining FerrariChat, the best forum for information about buying and maintaining these cars. FC has subforums for each model as well as classified ads. I have been a member since it's beginning (member #13 or so). Excellent source for DIY work although if you can afford to attend Cavallino these days you probably have others do all the work for you. I quit going there when the event was sold to another promoter and the ticket prices quadrupled. They also used to have vintage Ferrari track days and races at the nearby Moroso track for a mere $30, it was the best value in the Ferrari world. Some photos from Moroso back in the 2000's, the sound was worth the price of admission alone.


Attachments

  • img_2005.jpg
    img_2005.jpg
    128 KB · Views: 46
  • img_2045.jpg
    img_2045.jpg
    118.5 KB · Views: 26
  • img_2034.jpg
    img_2034.jpg
    104.3 KB · Views: 23
  • img_1975.jpg
    img_1975.jpg
    112.8 KB · Views: 23
  • 107-0790_IMG.JPG
    107-0790_IMG.JPG
    107.2 KB · Views: 25
  • 107-0782_IMG.JPG
    107-0782_IMG.JPG
    134.9 KB · Views: 24

nadogail

Well-known member
Joined
Jan 23, 2009
Messages
32,049
Location
Coronado, CA
I have been reading the Annual Report of one of my investments, the size and diversity of the company is impressive.
The brokerage firm that I am working with has repeatedly warned me that I am making a mistake by concentrating my money in only one stock.
I look at the computer generated letter and laugh, BRKB is probably one of the most diversified companies you can buy into.
They sell Cowboy Boots, bricks, underwear and ice cream, in addition to owning a railroad and making chocolate candies.
 
Last edited:

PassnThru

Well-known member
Joined
Jan 5, 2010
Messages
6,512
Location
Bowling Green KY
After 1 coat of poly on the door - sanding that and putting a second coat on over the weekend I started talking myself into believing that 2 were plenty. I realized this morning that I was making excuses because I was tired of dealing with it so I sanded and applied a third coat.
Crack that whip even on yourself I guess.
Currently putting a clear coat on the door hardware that I painted Friday.
 

Copymutt

Well-known member
Joined
Sep 3, 2016
Messages
3,407
Location
Colorado
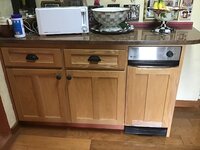
Wrapped up the integration of a $50.00 GE trash compactor into existing oak cabinetry.
Required GFCI outlet, bust through the wall behind it as it was deeper than the cabinets.
Work up replacement trim and a false door to cover the stainless. Just noticed one piece of oak didn'tIMG_5558.jpeg take stain like the rest. Oh, & I cancelled the trash pick up which worked out to $15.00 for every kitchen trash bag🤪.
 

larry4406

Well-known member
Joined
Jan 27, 2006
Messages
19,576
Location
Northern Virginia
Wrapped up the integration of a $50.00 GE trash compactor into existing oak cabinetry.
Required GFCI outlet, bust through the wall behind it as it was deeper than the cabinets.
Work up replacement trim and a false door to cover the stainless. Just noticed one piece of oak didn'tIMG_5558.jpeg take stain like the rest. Oh, & I cancelled the trash pick up which worked out to $15.00 for every kitchen trash bag🤪.
30 years ago trash compactors were the rage.

My brother's had a "vent" hole in the plate at the bottom that the ram pressed the trash into. Guess where all the smegma went when the bag is torn (which seemed to always occur) went?
 

jblnut

ALLIANCE MEMBER
Joined
Jan 17, 2015
Messages
7,137
Location
In the Middle of MN
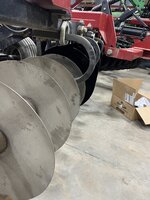
Finished the blade swap on the finishing disc today. All in I think we spend close to 40 man hours on it. We also adjusted all the scrapers, checked all the bearings and adjusted and repaired the rear harrow. I have to fix two leaking hoses and reseal two cylinders and it’ll be as close to a new unit again as it’ll be for a while.
IMG_3333.jpeg

Old blades vs new blades …..
IMG_3332.jpeg
 

SouthernIllinois

Well-known member
Joined
Jan 14, 2024
Messages
1,694
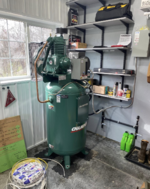
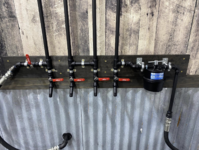
Thanks to a friends help with the wiring and plumbing the Transair lines, I finally have compressed air.

The compressor was delivered about two months ago, but due to a multitude of reason, we just got it wired and hooked up this evening.

Makes 24cfm @ 175psi. Fills the 80 gallon tank from empty to 170psi in about 4 minutes.

No leaks in my redneck cooler/water separator, the Transair plumbing or the three regulator/filters at each drop.

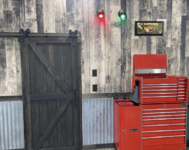
The green light on the exterior of the tool room tells you the compressor is energized, the red one tells you the Milwaukee and Dewalt chargers are energized so I don’t forget to turn them off at the end of the night.

Screenshot 2025-04-01 at 6.21.40 PM.pngScreenshot 2025-04-01 at 6.21.51 PM.pngScreenshot 2025-04-01 at 6.22.02 PM.pngScreenshot 2025-04-01 at 6.22.13 PM.png
 

kaymccampbell

Well-known member
Joined
Feb 27, 2015
Messages
29,622
Location
Upstate New York
Thanks to a friends help with the wiring and plumbing the Transair lines, I finally have compressed air.

The compressor was delivered about two months ago, but due to a multitude of reason, we just got it wired and hooked up this evening.

Makes 24cfm @ 175psi. Fills the 80 gallon tank from empty to 170psi in about 4 minutes.

No leaks in my redneck cooler/water separator, the Transair plumbing or the three regulator/filters at each drop.

The green light on the exterior of the tool room tells you the compressor is energized, the red one tells you the Milwaukee and Dewalt chargers are energized so I don’t forget to turn them off at the end of the night.

Screenshot 2025-04-01 at 6.21.40 PM.pngScreenshot 2025-04-01 at 6.21.51 PM.pngScreenshot 2025-04-01 at 6.22.02 PM.pngScreenshot 2025-04-01 at 6.22.13 PM.png
I put my chargers on a pushbutton timer. The max is 4 hours, and then they're off. The only ones that charge that long are my big Stihl batteries.
IMG_20240303_172839.jpg
 
To avoid these ads, REGISTER NOW!
Top Bottom