To avoid these ads, REGISTER NOW!

MP&C Help? Another patch panel attempt?

supermerle

Active member
Joined
Aug 25, 2010
Messages
44
Location
Arkansas
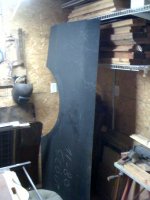
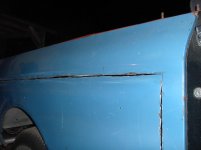
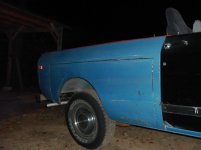
Last night the patch panel replacement began, and I would love for anyboody to chime in on the method they would use if this was there project. I have a whole side replacement panel that I got off of Epay and its made to replace the whole PS qtr. panel, but its not a true qtr. panel but pretty close. I have included pictures that show my cut and the cut is rough and I may recut the top line since I have alittle room left and I finally figured out the best way to cut the panel about the time I was getting to the end.
My method is after I drill the spot welds out I will lay the cut-out panel over my replacement and mark that panel then be more careful cutting the new panel. Does a person need those cleco clips to join the old and new panel or is there another way to hold the panels together? Here's the pictures and please feel free to comment with any tips?
 

Attachments

  • photopanel.jpg
    photopanel.jpg
    133.4 KB · Views: 83
  • PICT1424.jpg
    PICT1424.jpg
    114.6 KB · Views: 82
  • PICT1423.jpg
    PICT1423.jpg
    120.2 KB · Views: 94
  • PICT1422.jpg
    PICT1422.jpg
    142.6 KB · Views: 98
  • PICT1421.jpg
    PICT1421.jpg
    136.2 KB · Views: 89
To avoid these ads, REGISTER NOW!

Professur

Well-known member
Joined
Apr 7, 2010
Messages
3,911
Location
Mo-Ray-Al, K-bec, Ka-Na-Da
clecos only work if you're overlapping the panels.

The biggest mistake people make in trying to match cut lines is they forget that you can't put one panel inside the other without it moving up and down. Better to identify body lines and measure your cuts from them. Then **** weld, planish and grind flat, and work the joint smooth.

An alternative is to take a paper template of the cut piece and use that to transfer it to the new, but that won't take into account the cut kerf. You're going to need to pay attention to your gaps if you want a bondo-less joint.
 
OP
S

supermerle

Active member
Joined
Aug 25, 2010
Messages
44
Location
Arkansas
Professor
First thanks for the great Ideas. I think I'm going to re-cut the top line and make it straighter and then make a paper template as you suggested to get me in the ballpark. I will over cut the new panel and slowly trim till I can get the gap close as I'll be able to get it. Would a person help anything by putting a metal plate behind the old panel? I cut the top line about 2" away from the bend at the top of the existing panel to help stiffen the area of the new panel and thinking about the metal strip behind that area for extra ump? I don't think I will get away from a bondoless job but I'm going to try and minize the best I can. I did make my cuts from refence lines on the existing panel so I could refence the new panel to the old.
 

fflintstone

Well-known member
Joined
Jul 18, 2010
Messages
2,722
Location
MOFnowhere Mi.
You can run a flanging tool around your opening creating a depression for your patch panel to lie into. Having a flanged joint is easier for a beginner to make a satisfactory repair.
 

Professur

Well-known member
Joined
Apr 7, 2010
Messages
3,911
Location
Mo-Ray-Al, K-bec, Ka-Na-Da
You can run a flanging tool around your opening creating a depression for your patch panel to lie into. Having a flanged joint is easier for a beginner to make a satisfactory repair.

That's the other way. In fact, if you were to go this way, you'd be better off leaving the welder alone and using body panel adhesive. It's as strong when prepared correctly, and has no risk of heat warp. The major disadvantage to this is the same as if you were to use a backer plate ... it changes the flex of the panel. It'll always be visible to those who look. More, this will have a significant line that must be filled with Bondo.


In body work, there are two types of people perfectionists and realists. Dad was a realist. A rotted floor warranted simple repair by cutting out the old rust, and pop riveting in new metal (usually old license plates). So long as it was solid, it was good. I'm the other way. I want zero bondo, I want metal so smooth that you'll never know there was a spec of rust ...right down to tracking down the original gauge metal and hand working it til it fits. Makes sense on building a show car, but a total waste on restoring an old S-10 for a teen's first car ..... But that's how I am. Perfectly straight metal .. painted with a rattle can in the driveway.
 
OP
S

supermerle

Active member
Joined
Aug 25, 2010
Messages
44
Location
Arkansas
Professor
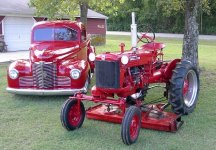
I more on youside of things:). Heres a picture of my first restore of a 1947 International KB-1 truck. Took @ 5 years but turned out nice. Modern drive train (Chevy283, IFS mustang II, Air, Electric Windows,21-circuit wiring harness, yada, yada, yada, Etc. Please keep all the ideas coming.
 

Attachments

  • PICT0254.JPG
    PICT0254.JPG
    100.7 KB · Views: 65

e-tek

Well-known member
Joined
Dec 19, 2007
Messages
10,690
Location
Saskatoon, SK
In body work, there are two types of people perfectionists and realists. Dad was a realist. A rotted floor warranted simple repair by cutting out the old rust, and pop riveting in new metal (usually old license plates). So long as it was solid, it was good. I'm the other way. I want zero bondo, I want metal so smooth that you'll never know there was a spec of rust ...right down to tracking down the original gauge metal and hand working it til it fits. Makes sense on building a show car, but a total waste on restoring an old S-10 for a teen's first car ..... But that's how I am. Perfectly straight metal .. painted with a rattle can in the driveway.

Hmmmmm....I think you meant there two EXTREMES of metalworker - and you and your Dad would certainly represent the two extremes!! For me, a lot depends on the job at hand - as you so rightly said, a crappy S-10 doesn't really require (or deserve) thr same tratment as does a show car. I find it's usually most reasonable to fall somewhere in the middle of the realistic-perfectionist realm.

Getting back to the OP's situation, I certainly wouldn't recommend he butts the panels, works the welds and planishes. That all takes a fair amount of experience, a TON of time and may just be lost on this vehicle. If the OP is going to USE this truck (I'm betting so), then the repair method should reflect that. Correct me if I'm wrong OP, but it doesn't sound like like you have ****-cutting or ****-welding experience, but you do want to do it yourself, do it right, use you welder and come out ahead. Right?
For these reasons I would go with the flanging method, welding it solid and using a skiff of filler (AllMetal, not "bondo").
Here's the jist:

Use a paper template as stated, but leave a 1/2" on each side for flanging/overlap. (A flanging tool is $15 at HF.). Then test fit using a 1/8" drill and short screws (or self-tappers) to mount the new panel onto the old, with the new panel's flange fitting under the old. You may take it off, trim, clean up the inners etc a few times. Also, drill 3/8" holes aslong the lip for your spot-wleds to the inner fender. The screws will help **** the panels together. Once it looks perfect (!), begin stitch welding at 3/8" to 1/2" lengths, working on different areas all the time to minimize heat transfer causing warpage. Once you're welded solid, grind the welds flat using the same method of working in different areas so as to minimize heat trasfer. You may (will!) have to weld up spots here and there and grind those down too. Now hammer and dolly where you can to get the panel as close as possible to level. Grind out 3-4 inches away from your welds (36G) and then use the AllMetal (an aluminum-based filler) over your weld area. It's waterproof and adds rigidity. Use a seam sealer in the flange in behind with a rubberized undercoating. Your later layers can be lightweight filler for final sanding. Primer, block, paint!

That's my input - for what its worth! Good luck and keep posting!
 

e-tek

Well-known member
Joined
Dec 19, 2007
Messages
10,690
Location
Saskatoon, SK
Professor
I more on youside of things:). Heres a picture of my first restore of a 1947 International KB-1 truck. Took @ 5 years but turned out nice. Modern drive train (Chevy283, IFS mustang II, Air, Electric Windows,21-circuit wiring harness, yada, yada, yada, Etc. Please keep all the ideas coming.

Your stuff is georgeous!!
 

MP&C

Well-known member
Joined
Oct 21, 2009
Messages
4,404
Location
Leonardtown, MD
supermerle said:
Last night the patch panel replacement began, and I would love for anyboody to chime in on the method they would use if this was there project. I have a whole side replacement panel that I got off of Epay and its made to replace the whole PS qtr. panel, but its not a true qtr. panel but pretty close. I have included pictures that show my cut and the cut is rough and I may recut the top line since I have alittle room left and I finally figured out the best way to cut the panel about the time I was getting to the end.
My method is after I drill the spot welds out I will lay the cut-out panel over my replacement and mark that panel then be more careful cutting the new panel. Does a person need those cleco clips to join the old and new panel or is there another way to hold the panels together? Here's the pictures and please feel free to comment with any tips?


What kind of access do you have to the back side of the quarter to be able to planish out any welds with hammer and dolly? How much do you absolutely have to replace? I can see the area between door opening and wheel opening needs it, area above wheel opening also?

In some instances, such as in floor pans, there are enough irregular shapes to keep the floors from warping too bad from the effects of welding. In cases like this (floors), you can cut out only what needs replacing rather than the entire panel. On a quarter as you have there, the closer you are to a creased body line, such as door jamb for instance, the better these shapes will tend to limit the distortion from welding effects, just as in the floor patches I explained above. So in essence, rather than having the rear joint through the center of that area between the wheel opening and rear of quarter, you would be well served to extend that joint as far to the rear, closer to a body crease. Down through the center of that area will tend to shrink the area of its low crown, causing either oil canning or a nice caved -in valley. Closer to a crease will help to limit these effects. Likewise, the top joint should be located close as possible to the upper body line, and the forward joint closer to the door jamb. I normally shoot for about 1/2" away from the door jamb, providing you still have room from behind for hammer and dolly work. This will not eliminate all the distortion in the metal, but should help to control it. Next, what tools do you have to work with? The clamps shown in the patch panel thread will serve well in holding the quarter in place, but I normally only use them temporarily, and start tacking from one end while removing/moving the clamps down and out of the way to allow the panels to **** tightly together prior to tack welding, to again limit the movement your panel will experience had you left a gap.
Next, although an International Scout is hardly a muscle car or other exotic car, that doesn't mean you can't spend the time and effort to **** weld all the seams and properly dress them. If you plan to install yourself, the majority of the additional expenditure to do it with **** welds will be your time. I will say that if you do opt for a flanged panel install, any warpage that occurs will be difficult at best to planish out with two thicknesses of metal on one side of the joint. But to better prepare for your quarter install, I think you need to get some scrap sheet metal and start practicing the different techniques, and see what works for you. Do some you tube searches for videos on **** welding sheetmetal, planishing welds, etc, it may help to get you started
 
Last edited:

Kevin54

MEMBER EMERITUS
Joined
Jan 12, 2005
Messages
29,341
Location
Urbana, Ohio
Flanging=rust unless really, really sealed. **** weld the panels. A small hand grinder, a fine line pen, and patience. Have someone hold it in place while you place a few tack weld here and there to initially hold it. Then spot weld it about an inch apart all along the panel, going back and filling in. It's not anything you are going to get done in 5 minutes though. Take your time, have a few beer breaks in between, and you'll get it. After it is all welded, use the edge of your cutoff wheel do knock the welds down. Then a small hand held grinder to finish. A thin coat of GOOD filler and you should be good to go.
 
OP
S

supermerle

Active member
Joined
Aug 25, 2010
Messages
44
Location
Arkansas
Thanks everybody for some great advise, first off. The picture above of the old truck is full of **** welds, but that doesn't mean a whole lot. That was my first attempt and this job will be my second attempt, but the first one was just small patches here and there except the whole passenger floor I replaced in the truck and I had access to a plasma cutter at the time which made cutting panels really nice. This job is involving a large area to be replaced and means warpage that I'm trying to avoid. The problem is this side of the truck was side-swiped and basically noway to get to the panel from behind. I may get the new replacement panel installed then remove the whole panel and prep the panel in a proper way to insure no problems down the road.
 

Stuart in MN

Well-known member
Joined
Sep 8, 2005
Messages
23,139
Location
Minneapolis
OP
S

supermerle

Active member
Joined
Aug 25, 2010
Messages
44
Location
Arkansas
Larry and Stuart
Just looked at the articule and I would have never thought about lapping the panels and then splicing together like they did. It would be like hanging wall paper in a way. Thanks again.
 
OP
S

supermerle

Active member
Joined
Aug 25, 2010
Messages
44
Location
Arkansas
Professor
I'm with you and MP&C on the quenching and the leading? Quenching to me is adding rust from the get go? What do you think about lapping the two panels then slicing both at the same time? That would give a person a perfect match at the seams. I'm thinking a really good template would work? As you can see I have most of the panel cut but didn't cut it at the corners and a few other places. That way it's still in the orginal place and can be used in a way to make the template from? I was thinking if I took some card board and placed on top of whats there and used an exacto knife and sliced in the grooves (knife held close to the outer edge) to make a template that would be pretty close? Then leave about 1/4" around the template and work the panel in from there alittle at a time?
 

MP&C

Well-known member
Joined
Oct 21, 2009
Messages
4,404
Location
Leonardtown, MD
Welds shrink when they cool. The only thing quenching is doing for you is shrinking the weld and HAZ even more (thus more possible distortion), and tempering the weld to make it more difficult to planish, so not a good idea.

I typically cut my patch panels about three times. Position the panel over the area once the damage is trimmed where you want it, mark it, and then cut about 1 inch oversize. Position again (this is where clecos may come in handy) it should fit slightly better with some of the bulk out of the way, and then mark with scribe, and trim to about 1/4" over. Fit once more, scribe again, trim to fit. Between scribes you can use a sharpie to hide the last and help the fresh scribe marks show up better. The trimming is done with a quality pair of offset snips. Offset gives you less distortion in your cut. The only issue I see with overlapping panels and cutting through both is your are adding gap, which is going to give you more room for error in panel movement as welds shrink and pull the metal, possibly throwing off your body line alignments.
 

Professur

Well-known member
Joined
Apr 7, 2010
Messages
3,911
Location
Mo-Ray-Al, K-bec, Ka-Na-Da
I'll be honest Most of the time, I'm not using stamped patch panels. I get most of my sheet from old computer cases. In general, old desktops were 20ga or thicker, able so support 75lbs monitors. So my standard approach must be to start with paper. If you use paper that's not water proof, and an older solvent type permanent marker, it marks the cut line on the paper, and the original panel at the same time. At the same time, any curve that the paper can't be smoothed into, you're gonna have a hard time making the metal follow. So if I have to V notch the paper to make a curve, ... well, I've just done all the figuring for the V notches to make the metal do it too. It's far less work to weld up a seam than to beat an impossibly deep curve into a sheet with a mallet and sand bag. Leaves the metal thicker and stronger too.
 
To avoid these ads, REGISTER NOW!

Stuart in MN

Well-known member
Joined
Sep 8, 2005
Messages
23,139
Location
Minneapolis
The only issue I see with overlapping panels and cutting through both is your are adding gap, which is going to give you more room for error in panel movement as welds shrink and pull the metal, possibly throwing off your body line alignments.

The article I read did make a point about using the thinnest grinding wheel they could find so the gap would be as small as possible. Their explanation was they wanted about a 1/16" gap to allow for the weld bead.
 

Brad54

Well-known member
Joined
Jun 13, 2006
Messages
4,646
I saw the same method outlined in one of the other car magazines recently (Hot Rod or Car Craft, I think.) It looks like a pretty ingenious method to get the panel gaps just right for welding.

That's funny... I did that EXACT same story with John at Muscle Car Restorations several years ago when I was the tech editor at Mopar Muscle.
I learned to do it from him, and the story you just saw was me putting in a floor pan in my Duster, using that process, for Hot Rod.

It is simply the very best way to do it.

I need to go dig up the issue that followed, where he taught me how to do lead work. I've got a fairly ambitious project coming with my '61 Suburban quarters!

-Brad
 

Brad54

Well-known member
Joined
Jun 13, 2006
Messages
4,646
I'm gonna have to call him on quenching the welds tho. No way in hell would I do that. Likewise, leading the joint .... is pointless.

Leading the seam is NOT pointless:
When you Mig weld a seam together, especially tack welding it the entire length, there is going to be some porosity.
When you smear it with plastic body filler, the filler is going to lay over the top of the porosity, leaving little voids.
That porosity goes through the seam and comes out the other side. Moisture will seep through the porosity and cause rust in the heart of the seam, and lift the plastic filler off the front side.
Molten lead will flow into and through the porosity of the seam, sealing it completely.

On my floors, I like to work POR15 into the seam's pores to seal it, then cover from the underside with a heavy layer of paint, or even undercoating, while the top gets a full coat of Rust-oleum, Dynamat, jute and carpet.

Not real concerned about the finished appearance of the seam on the floor of the car... but if I was, lead is the way to do it.

-Brad
 
Last edited:

Brad54

Well-known member
Joined
Jun 13, 2006
Messages
4,646
The only issue I see with overlapping panels and cutting through both is your are adding gap, which is going to give you more room for error in panel movement as welds shrink and pull the metal, possibly throwing off your body line alignments.
You're not really adding gap: There has to be a little gap between the panels to **** weld them to begin with, or as they heat up from the weld, the edges of the metal will shove together and the panels will buckle.
I wrote it down (and put it in the Hot Rod article) but I can't remember what the thickness is on those Lawson discs... it's a little fatter than they're stamped, but cheap discs are over twice as thick as advertised.
A six-inch cut through both panels, tack them, and then move on.

I've had the benefit of going through many, many shops in the last 15 years, and I've seen every wrong way to weld in patch panels. Balow's way is the best I've seen.

I will tell you two improvements I've found:
One is, never remove more of the factory metal than you need to. A lot of people feel like they have to use the whole panel, rather than just part of it, otherwise they've wasted their money. Not true... the goal is to make the car solid again, not use the new panel.

The other thing is to round all the corners of your cuts. When I did the story with Balow, he touched on this but working toward a corner from both directions: the metal grows a little, and you can control and guide that growth by working to a corner--the metal grows away from your work, in the direction you're working.

Going to the Charger in that story, the example would be the top seam, and the seam running up the door jamb. He'd work toward the door jamb on the top seam, and up the doorjamb from the bottom on the vertical seam.

A guy pointed out to me that you are putting heat into that area from both sides, and building up a lot of extra heat in that corner.
His solution is to use a pneumatic saw, and curve through that corner, rather than using the cut-off wheel and the straight-line cuts its limited to.
By curving through the corner, you can then weld through the curve, only putting heat in that area once.

I HATE those noisy little buzzsaws, and the blades are expensive, but guess what's on my Christmas list? :beer:

-Brad
 

z28snksknr

Well-known member
Joined
Jul 8, 2009
Messages
1,827
Location
Turnersville, NJ
Good info here. As a newbie in the patch panel world, I think the hardest thing for me is getting a nice consistent gap all along the panel (and keeping it there while I tack it into place).

I haven't been leading my seams, but I do tend to grind my welds down to the point where the surrounding metal is too thin. I WAS smart enough to use the All-metal vs. Bondo filler - it works really well and is tough to sand which is good for slowing me down. Just like a typical newbie, I want perfection - fast.
 
OP
S

supermerle

Active member
Joined
Aug 25, 2010
Messages
44
Location
Arkansas
Once again, Many thanks! My head is a swiming forsure but this some great info!!!I think there's more than one way to skin a cat and a person has to choose a plan and stick to it? I think I'll use alittle of everybody's suggestion and hope for the best.

PS With all this info I feel I can do the job right and have a great outcome!!
I'll post some pictures as I go!
 

Brad54

Well-known member
Joined
Jun 13, 2006
Messages
4,646
Good info here. As a newbie in the patch panel world, I think the hardest thing for me is getting a nice consistent gap all along the panel (and keeping it there while I tack it into place).

I haven't been leading my seams, but I do tend to grind my welds down to the point where the surrounding metal is too thin. I WAS smart enough to use the All-metal vs. Bondo filler - it works really well and is tough to sand which is good for slowing me down. Just like a typical newbie, I want perfection - fast.

Say you have a 3-inch overlap of both panels, strictly for illustration purposes here. Cut through both of them at the same time, with the thinnest wheel you can find... If you have the 3-inch overlap, cut through both panels 1.5-inches from the edge of the top panel... just cut a few inches, peel the excess metal away from BOTH panels, and tack. Then move on.

The little screwdriver tip fits in the gap and will leverage the two panels together at the seam, so you tack them together on the same plane.

As for grinding your welds, use the EDGE of your grinding wheel, and grind on the TOP of your weld bead, until it's down to the level of the panels.
Use fresh cutters, as a dull grind stone will generate a lot of heat.

Don't use roll-lock or other grinding pads in a side-to-side motion across the weld.

Also, there's EasyGrind wire that is a lot softer than regular mig wire. I don't have the name or the alloy here, but it's out there. Contact your welding supply place.

-Brad
 

e-tek

Well-known member
Joined
Dec 19, 2007
Messages
10,690
Location
Saskatoon, SK
Brad - I've read your ****-weld article(S) a few times in the last year. Definitely a great way to do it and I've begun to use that method myself - where it makes sense.

BUT I STILL say a rookie can often be better off using some of the "older" easier methods. I've been doing some resto-topic classses for 4-6 guys on a weekend and find that some people cannot grasp every type of panel attachment procedure rght away. There's a learning curve (like anything) and overlapping is step one. Not that anyone shouldn't try to **** weld, but often someone doesn't even have much welding experience, much less die-cutting, mig set up, ****-welding, planishing AND leading was even thrown in there! "Little by little the old lady said as she peed in the puddle..."
 

Jack Burton

Well-known member
Joined
May 22, 2009
Messages
105
I think Brad54 is exactly right. I came across those stories in Mopar Muscle a couple years ago and they blew my mind. I thought it was the single best quarter-panel how-to I'd ever seen.

I'm still trying to find out just how thin those West Cut wheels are but so far, I've been using 1/32" wheels. You want a small gap, but as Brad wrote the panels can't be so close they're touching or something is gonna buckle.

Another key thing is cutting near factory lines. It helps maintain shape and minimizes warping to some degree. I'm all for keeping as much factory metal as possible but I'd rather not weld across a flat panel.

As far as the quenching, I will take a slightly more brittle weld over a warped panel any day. With the lead and today's epoxy primers, the quenching causing rust issue seems moot.

The working towards corners thing makes perfect sense as well. If there is gonna be a problem, localize it.
 

rsanter

Well-known member
Joined
Dec 22, 2007
Messages
18,521
Location
visalia ca
if the area will not be seen you can use an added piece of metal to use as a backing strip ro make a step or flange. I prefer a but weld but be sure to stich it in and not overheat the panels
if the back side is accessable or visible then you can do a copper backing and remove it once welded

bob
 

Brad54

Well-known member
Joined
Jun 13, 2006
Messages
4,646
Balow showed me that easy-grind weld, and for a demo he welded two pieces of sheetmetal together, then folded the thing along the length of the seam, straightened it and then bent it across the seam. It wasn't brittle.
Grinding it also created less heat.

-Brad
 

Brad54

Well-known member
Joined
Jun 13, 2006
Messages
4,646
Brad - I've read your ****-weld article(S) a few times in the last year. Definitely a great way to do it and I've begun to use that method myself - where it makes sense.

BUT I STILL say a rookie can often be better off using some of the "older" easier methods. I've been doing some resto-topic classses for 4-6 guys on a weekend and find that some people cannot grasp every type of panel attachment procedure rght away. There's a learning curve (like anything) and overlapping is step one. Not that anyone shouldn't try to **** weld, but often someone doesn't even have much welding experience, much less die-cutting, mig set up, ****-welding, planishing AND leading was even thrown in there! "Little by little the old lady said as she peed in the puddle..."

I'll be honest--like I said, I've been lucky enough to have spent a lot of time in shops seeing the WRONG way to do things! Often, you learn as much watching the wrong way as the right.

I took a welding class two years ago, and am still learning. I'm okay at it... better than a lot, nowhere near as good as most.

The floor pan I did for the Duster in Hot Rod was the first time I've done my own panel repair... Now, that's a pretty loaded statement, because I've watched sooooo many panels go in from other people. I really just did what I've watched a lot of guys do, and did a few things I always thought should be done.

I'm doing it on my Suburban right now, and I gotta tell you--I had to off-dolly hammer a 1-inch deep body-bolt mount and shrink it away, and I had to re-contour a bead to match the factory one--Never done it before, and it turned out amazing.

Sadly, I guess I'm a huge believer in the old "If I can do it, ANYBODY can." But I've been reading how-to articles for almost 30 years, and watching guys do it for half that long.

A flanged weld IS easy... a **** welded panel isn't that much harder. The key is that it's a much, much slower process, and THAT'S where a lot of people get burned.

I spent a very, very little time around a couple of machinists... Nobody ever said anything to me, and I wasn't there learning from them specifically, I was just talking to them about whatever, and watching to see what I could pick up.
And what I picked up is this: Machinists don't do ANYTHING fast. And their work is precise and nearly perfect because of that.
If you apply that mindset to patch panels (and a lot of other things), the results speak for themselves.

-Brad
 

Brad54

Well-known member
Joined
Jun 13, 2006
Messages
4,646
if the area will not be seen you can use an added piece of metal to use as a backing strip ro make a step or flange. I prefer a but weld but be sure to stich it in and not overheat the panels
if the back side is accessable or visible then you can do a copper backing and remove it once welded

bob

I got one even better! (And I have to use it frequently, because I still burn through more than I want)
I took a piece of 1-inch copper plumbing pipe, flattened about 2 inches of the end and bent it at about a 30-degree angle. Then I took a 1/4-inch drill bit and drilled a couple rows of holes through the pipe, kind of like a semi truck exhaust stack or the barrel of a .50 cal machine gun.
You can hold the spatula up against the back side of the steel, weld, and the holes dissipate the heat. I did it without the cooling holes at first, and the tubing heated up to the point where I couldn't hold it with a welding glove on. With the holes, I can hold it with my bare hand.

-Brad
 
OP
S

supermerle

Active member
Joined
Aug 25, 2010
Messages
44
Location
Arkansas
Well I'm back and had a chance to do alittle more work over the weekend.
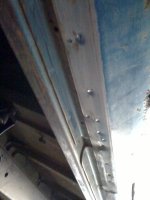
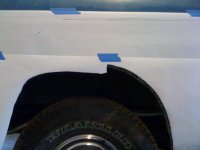
I was able to recut my top line and it has turned out very nice and straight. Sunday I pulled it into my garage and got to use the spot weld cutter for the first time ; so, heres a few pictures. First pic is were I pre-drilled the center of the spot welds. The second shows the dirt that lays behind them panels. The thrid is hard to see but some of the holes have the spot cuts and I found that you dont have to cut out the whole weld just get a good circle started and thats good enough. You might have to go back and cut alittle more if it's going to be stubbon but it really doesn't take much;also, the picture shows the the bottm edge seperated from the rocker panel. I then moved on to the wheel well and repeated the process. The last picture shows how I took some plotter paper and taped to my panel and then I made alot of reference marks. I then used a razor blade and cut as close to the outer most line as possible to make a template to transfer to the new patch panel. I will cut my new patch panel about 1/4" beyond my template then cut my panel from there to line everything up as close as I can get it.
 

Attachments

  • photo1u.jpg
    photo1u.jpg
    96.2 KB · Views: 31
  • photo2u.jpg
    photo2u.jpg
    119.7 KB · Views: 31
  • photo.jpg
    photo.jpg
    126.2 KB · Views: 33
  • photo4u.jpg
    photo4u.jpg
    136.2 KB · Views: 37
Last edited:
OP
S

supermerle

Active member
Joined
Aug 25, 2010
Messages
44
Location
Arkansas
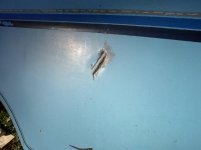
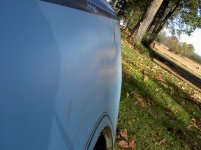
Since my other panel will not work I found an old one here local and have remove the panel off to use. In this picture you can see to big Gouge in the panel? Should a person 1. cut this out 2. cut a relief in the gouge and weld up 3. or just put body filler in the gouge?
 

Attachments

  • PICT1440.jpg
    PICT1440.jpg
    145.1 KB · Views: 20
  • PICT1444.jpg
    PICT1444.jpg
    143.2 KB · Views: 16

MP&C

Well-known member
Joined
Oct 21, 2009
Messages
4,404
Location
Leonardtown, MD
Merle, I like to use "opportunities" such as those in front of you to hone metalworking skills...

Option 1 would be to use hammer and dolly, shrinking disc, heat if necessary, etc to remove the damage and restore the correct contour to the panel.

Option 2 Once you have it closer, now a small amount of filler would be better than the thickness of filler required for where it presently is... If you can get it where no filler is needed, you have done well!

Option 3 if neither of the above options work to your satisfaction and the panel is now totally disfigured, now you can cut out the affected area and weld in new metal. But I would always consider this a last resort, providing the metal is still solid (no rust through)
 
OP
S

supermerle

Active member
Joined
Aug 25, 2010
Messages
44
Location
Arkansas
Robert
Thanks for the info and your approach seems the best method to follow. Now, do you have a short lesson anywhere on how to go about using the hammer and dolly to fix the gouge? I've seen words like off dolly work and things like that but having no hammer and dolly experience I don't want to make things worse? I've already hammered from the backside and made the metal bow inwards on both sides of the gouge, so I hammered the gouge back the other way and got the panel back to were it was in the begainning.
Thanks in advance and please keep your threads and knowhow coming they are great for newbees like myself.
 

MP&C

Well-known member
Joined
Oct 21, 2009
Messages
4,404
Location
Leonardtown, MD
Anytime you have damage such as that, the metal has stretched. I'd say to do a search on youtube for videos on metal shrinking, I think you'd get much more out of a video. Here is a thread I did on welding and shrinking, this may also give some insight......


For all the progress pictures, how-to's, etc, sometimes the small details get lost in the shuffle. I thought I'd start a thread just to get people thinking about the effects of welding and perhaps how to read a panel to see if we need to shrink or stretch the metal.


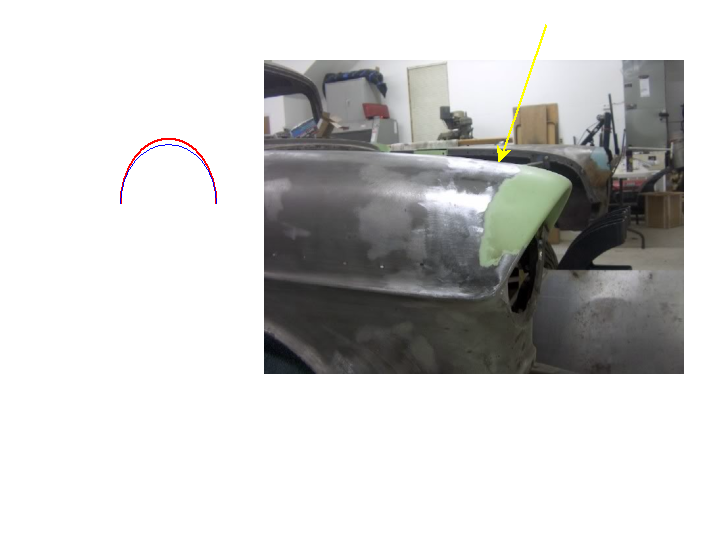
Using a headlight eyebrow picture as a sample, looking at a cross section of the patch panel we have a long arc that stretches from the outside of the fender to the inside. Once we weld along this seam, eventually going from one end to the other, the heat from welding will have a tendency to shrink the area in the HAZ (heat affected zone). In most cases, any shrinkage from the welding will tend to be more prominant within the center section of the panel, especially one with a low crown. In effect, the original arc shape (red) as the heat from welding attempts to shrink the area, will cause the arc to shorten in length. As the ends are somewhat locked in place, the result will be a smaller arc (blue) and even though the welds have been dressed, this can be seen as a slight dip (yellow arrow).

crown2.png


To correct this flaw, short of increasing the stock prices of bondo, some stretching of the HAZ thoughout the weld is in order. Some 80 grit on a long board sander, and a cross hatch pattern across the area will quickly show the high spots (become bright and shiny) and the low spots (sander didn't touch them) Match the contour underneath as closely as possible to an appropriate dolly, and with a low crown hammer (the flat one), use the on-dolly technique (you should hear a ping when you strike) to stretch the area. (this should only be done after the welds are dressed and the panel somewhat flat) Worked slowly and methodically, checking your progress with the sander. If you have an area you got too happy with the hammer and it now shows too high, use off dolly (dolly on low spot underneath, hammer strikes the high spot on top....gently- no ping sound) to bring it back down again. Repeat as neccessary until you are happy with the results. The recent fender repair I did to remove a crease shows what can be accomplished using this method. Where this used to have a good amount a filler as a repair, we should be able to straighten much of it out where high build will address the imperfections:


Picture374.jpg


Picture375.jpg


Once we have the dolly selected, in this case we use some off dolly with a ******* to bring down the high spots. (A ******* has much more surface area, and thus has less chance of leaving marks as a hammer.....plus can span a narrow valley to off-dolly the two sides at once) Unlike welding, a glancing blow does stretch the metal, so some shrinking is in order.


Picture376.jpg


Picture377.jpg


Once the high spots are brought down and the panel countour looks close, some on-dolly in the low areas will bring them up a bit more.


Picture378.jpg


Picture379.jpg


Much better:


Picture380.jpg


For flatter panels such as quarters, I think some may be under the misconception that because a panel used to be flat, and now that the metal has moved away from its flatness, well obviously the metal has stretched. NOT! There are very few, if any cases where a welding exercise will result in the permanent stretching of metal. Sure the metal will stretch while exposed to the heat from welding, but as the area cools, the molecular structure re-aligns and becomes tighter, closer than they were previously- resulting in shrinking.

Looking at the cross-section of the quarter, the same principle applies as the eyebrow patch above. Where this is a lower crown panel, and the heat often wreaks more havoc on the center of the panel, in many cases it will shrink, lose some of the crown, (become more flat), and possibly start to oil can as the metal loses its shape. In the picture below, again the red arc would represent the original shape, and the blue shows what occurs as the weld shrinks the surround area; the arc loses some of its length and pulls the adjoining metal into a valley.

crown.png


To correct this, the hammer and dolly principles as explained above are used. Use caution, no matter what type of panel you are working on, to not get trapped with "tunnel vision" and only focus on the immediate weld area. We should always keep an eye on the surrounding area as well, and check your progress with some long metal strips/rulers laid across the area to help see where the shape needs to move. On a quarter, I like to lay a long ruler across the seam to read the dip, and then also drag it along the panel parallel with the seam, to see any change in the crown from the unshrunk area and into the welded area. Hopefully this will give a better understanding to what happens when welding so we can use more metalworking and less filler. :thumbup:

Remember, on-dolly, metal pinging sound = stretching. Off-dolly, NO pinging sound and light taps = shrinking


Just to clarify a couple points, I had some questions about the above initial post....

Hi Robert,

As a student of these skills I need a little help.

I have never thought of “off dolly” work as a shrinking operation. I thought it was only used to raise or lower the surface of the metal. I understand that on dolly operations stretch the metal by thinning and spreading it out whereas shrinking requires the gathering and compression of the metal into an heated area.

Secondly, are you saying that to counteract the inherent shrinking produced by the welding operation that the weld metal should be planished (on dolly) but also the parent metal adjacent to the weld metal?


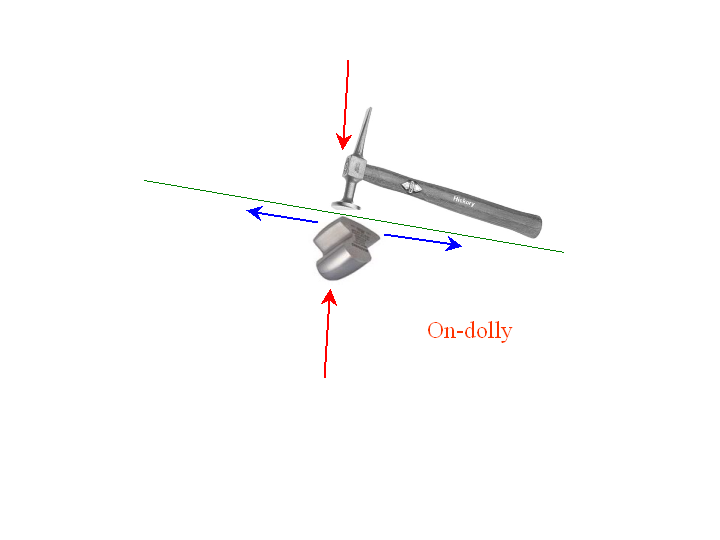
To explain what is occurring, when using On-dolly, hammer and dolly directly lined up with each other on opposite sides of our green metal, and when you strike the hammer you will hear a ping as the force travels through to the dolly. (red arrows) The secondary action is that this forces the metal outward (blue arrows), in essence stretching the metal.


OnDolly.png


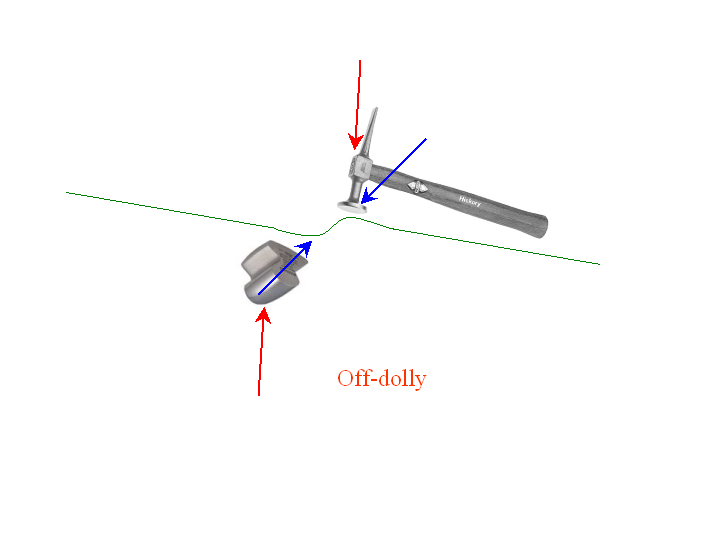
Now after someone backed into your fender (obviously stretching the metal) we have a ripple to remove. Using the off dolly technique, each tool on the high part of their side of the panel, striking the panel with the hammer will force the metal bulge of that side downward (red arrow) as does the dolly on its side of the panel. The secondary action in this case is to force the metal back into itself (blue arrows), as well as raising/lowering the metal as you suggest. By no means will you see the amount of shrinking that takes place when you introduce heat, such as with the torch or shrinking disc. But it shrinks, just the same.


OffDolly.png


As far as planishing the metal, where ever you see discoloration from the heat (the HAZ), you have experienced shrinking. Simply planishing the weld will help, but to truly fix the effects from the heat, the HAZ outside the weld will need planishing as well.


.
 
Last edited:
To avoid these ads, REGISTER NOW!
Top Bottom