Apologies if this has been asked before, I'm sure it has but I couldn't find anything specific to my situation. I'm sitting on 5 acres of rural land, and really want to put a pole barn in. There's already a good sized area cleared that a 30'x40' could easily fit into. The issue with this area, and most all of my property, is that it's sloped. The area that's cleared, specifically, would have anywhere from 4' to 8' of drop front to back, depending on how we angled it and positioned it. Obviously, that's a lot. I've talked to a couple of excavators, and neither seemed to think it was worth it (or needed) to build some kind of retaining wall. "Just compact the dirt and slope off of it, you have the room for it" is what both have said. I talked to a third, though, who said a retaining wall was probably a good idea, although that just a **** ton of dirt would be "doable". The pole barn builder I want to go with (very well rated and competitive cost-wise) unfortunately puts the onus on the property owner to get the site of the build up to snuff. Has anyone else here built on a slope of this grade? Any recommendations or lessons learned? Just struggling to decide how to approach this. We obviously want to get the site prep done perfectly, since we're splurging on a nice structure (and concrete) to sit on top of it. Thank you very much!!


You are using an out of date browser. It may not display this or other websites correctly.
You should upgrade or use an alternative browser.
You should upgrade or use an alternative browser.
Building a Pole Barn on Sloped Land
- Thread starter hutch0909
- Start date
Firebrick43
Well-known member
I have customers (farmers) that have pole buildings built on slopes.
If you have space and take the pad 20' or more from the edge of the building, yes it can be done. It depends on the soil however. We have clay/loam mix here that compacts and stays in place. Sand areas by the river need more stabilization such as retaining walls. Most use the 2'x2'x4' concrete blocks that the concrete trucks dump extra concrete into the forms when the go back to the batch plant.
Quite a few around here will also sink the back corner into the hill using a concrete stub wall 2 to 3' high on only that corner. The material the excavate will be used to build up the pad for the opposite corner.
The extra concrete cost many times is cheaper than hauling in so many loads of dirt if everything was only built up
What ever route you take, do not let the contractors use their skid steer as compaction by just driving over it. That is utter bs that many try to pull on people. Only a compactor/roller should be used in layer depth appropriate to the machine
billconner
Well-known member
A lot has to do with vehicular access. Hard to know if building up, are all cutting into slope, or ideally a combination will work.
I think with a post frame building you're better off excavating further into slope and building a retaining wall and through grading and drains, assure no water buildup.
I think with a post frame building you're better off excavating further into slope and building a retaining wall and through grading and drains, assure no water buildup.
We'd be accessing it from uphill, cutting into the slope doesn't seem feasible unfortunately.
A lot has to do with vehicular access. Hard to know if building up, are all cutting into slope, or ideally a combination will work.
I think with a post frame building you're better off excavating further into slope and building a retaining wall and through grading and drains, assure no water buildup.
We have a good amount of clay in our soil, but unfortunately, we'd have to access the pole barn from uphill...it's just how our property is laid out and the overall general slope of it. Building up seems like the only doable option. And this may be a silly concern, but I do wonder how this built-up area would look aesthetically. I suppose with the gradual slopes coming off of it, it wouldn't look too out of place.I have customers (farmers) that have pole buildings built on slopes.
If you have space and take the pad 20' or more from the edge of the building, yes it can be done. It depends on the soil however. We have clay/loam mix here that compacts and stays in place. Sand areas by the river need more stabilization such as retaining walls. Most use the 2'x2'x4' concrete blocks that the concrete trucks dump extra concrete into the forms when the go back to the batch plant.
Quite a few around here will also sink the back corner into the hill using a concrete stub wall 2 to 3' high on only that corner. The material the excavate will be used to build up the pad for the opposite corner.
The extra concrete cost many times is cheaper than hauling in so many loads of dirt if everything was only built up
What ever route you take, do not let the contractors use their skid steer as compaction by just driving over it. That is utter bs that many try to pull on people. Only a compactor/roller should be used in layer depth appropriate to the machine
Firebrick43
Well-known member
Do you have a photo or two of the site? That would be helpfulWe have a good amount of clay in our soil, but unfortunately, we'd have to access the pole barn from uphill...it's just how our property is laid out and the overall general slope of it. Building up seems like the only doable option. And this may be a silly concern, but I do wonder how this built-up area would look aesthetically. I suppose with the gradual slopes coming off of it, it wouldn't look too out of place.
jack stand
Well-known member
With up to 8' of elevation change and entering from up hill, your probably looking at some walls and a lot of dirt moved. Both to accommodate the grade change and to divert uphill water around the building.
Years back they would build a "bank barn" on a site like this. That involves a 3 sided foundation and a very sturdy floor, but that was for horses and wagons or eventually tractors. The plus side was a lower level (under the same roof) and usually used by livestock.
It sounds like you're describing a wooded lot with an area cleared....on a difficult slope. Is there a flatter area that could be cleared? You'd have to price it out, but retaining walls and earthmoving is generally way more expensive than clearing.
billconner
Well-known member
This sounds like a costly plan. Either a lot of fill and retaining walls - engineer required - or build a basement - half in the slope for no full/no spoils - and floor, with building on top. Since the basement is a foundation, makes more sense to stick frame. The savings of post frame is mostly excavation and foundation - which either retaining walls and fill or a basement provides.
Just a awful site for a pole barn with access from up hill.
Just a awful site for a pole barn with access from up hill.
There's another spot with a few trees in it I could clear out...if we put it there, we'd be entering into the pole barn from downhill, as the land slopes up from there front to back. HOWEVER, side to side, there's some slope too (not as major as 8' of drop), but still 3-4' of drop. Our property really is just a bunch of sloping land every which way. Our home was built into the slope with a walk-out basement...I'm half wondering if we should just bite the bullet and build a stick-built garage with a foundation.With up to 8' of elevation change and entering from up hill, your probably looking at some walls and a lot of dirt moved. Both to accommodate the grade change and to divert uphill water around the building.
Years back they would build a "bank barn" on a site like this. That involves a 3 sided foundation and a very sturdy floor, but that was for horses and wagons or eventually tractors. The plus side was a lower level (under the same roof) and usually used by livestock.
It sounds like you're describing a wooded lot with an area cleared....on a difficult slope. Is there a flatter area that could be cleared? You'd have to price it out, but retaining walls and earthmoving is generally way more expensive than clearing.
There is another spot we could put it that would be access from downhill (front to back), but there's still a few feet of drop side to side too to deal with. I mentioned it in another reply, but I am starting to wonder if building a stick-built garage, on a proper foundation, would be the better way to go.This sounds like a costly plan. Either a lot of fill and retaining walls - engineer required - or build a basement - half in the slope for no full/no spoils - and floor, with building on top. Since the basement is a foundation, makes more sense to stick frame. The savings of post frame is mostly excavation and foundation - which either retaining walls and fill or a basement provides.
Just a awful site for a pole barn with access from up hill.
Firebrick43
Well-known member
You could have a basement and a drive out door in the back for lawn and garden equipment or atvsThere's another spot with a few trees in it I could clear out...if we put it there, we'd be entering into the pole barn from downhill, as the land slopes up from there front to back. HOWEVER, side to side, there's some slope too (not as major as 8' of drop), but still 3-4' of drop. Our property really is just a bunch of sloping land every which way. Our home was built into the slope with a walk-out basement...I'm half wondering if we should just bite the bullet and build a stick-built garage with a foundation.
billconner
Well-known member
Not really knowing site, it sounds the other spot with masonry walls - block or icf if conditioning - to above grade and stick build on top would be most economical. Post frame seem suited for flat sites.
BlindViper
Well-known member
My pole barn required 4' of build up in the one corner. That side of my building has that 4' of height over 10' laterally or so its not bad. It has grass on it and I cut it with my tractor.
Last edited:
ericm
Well-known member
The site for my 40x80 ended up being about 3' low on one corner, but that slope extended pretty evenly from the high opposite corner. The fill and compaction was a good part of the excavation bill. There's a slope up at the front of the building so I had the excavator remove material from that hill to make room to get vehicles in. It's not ideal but all of the land that's reasonably close to the house is sloped, and this was the best place for the shop.
It's not done yet and I have yet to try to turn a trailer in that space or even pull a truck in to the shop although contractors have done it without complaint.
It's not done yet and I have yet to try to turn a trailer in that space or even pull a truck in to the shop although contractors have done it without complaint.
Youngandfree
Well-known member
Do the bank barn there with the concrete walls like a basement.There's another spot with a few trees in it I could clear out...if we put it there, we'd be entering into the pole barn from downhill, as the land slopes up from there front to back. HOWEVER, side to side, there's some slope too (not as major as 8' of drop), but still 3-4' of drop. Our property really is just a bunch of sloping land every which way. Our home was built into the slope with a walk-out basement...I'm half wondering if we should just bite the bullet and build a stick-built garage with a foundation.
jack stand
Well-known member
Don't feel bad about your lot. Leveling a 60x80 area for a 30x40 building and drainage is a learning experience for sure.There's another spot with a few trees in it I could clear out...if we put it there, we'd be entering into the pole barn from downhill, as the land slopes up from there front to back. HOWEVER, side to side, there's some slope too (not as major as 8' of drop), but still 3-4' of drop. Our property really is just a bunch of sloping land every which way. Our home was built into the slope with a walk-out basement...I'm half wondering if we should just bite the bullet and build a stick-built garage with a foundation.
You can build a "pole building" on a foundation. There are brackets* that make the connection between the concrete and the posts. You'll double your sq/ft but it'll cost you the foundation and the floor.
*https://permacolumn.com/
bsakal
Well-known member
I just did this, although not as excessive grade elevation change as yours. I had close to 30 inches from one corner to the other opposite corner elevation change. Bringing in fill was not an option because of my building setbacks, I would not be able to taper the grade gradually to allow access into the garage, the "ramp" would be too steep. Plus I would have had to bring in a lot of material to build a level pad site. So I decided on where my floor elevation would be, and had the contractor cut into the high side, and went with a perimeter spread footing and a foundation wall. My foundation wall is 2ft above the interior slab, and my exterior grade elevations stayed close to what they were prior to construction. Then I had a pole building erected onto the foundation. The builder used a specific bracket and Simpson Titan concrete screws to attach them to the wall. I still need to do the final grading. It was extra work and cost, but worth it.
Fav Onefour
Well-known member
We've built a lot of pole barns - machine sheds. I can't think of one the was built on flat ground.
It's part of life when you build. Don't overthink the plot. I bet the conversation with the "retaining wall" contractor involved you mentioning the size of open area. If you want to keep the area small, you may need a wall.
I'd go the other way with your thoughts. Go with a larger flat area. Extend it well beyond the building footprint. It allows room for using the outside area down the road. I've dealt with sheds that slope right off the walls. The outside area is unusable and steep slopes are problematic close to buildings. Roof runoff needs management. If it's right on top of a steep slope, it needs more management. I would almost guarantee that someday, you'll be on that slope trying to move or add fill to the top. That process is usually a pain with your walls right at the apex. That's usually when you clank the equipment into the walls. Sure, the repairs are easier if you run skirting, but it's easier to avoid the scenario altogether.

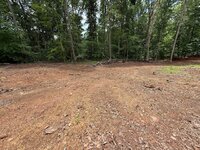

The first picture is of the area that trees could come out in, that would be accessing the pole barn from downhill. But there's slope side to side to, a few feet of it. The other 2 pictures are of the already cleared area, obviously. Slope isn't readily apparent I don't think from the pictures, but it's definitely moderate slope. Would love any ideas anyone has on how best to utilize this land for a 30x30 at a minimum. Thanks!
billconner
Well-known member
And post frame or stick frame? Sure seems stick frame is a better suited to this kind of foundation.Couldn’t find a good picture of what I had in mind, here is an example of the foundation.

jblnut
ALLIANCE MEMBER
A guy close to us has a drive out basement under about half of his farm shop. It is really slick as he drives the heavy stuff up top in the half without the basement and has his fab area and office/bathroom stuff in the back. It’s a really nice layout. Overall footprint is 54x90.You could have a basement and a drive out door in the back for lawn and garden equipment or atvs
I have moved close to 50,000yds of dirt to put all the buildings here and where I wanted them. Everything that is pole built other than the steer barn is built on concrete piers.Don't feel bad about your lot. Leveling a 60x80 area for a 30x40 building and drainage is a learning experience for sure.
You can build a "pole building" on a foundation. There are brackets* that make the connection between the concrete and the posts. You'll double your sq/ft but it'll cost you the foundation and the floor.
*https://permacolumn.com/
I’ve driven past a large shed that is sticking at least 10’ out of the ground on the far end of the building. It looks like a giant concrete ring was built and filled in with the building put on top. Doesn’t look cheap but building on grade never is.
Good luck !!
I’ve seen them both ways.And post frame or stick frame? Sure seems stick frame is a better suited to this kind of foundation.
Obvious most of the larger ones/ older ones are post and beam.
I have a small two car garage with a similar style that is stick built.
Shoester
Well-known member
I had a similar situation, and ended up pouring a full foundation wall/footing and built the pole barn on top of the wall using SturiWall post brackets attached to the wall. Brought in a bunch of dirt and gravel for backfill to bring grade up inside the walls, then poured the slab.
The foundation was pricey, but everything is out of the dirt and should last longer than me.
The foundation was pricey, but everything is out of the dirt and should last longer than me.
sjvicker
Well-known member
I was faced with a similar situation, although I didn't have the issue of having to access from the uphill side. I have zero regrets paying to have my graded area made much larger than my shop and placing the building on the cut. Your slope almost looks like it could be regraded to be steeper like mine was but not so steep that you'd need a retaining wall.
My goal was to have no french drains that will eventually clog and no dirt against a stem wall that will eventually weep. I have about 10' between the shop and that hillside with a ditch in there.

My
My goal was to have no french drains that will eventually clog and no dirt against a stem wall that will eventually weep. I have about 10' between the shop and that hillside with a ditch in there.
My
Craig Balzer
Well-known member
I had a slope to deal with when I built my pole-barn hobby shop. My shop is 72 feet along the back wall and 48 feet deep. See below

The high point is the upper left corner of the sketch - lowest is lower right: 7.5' height differential.
//
The gate on the now-gone fence line about equals the location of my 16' garage door on the finished product.
BEFORE

/
DURING - you can see some of the fill dirt on the right

/
/
To get a flat base I had 1,154 tons of fill dirt trucked in. It took 46 of these trucks (carrying 25 tons each) to get there.


/
This perspective also shows just how much fill needed to be trucked in to level the construction site: 1,154 tons of dirt. The near corner in this pic has 7 to 7.5 feet of fill.

My GC said that whether I brought dirt in or took dirt out (and include a small retaining) was about a wash in cost.
Since I have a heavily treed lot (like yours), taking dirt out / rising a retaining wall risked a lot of roots getting in the way.
Also, my GC explained that the corner where the retaining wall would be located would be a great catch point for weather (rain/snow) to collect and potentially attack the wall and the building - a point to consider. You don't mention where you live so the weather may not such an issue for you; I'm in NE Colorado Springs.
I opted to do 100% fill (another cost consideration is how you compact the fill to provide a good foundation point.
Other points to consider during you dig vs fill issue:
Are you bringing in / taking out water from the building?
How is power getting into the building?
Concrete drive / patio / walk?
Flow of rain/snow around outside of the building?
AFTER

When all was said and done, my GC said I needed to drop a bunch of trees or put in a retaining cause the slope of the fill was too steep.
My retaining wall was on the outside of the fill -- no corners to catch moisture.
I have, since these photos, laid concrete and filled the area adjacent to the shop with rock
/ /


The high point is the upper left corner of the sketch - lowest is lower right: 7.5' height differential.
//
The gate on the now-gone fence line about equals the location of my 16' garage door on the finished product.
BEFORE
/
DURING - you can see some of the fill dirt on the right
/
/
To get a flat base I had 1,154 tons of fill dirt trucked in. It took 46 of these trucks (carrying 25 tons each) to get there.
/
This perspective also shows just how much fill needed to be trucked in to level the construction site: 1,154 tons of dirt. The near corner in this pic has 7 to 7.5 feet of fill.
My GC said that whether I brought dirt in or took dirt out (and include a small retaining) was about a wash in cost.
Since I have a heavily treed lot (like yours), taking dirt out / rising a retaining wall risked a lot of roots getting in the way.
Also, my GC explained that the corner where the retaining wall would be located would be a great catch point for weather (rain/snow) to collect and potentially attack the wall and the building - a point to consider. You don't mention where you live so the weather may not such an issue for you; I'm in NE Colorado Springs.
I opted to do 100% fill (another cost consideration is how you compact the fill to provide a good foundation point.
Other points to consider during you dig vs fill issue:
Are you bringing in / taking out water from the building?
How is power getting into the building?
Concrete drive / patio / walk?
Flow of rain/snow around outside of the building?
AFTER
When all was said and done, my GC said I needed to drop a bunch of trees or put in a retaining cause the slope of the fill was too steep.
My retaining wall was on the outside of the fill -- no corners to catch moisture.
I have, since these photos, laid concrete and filled the area adjacent to the shop with rock
/ /
Last edited:
Craig Balzer
Well-known member
Since you are in the planning stage, maybe theses notes will help. I may have missed it, but I don't know the purpose of the build. My shop is for restoring old cars:
I compiled these notes during/after my Garaj Mahal build. Looks like you have the main dimensions already set, but you may find some nuggets here (I have posted this several times here so if this is redundant, my apologies). My shop was built to work on cars.
See attached PDF
My 2300 sq ft Hobby Shop is complete and I am working in it daily and still populating it with stuff.
What stuff? How is it all gonna fit? Where’s it gonna go. What goes next to what? See below
GENERAL
• Build as big as you can afford/fit on your property (or you'll regret it).
• You gotta know your plan inside and out – when the builder asks to move something elsewhere, only you can visualize the impact on other things / stuff
• Be flexible when reality shows up – also be true to your overall plan
• Windows? PRO: natural light – CON: entry point for a$$holes
• Skylight(s)? PRO: natural light – CON: then no attic
• Keep the building dimensions in multiples of 4 feet – reduces wastage of wood
• A mezzanine is good for long-time storage of large or awkward items; plan for where the staircase is gonna be placed; plan how to get heavy items up there and back down
FLOOR
• Gonna place light(s) in floor under lift??
• First thing you lay down is 10 mil vapor barrier
• Then closed-cell insulation – 2 inches thick
• In-floor tubing for radiant goes in before concrete pour – plan carefully if a lift is planned. Should be thicker concrete and limited pex tubing near posts
• Lay some plastic conduit in the floor before concrete is poured from the circuit box to the three other walls to allow future wiring to be run without tearing into walls or mounting conduit on the walls
o Since I forgot to do this, I installed a 2-3" PVC pipe in the upper left-hand corner of the circuit breaker box that terminates in the attic with another sweeping 90° curve. This easily allows fishing a new line (or two) into the circuit box. (See photo) The girts needed to be notched so the OSB would lay flat and metal straps were used to hold the pipe in place.

• Thickness? 4” works. Except under lift – my pour was 9-12 inches thick under posts.
• Plan now for smoothness of finish on concrete - - epoxy covering?
• Gonna wash cars in there – floor drain(s)? Lot’s of environmental issues to learn
WALLS
• 2x4 vs 2x6 construction. A 2x6 is pennies more per board and allows thicker insulation
• I have R19 in my walls (Colorado) and the building is noticeably cooler this summer and stays warm in winter during sub-freezing temps
• I have R49 blown-in above the ceiling
• Sheath with OSB vs Dry Wall. Dry wall looks prettier but to hang anything heavy requirements finding a stud or two. OSB has more industrial appearance but a shelf goes wherever you want to put it
• Windows – already covered
• Height of walls? 12 or 13’ allows most lifts to fit (I have 14’ ceilings in main room)
• Tall walls require more heating capacity, and costs more to heat
ELECTRICAL
• Plan where your 110v outlets are gonna be, then add 50% more of them (mine are 4 feet apart except where a window gets in the way); I have 45x 120V outlets in my 2300 sq ft hobby shop
• Are you gonna use 15- or 20-Amp circuits? (different wiring requirements and different fixtures)
• Place them 45-48” above the floor level so they aren’t hidden later by benches, toolboxes, etc
• Plan for outlet(s) on the exterior of each wall
• Plan for outlet(s) in ceiling for lift or drop light or other
• Plan for outlet(s) in ceiling for garage door opener
• Plan for outlets up high on wall: wall clock, TV, modern “smart” speakers, other
• Lights – fluorescent or LED? Dimmable? Dimmable LEDs are available and require different wiring and dimming switch
• Plan for exterior lights – Colorado Code requires a light above each man-door opening
• Plan for exterior lights – gonna have a patio nearby or BarBQ pit or horseshoe pit or Christmas lights?
• Plan for dedicated circuit for heater
• Plan for dedicated circuit for water heater
• Now plan where circuits are gonna start. Each can handle 8-10 outlets and should start with a GFIC outlet
• Plan where your 220v outlets are gonna be. Consider welders, air compressor, lift, oven (powder coating), special tools, etc. Even if you won’t have these until the future, plan now to power them.
WATER
• Gonna have water in the garage? A sink to wash up before going into the house is priceless
• Gonna have water in the garage? A sink to wash parts is useful
• A shower is priceless to avoid getting SWMBO’s towels and linens filthy
• Toilet?
• Hot water is nice to wash cars in the winter
• Plan a hose bibb on at least one exterior wall and maybe one inside
A/C
HEAT
• Gonna use in-floor PEX? -- see notes on concrete.
• If not, propane or electric heater will need power and proper placement and capacity
• See comments re height of walls
STUFF
What toys do you have? What toys do you plan to have? Sketch your floor plan to scale on gridded paper; don’t forget to include windows, doors, and the circuit. And then, to scale, place your toys. All of them. The easy ones are toolbox(es), benches, welders, air compressor, and the like. Did you remember to ID a place to store floor jacks? Creeper? Jack stands? Ladder(s)?
Find a place for everything:
o Welder
o Plasma Cutter
o Grinder
o Polisher / Buffer
o Powder Coating Oven
o Blast Cabinet
o Parts Washer
o Microwave
o Refrigerator
o Charging station for cordless tools
o Desk lamp
o TV
o Stereo
o Computer
o Phone
o Wall Art / Neon signs
o Other
Expanded details:
STORAGE
• Plan cabinet(s) to store hardware (nuts, bolts, washers, this and that)
• Plan cabinet(s) to store supplies, such as (paint, cleaners, paper towels, etc)
FLUIDS for the car
• Oil
• Oil Filters
• Fuel Filter(s)
• Gear Lube
• Differential Lube/Additive
• ATF
• Brake fluid
• Anti-Freeze
• Power Steering Fluid
• Marvel Mystery Oil
• Starting Fluid
• Lacquer Thinner
• Grease for ball joints/tie rod ends etc
CLEANING yourself
• Hand Cleaner
• Latex (or Nitrile) Gloves
• Shop Towels
CLEANERS for the Car/Engine/Garage/Floor
• Castrol Concentrated Cleaner
• Engine Cleaner
• Brake Cleaner
• Carb Cleaner
• Rust Remover
• Brushable Rustoleum
• Degreaser
• Acetone
• Mineral Spirits
BEAUTY PRODUCTS
• Polish
• Wax
• Touch-up paint
• Chrome Cleaner
• Chrome Kleener (Autosol)
WORKING on the Car
• Di-electric grease
• Bearing Grease
• 3-1 oil
• Silicon Spray
• Anti-seize compound
• Loctite
• Teflon tape
• Acousti-Seal, Exhaust System Sealing Compound
• Wellseal Gasket Compound / Gasket sealer
• Wire of various colors and sizes
• Electrical Connectors
• Masking Tape
• Duct Tape
• Electric Tape
• Contact Cement
• 3M Weather-strip Adhesive
• General Purpose Adhesive Solvent Part #: 051135-08984
• 3M Adhesive Remover (Ronson lighter fluid)
• PB Blaster or Kroil -or Knock’er Loose
• Wire ties
• Mechanic's wire
• Cotter pins
• C-clips
• E-clips
• Snap rings
• Hose clamps
• Roloc pads/grinding discs
• Die-grinder burrs/bits
• Buffing wheels/compound
• Razor blades
• Utility knife blades
• Sandpaper
• Emory cloth
• Scotch-brite
• Grease fittings
• Fuel line/brake line and fittings
• Rubber hose: windshield washer, heater, radiator, fuel, vacuum
• Spray paint
• JB Weld
THE MOST IMPORTANT POINT: TAKE TONS OF PHOTOS.
Just like when you disassemble a car or major component, referring to a before photo is priceless during reassembly. I have been able to show my GC photos of the routing of power lines or placement of studs or whatever on at least 5 occasions. Saved guess work by him and potential oop's during drilling or nailing.
I compiled these notes during/after my Garaj Mahal build. Looks like you have the main dimensions already set, but you may find some nuggets here (I have posted this several times here so if this is redundant, my apologies). My shop was built to work on cars.
See attached PDF
My 2300 sq ft Hobby Shop is complete and I am working in it daily and still populating it with stuff.
What stuff? How is it all gonna fit? Where’s it gonna go. What goes next to what? See below
GENERAL
• Build as big as you can afford/fit on your property (or you'll regret it).
• You gotta know your plan inside and out – when the builder asks to move something elsewhere, only you can visualize the impact on other things / stuff
• Be flexible when reality shows up – also be true to your overall plan
• Windows? PRO: natural light – CON: entry point for a$$holes
• Skylight(s)? PRO: natural light – CON: then no attic
• Keep the building dimensions in multiples of 4 feet – reduces wastage of wood
• A mezzanine is good for long-time storage of large or awkward items; plan for where the staircase is gonna be placed; plan how to get heavy items up there and back down
FLOOR
• Gonna place light(s) in floor under lift??
• First thing you lay down is 10 mil vapor barrier
• Then closed-cell insulation – 2 inches thick
• In-floor tubing for radiant goes in before concrete pour – plan carefully if a lift is planned. Should be thicker concrete and limited pex tubing near posts
• Lay some plastic conduit in the floor before concrete is poured from the circuit box to the three other walls to allow future wiring to be run without tearing into walls or mounting conduit on the walls
o Since I forgot to do this, I installed a 2-3" PVC pipe in the upper left-hand corner of the circuit breaker box that terminates in the attic with another sweeping 90° curve. This easily allows fishing a new line (or two) into the circuit box. (See photo) The girts needed to be notched so the OSB would lay flat and metal straps were used to hold the pipe in place.
• Thickness? 4” works. Except under lift – my pour was 9-12 inches thick under posts.
• Plan now for smoothness of finish on concrete - - epoxy covering?
• Gonna wash cars in there – floor drain(s)? Lot’s of environmental issues to learn
WALLS
• 2x4 vs 2x6 construction. A 2x6 is pennies more per board and allows thicker insulation
• I have R19 in my walls (Colorado) and the building is noticeably cooler this summer and stays warm in winter during sub-freezing temps
• I have R49 blown-in above the ceiling
• Sheath with OSB vs Dry Wall. Dry wall looks prettier but to hang anything heavy requirements finding a stud or two. OSB has more industrial appearance but a shelf goes wherever you want to put it
• Windows – already covered
• Height of walls? 12 or 13’ allows most lifts to fit (I have 14’ ceilings in main room)
• Tall walls require more heating capacity, and costs more to heat
ELECTRICAL
• Plan where your 110v outlets are gonna be, then add 50% more of them (mine are 4 feet apart except where a window gets in the way); I have 45x 120V outlets in my 2300 sq ft hobby shop
• Are you gonna use 15- or 20-Amp circuits? (different wiring requirements and different fixtures)
• Place them 45-48” above the floor level so they aren’t hidden later by benches, toolboxes, etc
• Plan for outlet(s) on the exterior of each wall
• Plan for outlet(s) in ceiling for lift or drop light or other
• Plan for outlet(s) in ceiling for garage door opener
• Plan for outlets up high on wall: wall clock, TV, modern “smart” speakers, other
• Lights – fluorescent or LED? Dimmable? Dimmable LEDs are available and require different wiring and dimming switch
• Plan for exterior lights – Colorado Code requires a light above each man-door opening
• Plan for exterior lights – gonna have a patio nearby or BarBQ pit or horseshoe pit or Christmas lights?
• Plan for dedicated circuit for heater
• Plan for dedicated circuit for water heater
• Now plan where circuits are gonna start. Each can handle 8-10 outlets and should start with a GFIC outlet
• Plan where your 220v outlets are gonna be. Consider welders, air compressor, lift, oven (powder coating), special tools, etc. Even if you won’t have these until the future, plan now to power them.
WATER
• Gonna have water in the garage? A sink to wash up before going into the house is priceless
• Gonna have water in the garage? A sink to wash parts is useful
• A shower is priceless to avoid getting SWMBO’s towels and linens filthy
• Toilet?
• Hot water is nice to wash cars in the winter
• Plan a hose bibb on at least one exterior wall and maybe one inside
A/C
HEAT
• Gonna use in-floor PEX? -- see notes on concrete.
• If not, propane or electric heater will need power and proper placement and capacity
• See comments re height of walls
STUFF
What toys do you have? What toys do you plan to have? Sketch your floor plan to scale on gridded paper; don’t forget to include windows, doors, and the circuit. And then, to scale, place your toys. All of them. The easy ones are toolbox(es), benches, welders, air compressor, and the like. Did you remember to ID a place to store floor jacks? Creeper? Jack stands? Ladder(s)?
Find a place for everything:
o Welder
o Plasma Cutter
o Grinder
o Polisher / Buffer
o Powder Coating Oven
o Blast Cabinet
o Parts Washer
o Microwave
o Refrigerator
o Charging station for cordless tools
o Desk lamp
o TV
o Stereo
o Computer
o Phone
o Wall Art / Neon signs
o Other
Expanded details:
STORAGE
• Plan cabinet(s) to store hardware (nuts, bolts, washers, this and that)
• Plan cabinet(s) to store supplies, such as (paint, cleaners, paper towels, etc)
FLUIDS for the car
• Oil
• Oil Filters
• Fuel Filter(s)
• Gear Lube
• Differential Lube/Additive
• ATF
• Brake fluid
• Anti-Freeze
• Power Steering Fluid
• Marvel Mystery Oil
• Starting Fluid
• Lacquer Thinner
• Grease for ball joints/tie rod ends etc
CLEANING yourself
• Hand Cleaner
• Latex (or Nitrile) Gloves
• Shop Towels
CLEANERS for the Car/Engine/Garage/Floor
• Castrol Concentrated Cleaner
• Engine Cleaner
• Brake Cleaner
• Carb Cleaner
• Rust Remover
• Brushable Rustoleum
• Degreaser
• Acetone
• Mineral Spirits
BEAUTY PRODUCTS
• Polish
• Wax
• Touch-up paint
• Chrome Cleaner
• Chrome Kleener (Autosol)
WORKING on the Car
• Di-electric grease
• Bearing Grease
• 3-1 oil
• Silicon Spray
• Anti-seize compound
• Loctite
• Teflon tape
• Acousti-Seal, Exhaust System Sealing Compound
• Wellseal Gasket Compound / Gasket sealer
• Wire of various colors and sizes
• Electrical Connectors
• Masking Tape
• Duct Tape
• Electric Tape
• Contact Cement
• 3M Weather-strip Adhesive
• General Purpose Adhesive Solvent Part #: 051135-08984
• 3M Adhesive Remover (Ronson lighter fluid)
• PB Blaster or Kroil -or Knock’er Loose
• Wire ties
• Mechanic's wire
• Cotter pins
• C-clips
• E-clips
• Snap rings
• Hose clamps
• Roloc pads/grinding discs
• Die-grinder burrs/bits
• Buffing wheels/compound
• Razor blades
• Utility knife blades
• Sandpaper
• Emory cloth
• Scotch-brite
• Grease fittings
• Fuel line/brake line and fittings
• Rubber hose: windshield washer, heater, radiator, fuel, vacuum
• Spray paint
• JB Weld
THE MOST IMPORTANT POINT: TAKE TONS OF PHOTOS.
Just like when you disassemble a car or major component, referring to a before photo is priceless during reassembly. I have been able to show my GC photos of the routing of power lines or placement of studs or whatever on at least 5 occasions. Saved guess work by him and potential oop's during drilling or nailing.
CraigStu
Well-known member
CraigB said;
"THE MOST IMPORTANT POINT: TAKE TONS OF PHOTOS.
Just like when you disassemble a car or major component, referring to a before photo is priceless during reassembly. I have been able to show my GC photos of the routing of power lines or placement of studs or whatever on at least 5 occasions. Saved guess work by him and potential oop's during drilling or nailing."
I can't stress this enough. When we had our house built I took tons of pics of the framing before drywall. Unfortunately, being 4 hours away, I missed getting a second set of pics showing the wiring. They drywalled the week before the weekend I could get there. I can't tell you how many times in 6 years I have looked at the framing pics and how many times I wished I could see the wiring.
Hooked
Well-known member
This is a life saver down the road. In addition to pictures, diagrams of all underground pipes, cables, etc.I can't stress this enough. When we had our house built I took tons of pics of the framing before drywall. Unfortunately, being 4 hours away, I missed getting a second set of pics showing the wiring. They drywalled the week before the weekend I could get there. I can't tell you how many times in 6 years I have looked at the framing pics and how many times I wished I could see the wiring.
Not our house but my daughter's. The original owner had added on to the house, built multiple small sheds, added a pooled, and rebuilt the garage. It has been a nightmare for us trying to locate underground water and electrical lines.