The wife is out of town on vacation so I had the opportunity for some shop time this weekend to get this lingering project done.
The Sahara trim level has a chrome "Jeep" badge with a gray background (outline). The actual "SAHARA" badge is a silver color. I never liked the OEM badge colors because they don't really match my color scheme, and I like to be unique.
The Rubicon trim level OEM "Jeep" badge is a charcoal gray with a red background (outline). I found a guy on one of the Jeep forums that de-badged his Rubicon and he sold me his old letters. These letters are plastic and are assembled in two parts to achieve the outline colors. To separate the parts you have to cut the alignment pins and they come apart easily. Here's what they looked liken prior to painting:

For ease of painting, I used a spray adhesive to attach them to the wooden stake as seen above. Unfortunately I'm not as good as Mike Z. with my pictures, so I didn't get any of the painting process. The steps I used was to first clean the letters with wax and grease remover, followed by two light coats of adhesion promoter, four coats of paint, and finished them off with four coats of satin clear coat. I wanted the foreground to be black, and the background (outline) to be bronze, which matches my wheels.
Since I was re-applying old badges, there would be no template to align them once I had removed the OE badges. To ensure I put them back on straight, I outlined the OE badges with painters tape. This also helped protect the surrounding paint during removal. I also used some pin striping tape to make sure the "Jeep" letters were spaced correctly.

To remove the OEM badges I used a heat gun and dental floss. The badges come off relatively easy once the heat is applied, but the 3M adhesive, not so much. Here you can see I've started that tedious glue removal process. One thing that REALLY helped is this
3M Eraser Wheel. You have to be careful using it, making sure not to spin it too fast, creating too much heat, but if you take your time it works very well to remove the stubborn factory applied 3M adhesive.

After I got all the glue removed, I cleaned the area with alcohol and re-applied the alignment striping in between the red marks in the above picture. Another tedious step that had to be done was to re-apply the new 3M adhesive to the back of the old letters. It was quite the task, and a PITA, but I got it done. BTW, the new OEM "SAHARA" badge goes in the upper slot, but it comes with a template to space/align the letters, so all I needed was a reference line.

Here is the before picture:
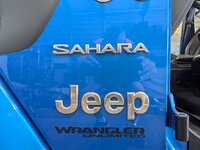
Here is the after picture:

It was a lot of work for something that 99% of the people would never notice, but I'm happy with how it turned out. Next up will be to repaint the factory silver factory headlight buckets and grill mesh inserts, which will also be satin black.