To avoid these ads, REGISTER NOW!

What did you do "IN" your garage today?

Beerhippie

Well-known member
Joined
Oct 13, 2023
Messages
9,972
Location
Far NE Oregon
Timm, did you ever put a welding ground lug on the potable stand?
I did. Then I realized the SS handle worked just fine as a ground lug. I improved the electrical bonding between the various parts. I then realized I didn't like the ground cable hanging up there where I would trip over it with the helm down, so I ground some of the paint off the SS part of the base. Perfect.
 
To avoid these ads, REGISTER NOW!

PWC Repair

Well-known member
Joined
Dec 27, 2012
Messages
3,188
Location
Arkansas
I tried to vacuum the a/c system in my son's, girlfriends, Hyundai.........found a fitting leaking and tightened it.......vacuumed again............good to go. Played HELL trying to get some 134a into the thing. Tried another valve I had, tried the other can he brought.........WTF!!! REALLY!!!! Can't be 2 bad cans.........finally put my ear to the can and could get pretty slow flow and just let it charge.......ssloOOOowly.... Got pissed and google searched.....YEP some dumb sumbitch decided we needed 'self sealing' valves on the cans so some ******* doesn't vent a bunch of refrigerant into the atmosphere. DUH!!! Maybe they should go watch most HVAC guys do a changeout.........ya......not cool! So the new cans take a new style valve handle, otherwise the can seals off cause refrigerant might be purging out..........OF COURSE it's purging out.......into the hose CAUSE I'M TRYING TO CHARGE THE SYSTEM!!!!! JEEZ!!
 

Outlawmws

Well-known member
Joined
Aug 9, 2011
Messages
39,312
Location
The Badlands
I tried to vacuum the a/c system in my son's, girlfriends, Hyundai.........found a fitting leaking and tightened it.......vacuumed again............good to go. Played HELL trying to get some 134a into the thing. Tried another valve I had, tried the other can he brought.........WTF!!! REALLY!!!! Can't be 2 bad cans.........finally put my ear to the can and could get pretty slow flow and just let it charge.......ssloOOOowly.... Got pissed and google searched.....YEP some dumb sumbitch decided we needed 'self sealing' valves on the cans so some ******* doesn't vent a bunch of refrigerant into the atmosphere. DUH!!! Maybe they should go watch most HVAC guys do a changeout.........ya......not cool! So the new cans take a new style valve handle, otherwise the can seals off cause refrigerant might be purging out..........OF COURSE it's purging out.......into the hose CAUSE I'M TRYING TO CHARGE THE SYSTEM!!!!! JEEZ!!

I bumped into the same thing last week. the control valve I used had, "post puncture" to be left partially open as when it was closed that was for pressure readings, - expected; but fully depressed, the puncture needle sealed the can... so I kept the gauge between 10 and 20 and waited.

But before that i'd gotten nothing at all... Of course, nothing in any instructions about this...


I did get it into the green but while its not blowing hot air anymore, its not the chilled air I expect from a car's AC.
 

TurnipTruck

Well-known member
Joined
Aug 28, 2005
Messages
1,581
Location
Southcentral Alaska
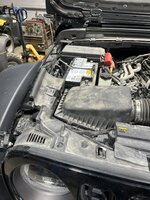
It pounded rain all Saturday AND I didn’t have to go anywhere, so it was a prime weekend to finish installing the winch-adjacent equipment in the Gladiator.
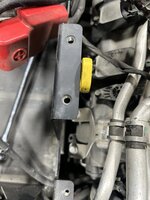
Some of the slightly used package deal was this overkill-even-for-me steel bracket double battery Genesis system that replaces the factory plastic bracket main battery+atv battery for the auto stop start nonsense.

Here is the original battery, with the atv battery only accessable by removing the entire fuse box:
IMG_5757.jpeg

plastic vs steel:
IMG_5758.jpeg

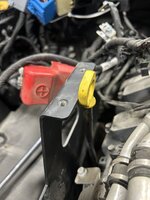
Mostly installed:
IMG_5761.jpeg

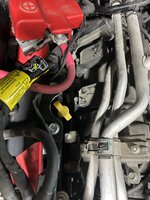
One modification I made was the yellow oil dipstick was half occluded by the new battery box, so a little hole saw and grinder action was needed:
IMG_5760.jpegIMG_5759.jpegIMG_5762.jpeg

Then a little bumpy road action to settle and test everything.
I should have the time in a couple days to finish the battery monitor LCD and the winch isolation solenoid trigger circuit and then finally wind rope on the drum.
 

Jay__Dub

Well-known member
Joined
Nov 19, 2024
Messages
1,256
Location
Cold Country, Canada
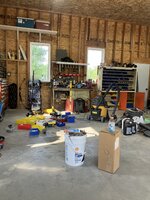
Too many miles this weekend. Shop is a ****** mess, tools laying all over the damn place. Lawnmowers needing repair. Starter still sitting on the kitchen table. Truck still up on jacks. You know, a regular old man shitshow. ;)

But I did try one hack that I saw on the tube of youse that worked. Had a helluva time seeing sat night. Headlight lenses totally fogged over.

Deep woods off, 25% deet, rinse with vinegar, perfecto. I have tried them all, bought the kits, but this is the best one. The cleanest I've ever got them. Now to see how long it lasts.
 

Zrsnopro97

Well-known member
Joined
Jul 26, 2017
Messages
475
Found a spare couple of hours this weekend to get in the garage. Finished the brake job: all new wheel cylinders, brake hoses, shoes, spring/hardware kit. Adjusted brakes 2x, bled brakes 2x, fixed E-brake cable. Finally got a good pedal feel. Mounted the tires by hand, first time ever doing this. First time I've rolled it out of the garage since last year, now with 2.5" drop spindles. Really liking the stance. The old me used to just slam everything to the ground, but the older I get the more I realize I want the car to be drivable. Still need to re-paint the front wheels black but that will have to wait.
bug.jpg
 

aka Larry

Well-known member
Joined
May 2, 2012
Messages
8,086
Location
Eastern, NC
The wife is out of town on vacation so I had the opportunity for some shop time this weekend to get this lingering project done.

The Sahara trim level has a chrome "Jeep" badge with a gray background (outline). The actual "SAHARA" badge is a silver color. I never liked the OEM badge colors because they don't really match my color scheme, and I like to be unique.

The Rubicon trim level OEM "Jeep" badge is a charcoal gray with a red background (outline). I found a guy on one of the Jeep forums that de-badged his Rubicon and he sold me his old letters. These letters are plastic and are assembled in two parts to achieve the outline colors. To separate the parts you have to cut the alignment pins and they come apart easily. Here's what they looked liken prior to painting:


R_letters.jpg


For ease of painting, I used a spray adhesive to attach them to the wooden stake as seen above. Unfortunately I'm not as good as Mike Z. with my pictures, so I didn't get any of the painting process. The steps I used was to first clean the letters with wax and grease remover, followed by two light coats of adhesion promoter, four coats of paint, and finished them off with four coats of satin clear coat. I wanted the foreground to be black, and the background (outline) to be bronze, which matches my wheels.

Since I was re-applying old badges, there would be no template to align them once I had removed the OE badges. To ensure I put them back on straight, I outlined the OE badges with painters tape. This also helped protect the surrounding paint during removal. I also used some pin striping tape to make sure the "Jeep" letters were spaced correctly.


align_prep_01.jpg


To remove the OEM badges I used a heat gun and dental floss. The badges come off relatively easy once the heat is applied, but the 3M adhesive, not so much. Here you can see I've started that tedious glue removal process. One thing that REALLY helped is this 3M Eraser Wheel. You have to be careful using it, making sure not to spin it too fast, creating too much heat, but if you take your time it works very well to remove the stubborn factory applied 3M adhesive.


glue_mess.jpg


After I got all the glue removed, I cleaned the area with alcohol and re-applied the alignment striping in between the red marks in the above picture. Another tedious step that had to be done was to re-apply the new 3M adhesive to the back of the old letters. It was quite the task, and a PITA, but I got it done. BTW, the new OEM "SAHARA" badge goes in the upper slot, but it comes with a template to space/align the letters, so all I needed was a reference line.


align_prep_03.jpg


Here is the before picture:


before_badges.jpg


Here is the after picture:


after_badges.jpg


It was a lot of work for something that 99% of the people would never notice, but I'm happy with how it turned out. Next up will be to repaint the factory silver factory headlight buckets and grill mesh inserts, which will also be satin black.
 

racecougar

Well-known member
Joined
Jan 26, 2021
Messages
5,174
Location
Missouri
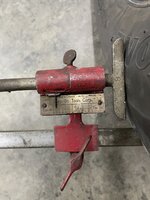
That's a neat alignment tool, any idea how old it is?
I've always guessed that it was from the 50's or 60's, but I just did a little research. It looks like the patent was filed in 1942 and published in 1948. No idea when it was actually made though. I use this one pretty often for setting toe, and it functioned as a good "double checker" for the Gyraline app I just bought.

I have an older unit hanging on the wall from the Model T days:
1749486558460.png

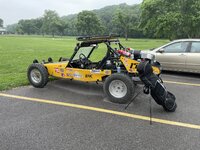
If I was driving that anywhere near a golf course, theres a good chance it would end in a police chase.lol:3gears:
I wasn't sure if I'd get glares or stares when I took it there. Luckily it was the latter. Folks dug it.
 
To avoid these ads, REGISTER NOW!

Beerhippie

Well-known member
Joined
Oct 13, 2023
Messages
9,972
Location
Far NE Oregon
You can still get a Klotz product that has 20% caster oil.
It’s sold for vintage (60s and 70s) two strokes.

My buddy uses it on a Sachs motor 100cc Penton (KTM) enduro bike.
I use caster oil for equipment moving wheels. Castor oil is what I use for engines.

In WWI, the strange radial aircraft engines that had the crankshaft attached to the bulkhead and the case attached to the blade had total-waste oil systems--as you can imagine, getting oil back from the heads wouldn't be easy. They used castor oil for lubrication, which is a strong laxative. The oil blew straight back into the faces of the pilots. Pilots returning with a load in their flight suits was common, even expected.

Ah, the good ol' days!
 
Last edited:

JEFFREYWisconsin

Well-known member
Joined
Oct 9, 2021
Messages
380
Went into garage...grabbed chainsaw...went out to check on some of the forestry issues I am working on ... we essentially live in a daycare, the mothers drop them off and come back after work I guess. This one watched me cut logs from 15 feet away for an hour, never made a peep.
 

Attachments

  • IMG_2822.jpeg
    IMG_2822.jpeg
    924.5 KB · Views: 82

Old Man Roger

Well-known member
Joined
Apr 6, 2017
Messages
17,760
Location
Palm Coast Florida
Went into garage...grabbed chainsaw...went out to check on some of the forestry issues I am working on ... we essentially live in a daycare, the mothers drop them off and come back after work I guess. This one watched me cut logs from 15 feet away for an hour, never made a peep.
What a coincidence, just this morning my girl mentioned 2 baby deer were hanging out in the neighbors yard. We saw them a few days ago with the whole family.
 

Beerhippie

Well-known member
Joined
Oct 13, 2023
Messages
9,972
Location
Far NE Oregon
Went into garage...grabbed chainsaw...went out to check on some of the forestry issues I am working on ... we essentially live in a daycare, the mothers drop them off and come back after work I guess. This one watched me cut logs from 15 feet away for an hour, never made a peep.
Just mess with the little fellow a bit... if it squalls, you'll get to meet mama in no time flat... and it'll be a meeting to remember.

As usual, it was a mix of odds and ends in the shop today. I noticed a kitchen floor drain cover was clogged, so I pulled it off to clean it. Pulling it up was a PITA, as it sits flush with the floor and has no lifting accommodation. I decided to cut an angled slot in the side to fit a prybar.

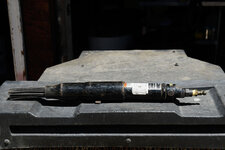
once I got it cleaned up, I noticed how rusty it was--bad. The cover is plate steel, not, as it should be, CI. There was probably 1/4" of hard rust scale on the bottom. I tried to grind it off with a 36 grit fiber disk, and immediately realized I was using the wrong tool. I broke out the needle scaler, which is meant to remove scale.

Got 'er clean and gave 'er a thick coat of gloss black (because I had a can that I bought for one small job) and:

54578686908_ac35a18934_o.jpg

Want that perfect "hammered" paint job? Use a lot of little hammers!

54578791290_5a5973328c_o.jpg

Fixed, fettled and fetched a lot of various other ****, then back to filing the vise.

54578708191_df26cbfe0e_o.jpg

54579034815_e5843a59ca_o.jpg

I'd started draw-filing, but realized that it wasn't giving me a long enough reference plane to true the jaws. I switched to flat-filing, changing sides and angles every hundred strokes to keep things true(ish) and flat(ish). It's about as good as it'll get--and now I can smooth it with draw-filing using a finer-tooth file.

The File-Eze handle is perfect for this use. Too bad they don't make 'em anymore.

Shiny spots are where the jaws were welded upon. The triangular one up front was a cut from a torch, the round one some serious spatter. Those spots are hard and hard on files, so good thing I recently bought some Pferds. They're holding up much better than my new Nicholsons, which take one look at weldment and give up.

Back to filing after a few more sips of a fine malt beverage....
 
Last edited:

rcktpwrd

Well-known member
Joined
Mar 5, 2008
Messages
1,098
Location
Raleigh, NC
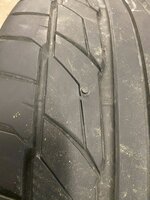
went into the garage to get the leaf blower and noticed the wife's truck had a flat! Jacked up the truck and pulled the rear wheel off so she can take it to work (she works in the office for several dealerships) to hopefully get it patched...
IMG_1410.jpg
She finally had a chance to bring the wheel to work today. They dismounted the tire, patched from the inside, remounted and balanced. I unloaded the wheel from the back of the wagon and put it in the garage next to the truck to be reinstalled another day...
IMG_1960.jpg
 

Motorman55

Well-known member
Joined
Apr 10, 2016
Messages
2,647
Location
South Jersey
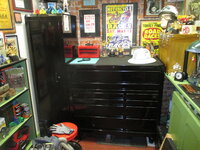
Weather forcast for today was overcast but no rain, so I went and hitched up the trailer with the HF 42" Tool Cabinet on it that I parked in my MIL's garage yesterday.
Started about 12:30 and just finished a half hour ago. Had to move a lot of stuff out of the garage including the motorcycles to get the box in the garage office, then put everything back. Phew!

The box just fit with nary a 1/4" on each side. Basically I had to slide it in. Lucky for me the wheels are a hard plastic or poly so it wasn't too bad. Added a piece of wood to the right side to level it to account for the sloped floor. Here's the results so far.

I ordered the chrome drawer handle kit but it didn't come in time, so I'll probably have to take out the top long drawers to install, but the smaller ones should have enough room to slide those in. 1749513338465.jpeg
 
Last edited:

LeeG

Well-known member
Joined
Nov 29, 2012
Messages
1,531
Location
Phoenix, AZ
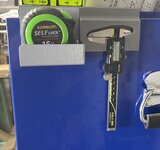
In my ongoing quest to have a specific home for every item, I 3D printed these two holders. I pretty much use both these every time I’m in the garage so I don’t want them in a drawer.

IMG_2849.jpeg

They loop over the lip on the top, and have a magnet to keep them from sliding.

Lee
 

Beerhippie

Well-known member
Joined
Oct 13, 2023
Messages
9,972
Location
Far NE Oregon
In my ongoing quest to have a specific home for every item, I 3D printed these two holders. I pretty much use both these every time I’m in the garage so I don’t want them in a drawer.

IMG_2849.jpeg

They loop over the lip on the top, and have a magnet to keep them from sliding.

Lee
Nice work!

I have a home for every tool in the shop... if only I could remember where that is....
 

Magnum440d100

Well-known member
Joined
Dec 2, 2018
Messages
3,581
Location
Indiana
Don’t know if I posted this yet…


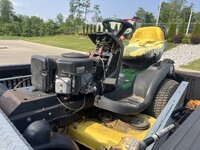
Bought this off a coworker. The original carb was giving him issues. So he bought a knockoff one. He never could get it running right. IMG_6460.jpeg


So he bought a new mower. And I bought this for $100. It looks rough, but really, it’s just missing a hood.


Anyway, he tried rebuilding the carb, but broke an ear that holds the float pin.

Let’s just say, now this mower has a carb that will never be rebuilt again, but now runs great (with the original broken carb). IMG_6482.jpeg


I got done on my 2 acres, pretty dang quick. You never realize how much time is wasted stopping/backing/turning!

Not bad for a $100 investment. Now to find a good (useable and cheap) hood lol
 
To avoid these ads, REGISTER NOW!
Top Bottom