To avoid these ads, REGISTER NOW!

The VISES of Garage Journal

Beerhippie

Well-known member
Joined
Oct 13, 2023
Messages
10,263
Location
Far NE Oregon
Thankyou, was just curious, I bought a new 6" Dawn swivel (overseas made), was good, but yeah did nothing for me I donated it to my BIL.

And bought a few of the magnetic plastic/aluminium jaw covers, but they are a PITA, going to try some copper ones that won't lift and move.
The plastic, "magnetic" ones I bought from the Jungle had the new, improved Chinesium super-magnets--that barely stick to iron. Every time I bump them, they fall off.
 
To avoid these ads, REGISTER NOW!

Beerhippie

Well-known member
Joined
Oct 13, 2023
Messages
10,263
Location
Far NE Oregon
Couldn't agree more on the "super magnets"

The copper jaw covers you made look very nice. Can you tell us where you sourced the sheet copper? Great job @Beerhippie !

I use scraps and off-cuts of larger dia--1 1/2-2" Type L copper pipe.
 

Outlawmws

Well-known member
Joined
Aug 9, 2011
Messages
39,432
Location
The Badlands
And here is Timm's most recent pass at the same task:

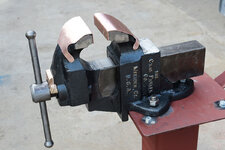
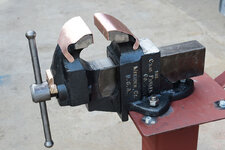
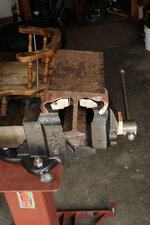
I made another set of copper jaw covers for my "new" Parker vise.
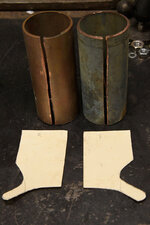
54582726832_c4d5a86557_o.jpg

I made two half-patterns from file folder paper--I scored a bunch of file folders when the office "went digital". The half patterns are the best way I know to keep things symmetrical. Cut two pieces of 2" type L copper pipe from the scrap copper bucket to the width of the "ears" of the patterns. Slotted them with a cut-off disk in an angle grinder--cuts fast, throws chunks of copper and makes a mess.

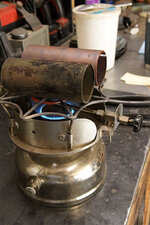
Now to anneal the pipe pieces. I'll use my "Coleman Rosebud":

54583597281_bc5a381e86_o.jpg

54583777239_9ee1146dda_o.jpg

Yeah, that little stove cooks. I need to clean and re-wax her.

Once the copper is red-hot,

54583908485_1a7a52f97a_o.jpg

make plates from the pipes.

Rough out with the bandsaw:

54582726842_379ac3fa8b_o.jpg

54583811398_5d046c4b6a_o.jpg

Finish the shaping and smoothing on an angle grinder w/flap disk in the vise.

Fitted:

54583597271_1918e12ed9_o.jpg

Finished:

54583811363_ebd3cb72a6_o.jpg

I made this set long as they protect the vise from welding spatter--and I will be doing some welding in it.
 

jawstight

Well-known member
Joined
Feb 10, 2025
Messages
155

I use scraps and off-cuts of larger dia--1 1/2-2" Type L copper pipe.
Copper pipe?!? Now I'm even more impressed with how they turned out. Great job Sir!

Oh, and that t-shaped insert for your vise to make an anvil? Genius!
 

jawstight

Well-known member
Joined
Feb 10, 2025
Messages
155
Well, it's got me looking at pieces of railroad track. I have a 6" piece that I use as an anvil now. But the web doesn't really have a straight spot in it that is long enough to lend itself to being clamped firmly in a vise. What I'd really like to find is a piece of t-channel that has a much smaller radius at the spots where the vertical meets the horizontal, so that that the hold by the vise would be that much stronger and positive, without having to resort to "extreme" tightening of the screw. Thing is I don't know if steel is ever fabricated in that shape. Was yours originally a piece of railroad track?
 

Beerhippie

Well-known member
Joined
Oct 13, 2023
Messages
10,263
Location
Far NE Oregon
Well, it's got me looking at pieces of railroad track. I have a 6" piece that I use as an anvil now. But the web doesn't really have a straight spot in it that is long enough to lend itself to being clamped firmly in a vise. What I'd really like to find is a piece of t-channel that has a much smaller radius at the spots where the vertical meets the horizontal, so that that the hold by the vise would be that much stronger and positive, without having to resort to "extreme" tightening of the screw. Thing is I don't know if steel is ever fabricated in that shape. Was yours originally a piece of railroad track?
Ah! The RR track anvil! It hadn't occurred to me to try it in the vise....

Even with the wide gap below the jaws of the Parker, it doesn't fit with the web down.

It would work like this:

54585358976_5c6ede6f91_o.jpg

Sorta'--until I try pounding on it.
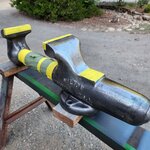
It would work better like this:

54585544574_1ae22c585d_o.jpg

But that would necessitate removing the cool old GE bonding plug.

54585358986_324f8a93cd_o.jpg

I guess if I carefully grind away at the plug from the backside I could save it.

I'm not sure what kind of RR this came from. It's not standard gauge, for sure. It's 5 7/8 overall height, web is 3/8" thick and the top is 2 1/4" wide. Maybe a mine railroad? Would they need electrical bonding for that?

Somewhere here at GJ is an entire thread on railroad rail anvils....
 

Private Lugnutz

Well-known member
Joined
Mar 30, 2012
Messages
30,914
Location
The Authentic Jersey Shore
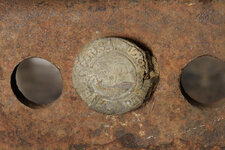
I saw that Vanderman was just a topic of discussion a few pages ago. I passed on this one at one of my flea markets this morning. If only for posterity, features, markings, the database, etc, I am posting a couple shots I took of it. It looked to be in terrific condition and I was pleasantly surprised that I could move the dynamic jaw very smoothly in and out with just two fingers on the spindle. We just couldn't arrive at a mutually agreeable price.
 

Attachments

  • 20250612_084110.jpg
    20250612_084110.jpg
    1.1 MB · Views: 52
  • 20250612_084117.jpg
    20250612_084117.jpg
    1.4 MB · Views: 51

jawstight

Well-known member
Joined
Feb 10, 2025
Messages
155
Ah! The RR track anvil! It hadn't occurred to me to try it in the vise....

Even with the wide gap below the jaws of the Parker, it doesn't fit with the web down.

It would work like this:

54585358976_5c6ede6f91_o.jpg

Sorta'--until I try pounding on it.

It would work better like this:

54585544574_1ae22c585d_o.jpg

But that would necessitate removing the cool old GE bonding plug.

54585358986_324f8a93cd_o.jpg

I guess if I carefully grind away at the plug from the backside I could save it.

I'm not sure what kind of RR this came from. It's not standard gauge, for sure. It's 5 7/8 overall height, web is 3/8" thick and the top is 2 1/4" wide. Maybe a mine railroad? Would they need electrical bonding for that?

Somewhere here at GJ is an entire thread on railroad rail anvils....
Not sure about the your question, but the fact that the railroad track being canted in your vise is why I was thinking a smaller radius in the corners would work better. And of course cutting the web horizontally along it's length so only the bottom of the track would be in the vise.

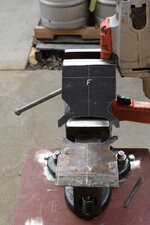
In looking more closely at your picture, I now see that what I thought was a T was actually a shadow line on the end of your static jaw. I guess in reality this was just a length of flat bar that you were using to flatten out the copper?

tShape.jpg
 

Beerhippie

Well-known member
Joined
Oct 13, 2023
Messages
10,263
Location
Far NE Oregon
Not sure about the your question, but the fact that the railroad track being canted in your vise is why I was thinking a smaller radius in the corners would work better. And of course cutting the web horizontally along it's length so only the bottom of the track would be in the vise.

In looking more closely at your picture, I now see that what I thought was a T was actually a shadow line on the end of your static jaw. I guess in reality this was just a length of flat bar that you were using to flatten out the copper?

tShape.jpg
Ah ha! That picture!

Yep, just a chunk of flat bar I'm using to flatten the pipe out. I don't do it that way anymore.

But, damnit, you got me going on the RR anvil in the vise idea!

I got the plug (which was causing the cant) out in fairly good shape:

54585619104_348743de7a_o.jpg

54585743905_f35cb913b7_o.jpg

Interesting that it appears to be tinned copper.

Now the rail sits solid in the vise:

54585743900_028cb7ba39_o.jpg

All I need to do (yeah, right) is flatten and polish the base. I'm thinking a radius of about 1/4" on one long edge and a 45 degree cutting edge on the other might be right handy--the rail can be turned sideways and held by one side of the base. If I can get the base nicely flat, it will still work as a regular RR anvil.

But it's 85 F right now, the front of the shop is in full sun, and there's no breeze back here. Maybe in an hour or so when the shadow of the warehouse reaches the shop....
 

jawstight

Well-known member
Joined
Feb 10, 2025
Messages
155
Now that web is nice and flat. I'd be tempted to take a piece of 1" wide flat bar, run it length-wise, and weld or bolt it to the web, stopping it right where the radius begins. Then cutting the web length-wise about the height of the jaws lower than the bottom of the flat bar. Such that when clamped in the vise, the grip of the jaws along with the positive stop of the top of the jaws against the bottom of the flat bar would provide a nice and solid platform to take any hard knocks that the bottom of the rail would receive when using it as an anvil.
It could then be used in pretty much any vise because there would be no part of the rail left that might be too tall or wide to impede the vise from closing tightly on the web.
 

Beerhippie

Well-known member
Joined
Oct 13, 2023
Messages
10,263
Location
Far NE Oregon
Now that web is nice and flat. I'd be tempted to take a piece of 1" wide flat bar, run it length-wise, and weld or bolt it to the web, stopping it right where the radius begins. Then cutting the web length-wise about the height of the jaws lower than the bottom of the flat bar. Such that when clamped in the vise, the grip of the jaws along with the positive stop of the top of the jaws against the bottom of the flat bar would provide a nice and solid platform to take any hard knocks that the bottom of the rail would receive when using it as an anvil.
It could then be used in pretty much any vise because there would be no part of the rail left that might be too tall or wide to impede the vise from closing tightly on the web.
Doing it this way will preserve it as a regular RR rail anvil. I wouldn't be doing any serious pounding on that thin base, anyhow. It would he handy for things like making the vise jaw pads, where I'm only beating hot, annealed copper pipe out flat.
How big of belt sander do you have? Put that in the vise belt up, and use it as a surface grinder. I use my belt sander like this more than hand held by far.
I do that all the time.
 

wam

Member
Joined
Jan 31, 2019
Messages
8
Location
I work in Waterloo, In.
It's a Wilton model no. C0 combination vise, circa "Chicago" (1950-1956). You mentioned it was a 4" vise, but a C0 is actually a 3-1/2" vise. The photo below is of the same model and era as your vise, with the "C0" casting where yours was apparently removed in a repair.

1953_12-53_c0-a06.jpg

No need to tape anything off for your electrolysis bath. Good luck and enjoy the restoration!
Do You Want to sell your Chicago C0.
 
To avoid these ads, REGISTER NOW!

jawstight

Well-known member
Joined
Feb 10, 2025
Messages
155
Received new steel jaws and a collar today for my 450, from @autopts. Great guy to deal with!
And so I was able to mount the 450 to my bench.

left3.jpg
I bought this on Craigslist, about an hour and a half south of me. No collar, brass jaws severely malformed, and frozen tight. Took me several hours, much experimentation, and finally brute force to free it up. Soaking it overnight in PB Blaster had no effect. Nor did the re-purposed wheel puller I rigged up to try and force it open. Strange thing is that it wasn't rust. I ended up essentially machining the entire surface of the tube in order to get it to push closed all the way by hand.

AluminumJaws2.jpg
Bought another counterbore bit and made a set of aluminum soft jaws for it while I was waiting on the steel jaws to arrive.

Pitting1.jpg
Check out the hammered finish on this. I'd guess this took decades of neglect to achieve!

Mounted1.jpg
It will now become my everday vise. At least until I decide whether or not I want to pick up a 500.

Bonus pic: I was curious as to the differences in size with each step up. And visually what that would look like. Here are a 9300, 350S, 8400, and a 450S side by side. The size (and weight), differences are pretty significant. These all lined up with the front edge of their swivel base positioned evenly on the edge of the bench. Some of this is distance from the camera. But not much. Judging by this, the baby and toddler would be extremely small in comparison.

4Right1.jpg
 

KMScott

Well-known member
Joined
Feb 14, 2012
Messages
4,652
Location
Daufuskie Island, South Carolina
Finished a couple Wiltons, C0 and a C1. New owners liked the Satin Leafy Rise from Valspar. These 50+ year old Wiltons are ready to go back to work.
 

Attachments

  • IMG_7384.jpeg
    IMG_7384.jpeg
    681.6 KB · Views: 51
  • IMG_7385.jpeg
    IMG_7385.jpeg
    813.2 KB · Views: 54
  • IMG_7386.jpeg
    IMG_7386.jpeg
    864 KB · Views: 54
  • IMG_7387.jpeg
    IMG_7387.jpeg
    521.4 KB · Views: 58
Last edited:

682bear

Well-known member
Joined
May 20, 2024
Messages
243
Location
West GA
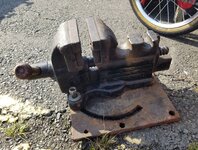
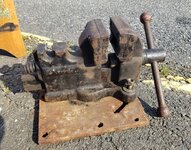
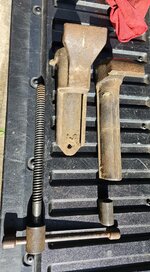
I picked up an old unmarked vise in a junk store... it was cheap because the slide was stuck...

20250620_091357.jpg

After I got it home, it took about two minutes to get it apart... I just unscrewed the screw and tapped the dynamic jaw a few times with a rubber mallet...

20250620_091927.jpg

The screw just threads out instead of pulling the dynamic jaw with it... I'm thinking there should be a collar and nut on the back end of the screw. If I can't find one, I may have to machine one.

This vise has no markings on it at all, so I don't know who manufactured it, but I believe that it is pretty old.

-Bear
 

jawstight

Well-known member
Joined
Feb 10, 2025
Messages
155
Isn't that object right above the right hand end of the screw handle the nut?
 
Last edited:

682bear

Well-known member
Joined
May 20, 2024
Messages
243
Location
West GA
Isn't that object right about the right hand end of the screw handle the nut?

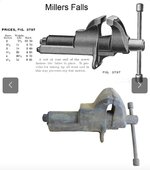
That is the nut that the screw turns in to open and close the vise... but I believe there should be another nut and collar on the back end of the screw to retain it in the dynamic jaw.

Like this...

Screenshot_20250620_122204_Chrome.jpg

This vise 'may' be a Millers Falls vise... but my understanding is that there were several companies that made a similar vise to this...

-Bear
 

jawstight

Well-known member
Joined
Feb 10, 2025
Messages
155
I see now, thanks. In the grand scheme of things I would think it would be easier to come up with the rear vise and collar, even if you had to fabricate them, than it would be to do so with the internal nut. Depending on the type of thread used of course. Either way though, nice find!
 

682bear

Well-known member
Joined
May 20, 2024
Messages
243
Location
West GA
I see now, thanks. In the grand scheme of things I would think it would be easier to come up with the rear vise and collar, even if you had to fabricate them, than it would be to do so with the internal nut. Depending on the type of thread used of course. Either way though, nice find!

Well... it is a 7/8"x4 threads per inch screw... so not a standard thread. I'll likely have to make something...

-Bear
 

jawstight

Well-known member
Joined
Feb 10, 2025
Messages
155
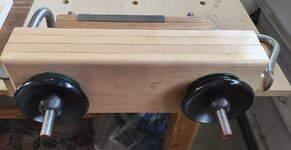
I used antique Singer sewing machine hand wheels to make the tightening wheels on my Moxon vise in place of the type that are more typical. To lock them to the nuts I used JB Weld in a cone shape around the correct nuts. They have held up surprisingly well.
I think that if you wrapped your lead screw in plastic wrap and then built up JB Weld around it you could form a "nut" for that odd thread. Planning it out beforehand so that you simultaneously mold the weld into a desirable shape while also adhering it to whatever form of locking collar you come up with might yield some pleasing results. Just a thought.

front2.jpg
 

CRSINMICH

Well-known member
Joined
Aug 15, 2015
Messages
2,442
Location
Southeastern Michigan

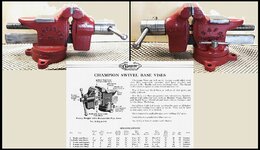
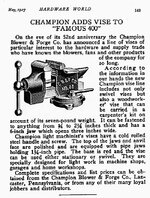
CHAMPION SWIVEL BASE VISE #30
Champion Blower and Forge, Lancaster, Pa

Champion Blower & Forge #30.jpg

Notice that the picture and the drawing have some differences most notably the pictures shows initials while the drawing has CHAMPION in script. Also, the hub is cylindrical. Older pictures show a rounded hub, a different lock down, and initials. This specific vise has features of both so it was probably an in-between version.

1927 Champion ad
1927 Champion Blower & Forge #40 light machinists' vise.jpg


Added specs: Spindle diameter - 5/8" with 6 tpi square threads
 
Last edited:

CRSINMICH

Well-known member
Joined
Aug 15, 2015
Messages
2,442
Location
Southeastern Michigan
I've had this vise for 10 years or so and never did anything with it. Another "I'll get to it someday" project.
H B Smith Combination Vise No.2A
H.B. Smith Machine Co., Smithville, NJ

Before I got started stripping and sanding, I noticed in an old journal article it had originally been japanned so all I did for the vise body was degunk, degrease, and wash it thoroughly. The bare metal parts were degunked and lightly sanded. The body got a thin coat of light machine oil and the bare metal was coated with Fluid Film. The lettering was cleaned and filed smooth across the tops and painted with a copper paint pen. The patent was issued to HB Dart although, in catalogs, this style is referred to as "Smith's patent".

HB Smith #2A post.jpg
The bottom picture is the bottom of the slide. I added it because it shows planer marks.


fishwatcher

Well-known member
Joined
Jan 26, 2023
Messages
761
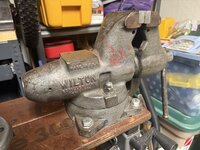
I’ve made slow but steady progress on this 10-76 Wilton C0. I used Easy Off degreaser and wire wheels on drills today.

Not as much paint nor “patina” came off as I expected.

Heavier on-hand stuff planned this weekend.. mineral spirits, brush cleaner and acetate.

I am thinking either Hammered soft flat iron or Pontiac metallic blue for paint.

IMG_1449.jpeg

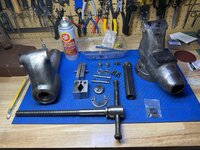
Life has kept me busy. Here’s an update on my Wilton C0 restore project.

Most of the paint has been removed, via wire wheels on a drill and some via a bench grinder. I polished the anvil with sandpaper using grits up to 5000, but the deep gouges aren’t going anywhere with the tools I have.

I did another cleaning with degreaser and an acetone wipe down. The section that holds the pipe jaws still doesn’t look clean. A couple of big dents/gashes have been filled with epoxy putty (not yet sanded down in this picture).
IMG_1782.jpeg
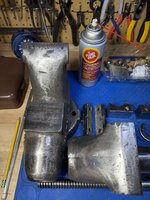
After epoxy fills have been sanded.
IMG_1790.jpeg

I might use a Rustoleum Rust Dissolver gel that I have on-hand (I don’t have Evaporust) to treat the metal before primer and paint. Not sure if that’s really helpful.

I’m still undecided on the color. Rustoleum soft flat iron or VHT metallic titanium silver are still my top considerations.
 
Last edited:

Shiftless

Well-known member
Joined
Mar 9, 2014
Messages
14,720
Location
East Bay SFO
I agree with Beerhippie.
After stripping off old paint, I wash with acetone and always use primer before the finish coat. Do you guys use primer or just shoot a few coats of the finish color?

One of the reasons I use primer is to do a final inspection of the surface. With a uniform coat of primer, any flaws that I want to deal with are then more noticeable. Plus of course, adhesion is supposed to be better with primer.
 
To avoid these ads, REGISTER NOW!
Top Bottom