To avoid these ads, REGISTER NOW!

Replacing sash cords on this window?

bw77

Well-known member
Joined
Jul 10, 2009
Messages
1,352
Location
Upstate NY
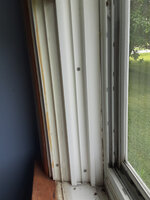
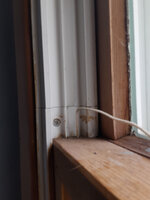
This is a 50 year old window, both sash cords are broken.
Sash is wood, feels heavy. Cord is 1/8" diameter.

There are 4 screws in the left side holding in the vinyl piece, none on the right.

I think I need to pull off the left side trim, remove the 4 screws and the lower sash
should swing out. But how would I replace the right side sash cord?
 

Attachments

  • 20250627_091222.jpg
    20250627_091222.jpg
    480.3 KB · Views: 47
  • 20250627_091242.jpg
    20250627_091242.jpg
    506.3 KB · Views: 48
  • 20250627_091323.jpg
    20250627_091323.jpg
    365.1 KB · Views: 46
  • 20250627_091328.jpg
    20250627_091328.jpg
    464.4 KB · Views: 47
To avoid these ads, REGISTER NOW!
OP
B

bw77

Well-known member
Joined
Jul 10, 2009
Messages
1,352
Location
Upstate NY
I found a YT video that shows how to repair this type of window. It's not the typical style.


Wrench97

Well-known member
Joined
Jun 23, 2018
Messages
12,309
Location
Southeastern Pa
Check the sash for soft spots, or fogged glass if you have either they make a replacement sash kit to convert it the newer tilt in type sash and side balances instead of sash cords.
 
To avoid these ads, REGISTER NOW!

Bert_

Well-known member
Joined
Dec 24, 2016
Messages
9,837
Location
NW Iowa
Never done one with those small cords, mine are 1/4".

Seeing the screws above the bottom sash makes me wonder. Are there more screws if you lift the bottom sash?
 
OP
B

bw77

Well-known member
Joined
Jul 10, 2009
Messages
1,352
Location
Upstate NY
Never done one with those small cords, mine are 1/4".

Seeing the screws above the bottom sash makes me wonder. Are there more screws if you lift the bottom sash?
You replace the entire balance unit, no just the cords. Yes, there are more screws, all shown in the video.
 

Wrench97

Well-known member
Joined
Jun 23, 2018
Messages
12,309
Location
Southeastern Pa
Never done one with those small cords, mine are 1/4".

Seeing the screws above the bottom sash makes me wonder. Are there more screws if you lift the bottom sash?
You take out the screws lower the top sash and you'll find some more to remove, then pick both back up to the top, remove the lower side jamb that had the screws in it by pulling out at the bottom then down. lower the sash and twist out the side you removed the jamb from first, then remove any remaining unbroken sash cords, if like most of us both of the lowers will be broken before we get around to this project....
 

GrayFlattop

Well-known member
Joined
Jan 18, 2018
Messages
1,053
Location
Chicago
Yep - pretty straightforward if you have the parts. I’ve done about 6 or 7 of mine that were new in the mid 80’s. ****** design, IMO. Replace both balances and consider yourself lucky if you don’t crack any of the jamb liners.

It’s also why I bought Marvin windows for the addition I built over 20 years ago.

Not sure what the parts cost today, but if one of your windows failed, more will soon enough.
 
Last edited:
OP
B

bw77

Well-known member
Joined
Jul 10, 2009
Messages
1,352
Location
Upstate NY
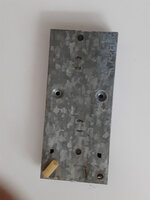
I got 2 replacement balancers and got 'er done.
Hardest part was pulling out the lower left plastic piece.
Putting it back in was easy with some silicone spray.

Also had to remove the top wood trim piece in order to remove the top plastic piece.

The new balancers have an added tab, as shown in post #10 above. The balancers in this window
do not have that tab, so use of a chisel is required. So I took the easy way out and got 2 old style
balancers on ebay. The window is not opened often, I expect the used balancers will last a long time.

There is another window that needs the same repair, going with new style balancers for that one.
So I will need to learn some wood chiseling skills.
 

Attachments

  • 20250703_111626.jpg
    20250703_111626.jpg
    329.4 KB · Views: 12
To avoid these ads, REGISTER NOW!
Top Bottom