

You are using an out of date browser. It may not display this or other websites correctly.
You should upgrade or use an alternative browser.
You should upgrade or use an alternative browser.
What did you do "IN" your garage today?
- Thread starter mayhemman
- Start date
oldman_pottering
Well-known member
lol, the jury is still out on that, i've seen what you guys doI ain’t that crazy.

tough looking rig, nice work
welder4956
Well-known member
I had rented a trencher last week to replace our main water line and decided to also trench for downspout drains (70 ft.) and a electrical conduit from the garage to the greenhouse (50 ft.) while I had it here. I managed to finish the main water line and downspout drains between the daily rain storms, but the trench to the greenhouse is now full of water. So, I cobbled together a portable bilge pump today to pump out the trench. Tested it without the hose and it works good, but waiting for some 1-1/8" flex hose to arrive so I can finish the job.

Also opened the package with the Tsunoda flush cutters I ordered a few days ago. Not sure what the instructions say, but I think I can figure them out.


Also opened the package with the Tsunoda flush cutters I ordered a few days ago. Not sure what the instructions say, but I think I can figure them out.
oldman_pottering
Well-known member
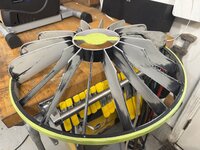
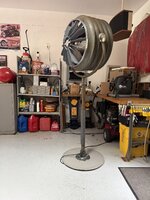
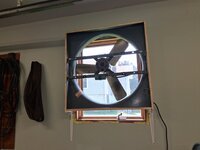
I love the look of those old fansGettting my old Westinghouse fan ready for paint... painted it black a while ago andapphated it. Going to try an Industrial grey. Polished the stainless trim and tape it off.
Here is it's little brother that I recently restored..

Beerhippie
Well-known member
We have this ancient (maybe not, but sure looks it) large chest freezer at the pub. It's not our primary, but a back-up and overflow for our prep room freezer.
It looks like it's been dropped from a high lift of a forklift, or maybe had a forklift dropped on it. The lid was completely collapsed where the hinges attach and the liner and seal had fallen off.
I decided to fix it. It was the perfect day for it when I started, high overcast in the high sixties.
This was after getting things more or less straight:
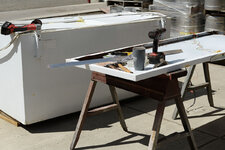
I made a parts run for the aluminum angle and a bunch of 3/16" pop-rivets in various lengths.
I used the aluminum angle to make some braces to support the hinges and the adjacent corners, which were also completely blown:


It's a satisfying job that uses more than one vise... and @jawstight's genius anvil mod idea.
I clamped the hell out of everything, drilled-in-place and pop riveted the braces in:


Now, aluminum and steel aren't a good combination when wet, and the door of a freezer is going to see some condensation--unless I seal it off:

The foam, which is still expanding, should also help to stiffen the edges of the door up some. Can't hurt, anyhow.
It's now 85F in full sun and I carefully set up in the one area of the brewery/pub yard where there isn't a breath of breeze, so while the foam is curing , I'm having a beer in the shop with the swamp cooler going. I'll get back at it in a hour or so when the work area is in the shade.
It looks like it's been dropped from a high lift of a forklift, or maybe had a forklift dropped on it. The lid was completely collapsed where the hinges attach and the liner and seal had fallen off.
I decided to fix it. It was the perfect day for it when I started, high overcast in the high sixties.
This was after getting things more or less straight:
I made a parts run for the aluminum angle and a bunch of 3/16" pop-rivets in various lengths.
I used the aluminum angle to make some braces to support the hinges and the adjacent corners, which were also completely blown:
It's a satisfying job that uses more than one vise... and @jawstight's genius anvil mod idea.
I clamped the hell out of everything, drilled-in-place and pop riveted the braces in:
Now, aluminum and steel aren't a good combination when wet, and the door of a freezer is going to see some condensation--unless I seal it off:
The foam, which is still expanding, should also help to stiffen the edges of the door up some. Can't hurt, anyhow.
It's now 85F in full sun and I carefully set up in the one area of the brewery/pub yard where there isn't a breath of breeze, so while the foam is curing , I'm having a beer in the shop with the swamp cooler going. I'll get back at it in a hour or so when the work area is in the shade.

JEFFREYWisconsin
Well-known member
- Joined
- Oct 9, 2021
- Messages
- 380
Spent some time in the attic this morning.
I purchased a pretty nice infrared sauna for my wide's birthday a few years ago, she loves it.
I could have just put her in charge of the attic and saved that money.
I purchased a pretty nice infrared sauna for my wide's birthday a few years ago, she loves it.
I could have just put her in charge of the attic and saved that money.
Beerhippie
Well-known member
Whew. Another fifteen minute job done, after over 100 3/16" pop rivets, a bunch of 3-M spray adhesive and four hours.
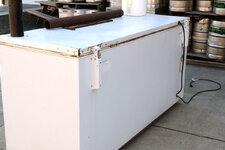

My wrists hurt. I need a better pop rivet gun!
The freezer sure ain't perfect, but the lid is now attached, the liner and seal are back where they belong and it'll sure work better than it did before. The weight on top is for "clamping" the spray adhesive (holding the liner and seal in place between the pop rivets) until it sets.
My wrists hurt. I need a better pop rivet gun!
The freezer sure ain't perfect, but the lid is now attached, the liner and seal are back where they belong and it'll sure work better than it did before. The weight on top is for "clamping" the spray adhesive (holding the liner and seal in place between the pop rivets) until it sets.
Outlawmws
Well-known member
With my luck after all the work Timm, the compressor would **** out catastrophically, within a week.
Hmmm Thread pool for this anyone?
Hmmm Thread pool for this anyone?
Beerhippie
Well-known member
SHUT THE F UP!With my luck after all the work Timm, the compressor would **** out catastrophically, within a week.
Hmmm Thread pool for this anyone?
You're jinxing it.
2001ZR2
Well-known member
The Suburban A/C and general deferred maintenence saga continues. The compressor and orifice tube are in. The switch that I was trying to transfer from one compressor to the other broke. Two trips to the parts store sorted that out..
The interesting thing isn't the work on the truck...
Last week I took advantage of the Harbor freight Icon wrench sale. One solid wrench purchase for my son who is an apprentice mechanic at dealership of long box ends. He'll use the for brake jobs and suspension work.
But I made a couple of what I considered vanity wrench purchases. First was a set of SAE ratcheting stubbies. But 2nd set is moving from a vanity purchase to a useful one. It's a set of large Metric combo wrenches. The 22 mm was useful with my SK USA 21mm flare to break some of the lines loose.
So the best thing is in GJ fashion I justified two tool purchases by needing them.
Using the offset wrench to tighten the loose belt tensioner bolt was just showing off...ratchet and std socket would have worked.
The interesting thing isn't the work on the truck...
Last week I took advantage of the Harbor freight Icon wrench sale. One solid wrench purchase for my son who is an apprentice mechanic at dealership of long box ends. He'll use the for brake jobs and suspension work.
But I made a couple of what I considered vanity wrench purchases. First was a set of SAE ratcheting stubbies. But 2nd set is moving from a vanity purchase to a useful one. It's a set of large Metric combo wrenches. The 22 mm was useful with my SK USA 21mm flare to break some of the lines loose.
So the best thing is in GJ fashion I justified two tool purchases by needing them.
Using the offset wrench to tighten the loose belt tensioner bolt was just showing off...ratchet and std socket would have worked.
GrayFlattop
Well-known member
Yep. My preferred nail clippers are a Klein D244-5C or a Klein D295-4C for finer work. There is always one or the other nearby.I have been keeping nail clippers in the garage for years. They come in handy more often than you would think.
Blue Chips
Well-known member
I'm sure you can figure it all out,Also opened the package with the Tsunoda flush cutters I ordered a few days ago. Not sure what the instructions say, but I think I can figure them out.
but if you're curious as to what it says, you can drag (or upload or paste) your images, one at a time, onto the Google Translate website. It's pretty good at reading text from photos, even if the text isn't super sharp. Or use the Google Translate app.Jay__Dub
Well-known member
In, under and all over my POS pickup, trying to sort electrical.
Sanded all grounds I could find. Took all electrical connectors I could see apart, and cleaned them.
Sanded all grounds I could find. Took all electrical connectors I could see apart, and cleaned them.
larry4406
Well-known member
What was the issue with the freezer that you are attempting to fix?Whew. Another fifteen minute job done, after over 100 3/16" pop rivets, a bunch of 3-M spray adhesive and four hours.
My wrists hurt. I need a better pop rivet gun!
The freezer sure ain't perfect, but the lid is now attached, the liner and seal are back where they belong and it'll sure work better than it did before. The weight on top is for "clamping" the spray adhesive (holding the liner and seal in place between the pop rivets) until it sets.
Never mind
What did you do "IN" your garage today?
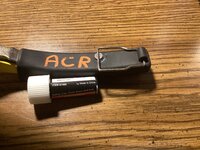
Been using this for years with closure clip getting in the way at times when riveting. Don’t know why I didn’t think of this sooner. Bought some rare magnets from harbor freight. Super glued one to the handle, problem solved.
 www.garagejournal.com
Last edited:
RonnieC
Well-known member
“Hold blue end. Cut with pointy end.”I'm sure you can figure it all out,
Outlawmws
Well-known member
"Caution: Keep body parts away from pointy end"“Hold blue end. Cut with pointy end.”
PhantomEB
Well-known member
Big list…..Today is transmission shifter linkage hooked up, make sure the 205 is filled up and see if everything is shifting within the C6 transmission before driveshafts go back in. Lots of trial and error/fabrication coming up. If that all plays out then I can put the side and rear windows back in on the soft top and drive it out for a car wash In the back alley. Photo ops too for the FB hater peanut gallery.
also need to cut and smoothen out the aluminum hood support as well plan for some steel purchase this week for an accessible storage platform in the back of the bronco as well scrap steel storage underneath my welding table. Oh and drive over fender extensions for the trailer. Figure 2x6 1/4 wall will never collapse when driving the bronco over them. Saves me time from having to pull the fenders out for clearance. Fender extensions will be removable if I need to but also designed for if I ever get another fast street car to take to the track.
-205 filled up. Gear oil takes a while so all I did was set up a funnel and hose under there. Oil soak pads underneath and just gravity fed every 20-30 min or so until it consistently dribbled out.
-while underneath there, millwrighted up the stock linkage with a drilled out nut tack welded into place. No tension side to side and I got thin SS washers to completely capture the nut inside hole.

got the linkage hooked up at park position. Hmmm why when I shift I barely get to Reverse…. Go back underneath and investigate…..transmission goes the opposite from what the shifter actually does. Gotta google and find the install instructions. Pretty sure something isn’t right inside the Center console Which brings me to todays ordeal. Did find out I can rotate down the cable mount to help out clearance to the cupholders.

-Fired up the bronco for a bit which brought by, two doors down Jerry who was on his way down the back lane to another buddy’s garage with a bottle of Sailor Jerry’s in his back pack. Ended up fine tuning my front lawn sprinkler system plans some more before a shovel hits the ground.
Life is good around here as I can see being able to put the bronco outside while I work in the shop on whatever soon enough.
Also need to investirate if I can send my little Miller 175 off to be refurbished or is there parts I can buy to get rid of the drive roller slop. Want to, but can’t upgrade this 25 year old unit to a new Miller 211 auto set. Ultimately I want a 252….
Some of my most expensive and/or specialty tools are those I bought when building or fixing something myself, that I didn't want to pay someone else to do. My wife is on board with the idea that money saved by not paying for someone else's labor is a good way to invest in tools. Then next time, if there is one the cost is even less.The Suburban A/C and general deferred maintenence saga continues. The compressor and orifice tube are in. The switch that I was trying to transfer from one compressor to the other broke. Two trips to the parts store sorted that out..
The interesting thing isn't the work on the truck...
Last week I took advantage of the Harbor freight Icon wrench sale. One solid wrench purchase for my son who is an apprentice mechanic at dealership of long box ends. He'll use the for brake jobs and suspension work.
But I made a couple of what I considered vanity wrench purchases. First was a set of SAE ratcheting stubbies. But 2nd set is moving from a vanity purchase to a useful one. It's a set of large Metric combo wrenches. The 22 mm was useful with my SK USA 21mm flare to break some of the lines loose.
So the best thing is in GJ fashion I justified two tool purchases by needing them.
Using the offset wrench to tighten the loose belt tensioner bolt was just showing off...ratchet and std socket would have worked.
Beerhippie
Well-known member
"Can be used to trim finger- and toe-nails.""Caution: Keep body parts away from pointy end"
69charged
Well-known member
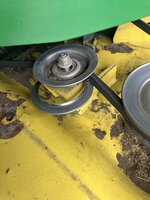
Well ****. Guess I know what I’m doing for the day today in the garage!!
Outlawmws
Well-known member
Well ****. Guess I know what I’m doing for the day today in the garage!!
What you are not doing is mowing the lawn...
Ultradog MN
Well-known member
Last week I brushed Citristrip on the left garage door and scraped off the 1940 lead paint...
I removed both door pulls, and lock sets on both garage doors...
Went to Lowe's and bought 1-1/4", 3/4" & 5/16" wood dowel rods and filled in the holes left by the hardware removal...
Glued up the dowels and sanded flush... Removed all of the old trim and installed new plywood panels (old were badly cracked)...
Before

Today I applied two coats of color matched primer on the left door... Right door shows wood dowel repair work...
I plan to apply the finish coat in the next couple days...
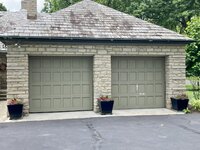
I will still need to make 384 miter cuts and install all of the trim around each panel... Not looking forward to that choir...
I removed both door pulls, and lock sets on both garage doors...
Went to Lowe's and bought 1-1/4", 3/4" & 5/16" wood dowel rods and filled in the holes left by the hardware removal...
Glued up the dowels and sanded flush... Removed all of the old trim and installed new plywood panels (old were badly cracked)...
Before
Today I applied two coats of color matched primer on the left door... Right door shows wood dowel repair work...
I plan to apply the finish coat in the next couple days...
I will still need to make 384 miter cuts and install all of the trim around each panel... Not looking forward to that choir...
Old Man Roger
Well-known member
Wow!
I braved the heat and humidity yesterday. Took an old 350X 3-wheeler engine that was in the scrap pile (blown up) and tore it down. Took out all the transmission gears and other neat looking parts and pieces for a project I want to do in the future.
Beerhippie
Well-known member
Changed spark plugs on the Toy. Just needs an air filter for the gradual semi-annual tune-up.
Also discovered that my old spark plug gap gauge doesn't meet up with the recommended gap for a Toyota 7AFE engine.
An excuse to run down-valley to the random used and surplus tool and junque shoppe?
Also discovered that my old spark plug gap gauge doesn't meet up with the recommended gap for a Toyota 7AFE engine.
An excuse to run down-valley to the random used and surplus tool and junque shoppe?
Beerhippie
Well-known member
Borrow/rent a second miter saw. Saves an F-load of time over changing the angle at each end.Last week I brushed Citristrip on the left garage door and scraped off the 1940 lead paint...
I removed both door pulls, and lock sets on both garage doors...
Went to Lowe's and bought 1-1/4", 3/4" & 5/16" wood dowel rods and filled in the holes left by the hardware removal...
Glued up the dowels and sanded flush... Removed all of the old trim and installed new plywood panels (old were badly cracked)...
Before
Today I applied two coats of color matched primer on the left door... Right door shows wood dowel repair work...
I plan to apply the finish coat in the next couple days...
I will still need to make 384 miter cuts and install all of the trim around each panel... Not looking forward to that choir...
You can thank me later--
JEFFREYWisconsin
Well-known member
- Joined
- Oct 9, 2021
- Messages
- 380
Oh now THAT is thinkingBorrow/rent a second miter saw. Saves an F-load of time over changing the angle at each end.
You can thank me later--
Prospecter
Well-known member
Nice work! Glazing compound and caulk are your friends on those miters!Last week I brushed Citristrip on the left garage door and scraped off the 1940 lead paint...
I removed both door pulls, and lock sets on both garage doors...
Went to Lowe's and bought 1-1/4", 3/4" & 5/16" wood dowel rods and filled in the holes left by the hardware removal...
Glued up the dowels and sanded flush... Removed all of the old trim and installed new plywood panels (old were badly cracked)...
Before
Today I applied two coats of color matched primer on the left door... Right door shows wood dowel repair work...
I plan to apply the finish coat in the next couple days...
I will still need to make 384 miter cuts and install all of the trim around each panel... Not looking forward to that choir...
Beerhippie
Well-known member
Been there, done that. It goes really fast with two people--one cuts left, one cuts right--as long as they both know what they're doing. If the person making the second cut has a stop, it goes even faster yet, with less chance of mistakes.Oh now THAT is thinking
A second for glazing compound/plumber's putty. You will need to use an oil based primer over it (Kilz used to make a primer for latex paint over oil-based, and might still), but nothing fills nail holes and miters like it. The only tools needed are attached to your arms.
Last edited:
strength_and_power
Well-known member
- Joined
- Apr 26, 2015
- Messages
- 1,417
Aside from sweating, I built a cart using an “acquired” 4 wheel dolly for folding chairs that were also “acquired”. Exhibitors at one of the shows we work in Vegas will often buy chairs from Home Depot/Walmart and leave them after the show vs. paying $300 or so to rent them from the show decorator. Lumber was from another project so almost zero cost in the project.
Attachments

larry4406
Well-known member
Checked inventory.
Good.

Good.
niget2002
Well-known member
Got home from lunch with a huge list of things to do. So I took a nap.
rshadd
Well-known member
Restocked the garage fridge....

Beerhippie
Well-known member
I made another inroad on my deep backlog of Coleman fettling.
I was attending a barn sale in mid-August last year when I spied this unmistakable aluminum canister:

The price was right.
I tore it down and started cleaning it:

I stuck it in a box, where it sat for ten months, pretty much forgotten.
Today, I got a wild hare up my *** and finally found it. It took some digging!
I gave it a bath in sodium citrate solution in the ultrasonic, added some elbow grease and Mother's and put it back together:


The funnel came with the stove, but I'm pretty sure it's a Milspec. I made the S-link to anchor it to the frame, then realized there's nowhere to do so. I'm selling this stove (I have another) so I'm not adding a hole for a non-stock part.
Once again, it's too hot--90F--to light it up right now. Maybe later....
If I keep fettling one Coleman item each weekend, I should be caught up in about a year--assuming the queue doesn't get any longer.
I was attending a barn sale in mid-August last year when I spied this unmistakable aluminum canister:
The price was right.
I tore it down and started cleaning it:
I stuck it in a box, where it sat for ten months, pretty much forgotten.
Today, I got a wild hare up my *** and finally found it. It took some digging!
I gave it a bath in sodium citrate solution in the ultrasonic, added some elbow grease and Mother's and put it back together:
The funnel came with the stove, but I'm pretty sure it's a Milspec. I made the S-link to anchor it to the frame, then realized there's nowhere to do so. I'm selling this stove (I have another) so I'm not adding a hole for a non-stock part.
Once again, it's too hot--90F--to light it up right now. Maybe later....
If I keep fettling one Coleman item each weekend, I should be caught up in about a year--assuming the queue doesn't get any longer.
Last edited:
lolaetype
Well-known member
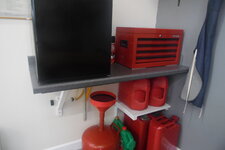
We replaced the master bath vanity top with quartz so I wound up with a section of old countertop measuring 53" between the sink cutouts. It found a new home in the garage as a countertop for the mini-fridge and the box I keep small electrical supplies in.
nadogail
Well-known member
Terminated ( hooked up ) the ON/OFF switch and the Feed, Motor and Switched Outlet cables for the saw.
Assisted a neighbor with the assembly of the Potting Bench his wife purchased. She came and asked me to help him if I could, but please don’t Shame him. I went over and encouraged him to continue with the project; the guy didn’t know the difference between #1 and 2 Phillips Screwdriver tips. His print reading skills leave much to be desired.
I encouraged him to work on this project until he gets tired, there is always another day. Hit it again after you rest and recover.
Assisted a neighbor with the assembly of the Potting Bench his wife purchased. She came and asked me to help him if I could, but please don’t Shame him. I went over and encouraged him to continue with the project; the guy didn’t know the difference between #1 and 2 Phillips Screwdriver tips. His print reading skills leave much to be desired.
I encouraged him to work on this project until he gets tired, there is always another day. Hit it again after you rest and recover.
It's important to keep water intake high in these heat conditions!Got home from lunch with a huge list of things to do. So I took a nap.
nadogail
Well-known member
Another neighbor came and asked if I had an extension ladder he could use, I told him I don’t have one extension ladder you can use; I have two.
Actually the second ladder belongs to a friend, but he is welcome to use both of them.
Actually the second ladder belongs to a friend, but he is welcome to use both of them.