To avoid these ads, REGISTER NOW!

Clueless: How to Mount Chuck on Rotary Table?

Bolster

Well-known member
Joined
Jul 8, 2008
Messages
4,056
Location
Mexifornia
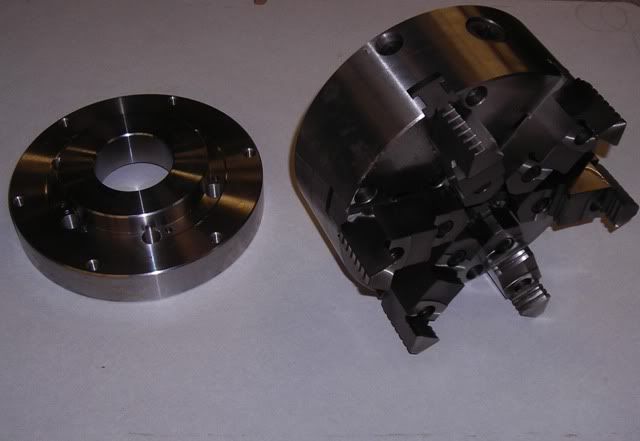
I'm a wanna-be machinist newbie. I have a small mill (no lathe). I obtained this small 6" rotary table (a Griz product). I would like to get a small 3-jaw chuck mounted to it, but have NO CLUE as to how to choose a chuck that will be compatible with this RoTab. Am I looking for a 6" chuck? Or 4"? I can't go too "tall" or I waste all my Z axis. I don't even know how the chuck would mount to the RoTab. The hole in the center is a MT#2, would a chuck use the MT? Or attached how?

Can someone guide me to some options regarding how to get a chuck on here, where to find the components needed? I am not looking for gold-plated accuracy. (It's just an inexpensive $900 ChiCom mill with an inexpensive $250 ChiCom RoTab. Not proud of it, but I'm lucky to have it, and it works good enough.) In fact I'd love to buy a chuck used if possible and save some coin. Ideas?

RoTab.png


More info on my intended useage of chuck-on-rotab, if you are interested: This RoTab will mount horizontal or vertical. With the RoTab in the vertical position, with its associated tailstock, I believe you can "fake" some lathe operations on a mill. I need to do some small lathe operations with it, which will entail bringing down an endmill to the work and then slowly turning the RoTab. So sort of reverse of a lathe, in this setup the bit is powered and the work is being turned slowly by hand. Yeah, I wish had a lathe but in this obanomy, you make do with what you got.

Alternately, I think I can do some vertical lathing without the RoTab. If the stock is small enough to go into the mill's chuck (5/8 max) and stout enough to hang free, some lathing can be done by clamping a lathe bit in the vise and running it up and down the work using the Z axis. For small work only.

I suppose you could also chuck a larger round piece in the rotab/chuck (with the rotab/chuck in the horizontal position, and the work sticking up vertically), and use an endmill to make bushings, and other short, squat round work, etc. by spinning the work in the rotab/chuck against the endmill.

What would be really helpful is to find a tutorial that discusses how to fake a lathe on a mill...anybody have a source? As I say a lathe is not in my immediate future. Even if I had the $ I do not have the space right now!
 
Last edited:
To avoid these ads, REGISTER NOW!

A_Pmech

Well-known member
Joined
May 8, 2007
Messages
8,002
Location
IL
There are a number of ways you can approach this. Here are a couple:

The first way, if you want to use a >small< chuck, is simply to buy a chuck with a #2 Morse arbor. They're commonly called "tailstock chucks".

A second method, which I prefer, is to either drill and tap the rotab table to accept extended length chuck back mounting bolts and thru-bolt the chuck to the table. OR, using the T-slots, install a sub-plate on the top of the table, true it up and mill a clearance in the center to roughly locate the chuck back. Then, thru-bolt the chuck to the sub-plate. Dial in the chuck by tapping it around with a hammer until centered.

Edit: Since a picture speaks a thousand words, here's 2,000 words:

:)

39315d1170116182-mounting-chuck-rotary-table-chuck-table.jpg


!Bfz-be!!2k~$(KGrHqIH-DIEsJUpiZGEBLCu5lYQT!~~_12.jpg
 
Last edited:

GrantCee

Well-known member
Joined
Aug 23, 2010
Messages
808
Location
Willamette Valley, Oregon
There are several ways. VERY small screw-mount chucks can be mounted with a taper shank, IF you can find one with the proper threads.

The usual method is to obtain a backing plate (adaptor) that is the diameter of the table, then buy a chuck that is at least an inch smaller in diameter. The plate is drilled near the edge to take socket head cap screws that go into t-nuts in the table slots; the chuck is mounted to the plate, then the plate is mounted to the rotab and adjusted for concentricity.

The reason for the undersized chuck is so that you can access the cap screws to tighten them.

(Edit: someone beat me to it!)
 
OP
B

Bolster

Well-known member
Joined
Jul 8, 2008
Messages
4,056
Location
Mexifornia
The first way, if you want to use a >small< chuck, is simply to buy a chuck with a #2 Morse arbor. They're commonly called "tailstock chucks".

So, that would be a drill chuck, probably maximum 5/8 capacity, yes? [EDIT: No, I've found them up to 2"] There is no 3-5" chuck with a #2 Morse arbor, I assume? yeah, I'd prefer at least 3" capacity.

A second method, which I prefer, is to either drill and tap the rotab table to accept extended length chuck back mounting bolts and thru-bolt the chuck to the table. OR, using the T-slots, install a sub-plate on the top of the table, true it up and mill a clearance in the center to roughly locate the chuck back. Then, thru-bolt the chuck to the sub-plate. Dial in the chuck by tapping it around with a hammer until centered.

Given that your preferred method scares the **** out of me, as a rookie machinist, I'll be working on your second option, the sub-plate. Now where will I go looking for this 4-5" chuck, and what kind of back should it have?

The usual method is to obtain a backing plate (adaptor) that is the diameter of the table, then buy a chuck that is at least an inch smaller in diameter. The plate is drilled near the edge to take socket head cap screws that go into t-nuts in the table slots; the chuck is mounted to the plate, then the plate is mounted to the rotab and adjusted for concentricity.

Sounds straightforward (and like a lot of fiddling to achieve concentricity, but fiddling is what machinists do, right?). Do I have to make this backing plate, or can it be purchased? And I assume lathe chucks attach in different ways, so what type of (say 4-5") lathe chuck am I looking for?

Can I get reasonable concentricity by chucking up sharpened rods (in quill above and lathe chuck on rotab below) and aligning them? Would that get me within a couple thou?
 
Last edited:

Shadowdog500

Well-known member
Joined
Dec 7, 2009
Messages
9,850
Location
Down the shore
$9.99 1/2" MT2 Mini-Lathe Drill Chuck from HF
Item # 42340

If they dont have this in the store you can usually get one in the store with a full taper MT2 for the same price.


Chris

image_968.jpg


Chris
 
OP
B

Bolster

Well-known member
Joined
Jul 8, 2008
Messages
4,056
Location
Mexifornia
That's interesting. A 2" capacity and I'm up and running for $30 + shipping. Also, low profile, so it's not using up my Z axis. Interesting!

Why lookie here, Griz sells one too (for more, probably the same thing):
http://www.amazon.com/dp/B0007D2BPW/?tag=atomicindus08-20

For a 5" 3-jaw chuck I'm looking at $60 chuck, $35 backing plate, and probably machine shop time to put it all together (don't trust myself to do this accurate type of work, yet).
 
Last edited:
To avoid these ads, REGISTER NOW!

A_Pmech

Well-known member
Joined
May 8, 2007
Messages
8,002
Location
IL
Nope...It's a lathe chuck with a MT mount -

image_1114.jpg

Yup. That's a tailstock chuck! :thumbup:

For lathe use, a plain-back chuck requires a back plate to mount up to a lathe and different back plates will allow the chuck to be used on different machines with different mounting schemes. Here's an example of a plain-back chuck with it's back plate (D1-6):

chuck-1.jpg


To install a plain-back chuck on a rotab sub-plate, you don't need a lathe back plate. The sub-plate IS the back plate that adapts the chuck to the rotab.

Begin by getting ahold of a section of 3/4" to 1" aluminum. Install it on your rotab using socket head cap screws in counterbored holes deep enough to clear the face by .050" or so.

Then, face the entire top of the sub plate just enough to clean it up. Locate the chuck on-center on the sub-plate and transfer the mounting bolt locations to the sub-plate. Remove the sub-plate, drill and tap the holes and re-mount.

Now, install your chuck, tighten down the sub-plate bolts and snug up the chuck bolts. Put the rotab in neutral and swing it around with a DTI in the spindle and a 1" or so hardened pin in the chuck jaws. Tap things concentric with a small soft-faced hammer, then tighten down the chuck mounting bolts.

:beer:
 
Last edited:

larry_g

Well-known member
Joined
Apr 28, 2007
Messages
16,879
Location
oregon
Have you found the Chaski machining site yet? There is a thread of this same question going in grneral. Also the home shop machinst site is perty good for this kind of stuff.

As far as getting a chuck on there get a 4 jaw that has a flat back and 4 through holes for mounting to the backing plate. Use T-nuts to bolt it directly to the rotab.

lg
no neat sig line
 
OP
B

Bolster

Well-known member
Joined
Jul 8, 2008
Messages
4,056
Location
Mexifornia
Considering mounting this 6" wood chuck (not ferret, not skunk, not groundhog...but wood chuck) to my 6" RoTab. $58. Very low profile, won't eat up my Z axis. No intermediate/sub-plate, just drill four holes in the chuck and mount through to the T-slot nuts in the RoTab.

g1082.jpg


http://www.grizzly.com/products/4-Jaw-Chuck/G1082

What do you think?

Am I missing something important, here?

Probably will lathe some sort of indexing device so I can align the centers easily.

@ larry: Thanks for the tip on the Chaski thread.
 
Last edited:

larry_g

Well-known member
Joined
Apr 28, 2007
Messages
16,879
Location
oregon
Considering mounting this 6" wood chuck (not ferret, not skunk, not groundhog...but wood chuck) to my 6" RoTab. $58. Very low profile, won't eat up my Z axis. No intermediate/sub-plate, just drill four holes in the chuck and mount through to the T-slot nuts in the RoTab.

g1082.jpg


http://www.grizzly.com/products/4-Jaw-Chuck/G1082

What do you think?

Am I missing something important, here?

.

What your missing in the wood chuck is the T-slots the jaws move in. It looks like the jaws on the wood chuck have a bolt from the back. If it was free and you could try it, then maybe, but I would not put out money when the same money should be good for a proper jaw.

lg
no neat sig line
 

cageek

Member
Joined
Sep 15, 2010
Messages
6
Location
San Diego, CA, USA
If you want to go from MT2 -> Threaded interface (1" x 8TPI, or 1.25" x 8TPI) -> Threaded Wood Chuck, google "Hold Fast Chuck Reversing adapter". It is used for a vacuum chuck system to mount a wood chuck in an MT2 tailstock, and sold separately for about $33, but might work for your purpose as well. It might save you from drilling your chuck (and associated centering problems). I suspect it will also hold your chuck away from the table a little bit, which might be a pain. I suppose a chuck mounted might rotate on you, though I doubt it (weight down and all). Basically, you're making your own tailstock chuck.

BTW, non-self centering chucks are a serious pain on a wood lathe for most operations. But I know next to nothing about machining.
 

Bigpigdave

Well-known member
Joined
Jan 2, 2010
Messages
321
Location
Camden, IN
That's interesting. A 2" capacity and I'm up and running for $30 + shipping. Also, low profile, so it's not using up my Z axis. Interesting!

Why lookie here, Griz sells one too (for more, probably the same thing):
http://www.amazon.com/dp/B0007D2BPW/?tag=atomicindus08-20

For a 5" 3-jaw chuck I'm looking at $60 chuck, $35 backing plate, and probably machine shop time to put it all together (don't trust myself to do this accurate type of work, yet).

Why not? How can you learn if you don't mess something up every once in a while. Almost all mistakes can be fixed and the fixing is what really teaches you to be a good machinist. Take your time, visualize your cuts ahead of time and have at it. You can do it!!
Also you were asking about turning stock on a mill. You can mount your work in the mill spindle (collet is best) and mount a lathe cutting tool on your mill table and spin the work past the cutting tool. This only works for short parts, you have to have room to move past the cutter. I have done this in the past when all of the lathes in the shop were *******.

Also get an Enco Master Catalog and take a look. The amount of tooling available for machining is incredible and Enco sells almost all of it (at good prices). Look for things that can make your projects easier and decide if you should buy one or could you make your own. There are also some really good books on machining available (check out the 3 book Machinist's Bedside Reader series).

Good luck and keep at it, every mistake is another chance to learn something new. Dave
 
Last edited:
To avoid these ads, REGISTER NOW!
Top Bottom